Credits to HTB Academy
You can also check my note Nmap 👁️🗨️
Enumeration
Enumeration is the most critical part of all. The art, the difficulty, and the goal are not to gain access to our target computer. Instead, it is identifying all of the ways we could attack a target we must find.
It is not just based on the tools we use. They will only do much good if we know what to do with the information we get from them. The tools are just tools, and tools alone should never replace our knowledge and our attention to detail. Here it is much more about actively interacting with the individual services to see what information they provide us and what possibilities they offer us.
It is essential to understand how these services work and what syntax they use for effective communication and interaction with the different services.
This phase aims to improve our knowledge and understanding of the technologies, protocols, and how they work and learn to deal with new information and adapt to our already acquired knowledge. Enumeration is collecting as much information as possible. The more information we have, the easier it will be for us to find vectors of attack.
Imagine the following situation:
Note
Our partner is not at home and has misplaced our car keys. We call our partner and ask where the keys are. If we get an answer like “in the living room,” it is entirely unclear and can take much time to find them there. However, what if our partner tells us something like “in the living room on the white shelf, next to the TV, in the third drawer”? As a result, it will be much easier to find them.
It’s not hard to get access to the target system once we know how to do it. Most of the ways we can get access we can narrow down to the following two points:
Functions and/or resources that allow us to interact with the target and/or provide additional information.Information that provides us with even more important information to access our target.
When scanning and inspecting, we look exactly for these two possibilities. Most of the information we get comes from misconfigurations or neglect of security for the respective services. Misconfigurations are either the result of ignorance or a wrong security mindset. For example, if the administrator only relies on the firewall, Group Policy Objects (GPOs), and continuous updates, it is often not enough to secure the network.
Enumeration is the key.
That’s what most people say, and they are right. However, it is too often misunderstood. Most people understand that they haven’t tried all the tools to get the information they need. Most of the time, however, it’s not the tools we haven’t tried, but rather the fact that we don’t know how to interact with the service and what’s relevant.
That’s precisely the reason why so many people stay stuck in one spot and don’t get ahead. Had these people invested a couple of hours learning more about the service, how it works, and what it is meant for, they would save a few hours or even days from reaching their goal and get access to the system.
Manual enumeration is a critical component. Many scanning tools simplify and accelerate the process. However, these cannot always bypass the security measures of the services. The easiest way to illustrate this is to use the following example:
Note
Most scanning tools have a timeout set until they receive a response from the service. If this tool does not respond within a specific time, this service/port will be marked as closed, filtered, or unknown. In the last two cases, we will still be able to work with it. However, if a port is marked as closed and Nmap doesn’t show it to us, we will be in a bad situation. This service/port may provide us with the opportunity to find a way to access the system. Therefore, this result can take much unnecessary time until we find it.
Introduction to Nmap
Network Mapper (Nmap) is an open-source network analysis and security auditing tool written in C, C++, Python, and Lua. It is designed to scan networks and identify which hosts are available on the network using raw packets, and services and applications, including the name and version, where possible. It can also identify the operating systems and versions of these hosts. Besides other features, Nmap also offers scanning capabilities that can determine if packet filters, firewalls, or intrusion detection systems (IDS) are configured as needed.
Use Cases
The tool is one of the most used tools by network administrators and IT security specialists. It is used to:
- Audit the security aspects of networks
- Simulate penetration tests
- Check firewall and IDS settings and configurations
- Types of possible connections
- Network mapping
- Response analysis
- Identify open ports
- Vulnerability assessment as well.
Nmap Architecture
Nmap offers many different types of scans that can be used to obtain various results about our targets. Basically, Nmap can be divided into the following scanning techniques:
- Host discovery
- Port scanning
- Service enumeration and detection
- OS detection
- Scriptable interaction with the target service (Nmap Scripting Engine)
Syntax
The syntax for Nmap is fairly simple and looks like this:
gitblanc@htb[/htb]$ nmap <scan types> <options> <target>Scan Techniques
Nmap offers many different scanning techniques, making different types of connections and using differently structured packets to send. Here we can see all the scanning techniques Nmap offers:
gitblanc@htb[/htb]$ nmap --help

<SNIP>
SCAN TECHNIQUES:
  -sS/sT/sA/sW/sM: TCP SYN/Connect()/ACK/Window/Maimon scans
  -sU: UDP Scan
  -sN/sF/sX: TCP Null, FIN, and Xmas scans
  --scanflags <flags>: Customize TCP scan flags
  -sI <zombie host[:probeport]>: Idle scan
  -sY/sZ: SCTP INIT/COOKIE-ECHO scans
  -sO: IP protocol scan
  -b <FTP relay host>: FTP bounce scan
<SNIP>
For example, the TCP-SYN scan (-sS) is one of the default settings unless we have defined otherwise and is also one of the most popular scan methods. This scan method makes it possible to scan several thousand ports per second. The TCP-SYN scan sends one packet with the SYN flag and, therefore, never completes the three-way handshake, which results in not establishing a full TCP connection to the scanned port.
- If our target sends a
SYN-ACKflagged packet back to us, Nmap detects that the port isopen. - If the target responds with an
RSTflagged packet, it is an indicator that the port isclosed. - If Nmap does not receive a packet back, it will display it as
filtered. Depending on the firewall configuration, certain packets may be dropped or ignored by the firewall.
Let us take an example of such a scan.
gitblanc@htb[/htb]$ sudo nmap -sS localhost

Starting Nmap 7.80 ( https://nmap.org ) at 2020-06-11 22:50 UTC
Nmap scan report for localhost (127.0.0.1)
Host is up (0.000010s latency).
Not shown: 996 closed ports
PORT     STATE SERVICE
22/tcp   open  ssh
80/tcp   open  http
5432/tcp open  postgresql
5901/tcp open  vnc-1

Nmap done: 1 IP address (1 host up) scanned in 0.18 seconds
In this example, we can see that we have four different TCP ports open. In the first column, we see the number of the port. Then, in the second column, we see the service’s status and then what kind of service it is.
Host Discovery
When we need to conduct an internal penetration test for the entire network of a company, for example, then we should, first of all, get an overview of which systems are online that we can work with. To actively discover such systems on the network, we can use various Nmap host discovery options. There are many options Nmap provides to determine whether our target is alive or not. The most effective host discovery method is to use ICMP echo requests, which we will look into.
It is always recommended to store every single scan. This can later be used for comparison, documentation, and reporting. After all, different tools may produce different results. Therefore it can be beneficial to distinguish which tool produces which results.
Scan Network Range
gitblanc@htb[/htb]$ sudo nmap 10.129.2.0/24 -sn -oA tnet | grep for | cut -d" " -f5

10.129.2.4
10.129.2.10
10.129.2.11
10.129.2.18
10.129.2.19
10.129.2.20
10.129.2.28| Scanning Options | Description |
|---|---|
10.129.2.0/24 | Target network range. |
-sn | Disables port scanning. |
-oA tnet | Stores the results in all formats starting with the name ‘tnet’. |
This scanning method works only if the firewalls of the hosts allow it. Otherwise, we can use other scanning techniques to find out if the hosts are active or not. We will take a closer look at these techniques in “Firewall and IDS Evasion”.
Scan IP List
During an internal penetration test, it is not uncommon for us to be provided with an IP list with the hosts we need to test. Nmap also gives us the option of working with lists and reading the hosts from this list instead of manually defining or typing them in.
Such a list could look something like this:
gitblanc@htb[/htb]$ cat hosts.lst

10.129.2.4
10.129.2.10
10.129.2.11
10.129.2.18
10.129.2.19
10.129.2.20
10.129.2.28
If we use the same scanning technique on the predefined list, the command will look like this:
gitblanc@htb[/htb]$ sudo nmap -sn -oA tnet -iL hosts.lst | grep for | cut -d" " -f5

10.129.2.18
10.129.2.19
10.129.2.20| Scanning Options | Description |
|---|---|
-sn | Disables port scanning. |
-oA tnet | Stores the results in all formats starting with the name ‘tnet’. |
-iL | Performs defined scans against targets in provided ‘hosts.lst’ list. |
In this example, we see that only 3 of 7 hosts are active. Remember, this may mean that the other hosts ignore the default ICMP echo requests because of their firewall configurations. Since Nmap does not receive a response, it marks those hosts as inactive.
Scan Multiple IPs
It can also happen that we only need to scan a small part of a network. An alternative to the method we used last time is to specify multiple IP addresses.
gitblanc@htb[/htb]$ sudo nmap -sn -oA tnet 10.129.2.18 10.129.2.19 10.129.2.20| grep for | cut -d" " -f5

10.129.2.18
10.129.2.19
10.129.2.20
If these IP addresses are next to each other, we can also define the range in the respective octet.
gitblanc@htb[/htb]$ sudo nmap -sn -oA tnet 10.129.2.18-20| grep for | cut -d" " -f5

10.129.2.18
10.129.2.19
10.129.2.20
Scan Single IP
Before we scan a single host for open ports and its services, we first have to determine if it is alive or not. For this, we can use the same method as before.
gitblanc@htb[/htb]$ sudo nmap 10.129.2.18 -sn -oA host

Starting Nmap 7.80 ( https://nmap.org ) at 2020-06-14 23:59 CEST
Nmap scan report for 10.129.2.18
Host is up (0.087s latency).
MAC Address: DE:AD:00:00:BE:EF
Nmap done: 1 IP address (1 host up) scanned in 0.11 seconds| Scanning Options | Description |
|---|---|
10.129.2.18 | Performs defined scans against the target. |
-sn | Disables port scanning. |
-oA host | Stores the results in all formats starting with the name ‘host’. |
If we disable port scan (-sn), Nmap automatically ping scan with ICMP Echo Requests (-PE). Once such a request is sent, we usually expect an ICMP reply if the pinging host is alive. The more interesting fact is that our previous scans did not do that because before Nmap could send an ICMP echo request, it would send an ARP ping resulting in an ARP reply. We can confirm this with the “--packet-trace” option. To ensure that ICMP echo requests are sent, we also define the option (-PE) for this.
gitblanc@htb[/htb]$ sudo nmap 10.129.2.18 -sn -oA host -PE --packet-trace

Starting Nmap 7.80 ( https://nmap.org ) at 2020-06-15 00:08 CEST
SENT (0.0074s) ARP who-has 10.129.2.18 tell 10.10.14.2
RCVD (0.0309s) ARP reply 10.129.2.18 is-at DE:AD:00:00:BE:EF
Nmap scan report for 10.129.2.18
Host is up (0.023s latency).
MAC Address: DE:AD:00:00:BE:EF
Nmap done: 1 IP address (1 host up) scanned in 0.05 seconds| Scanning Options | Description |
|---|---|
10.129.2.18 | Performs defined scans against the target. |
-sn | Disables port scanning. |
-oA host | Stores the results in all formats starting with the name ‘host’. |
-PE | Performs the ping scan by using ‘ICMP Echo requests’ against the target. |
--packet-trace | Shows all packets sent and received |
Another way to determine why Nmap has our target marked as “alive” is with the “--reason” option.
gitblanc@htb[/htb]$ sudo nmap 10.129.2.18 -sn -oA host -PE --reason

Starting Nmap 7.80 ( https://nmap.org ) at 2020-06-15 00:10 CEST
SENT (0.0074s) ARP who-has 10.129.2.18 tell 10.10.14.2
RCVD (0.0309s) ARP reply 10.129.2.18 is-at DE:AD:00:00:BE:EF
Nmap scan report for 10.129.2.18
Host is up, received arp-response (0.028s latency).
MAC Address: DE:AD:00:00:BE:EF
Nmap done: 1 IP address (1 host up) scanned in 0.03 seconds| Scanning Options | Description |
|---|---|
10.129.2.18 | Performs defined scans against the target. |
-sn | Disables port scanning. |
-oA host | Stores the results in all formats starting with the name ‘host’. |
-PE | Performs the ping scan by using ‘ICMP Echo requests’ against the target. |
--reason | Displays the reason for specific result. |
We see here that Nmap does indeed detect whether the host is alive or not through the ARP request and ARP reply alone. To disable ARP requests and scan our target with the desired ICMP echo requests, we can disable ARP pings by setting the “--disable-arp-ping” option. Then we can scan our target again and look at the packets sent and received.
gitblanc@htb[/htb]$ sudo nmap 10.129.2.18 -sn -oA host -PE --packet-trace --disable-arp-ping

Starting Nmap 7.80 ( https://nmap.org ) at 2020-06-15 00:12 CEST
SENT (0.0107s) ICMP [10.10.14.2 > 10.129.2.18 Echo request (type=8/code=0) id=13607 seq=0] IP [ttl=255 id=23541 iplen=28 ]
RCVD (0.0152s) ICMP [10.129.2.18 > 10.10.14.2 Echo reply (type=0/code=0) id=13607 seq=0] IP [ttl=128 id=40622 iplen=28 ]
Nmap scan report for 10.129.2.18
Host is up (0.086s latency).
MAC Address: DE:AD:00:00:BE:EF
Nmap done: 1 IP address (1 host up) scanned in 0.11 seconds
We have already mentioned in the “Learning Process,” and at the beginning of this module, it is essential to pay attention to details. An ICMP echo request can help us determine if our target is alive and identify its system. More strategies about host discovery can be found at https://nmap.org/book/host-discovery-strategies.html
Example
The Academy’s exercise for this section.
To know the OS in use, I’ll check the TTL (Time to Life):
- Check this TTL blog
It’s windows.
Host and Port Scanning
It is essential to understand how the tool we use works and how it performs and processes the different functions. We will only understand the results if we know what they mean and how they are obtained. Therefore we will take a closer look at and analyze some of the scanning methods. After we have found out that our target is alive, we want to get a more accurate picture of the system. The information we need includes:
- Open ports and its services
- Service versions
- Information that the services provided
- Operating system
There are a total of 6 different states for a scanned port we can obtain:
| State | Description |
|---|---|
open | This indicates that the connection to the scanned port has been established. These connections can be TCP connections, UDP datagrams as well as SCTP associations. |
closed | When the port is shown as closed, the TCP protocol indicates that the packet we received back contains an RST flag. This scanning method can also be used to determine if our target is alive or not. |
filtered | Nmap cannot correctly identify whether the scanned port is open or closed because either no response is returned from the target for the port or we get an error code from the target. |
unfiltered | This state of a port only occurs during the TCP-ACK scan and means that the port is accessible, but it cannot be determined whether it is open or closed. |
open|filtered | If we do not get a response for a specific port, Nmap will set it to that state. This indicates that a firewall or packet filter may protect the port. |
closed|filtered | This state only occurs in the IP ID idle scans and indicates that it was impossible to determine if the scanned port is closed or filtered by a firewall. |
Discovering Open TCP Ports
By default, Nmap scans the top 1000 TCP ports with the SYN scan (-sS). This SYN scan is set only to default when we run it as root because of the socket permissions required to create raw TCP packets. Otherwise, the TCP scan (-sT) is performed by default. This means that if we do not define ports and scanning methods, these parameters are set automatically. We can define the ports one by one (-p 22,25,80,139,445), by range (-p 22-445), by top ports (--top-ports=10) from the Nmap database that have been signed as most frequent, by scanning all ports (-p-) but also by defining a fast port scan, which contains top 100 ports (-F).
Scanning Top 10 TCP Ports
gitblanc@htb[/htb]$ sudo nmap 10.129.2.28 --top-ports=10

Starting Nmap 7.80 ( https://nmap.org ) at 2020-06-15 15:36 CEST
Nmap scan report for 10.129.2.28
Host is up (0.021s latency).

PORT     STATE    SERVICE
21/tcp   closed   ftp
22/tcp   open     ssh
23/tcp   closed   telnet
25/tcp   open     smtp
80/tcp   open     http
110/tcp  open     pop3
139/tcp  filtered netbios-ssn
443/tcp  closed   https
445/tcp  filtered microsoft-ds
3389/tcp closed   ms-wbt-server
MAC Address: DE:AD:00:00:BE:EF (Intel Corporate)

Nmap done: 1 IP address (1 host up) scanned in 1.44 seconds| Scanning Options | Description |
|---|---|
10.129.2.28 | Scans the specified target. |
--top-ports=10 | Scans the specified top ports that have been defined as most frequent. |
We see that we only scanned the top 10 TCP ports of our target, and Nmap displays their state accordingly. If we trace the packets Nmap sends, we will see the RST flag on TCP port 21 that our target sends back to us. To have a clear view of the SYN scan, we disable the ICMP echo requests (-Pn), DNS resolution (-n), and ARP ping scan (--disable-arp-ping).
Nmap - Trace the Packets
gitblanc@htb[/htb]$ sudo nmap 10.129.2.28 -p 21 --packet-trace -Pn -n --disable-arp-ping

Starting Nmap 7.80 ( https://nmap.org ) at 2020-06-15 15:39 CEST
SENT (0.0429s) TCP 10.10.14.2:63090 > 10.129.2.28:21 S ttl=56 id=57322 iplen=44  seq=1699105818 win=1024 <mss 1460>
RCVD (0.0573s) TCP 10.129.2.28:21 > 10.10.14.2:63090 RA ttl=64 id=0 iplen=40  seq=0 win=0
Nmap scan report for 10.11.1.28
Host is up (0.014s latency).

PORT   STATE  SERVICE
21/tcp closed ftp
MAC Address: DE:AD:00:00:BE:EF (Intel Corporate)

Nmap done: 1 IP address (1 host up) scanned in 0.07 seconds| Scanning Options | Description |
|---|---|
10.129.2.28 | Scans the specified target. |
-p 21 | Scans only the specified port. |
--packet-trace | Shows all packets sent and received. |
-n | Disables DNS resolution. |
--disable-arp-ping | Disables ARP ping. |
We can see from the SENT line that we (10.10.14.2) sent a TCP packet with the SYN flag (S) to our target (10.129.2.28). In the next RCVD line, we can see that the target responds with a TCP packet containing the RST and ACK flags (RA). RST and ACK flags are used to acknowledge receipt of the TCP packet (ACK) and to end the TCP session (RST).
Request
| Message | Description |
|---|---|
SENT (0.0429s) | Indicates the SENT operation of Nmap, which sends a packet to the target. |
TCP | Shows the protocol that is being used to interact with the target port. |
10.10.14.2:63090 > | Represents our IPv4 address and the source port, which will be used by Nmap to send the packets. |
10.129.2.28:21 | Shows the target IPv4 address and the target port. |
S | SYN flag of the sent TCP packet. |
ttl=56 id=57322 iplen=44 seq=1699105818 win=1024 mss 1460 | Additional TCP Header parameters. |
Response
| Message | Description |
|---|---|
RCVD (0.0573s) | Indicates a received packet from the target. |
TCP | Shows the protocol that is being used. |
10.129.2.28:21 > | Represents targets IPv4 address and the source port, which will be used to reply. |
10.10.14.2:63090 | Shows our IPv4 address and the port that will be replied to. |
RA | RST and ACK flags of the sent TCP packet. |
ttl=64 id=0 iplen=40 seq=0 win=0 | Additional TCP Header parameters. |
Connect Scan
The Nmap TCP Connect Scan (-sT) uses the TCP three-way handshake to determine if a specific port on a target host is open or closed. The scan sends an SYN packet to the target port and waits for a response. It is considered open if the target port responds with an SYN-ACK packet and closed if it responds with an RST packet.
The Connect scan (also known as a full TCP connect scan) is highly accurate because it completes the three-way TCP handshake, allowing us to determine the exact state of a port (open, closed, or filtered). However, it is not the most stealthy. In fact, the Connect scan is one of the least stealthy techniques, as it fully establishes a connection, which creates logs on most systems and is easily detected by modern IDS/IPS solutions. That said, the Connect scan can still be useful in certain situations, particularly when accuracy is a priority, and the goal is to map the network without causing significant disruption to services. Since the scan fully establishes a TCP connection, it interacts cleanly with services, making it less likely to cause service errors or instability compared to more intrusive scans. While it is not the most stealthy method, it is sometimes considered a more “polite” scan because it behaves like a normal client connection, thus having minimal impact on the target services.
It is also useful when the target host has a personal firewall that drops incoming packets but allows outgoing packets. In this case, a Connect scan can bypass the firewall and accurately determine the state of the target ports. However, it is important to note that the Connect scan is slower than other types of scans because it requires the scanner to wait for a response from the target after each packet it sends, which could take some time if the target is busy or unresponsive.
Scans like the SYN scan (also known as a half-open scan) are generally considered more stealthy because they do not complete the full handshake, leaving the connection incomplete after sending the initial SYN packet. This minimizes the chance of triggering connection logs while still gathering port state information. Advanced IDS/IPS systems, however, have adapted to detect even these subtler techniques.
Connect Scan on TCP Port 443
gitblanc@htb[/htb]$ sudo nmap 10.129.2.28 -p 443 --packet-trace --disable-arp-ping -Pn -n --reason -sT

Starting Nmap 7.80 ( https://nmap.org ) at 2020-06-15 16:26 CET
CONN (0.0385s) TCP localhost > 10.129.2.28:443 => Operation now in progress
CONN (0.0396s) TCP localhost > 10.129.2.28:443 => Connected
Nmap scan report for 10.129.2.28
Host is up, received user-set (0.013s latency).

PORT    STATE SERVICE REASON
443/tcp open  https   syn-ack

Nmap done: 1 IP address (1 host up) scanned in 0.04 seconds
Filtered Ports
When a port is shown as filtered, it can have several reasons. In most cases, firewalls have certain rules set to handle specific connections. The packets can either be dropped, or rejected. When a packet gets dropped, Nmap receives no response from our target, and by default, the retry rate (--max-retries) is set to 10. This means Nmap will resend the request to the target port to determine if the previous packet was accidentally mishandled or not.
Let us look at an example where the firewall drops the TCP packets we send for the port scan. Therefore we scan the TCP port 139, which was already shown as filtered. To be able to track how our sent packets are handled, we deactivate the ICMP echo requests (-Pn), DNS resolution (-n), and ARP ping scan (--disable-arp-ping) again.
gitblanc@htb[/htb]$ sudo nmap 10.129.2.28 -p 139 --packet-trace -n --disable-arp-ping -Pn

Starting Nmap 7.80 ( https://nmap.org ) at 2020-06-15 15:45 CEST
SENT (0.0381s) TCP 10.10.14.2:60277 > 10.129.2.28:139 S ttl=47 id=14523 iplen=44  seq=4175236769 win=1024 <mss 1460>
SENT (1.0411s) TCP 10.10.14.2:60278 > 10.129.2.28:139 S ttl=45 id=7372 iplen=44  seq=4175171232 win=1024 <mss 1460>
Nmap scan report for 10.129.2.28
Host is up.

PORT    STATE    SERVICE
139/tcp filtered netbios-ssn
MAC Address: DE:AD:00:00:BE:EF (Intel Corporate)

Nmap done: 1 IP address (1 host up) scanned in 2.06 seconds| Scanning Options | Description |
|---|---|
10.129.2.28 | Scans the specified target. |
-p 139 | Scans only the specified port. |
--packet-trace | Shows all packets sent and received. |
-n | Disables DNS resolution. |
--disable-arp-ping | Disables ARP ping. |
-Pn | Disables ICMP Echo requests. |
We see in the last scan that Nmap sent two TCP packets with the SYN flag. By the duration (2.06s) of the scan, we can recognize that it took much longer than the previous ones (~0.05s). The case is different if the firewall rejects the packets. For this, we look at TCP port 445, which is handled accordingly by such a rule of the firewall.
gitblanc@htb[/htb]$ sudo nmap 10.129.2.28 -p 445 --packet-trace -n --disable-arp-ping -Pn

Starting Nmap 7.80 ( https://nmap.org ) at 2020-06-15 15:55 CEST
SENT (0.0388s) TCP 10.129.2.28:52472 > 10.129.2.28:445 S ttl=49 id=21763 iplen=44  seq=1418633433 win=1024 <mss 1460>
RCVD (0.0487s) ICMP [10.129.2.28 > 10.129.2.28 Port 445 unreachable (type=3/code=3) ] IP [ttl=64 id=20998 iplen=72 ]
Nmap scan report for 10.129.2.28
Host is up (0.0099s latency).

PORT    STATE    SERVICE
445/tcp filtered microsoft-ds
MAC Address: DE:AD:00:00:BE:EF (Intel Corporate)

Nmap done: 1 IP address (1 host up) scanned in 0.05 seconds| Scanning Options | Description |
|---|---|
10.129.2.28 | Scans the specified target. |
-p 445 | Scans only the specified port. |
--packet-trace | Shows all packets sent and received. |
-n | Disables DNS resolution. |
--disable-arp-ping | Disables ARP ping. |
-Pn | Disables ICMP Echo requests. |
As a response, we receive an ICMP reply with type 3 and error code 3, which indicates that the desired port is unreachable. Nevertheless, if we know that the host is alive, we can strongly assume that the firewall on this port is rejecting the packets, and we will have to take a closer look at this port later.
Discovering Open UDP Ports
Some system administrators sometimes forget to filter the UDP ports in addition to the TCP ones. Since UDP is a stateless protocol and does not require a three-way handshake like TCP. We do not receive any acknowledgment. Consequently, the timeout is much longer, making the whole UDP scan (-sU) much slower than the TCP scan (-sS).
Let’s look at an example of what a UDP scan (-sU) can look like and what results it gives us.
UDP Port Scan
gitblanc@htb[/htb]$ sudo nmap 10.129.2.28 -F -sU

Starting Nmap 7.80 ( https://nmap.org ) at 2020-06-15 16:01 CEST
Nmap scan report for 10.129.2.28
Host is up (0.059s latency).
Not shown: 95 closed ports
PORT     STATE         SERVICE
68/udp   open|filtered dhcpc
137/udp  open          netbios-ns
138/udp  open|filtered netbios-dgm
631/udp  open|filtered ipp
5353/udp open          zeroconf
MAC Address: DE:AD:00:00:BE:EF (Intel Corporate)

Nmap done: 1 IP address (1 host up) scanned in 98.07 seconds| Scanning Options | Description |
|---|---|
10.129.2.28 | Scans the specified target. |
-F | Scans top 100 ports. |
-sU | Performs a UDP scan. |
Another disadvantage of this is that we often do not get a response back because Nmap sends empty datagrams to the scanned UDP ports, and we do not receive any response. So we cannot determine if the UDP packet has arrived at all or not. If the UDP port is open, we only get a response if the application is configured to do so.
gitblanc@htb[/htb]$ sudo nmap 10.129.2.28 -sU -Pn -n --disable-arp-ping --packet-trace -p 137 --reason

Starting Nmap 7.80 ( https://nmap.org ) at 2020-06-15 16:15 CEST
SENT (0.0367s) UDP 10.10.14.2:55478 > 10.129.2.28:137 ttl=57 id=9122 iplen=78
RCVD (0.0398s) UDP 10.129.2.28:137 > 10.10.14.2:55478 ttl=64 id=13222 iplen=257
Nmap scan report for 10.129.2.28
Host is up, received user-set (0.0031s latency).

PORT    STATE SERVICE    REASON
137/udp open  netbios-ns udp-response ttl 64
MAC Address: DE:AD:00:00:BE:EF (Intel Corporate)

Nmap done: 1 IP address (1 host up) scanned in 0.04 seconds| Scanning Options | Description |
|---|---|
10.129.2.28 | Scans the specified target. |
-sU | Performs a UDP scan. |
-Pn | Disables ICMP Echo requests. |
-n | Disables DNS resolution. |
--disable-arp-ping | Disables ARP ping. |
--packet-trace | Shows all packets sent and received. |
-p 137 | Scans only the specified port. |
--reason | Displays the reason a port is in a particular state. |
If we get an ICMP response with error code 3 (port unreachable), we know that the port is indeed closed.
gitblanc@htb[/htb]$ sudo nmap 10.129.2.28 -sU -Pn -n --disable-arp-ping --packet-trace -p 100 --reason

Starting Nmap 7.80 ( https://nmap.org ) at 2020-06-15 16:25 CEST
SENT (0.0445s) UDP 10.10.14.2:63825 > 10.129.2.28:100 ttl=57 id=29925 iplen=28
RCVD (0.1498s) ICMP [10.129.2.28 > 10.10.14.2 Port unreachable (type=3/code=3) ] IP [ttl=64 id=11903 iplen=56 ]
Nmap scan report for 10.129.2.28
Host is up, received user-set (0.11s latency).

PORT    STATE  SERVICE REASON
100/udp closed unknown port-unreach ttl 64
MAC Address: DE:AD:00:00:BE:EF (Intel Corporate)

Nmap done: 1 IP address (1 host up) scanned in 0.15 seconds| Scanning Options | Description |
|---|---|
10.129.2.28 | Scans the specified target. |
-sU | Performs a UDP scan. |
-Pn | Disables ICMP Echo requests. |
-n | Disables DNS resolution. |
--disable-arp-ping | Disables ARP ping. |
--packet-trace | Shows all packets sent and received. |
-p 100 | Scans only the specified port. |
--reason | Displays the reason a port is in a particular state. |
For all other ICMP responses, the scanned ports are marked as (open|filtered).
gitblanc@htb[/htb]$ sudo nmap 10.129.2.28 -sU -Pn -n --disable-arp-ping --packet-trace -p 138 --reason

Starting Nmap 7.80 ( https://nmap.org ) at 2020-06-15 16:32 CEST
SENT (0.0380s) UDP 10.10.14.2:52341 > 10.129.2.28:138 ttl=50 id=65159 iplen=28
SENT (1.0392s) UDP 10.10.14.2:52342 > 10.129.2.28:138 ttl=40 id=24444 iplen=28
Nmap scan report for 10.129.2.28
Host is up, received user-set.

PORT    STATE         SERVICE     REASON
138/udp open|filtered netbios-dgm no-response
MAC Address: DE:AD:00:00:BE:EF (Intel Corporate)

Nmap done: 1 IP address (1 host up) scanned in 2.06 seconds| Scanning Options | Description |
|---|---|
10.129.2.28 | Scans the specified target. |
-sU | Performs a UDP scan. |
-Pn | Disables ICMP Echo requests. |
-n | Disables DNS resolution. |
--disable-arp-ping | Disables ARP ping. |
--packet-trace | Shows all packets sent and received. |
-p 138 | Scans only the specified port. |
--reason | Displays the reason a port is in a particular state. |
Another handy method for scanning ports is the -sV option which is used to get additional available information from the open ports. This method can identify versions, service names, and details about our target.
Version Scan
gitblanc@htb[/htb]$ sudo nmap 10.129.2.28 -Pn -n --disable-arp-ping --packet-trace -p 445 --reason  -sV

Starting Nmap 7.80 ( https://nmap.org ) at 2022-11-04 11:10 GMT
SENT (0.3426s) TCP 10.10.14.2:44641 > 10.129.2.28:445 S ttl=55 id=43401 iplen=44  seq=3589068008 win=1024 <mss 1460>
RCVD (0.3556s) TCP 10.129.2.28:445 > 10.10.14.2:44641 SA ttl=63 id=0 iplen=44  seq=2881527699 win=29200 <mss 1337>
NSOCK INFO [0.4980s] nsock_iod_new2(): nsock_iod_new (IOD #1)
NSOCK INFO [0.4980s] nsock_connect_tcp(): TCP connection requested to 10.129.2.28:445 (IOD #1) EID 8
NSOCK INFO [0.5130s] nsock_trace_handler_callback(): Callback: CONNECT SUCCESS for EID 8 [10.129.2.28:445]
Service scan sending probe NULL to 10.129.2.28:445 (tcp)
NSOCK INFO [0.5130s] nsock_read(): Read request from IOD #1 [10.129.2.28:445] (timeout: 6000ms) EID 18
NSOCK INFO [6.5190s] nsock_trace_handler_callback(): Callback: READ TIMEOUT for EID 18 [10.129.2.28:445]
Service scan sending probe SMBProgNeg to 10.129.2.28:445 (tcp)
NSOCK INFO [6.5190s] nsock_write(): Write request for 168 bytes to IOD #1 EID 27 [10.129.2.28:445]
NSOCK INFO [6.5190s] nsock_read(): Read request from IOD #1 [10.129.2.28:445] (timeout: 5000ms) EID 34
NSOCK INFO [6.5190s] nsock_trace_handler_callback(): Callback: WRITE SUCCESS for EID 27 [10.129.2.28:445]
NSOCK INFO [6.5320s] nsock_trace_handler_callback(): Callback: READ SUCCESS for EID 34 [10.129.2.28:445] (135 bytes)
Service scan match (Probe SMBProgNeg matched with SMBProgNeg line 13836): 10.129.2.28:445 is netbios-ssn.  Version: |Samba smbd|3.X - 4.X|workgroup: WORKGROUP|
NSOCK INFO [6.5320s] nsock_iod_delete(): nsock_iod_delete (IOD #1)
Nmap scan report for 10.129.2.28
Host is up, received user-set (0.013s latency).

PORT    STATE SERVICE     REASON         VERSION
445/tcp open  netbios-ssn syn-ack ttl 63 Samba smbd 3.X - 4.X (workgroup: WORKGROUP)
Service Info: Host: Ubuntu

Service detection performed. Please report any incorrect results at https://nmap.org/submit/ .
Nmap done: 1 IP address (1 host up) scanned in 6.55 seconds| Scanning Options | Description |
|---|---|
10.129.2.28 | Scans the specified target. |
-Pn | Disables ICMP Echo requests. |
-n | Disables DNS resolution. |
--disable-arp-ping | Disables ARP ping. |
--packet-trace | Shows all packets sent and received. |
-p 445 | Scans only the specified port. |
--reason | Displays the reason a port is in a particular state. |
-sV | Performs a service scan. |
More information about port scanning techniques we can find at: https://nmap.org/book/man-port-scanning-techniques.html
Example
The Academy’s exercise for this section. Enumerate the hostname of your target and submit it as the answer. (case-sensitive)
Just do a version scan:
nmap -sV HOSTSaving the Results
Different Formats
While we run various scans, we should always save the results. We can use these later to examine the differences between the different scanning methods we have used. Nmap can save the results in 3 different formats.
- Normal output (
-oN) with the.nmapfile extension - Grepable output (
-oG) with the.gnmapfile extension - XML output (
-oX) with the.xmlfile extension
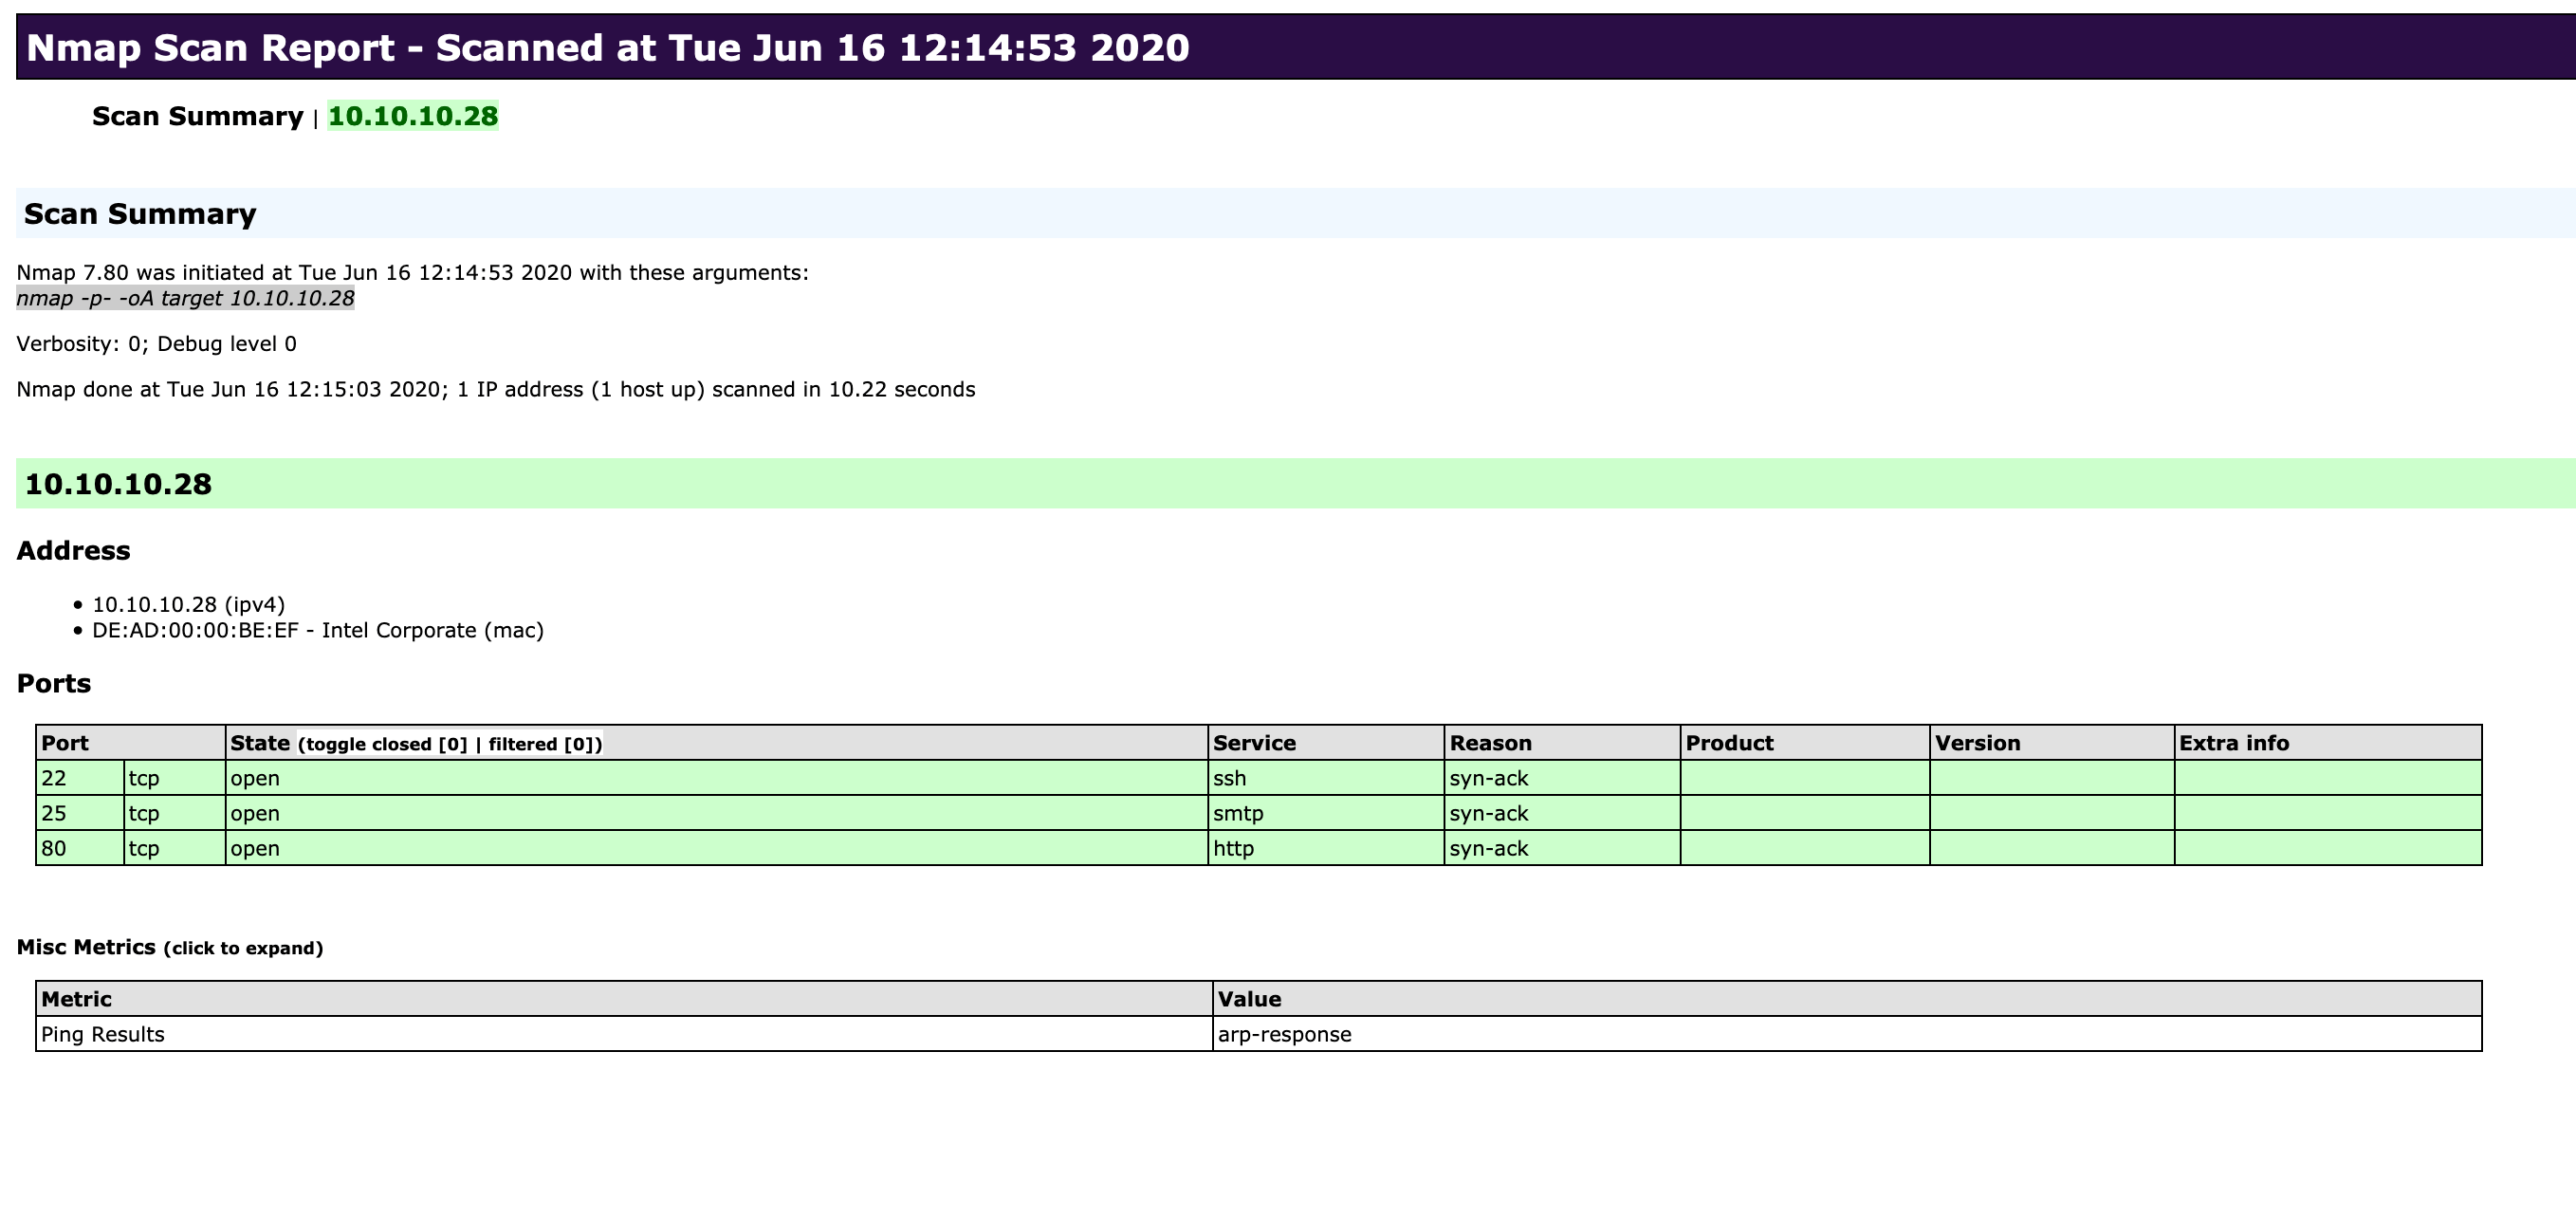
We can also specify the option (-oA) to save the results in all formats. The command could look like this:
gitblanc@htb[/htb]$ sudo nmap 10.129.2.28 -p- -oA target

Starting Nmap 7.80 ( https://nmap.org ) at 2020-06-16 12:14 CEST
Nmap scan report for 10.129.2.28
Host is up (0.0091s latency).
Not shown: 65525 closed ports
PORT      STATE SERVICE
22/tcp    open  ssh
25/tcp    open  smtp
80/tcp    open  http
MAC Address: DE:AD:00:00:BE:EF (Intel Corporate)

Nmap done: 1 IP address (1 host up) scanned in 10.22 seconds| Scanning Options | Description |
|---|---|
10.129.2.28 | Scans the specified target. |
-p- | Scans all ports. |
-oA target | Saves the results in all formats, starting the name of each file with ‘target’. |
If no full path is given, the results will be stored in the directory we are currently in. Next, we look at the different formats Nmap has created for us.
gitblanc@htb[/htb]$ ls

target.gnmap target.xml  target.nmap
Normal Output
gitblanc@htb[/htb]$ cat target.nmap

# Nmap 7.80 scan initiated Tue Jun 16 12:14:53 2020 as: nmap -p- -oA target 10.129.2.28
Nmap scan report for 10.129.2.28
Host is up (0.053s latency).
Not shown: 4 closed ports
PORT   STATE SERVICE
22/tcp open  ssh
25/tcp open  smtp
80/tcp open  http
MAC Address: DE:AD:00:00:BE:EF (Intel Corporate)

# Nmap done at Tue Jun 16 12:15:03 2020 -- 1 IP address (1 host up) scanned in 10.22 seconds
Grepable Output
gitblanc@htb[/htb]$ cat target.gnmap

# Nmap 7.80 scan initiated Tue Jun 16 12:14:53 2020 as: nmap -p- -oA target 10.129.2.28
Host: 10.129.2.28 ()	Status: Up
Host: 10.129.2.28 ()	Ports: 22/open/tcp//ssh///, 25/open/tcp//smtp///, 80/open/tcp//http///	Ignored State: closed (4)
# Nmap done at Tue Jun 16 12:14:53 2020 -- 1 IP address (1 host up) scanned in 10.22 seconds
XML Output
gitblanc@htb[/htb]$ cat target.xml

<?xml version="1.0" encoding="UTF-8"?>
<!DOCTYPE nmaprun>
<?xml-stylesheet href="file:///usr/local/bin/../share/nmap/nmap.xsl" type="text/xsl"?>
<!-- Nmap 7.80 scan initiated Tue Jun 16 12:14:53 2020 as: nmap -p- -oA target 10.129.2.28 -->
<nmaprun scanner="nmap" args="nmap -p- -oA target 10.129.2.28" start="12145301719" startstr="Tue Jun 16 12:15:03 2020" version="7.80" xmloutputversion="1.04">
<scaninfo type="syn" protocol="tcp" numservices="65535" services="1-65535"/>
<verbose level="0"/>
<debugging level="0"/>
<host starttime="12145301719" endtime="12150323493"><status state="up" reason="arp-response" reason_ttl="0"/>
<address addr="10.129.2.28" addrtype="ipv4"/>
<address addr="DE:AD:00:00:BE:EF" addrtype="mac" vendor="Intel Corporate"/>
<hostnames>
</hostnames>
<ports><extraports state="closed" count="4">
<extrareasons reason="resets" count="4"/>
</extraports>
<port protocol="tcp" portid="22"><state state="open" reason="syn-ack" reason_ttl="64"/><service name="ssh" method="table" conf="3"/></port>
<port protocol="tcp" portid="25"><state state="open" reason="syn-ack" reason_ttl="64"/><service name="smtp" method="table" conf="3"/></port>
<port protocol="tcp" portid="80"><state state="open" reason="syn-ack" reason_ttl="64"/><service name="http" method="table" conf="3"/></port>
</ports>
<times srtt="52614" rttvar="75640" to="355174"/>
</host>
<runstats><finished time="12150323493" timestr="Tue Jun 16 12:14:53 2020" elapsed="10.22" summary="Nmap done at Tue Jun 16 12:15:03 2020; 1 IP address (1 host up) scanned in 10.22 seconds" exit="success"/><hosts up="1" down="0" total="1"/>
</runstats>
</nmaprun>
Style sheets
With the XML output, we can easily create HTML reports that are easy to read, even for non-technical people. This is later very useful for documentation, as it presents our results in a detailed and clear way. To convert the stored results from XML format to HTML, we can use the tool xsltproc.
gitblanc@htb[/htb]$ xsltproc target.xml -o target.htmlIf we now open the HTML file in our browser, we see a clear and structured presentation of our results.
Nmap Report
More information about the output formats can be found at: https://nmap.org/book/output.html
Service Enumeration
For us, it is essential to determine the application and its version as accurately as possible. We can use this information to scan for known vulnerabilities and analyze the source code for that version if we find it. An exact version number allows us to search for a more precise exploit that fits the service and the operating system of our target.
Service Version Detection
It is recommended to perform a quick port scan first, which gives us a small overview of the available ports. This causes significantly less traffic, which is advantageous for us because otherwise we can be discovered and blocked by the security mechanisms. We can deal with these first and run a port scan in the background, which shows all open ports (-p-). We can use the version scan to scan the specific ports for services and their versions (-sV).
A full port scan takes quite a long time. To view the scan status, we can press the [Space Bar] during the scan, which will cause Nmap to show us the scan status.
gitblanc@htb[/htb]$ sudo nmap 10.129.2.28 -p- -sV

Starting Nmap 7.80 ( https://nmap.org ) at 2020-06-15 19:44 CEST
[Space Bar]
Stats: 0:00:03 elapsed; 0 hosts completed (1 up), 1 undergoing SYN Stealth Scan
SYN Stealth Scan Timing: About 3.64% done; ETC: 19:45 (0:00:53 remaining)| Scanning Options | Description |
|---|---|
10.129.2.28 | Scans the specified target. |
-p- | Scans all ports. |
-sV | Performs service version detection on specified ports. |
Another option (--stats-every=5s) that we can use is defining how periods of time the status should be shown. Here we can specify the number of seconds (s) or minutes (m), after which we want to get the status.
gitblanc@htb[/htb]$ sudo nmap 10.129.2.28 -p- -sV --stats-every=5s

Starting Nmap 7.80 ( https://nmap.org ) at 2020-06-15 19:46 CEST
Stats: 0:00:05 elapsed; 0 hosts completed (1 up), 1 undergoing SYN Stealth Scan
SYN Stealth Scan Timing: About 13.91% done; ETC: 19:49 (0:00:31 remaining)
Stats: 0:00:10 elapsed; 0 hosts completed (1 up), 1 undergoing SYN Stealth Scan
SYN Stealth Scan Timing: About 39.57% done; ETC: 19:48 (0:00:15 remaining)| Scanning Options | Description |
|---|---|
10.129.2.28 | Scans the specified target. |
-p- | Scans all ports. |
-sV | Performs service version detection on specified ports. |
--stats-every=5s | Shows the progress of the scan every 5 seconds. |
We can also increase the verbosity level (-v / -vv), which will show us the open ports directly when Nmap detects them.
gitblanc@htb[/htb]$ sudo nmap 10.129.2.28 -p- -sV -v

Starting Nmap 7.80 ( https://nmap.org ) at 2020-06-15 20:03 CEST
NSE: Loaded 45 scripts for scanning.
Initiating ARP Ping Scan at 20:03
Scanning 10.129.2.28 [1 port]
Completed ARP Ping Scan at 20:03, 0.03s elapsed (1 total hosts)
Initiating Parallel DNS resolution of 1 host. at 20:03
Completed Parallel DNS resolution of 1 host. at 20:03, 0.02s elapsed
Initiating SYN Stealth Scan at 20:03
Scanning 10.129.2.28 [65535 ports]
Discovered open port 995/tcp on 10.129.2.28
Discovered open port 80/tcp on 10.129.2.28
Discovered open port 993/tcp on 10.129.2.28
Discovered open port 143/tcp on 10.129.2.28
Discovered open port 25/tcp on 10.129.2.28
Discovered open port 110/tcp on 10.129.2.28
Discovered open port 22/tcp on 10.129.2.28
<SNIP>| Scanning Options | Description |
|---|---|
10.129.2.28 | Scans the specified target. |
-p- | Scans all ports. |
-sV | Performs service version detection on specified ports. |
-v | Increases the verbosity of the scan, which displays more detailed information. |
Banner Grabbing
Once the scan is complete, we will see all TCP ports with the corresponding service and their versions that are active on the system.
gitblanc@htb[/htb]$ sudo nmap 10.129.2.28 -p- -sV

Starting Nmap 7.80 ( https://nmap.org ) at 2020-06-15 20:00 CEST
Nmap scan report for 10.129.2.28
Host is up (0.013s latency).
Not shown: 65525 closed ports
PORT      STATE    SERVICE      VERSION
22/tcp    open     ssh          OpenSSH 7.6p1 Ubuntu 4ubuntu0.3 (Ubuntu Linux; protocol 2.0)
25/tcp    open     smtp         Postfix smtpd
80/tcp    open     http         Apache httpd 2.4.29 ((Ubuntu))
110/tcp   open     pop3         Dovecot pop3d
139/tcp   filtered netbios-ssn
143/tcp   open     imap         Dovecot imapd (Ubuntu)
445/tcp   filtered microsoft-ds
993/tcp   open     ssl/imap     Dovecot imapd (Ubuntu)
995/tcp   open     ssl/pop3     Dovecot pop3d
MAC Address: DE:AD:00:00:BE:EF (Intel Corporate)
Service Info: Host:  inlane; OS: Linux; CPE: cpe:/o:linux:linux_kernel

Service detection performed. Please report any incorrect results at https://nmap.org/submit/ .
Nmap done: 1 IP address (1 host up) scanned in 91.73 seconds| Scanning Options | Description |
|---|---|
10.129.2.28 | Scans the specified target. |
-p- | Scans all ports. |
-sV | Performs service version detection on specified ports. |
Primarily, Nmap looks at the banners of the scanned ports and prints them out. If it cannot identify versions through the banners, Nmap attempts to identify them through a signature-based matching system, but this significantly increases the scan’s duration. One disadvantage to Nmap’s presented results is that the automatic scan can miss some information because sometimes Nmap does not know how to handle it. Let us look at an example of this.
gitblanc@htb[/htb]$ sudo nmap 10.129.2.28 -p- -sV -Pn -n --disable-arp-ping --packet-trace

Starting Nmap 7.80 ( https://nmap.org ) at 2020-06-16 20:10 CEST
<SNIP>
NSOCK INFO [0.4200s] nsock_trace_handler_callback(): Callback: READ SUCCESS for EID 18 [10.129.2.28:25] (35 bytes): 220 inlane ESMTP Postfix (Ubuntu)..
Service scan match (Probe NULL matched with NULL line 3104): 10.129.2.28:25 is smtp.  Version: |Postfix smtpd|||
NSOCK INFO [0.4200s] nsock_iod_delete(): nsock_iod_delete (IOD #1)
Nmap scan report for 10.129.2.28
Host is up (0.076s latency).

PORT   STATE SERVICE VERSION
25/tcp open  smtp    Postfix smtpd
MAC Address: DE:AD:00:00:BE:EF (Intel Corporate)
Service Info: Host:  inlane

Service detection performed. Please report any incorrect results at https://nmap.org/submit/ .
Nmap done: 1 IP address (1 host up) scanned in 0.47 seconds| Scanning Options | Description |
|---|---|
10.129.2.28 | Scans the specified target. |
-p- | Scans all ports. |
-sV | Performs service version detection on specified ports. |
-Pn | Disables ICMP Echo requests. |
-n | Disables DNS resolution. |
--disable-arp-ping | Disables ARP ping. |
--packet-trace | Shows all packets sent and received. |
If we look at the results from Nmap, we can see the port’s status, service name, and hostname. Nevertheless, let us look at this line here:
NSOCK INFO [0.4200s] nsock_trace_handler_callback(): Callback: READ SUCCESS for EID 18 [10.129.2.28:25] (35 bytes): 220 inlane ESMTP Postfix (Ubuntu)..
Then we see that the SMTP server on our target gave us more information than Nmap showed us. Because here, we see that it is the Linux distribution Ubuntu. It happens because, after a successful three-way handshake, the server often sends a banner for identification. This serves to let the client know which service it is working with. At the network level, this happens with a PSH flag in the TCP header. However, it can happen that some services do not immediately provide such information. It is also possible to remove or manipulate the banners from the respective services. If we manually connect to the SMTP server using nc, grab the banner, and intercept the network traffic using tcpdump, we can see what Nmap did not show us.
Tcpdump
gitblanc@htb[/htb]$ sudo tcpdump -i eth0 host 10.10.14.2 and 10.129.2.28

tcpdump: verbose output suppressed, use -v or -vv for full protocol decode
listening on eth0, link-type EN10MB (Ethernet), capture size 262144 bytes
Nc
gitblanc@htb[/htb]$  nc -nv 10.129.2.28 25

Connection to 10.129.2.28 port 25 [tcp/*] succeeded!
220 inlane ESMTP Postfix (Ubuntu)
Tcpdump - Intercepted Traffic
18:28:07.128564 IP 10.10.14.2.59618 > 10.129.2.28.smtp: Flags [S], seq 1798872233, win 65535, options [mss 1460,nop,wscale 6,nop,nop,TS val 331260178 ecr 0,sackOK,eol], length 0
18:28:07.255151 IP 10.129.2.28.smtp > 10.10.14.2.59618: Flags [S.], seq 1130574379, ack 1798872234, win 65160, options [mss 1460,sackOK,TS val 1800383922 ecr 331260178,nop,wscale 7], length 0
18:28:07.255281 IP 10.10.14.2.59618 > 10.129.2.28.smtp: Flags [.], ack 1, win 2058, options [nop,nop,TS val 331260304 ecr 1800383922], length 0
18:28:07.319306 IP 10.129.2.28.smtp > 10.10.14.2.59618: Flags [P.], seq 1:36, ack 1, win 510, options [nop,nop,TS val 1800383985 ecr 331260304], length 35: SMTP: 220 inlane ESMTP Postfix (Ubuntu)
18:28:07.319426 IP 10.10.14.2.59618 > 10.129.2.28.smtp: Flags [.], ack 36, win 2058, options [nop,nop,TS val 331260368 ecr 1800383985], length 0
The first three lines show us the three-way handshake.
| 1. | [SYN] | 18:28:07.128564 IP 10.10.14.2.59618 > 10.129.2.28.smtp: Flags [S], <SNIP> |
|---|---|---|
| 2. | [SYN-ACK] | 18:28:07.255151 IP 10.129.2.28.smtp > 10.10.14.2.59618: Flags [S.], <SNIP> |
| 3. | [ACK] | 18:28:07.255281 IP 10.10.14.2.59618 > 10.129.2.28.smtp: Flags [.], <SNIP> |
After that, the target SMTP server sends us a TCP packet with the PSH and ACK flags, where PSH states that the target server is sending data to us and with ACK simultaneously informs us that all required data has been sent.
| 4. | [PSH-ACK] | 18:28:07.319306 IP 10.129.2.28.smtp > 10.10.14.2.59618: Flags [P.], <SNIP> |
|---|
The last TCP packet that we sent confirms the receipt of the data with an ACK.
| 5. | [ACK] | 18:28:07.319426 IP 10.10.14.2.59618 > 10.129.2.28.smtp: Flags [.], <SNIP> |
|---|
Nmap Scripting Engine
Nmap Scripting Engine (NSE) is another handy feature of Nmap. It provides us with the possibility to create scripts in Lua for interaction with certain services. There are a total of 14 categories into which these scripts can be divided:
| Category | Description |
|---|---|
auth | Determination of authentication credentials. |
broadcast | Scripts, which are used for host discovery by broadcasting and the discovered hosts, can be automatically added to the remaining scans. |
brute | Executes scripts that try to log in to the respective service by brute-forcing with credentials. |
default | Default scripts executed by using the -sC option. |
discovery | Evaluation of accessible services. |
dos | These scripts are used to check services for denial of service vulnerabilities and are used less as it harms the services. |
exploit | This category of scripts tries to exploit known vulnerabilities for the scanned port. |
external | Scripts that use external services for further processing. |
fuzzer | This uses scripts to identify vulnerabilities and unexpected packet handling by sending different fields, which can take much time. |
intrusive | Intrusive scripts that could negatively affect the target system. |
malware | Checks if some malware infects the target system. |
safe | Defensive scripts that do not perform intrusive and destructive access. |
version | Extension for service detection. |
vuln | Identification of specific vulnerabilities. |
We have several ways to define the desired scripts in Nmap.
Default Scripts
gitblanc@htb[/htb]$ sudo nmap <target> -sCSpecific Scripts Category
gitblanc@htb[/htb]$ sudo nmap <target> --script <category>Defined Scripts
gitblanc@htb[/htb]$ sudo nmap <target> --script <script-name>,<script-name>,...For example, let us keep working with the target SMTP port and see the results we get with two defined scripts.
Nmap - Specifying Scripts
gitblanc@htb[/htb]$ sudo nmap 10.129.2.28 -p 25 --script banner,smtp-commands

Starting Nmap 7.80 ( https://nmap.org ) at 2020-06-16 23:21 CEST
Nmap scan report for 10.129.2.28
Host is up (0.050s latency).

PORT   STATE SERVICE
25/tcp open  smtp
|_banner: 220 inlane ESMTP Postfix (Ubuntu)
|_smtp-commands: inlane, PIPELINING, SIZE 10240000, VRFY, ETRN, STARTTLS, ENHANCEDSTATUSCODES, 8BITMIME, DSN, SMTPUTF8,
MAC Address: DE:AD:00:00:BE:EF (Intel Corporate)| Scanning Options | Description |
|---|---|
10.129.2.28 | Scans the specified target. |
-p 25 | Scans only the specified port. |
--script banner,smtp-commands | Uses specified NSE scripts. |
We see that we can recognize the Ubuntu distribution of Linux by using the’ banner’ script. The smtp-commands script shows us which commands we can use by interacting with the target SMTP server. In this example, such information may help us to find out existing users on the target. Nmap also gives us the ability to scan our target with the aggressive option (-A). This scans the target with multiple options as service detection (-sV), OS detection (-O), traceroute (--traceroute), and with the default NSE scripts (-sC).
Nmap - Aggressive Scan
gitblanc@htb[/htb]$ sudo nmap 10.129.2.28 -p 80 -A
Starting Nmap 7.80 ( https://nmap.org ) at 2020-06-17 01:38 CEST
Nmap scan report for 10.129.2.28
Host is up (0.012s latency).

PORT   STATE SERVICE VERSION
80/tcp open  http    Apache httpd 2.4.29 ((Ubuntu))
|_http-generator: WordPress 5.3.4
|_http-server-header: Apache/2.4.29 (Ubuntu)
|_http-title: blog.inlanefreight.com
MAC Address: DE:AD:00:00:BE:EF (Intel Corporate)
Warning: OSScan results may be unreliable because we could not find at least 1 open and 1 closed port
Aggressive OS guesses: Linux 2.6.32 (96%), Linux 3.2 - 4.9 (96%), Linux 2.6.32 - 3.10 (96%), Linux 3.4 - 3.10 (95%), Linux 3.1 (95%), Linux 3.2 (95%),
AXIS 210A or 211 Network Camera (Linux 2.6.17) (94%), Synology DiskStation Manager 5.2-5644 (94%), Netgear RAIDiator 4.2.28 (94%),
Linux 2.6.32 - 2.6.35 (94%)
No exact OS matches for host (test conditions non-ideal).
Network Distance: 1 hop

TRACEROUTE
HOP RTT      ADDRESS
1   11.91 ms 10.129.2.28

OS and Service detection performed. Please report any incorrect results at https://nmap.org/submit/ .
Nmap done: 1 IP address (1 host up) scanned in 11.36 seconds| Scanning Options | Description |
|---|---|
10.129.2.28 | Scans the specified target. |
-p 80 | Scans only the specified port. |
-A | Performs service detection, OS detection, traceroute and uses defaults scripts to scan the target. |
With the help of the used scan option (-A), we found out what kind of web server (Apache 2.4.29) is running on the system, which web application (WordPress 5.3.4) is used, and the title (blog.inlanefreight.com) of the web page. Also, Nmap shows that it is likely to be Linux (96%) operating system.
Vulnerability Assessment
Now let us move on to HTTP port 80 and see what information and vulnerabilities we can find using the vuln category from NSE.
Nmap - Vuln Category
gitblanc@htb[/htb]$ sudo nmap 10.129.2.28 -p 80 -sV --script vuln

Nmap scan report for 10.129.2.28
Host is up (0.036s latency).

PORT   STATE SERVICE VERSION
80/tcp open  http    Apache httpd 2.4.29 ((Ubuntu))
| http-enum:
|   /wp-login.php: Possible admin folder
|   /readme.html: Wordpress version: 2
|   /: WordPress version: 5.3.4
|   /wp-includes/images/rss.png: Wordpress version 2.2 found.
|   /wp-includes/js/jquery/suggest.js: Wordpress version 2.5 found.
|   /wp-includes/images/blank.gif: Wordpress version 2.6 found.
|   /wp-includes/js/comment-reply.js: Wordpress version 2.7 found.
|   /wp-login.php: Wordpress login page.
|   /wp-admin/upgrade.php: Wordpress login page.
|_  /readme.html: Interesting, a readme.
|_http-server-header: Apache/2.4.29 (Ubuntu)
|_http-stored-xss: Couldn't find any stored XSS vulnerabilities.
| http-wordpress-users:
| Username found: admin
|_Search stopped at ID #25. Increase the upper limit if necessary with 'http-wordpress-users.limit'
| vulners:
|   cpe:/a:apache:http_server:2.4.29:
|     	CVE-2019-0211	7.2	https://vulners.com/cve/CVE-2019-0211
|     	CVE-2018-1312	6.8	https://vulners.com/cve/CVE-2018-1312
|     	CVE-2017-15715	6.8	https://vulners.com/cve/CVE-2017-15715
<SNIP>| Scanning Options | Description |
|---|---|
10.129.2.28 | Scans the specified target. |
-p 80 | Scans only the specified port. |
-sV | Performs service version detection on specified ports. |
--script vuln | Uses all related scripts from specified category. |
The scripts used for the last scan interact with the webserver and its web application to find out more information about their versions and check various databases to see if there are known vulnerabilities. More information about NSE scripts and the corresponding categories we can find at: https://nmap.org/nsedoc/index.html
Example
The Academy’s exercise for this section
Once performing the vuln NSE script to the port 80, check the robots.txt
Performance
Scanning performance plays a significant role when we need to scan an extensive network or are dealing with low network bandwidth. We can use various options to tell Nmap how fast (-T <0-5>), with which frequency (--min-parallelism <number>), which timeouts (--max-rtt-timeout <time>) the test packets should have, how many packets should be sent simultaneously (--min-rate <number>), and with the number of retries (--max-retries <number>) for the scanned ports the targets should be scanned.
Timeouts
When Nmap sends a packet, it takes some time (Round-Trip-Time - RTT) to receive a response from the scanned port. Generally, Nmap starts with a high timeout (--min-RTT-timeout) of 100ms. Let us look at an example by scanning the whole network with 256 hosts, including the top 100 ports.
Default Scan
gitblanc@htb[/htb]$ sudo nmap 10.129.2.0/24 -F

<SNIP>
Nmap done: 256 IP addresses (10 hosts up) scanned in 39.44 seconds
Optimized RTT
gitblanc@htb[/htb]$ sudo nmap 10.129.2.0/24 -F --initial-rtt-timeout 50ms --max-rtt-timeout 100ms

<SNIP>
Nmap done: 256 IP addresses (8 hosts up) scanned in 12.29 seconds| Scanning Options | Description |
|---|---|
10.129.2.0/24 | Scans the specified target network. |
-F | Scans top 100 ports. |
--initial-rtt-timeout 50ms | Sets the specified time value as initial RTT timeout. |
--max-rtt-timeout 100ms | Sets the specified time value as maximum RTT timeout. |
When comparing the two scans, we can see that we found two hosts less with the optimized scan, but the scan took only a quarter of the time. From this, we can conclude that setting the initial RTT timeout (--initial-rtt-timeout) to too short a time period may cause us to overlook hosts.
Max Retries
Another way to increase scan speed is by specifying the retry rate of sent packets (--max-retries). The default value is 10, but we can reduce it to 0. This means if Nmap does not receive a response for a port, it won’t send any more packets to that port and will skip it.
Default Scan
gitblanc@htb[/htb]$ sudo nmap 10.129.2.0/24 -F | grep "/tcp" | wc -l

23
Reduced Retries
gitblanc@htb[/htb]$ sudo nmap 10.129.2.0/24 -F --max-retries 0 | grep "/tcp" | wc -l

21| Scanning Options | Description |
|---|---|
10.129.2.0/24 | Scans the specified target network. |
-F | Scans top 100 ports. |
--max-retries 0 | Sets the number of retries that will be performed during the scan. |
Again, we recognize that accelerating can also have a negative effect on our results, which means we can overlook important information.
Rates
During a white-box penetration test, we may get whitelisted for the security systems to check the systems in the network for vulnerabilities and not only test the protection measures. If we know the network bandwidth, we can work with the rate of packets sent, which significantly speeds up our scans with Nmap. When setting the minimum rate (--min-rate <number>) for sending packets, we tell Nmap to simultaneously send the specified number of packets. It will attempt to maintain the rate accordingly.
Default Scan
gitblanc@htb[/htb]$ sudo nmap 10.129.2.0/24 -F -oN tnet.default

<SNIP>
Nmap done: 256 IP addresses (10 hosts up) scanned in 29.83 seconds
Optimized Scan
gitblanc@htb[/htb]$ sudo nmap 10.129.2.0/24 -F -oN tnet.minrate300 --min-rate 300

<SNIP>
Nmap done: 256 IP addresses (10 hosts up) scanned in 8.67 seconds| Scanning Options | Description |
|---|---|
10.129.2.0/24 | Scans the specified target network. |
-F | Scans top 100 ports. |
-oN tnet.minrate300 | Saves the results in normal formats, starting the specified file name. |
--min-rate 300 | Sets the minimum number of packets to be sent per second. |
Default Scan - Found Open Ports
gitblanc@htb[/htb]$ cat tnet.default | grep "/tcp" | wc -l

23
Optimized Scan - Found Open Ports
gitblanc@htb[/htb]$ cat tnet.minrate300 | grep "/tcp" | wc -l

23
Timing
Because such settings cannot always be optimized manually, as in a black-box penetration test, Nmap offers six different timing templates (-T <0-5>) for us to use. These values (0-5) determine the aggressiveness of our scans. This can also have negative effects if the scan is too aggressive, and security systems may block us due to the produced network traffic. The default timing template used when we have defined nothing else is the normal (-T 3).
-T 0/-T paranoid-T 1/-T sneaky-T 2/-T polite-T 3/-T normal-T 4/-T aggressive-T 5/-T insane
These templates contain options that we can also set manually, and have seen some of them already. The developers determined the values set for these templates according to their best results, making it easier for us to adapt our scans to the corresponding network environment. The exact used options with their values we can find here: https://nmap.org/book/performance-timing-templates.html
Default Scan
gitblanc@htb[/htb]$ sudo nmap 10.129.2.0/24 -F -oN tnet.default

<SNIP>
Nmap done: 256 IP addresses (10 hosts up) scanned in 32.44 seconds
Insane Scan
gitblanc@htb[/htb]$ sudo nmap 10.129.2.0/24 -F -oN tnet.T5 -T 5

<SNIP>
Nmap done: 256 IP addresses (10 hosts up) scanned in 18.07 seconds| Scanning Options | Description |
|---|---|
10.129.2.0/24 | Scans the specified target network. |
-F | Scans top 100 ports. |
-oN tnet.T5 | Saves the results in normal formats, starting the specified file name. |
-T 5 | Specifies the insane timing template. |
Default Scan - Found Open Ports
gitblanc@htb[/htb]$ cat tnet.default | grep "/tcp" | wc -l

23
Insane Scan - Found Open Ports
gitblanc@htb[/htb]$ cat tnet.T5 | grep "/tcp" | wc -l

23
More information about scan performance we can find at https://nmap.org/book/man-performance.html
Firewall and IDS/IPS Evasion
Nmap gives us many different ways to bypass firewalls rules and IDS/IPS. These methods include the fragmentation of packets, the use of decoys, and others that we will discuss in this section.
Firewalls
A firewall is a security measure against unauthorized connection attempts from external networks. Every firewall security system is based on a software component that monitors network traffic between the firewall and incoming data connections and decides how to handle the connection based on the rules that have been set. It checks whether individual network packets are being passed, ignored, or blocked. This mechanism is designed to prevent unwanted connections that could be potentially dangerous.
IDS/IPS
Like the firewall, the intrusion detection system (IDS) and intrusion prevention system (IPS) are also software-based components. IDS scans the network for potential attacks, analyzes them, and reports any detected attacks. IPS complements IDS by taking specific defensive measures if a potential attack should have been detected. The analysis of such attacks is based on pattern matching and signatures. If specific patterns are detected, such as a service detection scan, IPS may prevent the pending connection attempts.
Determine Firewalls and Their Rules
We already know that when a port is shown as filtered, it can have several reasons. In most cases, firewalls have certain rules set to handle specific connections. The packets can either be dropped, or rejected. The dropped packets are ignored, and no response is returned from the host.
This is different for rejected packets that are returned with an RST flag. These packets contain different types of ICMP error codes or contain nothing at all.
Such errors can be:
- Net Unreachable
- Net Prohibited
- Host Unreachable
- Host Prohibited
- Port Unreachable
- Proto Unreachable
Nmap’s TCP ACK scan (-sA) method is much harder to filter for firewalls and IDS/IPS systems than regular SYN (-sS) or Connect scans (sT) because they only send a TCP packet with only the ACK flag. When a port is closed or open, the host must respond with an RST flag. Unlike outgoing connections, all connection attempts (with the SYN flag) from external networks are usually blocked by firewalls. However, the packets with the ACK flag are often passed by the firewall because the firewall cannot determine whether the connection was first established from the external network or the internal network.
If we look at these scans, we will see how the results differ.
SYN-Scan
gitblanc@htb[/htb]$ sudo nmap 10.129.2.28 -p 21,22,25 -sS -Pn -n --disable-arp-ping --packet-trace

Starting Nmap 7.80 ( https://nmap.org ) at 2020-06-21 14:56 CEST
SENT (0.0278s) TCP 10.10.14.2:57347 > 10.129.2.28:22 S ttl=53 id=22412 iplen=44  seq=4092255222 win=1024 <mss 1460>
SENT (0.0278s) TCP 10.10.14.2:57347 > 10.129.2.28:25 S ttl=50 id=62291 iplen=44  seq=4092255222 win=1024 <mss 1460>
SENT (0.0278s) TCP 10.10.14.2:57347 > 10.129.2.28:21 S ttl=58 id=38696 iplen=44  seq=4092255222 win=1024 <mss 1460>
RCVD (0.0329s) ICMP [10.129.2.28 > 10.10.14.2 Port 21 unreachable (type=3/code=3) ] IP [ttl=64 id=40884 iplen=72 ]
RCVD (0.0341s) TCP 10.129.2.28:22 > 10.10.14.2:57347 SA ttl=64 id=0 iplen=44  seq=1153454414 win=64240 <mss 1460>
RCVD (1.0386s) TCP 10.129.2.28:22 > 10.10.14.2:57347 SA ttl=64 id=0 iplen=44  seq=1153454414 win=64240 <mss 1460>
SENT (1.1366s) TCP 10.10.14.2:57348 > 10.129.2.28:25 S ttl=44 id=6796 iplen=44  seq=4092320759 win=1024 <mss 1460>
Nmap scan report for 10.129.2.28
Host is up (0.0053s latency).

PORT   STATE    SERVICE
21/tcp filtered ftp
22/tcp open     ssh
25/tcp filtered smtp
MAC Address: DE:AD:00:00:BE:EF (Intel Corporate)

Nmap done: 1 IP address (1 host up) scanned in 0.07 seconds
ACK-Scan
gitblanc@htb[/htb]$ sudo nmap 10.129.2.28 -p 21,22,25 -sA -Pn -n --disable-arp-ping --packet-trace

Starting Nmap 7.80 ( https://nmap.org ) at 2020-06-21 14:57 CEST
SENT (0.0422s) TCP 10.10.14.2:49343 > 10.129.2.28:21 A ttl=49 id=12381 iplen=40  seq=0 win=1024
SENT (0.0423s) TCP 10.10.14.2:49343 > 10.129.2.28:22 A ttl=41 id=5146 iplen=40  seq=0 win=1024
SENT (0.0423s) TCP 10.10.14.2:49343 > 10.129.2.28:25 A ttl=49 id=5800 iplen=40  seq=0 win=1024
RCVD (0.1252s) ICMP [10.129.2.28 > 10.10.14.2 Port 21 unreachable (type=3/code=3) ] IP [ttl=64 id=55628 iplen=68 ]
RCVD (0.1268s) TCP 10.129.2.28:22 > 10.10.14.2:49343 R ttl=64 id=0 iplen=40  seq=1660784500 win=0
SENT (1.3837s) TCP 10.10.14.2:49344 > 10.129.2.28:25 A ttl=59 id=21915 iplen=40  seq=0 win=1024
Nmap scan report for 10.129.2.28
Host is up (0.083s latency).

PORT   STATE      SERVICE
21/tcp filtered   ftp
22/tcp unfiltered ssh
25/tcp filtered   smtp
MAC Address: DE:AD:00:00:BE:EF (Intel Corporate)

Nmap done: 1 IP address (1 host up) scanned in 0.15 seconds| Scanning Options | Description |
|---|---|
10.129.2.28 | Scans the specified target. |
-p 21,22,25 | Scans only the specified ports. |
-sS | Performs SYN scan on specified ports. |
-sA | Performs ACK scan on specified ports. |
-Pn | Disables ICMP Echo requests. |
-n | Disables DNS resolution. |
--disable-arp-ping | Disables ARP ping. |
--packet-trace | Shows all packets sent and received. |
Please pay attention to the RCVD packets and its set flag we receive from our target. With the SYN scan (-sS) our target tries to establish the TCP connection by sending a packet back with the SYN-ACK (SA) flags set and with the ACK scan (-sA) we get the RST flag because TCP port 22 is open. For the TCP port 25, we do not receive any packets back, which indicates that the packets will be dropped.
Detect IDS/IPS
Unlike firewalls and their rules, the detection of IDS/IPS systems is much more difficult because these are passive traffic monitoring systems. IDS systems examine all connections between hosts. If the IDS finds packets containing the defined contents or specifications, the administrator is notified and takes appropriate action in the worst case.
IPS systems take measures configured by the administrator independently to prevent potential attacks automatically. It is essential to know that IDS and IPS are different applications and that IPS serves as a complement to IDS.
Several virtual private servers (VPS) with different IP addresses are recommended to determine whether such systems are on the target network during a penetration test. If the administrator detects such a potential attack on the target network, the first step is to block the IP address from which the potential attack comes. As a result, we will no longer be able to access the network using that IP address, and our Internet Service Provider (ISP) will be contacted and blocked from all access to the Internet.
IDS systemsalone are usually there to help administrators detect potential attacks on their network. They can then decide how to handle such connections. We can trigger certain security measures from an administrator, for example, by aggressively scanning a single port and its service. Based on whether specific security measures are taken, we can detect if the network has some monitoring applications or not.- One method to determine whether such
IPS systemis present in the target network is to scan from a single host (VPS). If at any time this host is blocked and has no access to the target network, we know that the administrator has taken some security measures. Accordingly, we can continue our penetration test with anotherVPS.
Consequently, we know that we need to be quieter with our scans and, in the best case, disguise all interactions with the target network and its services.
Decoys
There are cases in which administrators block specific subnets from different regions in principle. This prevents any access to the target network. Another example is when IPS should block us. For this reason, the Decoy scanning method (-D) is the right choice. With this method, Nmap generates various random IP addresses inserted into the IP header to disguise the origin of the packet sent. With this method, we can generate random (RND) a specific number (for example: 5) of IP addresses separated by a colon (:). Our real IP address is then randomly placed between the generated IP addresses. In the next example, our real IP address is therefore placed in the second position. Another critical point is that the decoys must be alive. Otherwise, the service on the target may be unreachable due to SYN-flooding security mechanisms.
Scan by Using Decoys
gitblanc@htb[/htb]$ sudo nmap 10.129.2.28 -p 80 -sS -Pn -n --disable-arp-ping --packet-trace -D RND:5

Starting Nmap 7.80 ( https://nmap.org ) at 2020-06-21 16:14 CEST
SENT (0.0378s) TCP 102.52.161.59:59289 > 10.129.2.28:80 S ttl=42 id=29822 iplen=44  seq=3687542010 win=1024 <mss 1460>
SENT (0.0378s) TCP 10.10.14.2:59289 > 10.129.2.28:80 S ttl=59 id=29822 iplen=44  seq=3687542010 win=1024 <mss 1460>
SENT (0.0379s) TCP 210.120.38.29:59289 > 10.129.2.28:80 S ttl=37 id=29822 iplen=44  seq=3687542010 win=1024 <mss 1460>
SENT (0.0379s) TCP 191.6.64.171:59289 > 10.129.2.28:80 S ttl=38 id=29822 iplen=44  seq=3687542010 win=1024 <mss 1460>
SENT (0.0379s) TCP 184.178.194.209:59289 > 10.129.2.28:80 S ttl=39 id=29822 iplen=44  seq=3687542010 win=1024 <mss 1460>
SENT (0.0379s) TCP 43.21.121.33:59289 > 10.129.2.28:80 S ttl=55 id=29822 iplen=44  seq=3687542010 win=1024 <mss 1460>
RCVD (0.1370s) TCP 10.129.2.28:80 > 10.10.14.2:59289 SA ttl=64 id=0 iplen=44  seq=4056111701 win=64240 <mss 1460>
Nmap scan report for 10.129.2.28
Host is up (0.099s latency).

PORT   STATE SERVICE
80/tcp open  http
MAC Address: DE:AD:00:00:BE:EF (Intel Corporate)

Nmap done: 1 IP address (1 host up) scanned in 0.15 seconds| Scanning Options | Description |
|---|---|
10.129.2.28 | Scans the specified target. |
-p 80 | Scans only the specified ports. |
-sS | Performs SYN scan on specified ports. |
-Pn | Disables ICMP Echo requests. |
-n | Disables DNS resolution. |
--disable-arp-ping | Disables ARP ping. |
--packet-trace | Shows all packets sent and received. |
-D RND:5 | Generates five random IP addresses that indicates the source IP the connection comes from. |
The spoofed packets are often filtered out by ISPs and routers, even though they come from the same network range. Therefore, we can also specify our VPS servers’ IP addresses and use them in combination with “IP ID” manipulation in the IP headers to scan the target.
Another scenario would be that only individual subnets would not have access to the server’s specific services. So we can also manually specify the source IP address (-S) to test if we get better results with this one. Decoys can be used for SYN, ACK, ICMP scans, and OS detection scans. So let us look at such an example and determine which operating system it is most likely to be.
Testing Firewall Rule
gitblanc@htb[/htb]$ sudo nmap 10.129.2.28 -n -Pn -p445 -O

Starting Nmap 7.80 ( https://nmap.org ) at 2020-06-22 01:23 CEST
Nmap scan report for 10.129.2.28
Host is up (0.032s latency).

PORT    STATE    SERVICE
445/tcp filtered microsoft-ds
MAC Address: DE:AD:00:00:BE:EF (Intel Corporate)
Too many fingerprints match this host to give specific OS details
Network Distance: 1 hop

OS detection performed. Please report any incorrect results at https://nmap.org/submit/ .
Nmap done: 1 IP address (1 host up) scanned in 3.14 seconds
Scan by Using Different Source IP
gitblanc@htb[/htb]$ sudo nmap 10.129.2.28 -n -Pn -p 445 -O -S 10.129.2.200 -e tun0

Starting Nmap 7.80 ( https://nmap.org ) at 2020-06-22 01:16 CEST
Nmap scan report for 10.129.2.28
Host is up (0.010s latency).

PORT    STATE SERVICE
445/tcp open  microsoft-ds
MAC Address: DE:AD:00:00:BE:EF (Intel Corporate)
Warning: OSScan results may be unreliable because we could not find at least 1 open and 1 closed port
Aggressive OS guesses: Linux 2.6.32 (96%), Linux 3.2 - 4.9 (96%), Linux 2.6.32 - 3.10 (96%), Linux 3.4 - 3.10 (95%), Linux 3.1 (95%), Linux 3.2 (95%), AXIS 210A or 211 Network Camera (Linux 2.6.17) (94%), Synology DiskStation Manager 5.2-5644 (94%), Linux 2.6.32 - 2.6.35 (94%), Linux 2.6.32 - 3.5 (94%)
No exact OS matches for host (test conditions non-ideal).
Network Distance: 1 hop

OS detection performed. Please report any incorrect results at https://nmap.org/submit/ .
Nmap done: 1 IP address (1 host up) scanned in 4.11 seconds| Scanning Options | Description |
|---|---|
10.129.2.28 | Scans the specified target. |
-n | Disables DNS resolution. |
-Pn | Disables ICMP Echo requests. |
-p 445 | Scans only the specified ports. |
-O | Performs operation system detection scan. |
-S | Scans the target by using different source IP address. |
10.129.2.200 | Specifies the source IP address. |
-e tun0 | Sends all requests through the specified interface. |
DNS Proxying
By default, Nmap performs a reverse DNS resolution unless otherwise specified to find more important information about our target. These DNS queries are also passed in most cases because the given web server is supposed to be found and visited. The DNS queries are made over the UDP port 53. The TCP port 53 was previously only used for the so-called “Zone transfers” between the DNS servers or data transfer larger than 512 bytes. More and more, this is changing due to IPv6 and DNSSEC expansions. These changes cause many DNS requests to be made via TCP port 53.
However, Nmap still gives us a way to specify DNS servers ourselves (--dns-server <ns>,<ns>). This method could be fundamental to us if we are in a demilitarized zone (DMZ). The company’s DNS servers are usually more trusted than those from the Internet. So, for example, we could use them to interact with the hosts of the internal network. As another example, we can use TCP port 53 as a source port (--source-port) for our scans. If the administrator uses the firewall to control this port and does not filter IDS/IPS properly, our TCP packets will be trusted and passed through.
SYN-Scan of a Filtered Port
gitblanc@htb[/htb]$ sudo nmap 10.129.2.28 -p50000 -sS -Pn -n --disable-arp-ping --packet-trace

Starting Nmap 7.80 ( https://nmap.org ) at 2020-06-21 22:50 CEST
SENT (0.0417s) TCP 10.10.14.2:33436 > 10.129.2.28:50000 S ttl=41 id=21939 iplen=44  seq=736533153 win=1024 <mss 1460>
SENT (1.0481s) TCP 10.10.14.2:33437 > 10.129.2.28:50000 S ttl=46 id=6446 iplen=44  seq=736598688 win=1024 <mss 1460>
Nmap scan report for 10.129.2.28
Host is up.

PORT      STATE    SERVICE
50000/tcp filtered ibm-db2

Nmap done: 1 IP address (1 host up) scanned in 2.06 seconds
SYN-Scan From DNS Port
gitblanc@htb[/htb]$ sudo nmap 10.129.2.28 -p50000 -sS -Pn -n --disable-arp-ping --packet-trace --source-port 53

SENT (0.0482s) TCP 10.10.14.2:53 > 10.129.2.28:50000 S ttl=58 id=27470 iplen=44  seq=4003923435 win=1024 <mss 1460>
RCVD (0.0608s) TCP 10.129.2.28:50000 > 10.10.14.2:53 SA ttl=64 id=0 iplen=44  seq=540635485 win=64240 <mss 1460>
Nmap scan report for 10.129.2.28
Host is up (0.013s latency).

PORT      STATE SERVICE
50000/tcp open  ibm-db2
MAC Address: DE:AD:00:00:BE:EF (Intel Corporate)

Nmap done: 1 IP address (1 host up) scanned in 0.08 seconds| Scanning Options | Description |
|---|---|
10.129.2.28 | Scans the specified target. |
-p 50000 | Scans only the specified ports. |
-sS | Performs SYN scan on specified ports. |
-Pn | Disables ICMP Echo requests. |
-n | Disables DNS resolution. |
--disable-arp-ping | Disables ARP ping. |
--packet-trace | Shows all packets sent and received. |
--source-port 53 | Performs the scans from specified source port. |
Now that we have found out that the firewall accepts TCP port 53, it is very likely that IDS/IPS filters might also be configured much weaker than others. We can test this by trying to connect to this port by using Netcat.
Connect To The Filtered Port
gitblanc@htb[/htb]$ ncat -nv --source-port 53 10.129.2.28 50000

Ncat: Version 7.80 ( https://nmap.org/ncat )
Ncat: Connected to 10.129.2.28:50000.
220 ProFTPd
Firewall and IDS/IPS Evasion Labs
In the next three sections, we get different scenarios to practice where we have to scan our target. Firewall rules and IDS/IPS protect the systems, so we need to use the techniques shown to bypass the firewall rules and do this as quiet as possible. Otherwise, we will be blocked by IPS.
Firewall and IDS/IPS Evasion - Easy Lab
Now let’s get practical. A company hired us to test their IT security defenses, including their IDS and IPS systems. Our client wants to increase their IT security and will, therefore, make specific improvements to their IDS/IPS systems after each successful test. We do not know, however, according to which guidelines these changes will be made. Our goal is to find out specific information from the given situations.
We are only ever provided with a machine protected by IDS/IPS systems and can be tested. For learning purposes and to get a feel for how IDS/IPS can behave, we have access to a status web page at http://<target>/status.php.
This page shows us the number of alerts. We know that if we receive a specific amount of alerts, we will be banned. Therefore we have to test the target system as quietly as possible.
Example
The Academy’s exercise for this section. Our client wants to know if we can identify which operating system their provided machine is running on. Submit the OS name as the answer.
First I’ll do a basic SYN scan:
nmap 10.129.114.47 -sS -sV -Pn -n --source-port 53

[redacted]
PORT      STATE SERVICE     VERSION
22/tcp    open  ssh         OpenSSH 7.6p1 Ubuntu 4ubuntu0.7 (Ubuntu Linux; protocol 2.0)
80/tcp    open  http        Apache httpd 2.4.29 ((Ubuntu))
10001/tcp open  scp-config?
Based on the SSH output, we can say that the distro is Ubuntu.
I could have also used an NSE script:
sudo nmap --script smb-os-discovery -vv 10.129.114.47Firewall and IDS/IPS Evasion - Medium Lab
After we conducted the first test and submitted our results to our client, the administrators made some changes and improvements to the IDS/IPS and firewall. We could hear that the administrators were not satisfied with their previous configurations during the meeting, and they could see that the network traffic could be filtered more strictly.
Example
The Academy’s exercise for this section. After the configurations are transferred to the system, our client wants to know if it is possible to find out our target’s DNS server version. Submit the DNS server version of the target as the answer.
To do so, I’ll use UDP scan type and NSE script for dns:
sudo nmap -sSU -p 53 --script dns-nsid 10.129.2.48

[redacted]
PORT   STATE    SERVICE
53/tcp filtered domain
53/udp open     domain
| dns-nsid:
|_  bind.version: HTB{-}
Firewall and IDS/IPS Evasion - Hard Lab
With our second test’s help, our client was able to gain new insights and sent one of its administrators to a training course for IDS/IPS systems. As our client told us, the training would last one week. Now the administrator has taken all the necessary precautions and wants us to test this again because specific services must be changed, and the communication for the provided software had to be modified.
Example
The Academy’s exercise for this section. Now our client wants to know if it is possible to find out the version of the running services. Identify the version of service our client was talking about and submit the flag as the answer.
I’ll perform a SYN scan with decoys and from a dns port:
nmap -sS -Pn -n --source-port 53 -D RND:5 10.129.213.192

PORT      STATE SERVICE
80/tcp    open  http
50000/tcp open  ibm-db2
Now I’ll connect to port 50000 to check the service running:
ncat -nv -p 53 10.129.213.192 50000

Ncat: Connected to 10.129.213.192:50000.
220 HTB{-}
HTB Cheatsheet
- Check the note Nmap 👁️🗨️