- Info extracted from THM Intro to Docker
Introduction
In this note, you’ll get your first hands-on experience deploying and interacting with Docker containers.
Namely, by the end of the room, you will be familiar with the following:
- The basic syntax to get you started with Docker
- Running and deploying your first container
- Understanding how Docker containers are distributed using images
- Creating your own image using a Dockerfile
- How Dockerfiles are used to build containers, using Docker Compose to orchestrate multiple containers
- Applying the knowledge gained from the room into the practical element at the end.
Please note: It is strongly recommended that you are at least familiar with basic Linux syntax (such as running commands, moving files and familiarity with how the filesystem structure looks). If you have completed the Linux Fundamentals Module - you will be all set for this room!
Additionally, it is important to remember that you will need internet connectivity to pull Docker images.
Kali installation
Basic Docker Syntax
Docker can seem overwhelming at first. However, the commands are pretty intuitive, and with a bit of practice, you’ll be a Docker wizard in no time.
The syntax for Docker can be categorised into four main groups:
- Running a container
- Managing & Inspecting containers
- Managing Docker images
- Docker daemon stats and information
We will break down each of these categories in this task.
Managing Docker Images
Docker Pull
Before we can run a Docker container, we will first need an image. Recall from the “Intro to Containerisation” room that images are instructions for what a container should execute. There’s no use running a container that does nothing!
In this room, we will use the Nginx image to run a web server within a container. Before downloading the image, let’s break down the commands and syntax required to download an image. Images can be downloaded using the docker pull command and providing the name of the image.
For example, docker pull nginx. Docker must know where to get this image (such as from a repository which we’ll come onto in a later task).
Continuing with our example above, let’s download this Nginx image!
A terminal showing the downloading of the “Nginx” image
cmnatic@thm:~$ docker pull nginx
Using default tag: latest
latest: Pulling from library/nginx
-- omitted for brevity --
Status: Downloaded newer image for nginx:latest
cmnatic@thm:~$
By running this command, we are downloading the latest version of the image titled “nginx”. Images have these labels called tags. These tags are used to refer to variations of an image. For example, an image can have the same name but different tags to indicate a different version. I’ve provided an example of how tags are used within the table below:
| Docker Image | Tag | Command Example | Explanation |
| ubuntu | latest | docker pull ubuntu - IS THE SAME AS - docker pull ubuntu:latest | This command will pull the latest version of the “ubuntu” image. If no tag is specified, Docker will assume you want the “latest” version if no tag is specified. It is worth remembering that you do not always want the “latest”. This image is quite literally the “latest” in the sense it will have the most recent changes. This could either fix or break your container. |
| ubuntu | 22.04 | docker pull ubuntu:22.04 | This command will pull version “22.04 (Jammy)” of the “ubuntu” image. |
| ubuntu | 20.04 | docker pull ubuntu:20.04 | This command will pull version “20.04 (Focal)” of the “ubuntu” image. |
| ubuntu | 18.04 | docker pull ubuntu:18.04 | This command will pull version “18.04 (Bionic)” of the “ubuntu” image. |
When specifying a tag, you must include a colon : between the image name and tag, for example, ubuntu:22.04 (image:tag). Don’t forget about tags - we will return to these in a future task!
Docker Image x/y/z
The docker image command, with the appropriate option, allows us to manage the images on our local system. To list the available options, we can simply do docker image to see what we can do. I’ve done this for you in the terminal below:
A terminal showing the various arguments we can provide with “docker image”
cmnatic@thm:~$ docker image

Usage:  docker image COMMAND

Manage images

Commands:
  build       Build an image from a Dockerfile
  history     Show the history of an image
  import      Import the contents from a tarball to create a filesystem image
  inspect     Display detailed information on one or more images
  load        Load an image from a tar archive or STDIN
  ls          List images
  prune       Remove unused images
  pull        Pull an image or a repository from a registry
  push        Push an image or a repository to a registry
  rm          Remove one or more images
  save        Save one or more images to a tar archive (streamed to STDOUT by default)
  tag         Create a tag TARGET_IMAGE that refers to SOURCE_IMAGE

Run 'docker image COMMAND --help' for more information on a command.
cmnatic@thm:~$- In this room, we are only going to cover the following options for docker images:
- pull (we have done this above!)
- ls (list images)
- rm (remove an image)
- build (we will come onto this in the “Building your First Container” task)
Docker Image ls
This command allows us to list all images stored on the local system. We can use this command to verify if an image has been downloaded correctly and to view a little bit more information about it (such as the tag, when the image was created and the size of the image).
A terminal listing the Docker images that are stored on the host operating system
cmnatic@thm:~$ docker image ls
REPOSITORY   TAG       IMAGE ID       CREATED       SIZE
ubuntu       22.04     2dc39ba059dc   10 days ago   77.8MB
nginx        latest    2b7d6430f78d   2 weeks ago   142MB
cmnatic@thm:~$
For example, in the terminal above, we can see some information for two images on the system:
| Repository | Tag | Image ID | Created | Size |
| ubuntu | 22.04 | 2dc39ba059dc | 10 days ago | 77.8MB |
| nginx | latest | 2b7d6430f78d | 2 weeks ago | 142MB |
Docker Image rm
If we want to remove an image from the system, we can use docker image rm along with the name (or Image ID). In the following example, I will remove the “ubuntu” image with the tag “22.04”. My command will be docker image rm ubuntu:22.04:
It is important to remember to include the tag with the image name.
A terminal displaying the untagging of an image
cmnatic@thm:~$ docker image rm ubuntu:22.04
Untagged: ubuntu:22.04
Untagged: ubuntu@sha256:20fa2d7bb4de7723f542be5923b06c4d704370f0390e4ae9e1c833c8785644c1
Deleted: sha256:2dc39ba059dcd42ade30aae30147b5692777ba9ff0779a62ad93a74de02e3e1f
Deleted: sha256:7f5cbd8cc787c8d628630756bcc7240e6c96b876c2882e6fc980a8b60cdfa274
cmnatic@thm:~$
If we were to run a docker image ls, we would see that the image is no longer listed:
A terminal confirming that our Docker image has been deleted
cmnatic@thm:~$ docker image ls
REPOSITORY   TAG       IMAGE ID       CREATED       SIZE
nginx        latest    2b7d6430f78d   2 weeks ago   142MB
cmnatic@thm:~$
Running your first container

The Docker run command creates running containers from images. This is where commands from the Dockerfile (as well as our own input at runtime) are run. Because of this, it must be some of the first syntaxes you learn.
The command works in the following way: docker run [OPTIONS] IMAGE_NAME [COMMAND] [ARGUMENTS...] the options enclosed in brackets are not required for a container to run.
Docker containers can be run with various options - depending on how we will use the container. This task will explain some of the most common options that you may want to use.
First, Simply Running a Container
Let’s recall the syntax required to run a Docker container: docker run [OPTIONS] IMAGE_NAME [COMMAND] [ARGUMENTS...] . In this example, I am going to configure the container to run:
- An image named “helloworld"
- "Interactively” by providing the
-itswitch in the [OPTIONS] command. This will allow us to interact with the container directly. - I am going to spawn a shell within the container by providing
/bin/bashas the [COMMAND] part. This argument is where you will place what commands you want to run within the container (such as a file, application or shell!)
So, to achieve the above, my command will look like the following: docker run -it helloworld /bin/bash
A terminal showing a container being launched in ‘interactive’ mode
cmnatic@thm-intro-to-docker:~$ docker run -it helloworld /bin/bash
root@30eff5ed7492:/#
We can verify that we have successfully launched a shell because our prompt will change to another user account and hostname. The hostname of a container is the container ID (which can be found by using docker ps). For example, in the terminal above, our username and hostname are root@30eff5ed7492
Running Containers…Continued
As previously mentioned, Docker containers can be run with various options. The purpose of the container and the instructions set in a Dockerfile (we’ll come onto this in a later task) determines what options we need to run the container with. To start, I’ve put some of the most common options you may need to run your Docker container into the table below.
| [OPTION] | Explanation | Relevant Dockerfile Instruction | Example |
| -d | This argument tells the container to start in “detached” mode. This means that the container will run in the background. | N/A | docker run -d helloworld |
| -it | This argument has two parts. The “i” means run interactively, and “t” tells Docker to run a shell within the container. We would use this option if we wish to interact with the container directly once it runs. | N/A | docker run -it helloworld |
| -v | This argument is short for “Volume” and tells Docker to mount a directory or file from the host operating system to a location within the container. The location these files get stored is defined in the Dockerfile | VOLUME | docker run -v /host/os/directory:/container/directory helloworld |
| -p | This argument tells Docker to bind a port on the host operating system to a port that is being exposed in the container. You would use this instruction if you are running an application or service (such as a web server) in the container and wish to access the application/service by navigating to the IP address. | EXPOSE | docker run -p 80:80 webserver |
| —rm | This argument tells Docker to remove the container once the container finishes running whatever it has been instructed to do. | N/A | docker run --rm helloworld |
| —name | This argument lets us give a friendly, memorable name to the container. When a container is run without this option, the name is two random words. We can use this open to name a container after the application the container is running. | N/A | docker run --name helloworld |
These are just some arguments we can provide when running a container. Again, most arguments we need to run will be determined by how the container is built. However, arguments such as --rm and --name will instruct Docker on how to run the container. Other arguments include (but are not limited to!):
- Telling Docker what network adapter the container should use
- What capabilities the container should have access to. This is covered in the “Docker Rodeo” room on TryHackMe.
- Storing a value into an environment variable
If you wish to explore more of these arguments, I highly suggest reading the Docker run documentation.
Listing Running Containers
To list running containers, we can use the docker ps command. This command will list containers that are currently running - like so:
A terminal showing a list of running containers and their information
cmnatic@thm:~/intro-to-docker$ docker ps
CONTAINER ID   IMAGE                           COMMAND        CREATED        STATUS      PORTS     NAMES

a913a8f6e30f   cmnatic/helloworld:latest   "sleep"   1 months ago   Up 3 days   0.0.0.0:8000->8000/tcp   helloworld
cmnatic@thm:~/intro-to-docker$
This command will also show information about the container, including:
- The container’s ID
- What command is the container running
- When was the container created
- How long has the container been running
- What ports are mapped
- The name of the container
Tip: To list all containers (even stopped), you can use docker ps -a:
A terminal showing a list of ALL containers and their information
cmnatic@thm:~/intro-to-docker$ docker ps -a
CONTAINER ID   IMAGE                             COMMAND                  CREATED             STATUS     PORTS    NAMES
00ba1eed0826   gobuster:cmnatic                  "./gobuster dir -url…"   an hour ago   Exited an hour ago practical_khayyam
Intro to Dockerfiles
Dockerfiles play an essential role in Docker. Dockerfiles is a formatted text file which essentially serves as an instruction manual for what containers should do and ultimately assembles a Docker image.
You use Dockerfiles to contain the commands the container should execute when it is built. To get started with Dockerfiles, we need to know some basic syntax and instructions. Dockerfiles are formatted in the following way:
INSTRUCTION argument
First, let’s cover some essential instructions:
| Instruction | Description | Example |
| FROM | This instruction sets a build stage for the container as well as setting the base image (operating system). All Dockerfiles must start with this. | FROM ubuntu |
| RUN | This instruction will execute commands in the container within a new layer. | RUN whoami |
| COPY | This instruction copies files from the local system to the working directory in the container (the syntax is similar to the cp command). | COPY /home/cmnatic/myfolder/app/ |
| WORKDIR | This instruction sets the working directory of the container. (similar to using cd on Linux). | WORKDIR / (sets to the root of the filesystem in the container) |
| CMD | This instruction determines what command is run when the container starts (you would use this to start a service or application). | CMD /bin/sh -c script.sh |
| EXPOSE | This instruction is used to tell the person who runs the container what port they should publish when running the container. | EXPOSE 80 (tells the person running the container to publish to port 80 i.e. docker run -p 80:80) |
Now that we understand the core instructions that make up a Dockerfile, let’s see a working example of a Dockerfile. But first, I’ll explain what I want the container to do:
- Use the “Ubuntu” (version 22.04) operating system as the base.
- Set the working directory to be the root of the container.
- Create the text file “helloworld.txt”.
# THIS IS A COMMENT
# Use Ubuntu 22.04 as the base operating system of the container
FROM ubuntu:22.04

# Set the working directory to the root of the container
WORKDIR /

# Create helloworld.txt
RUN touch helloworld.txt
Remember, the commands that you can run via the RUN instruction will depend on the operating system you use in the FROM instruction. (In this example, I have chosen Ubuntu. It’s important to remember that the operating systems used in containers are usually very minimal. I.e., don’t expect a command to be there from the start (even commands like curl, ping, etc., may need to be installed.)
Building Your First Container
Once we have a Dockerfile, we can create an image using the docker build command. This command requires a few pieces of information:
- Whether or not you want to name the image yourself (we will use the
-t(tag) argument). - The name that you are going to give the image.
- The location of the Dockerfile you wish to build with.
I’ll provide the scenario and then explain the relevant command. Let’s say we want to build an image - let’s fill in the two required pieces of information listed above:
- We are going to name it ourselves, so we are going to use the
-targument. - We want to name the image.
- The Dockerfile is located in our current working directory (
.).
The Dockerfile we are going to build is the following:
# Use Ubuntu 22.04 as the base operating system of the container
FROM ubuntu:22.04

# Set the working directory to the root of the container
WORKDIR /

# Create helloworld.txt
RUN touch helloworld.txt
The command would look like so: docker build -t helloworld . (we are using the dot to tell Docker to look in our working directory). If we have filled out the command right, we will see Docker starting to build the image:
A terminal showing the building process of the “helloworld” image
cmnatic@thm:~$ docker build -t helloworld .
Sending build context to Docker daemon  4.778MB
Step 1/3 : FROM ubuntu:22.04
22.04: Pulling from library/ubuntu
2b55860d4c66: Pull complete
Digest: sha256:20fa2d7bb4de7723f542be5923b06c4d704370f0390e4ae9e1c833c8785644c1
Status: Downloaded newer image for ubuntu:22.04
 ---> 2dc39ba059dc
Step 2/3 : WORKDIR /
 ---> Running in 64d497097f8a
Removing intermediate container 64d497097f8a
 ---> d6bd1253fd4e
Step 3/3 : RUN touch helloworld.txt
 ---> Running in 54e94c9774be
Removing intermediate container 54e94c9774be
 ---> 4b11fc80fdd5
Successfully built 4b11fc80fdd5
Successfully tagged helloworld:latest
cmnatic@thm:~$
Great! That looks like a success. Let’s use docker image ls to now see if this image has been built:
Using the “docker image ls” command to confirm whether or not our image has successfully built
cmnatic@thm:~$ docker image ls
REPOSITORY   TAG       IMAGE ID       CREATED         SIZE
helloworld   latest    4b11fc80fdd5   2 minutes ago   77.8MB
ubuntu       22.04     2dc39ba059dc   10 days ago     77.8MB
cmnatic@thm:~$
Note: Whatever base operating system you list in the FROM instruction in the Dockerfile will also be downloaded. This is why we can see two images:
- helloworld (our image).
- ubuntu (the base operating system used in our image).
You will now be able to use this image in a container. Refer to the “Running Your First Container” task to remind you how to start a container.
Levelling up Our Dockerfile
Let’s level up our Dockerfile. So far, our container will only create a file - that’s not very useful! In the following Dockerfile, I am going to:
- Use Ubuntu 22.04 as the base operating system for the container.
- Install the “apache2” web server.
- Add some networking. As this is a web server, we will need to be able to connect to the container over the network somehow. I will achieve this by using the
EXPOSEinstruction and telling the container to expose port 80. - Tell the container to start the “apache2” service at startup. Containers do not have service managers like
systemd(this is by design - it is bad practice to run multiple applications in the same container. For example, this container is for the apache2 web server - and the apache2 web server only).
# THIS IS A COMMENT
FROM ubuntu:22.04

# Update the APT repository to ensure we get the latest version of apache2
RUN apt-get update -y

# Install apache2
RUN apt-get install apache2 -y

# Tell the container to expose port 80 to allow us to connect to the web server
EXPOSE 80

# Tell the container to run the apache2 service
CMD ["apache2ctl", "-D","FOREGROUND"]
For reference, the command to build this would be docker build -t webserver . (assuming the Dockerfile is in the same directory as where you run the command from). Once starting the container with the appropriate options (docker run -d --name webserver -p 80:80 webserver), we can navigate to the IP address of our local machine in our browser!
The web server works! Currently, Apache2 is serving the default files because we have not added our own to the container.
Optimising Our Dockerfile
There’s certainly an art to Docker - and it doesn’t stop with Dockerfiles! Firstly, we need to ask ourselves why is it essential to optimise our Dockerfile? Bloated Dockerfiles are hard to read and maintain and often use a lot of unnecessary storage! For example, you can reduce the size of a docker image (and reduce build time!) using a few ways:
- Only installing the essential packages. What’s nice about containers is that they’re practically empty from the get-go - we have complete freedom to decide what we want.
- Removing cached files (such as APT cache or documentation installed with tools). The code within a container will only be executed once (on build!), so we don’t need to store anything for later use.
- Using minimal base operating systems in our
FROMinstruction. Even though operating systems for containers such as Ubuntu are already pretty slim, consider using an even more stripped-down version (i.e.ubuntu:22.04-minimal). Or, for example, using Alpine (which can be as small as 5.59MB!). - Minimising the number of layers - I’ll explain this further below.
Each instruction (I.E. FROM, RUN, etc.) is run in its own layer. Layers increase build time! The objective is to have as few layers as possible. For example, try chaining commands from RUN together like so:
Before:
FROM ubuntu:latest
RUN apt-get update -y
RUN apt-get upgrade -y
RUN apt-get install apache2 -y
RUN apt-get install net-tools -y
A terminal showing five layers of a Dockerfile being built
cmnatic@thm:~$ docker build -t before .
--omitted for brevity--
Step 2/5 : RUN apt-get update -y
 ---> Using cache
 ---> 446962612d20
Step 3/5 : RUN apt-get upgrade -y
 ---> Running in 8bed81c695f4
--omitted for brevity--
cmnatic@thm:~$
After:
FROM ubuntu:latest
RUN apt-get update -y && apt-get upgrade -y && apt-get install apache2 -y && apt-get install net-tools
A terminal showing two layers of a Dockerfile being built
cmnatic@thm:~$ docker build -t after .
Sending build context to Docker daemon   4.78MB
Step 1/2 : FROM ubuntu
 ---> 2dc39ba059dc
Step 2/2 : RUN apt-get update -y && apt-get upgrade -y && apt-get install apache2 -y && apt-get install net-tools
 ---> Running in a4d4943bcf04
--omitted for brevity--
cmnatic@thm:~$
Note here how there are now only two build steps (this will be two layers, making the build much quicker). This is just a tiny example of a Dockerfile, so the build time will not be so drastic, but in much larger Dockerfiles - reducing the number of layers will have a fantastic performance increase during the build.
Intro to Docker Compose
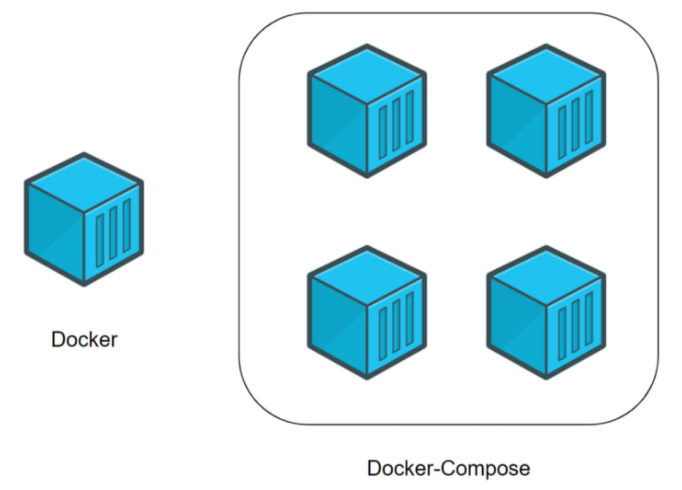
Let’s first understand what Docker Compose is and why it’s worth understanding. So far, we’ve only interacted with containers individually. Docker Compose, in summary, allows multiple containers (or applications) to interact with each other when needed while running in isolation from one another.
You may have noticed a problem with Docker so far. More often than not, applications require additional services to run, which we cannot do in a single container. For example, modern - dynamic - websites use services such as databases and a web server. For the sake of this task, we will consider each application as a “microservice”.
While we can spin up multiple containers or “microservices” individually and connect them, doing so one by one is cumbersome and inefficient. Docker Compose allows us to create these “microservices” as one singular “service”.
This illustration shows how containers are deployed together using Docker Compose Vs. Docker:
Before we demonstrate Docker Compose, let’s cover the fundamentals of using Docker Compose.
- We need Docker Compose installed (it does not come with Docker by default). Installing it is out of scope for this room, as it changes depending on your operating system and other factors. You can check out the installation documentation here.
- We need a valid docker-compose.yml file - we will come onto this shortly.
- A fundamental understanding of using Docker Compose to build and manage containers.
I have put some of the essential Docker Compose commands into the table below:
| Command | Explanation | Example |
|---|---|---|
| up | This command will (re)create/build and start the containers specified in the compose file. | docker-compose up |
| start | This command will start (but requires the containers already being built) the containers specified in the compose file. | docker-compose start |
| down | This command will stop and delete the containers specified in the compose file. | docker-compose down |
| stop | This command will stop (not delete) the containers specified in the compose file. | docker-compose stop |
| build | This command will build (but will not start) the containers specified in the compose file. | docker-compose build |
| Note: These are just a few of the possible commands. Check out the compose documentation for all possible options. |
A Showcase of Docker Compose
With that said, let’s look into how we can use Docker Compose ourselves. In this scenario, I am going to assume the following requirements:
- An E-commerce website running on Apache
- This E-commerce website stores customer information in a MySQL database
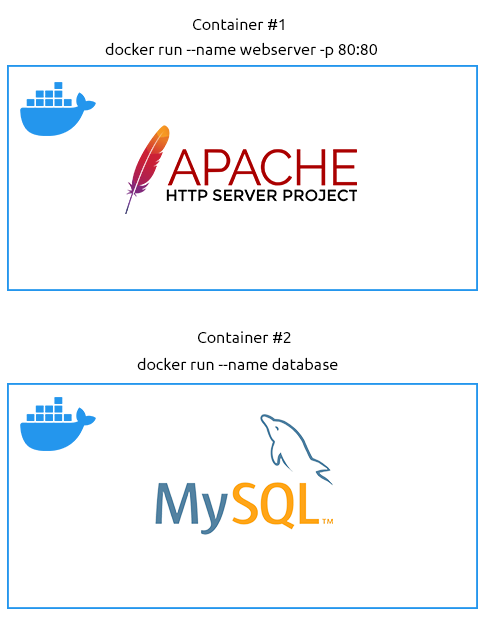
Now, we could manually run the two containers via the following:
- Creating the network between the two containers:
docker network create ecommerce - Running the Apache2 webserver container:
docker run -p 80:80 --name webserver --net ecommerce webserver - Running the MySQL Database server:
docker run --name database --net ecommerce webserver
An illustration shows two containers running independently of each other and is unable to communicate with one another.
…but do we want to do this every time? Or what if we decide to scale up and get many web servers involved? Do we want to do this for every container, every time? I certainly don’t.
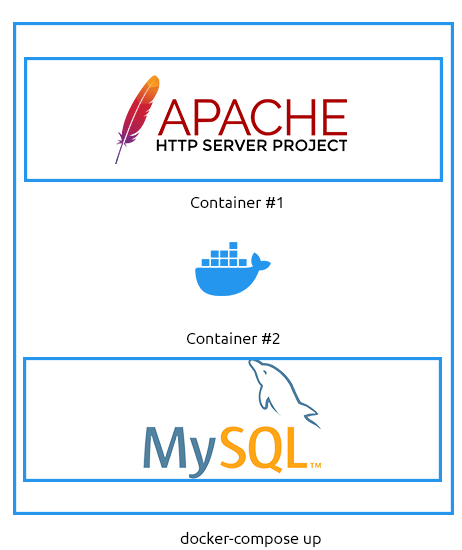
Instead, we can use Docker Compose via docker-compose up to run these containers together, giving us the advantages of:
- One simple command to run them both
- These two containers are networked together, so we don’t need to go about configuring the network.
- Extremely portable. We can share our docker-compose.yml file with someone else, and they can get the setup working precisely the same without understanding how the containers work individually.
- Easy to maintain and change. We don’t have to worry about specific containers using (perhaps outdated) images.
An illustration showing two containers deployed as a combined service. These two containers can communicate with one another.
Docker-compose.yml files 101
One file to rule them all. The formatting of a docker-compose.yml file is different to that of a Dockerfile. It is important to note that YAML requires indentation (a good practice is two spaces which must be consistent!). First, I’ll show some of the new instructions that you will need to learn to be able to write a docker-compose.yml file before we go into creating a docker-compose.yml file:
| Instruction | Explanation | Example |
| version | This is placed at the top of the file and is used to identify what version of Compose the docker-compose.yml is written for. | ‘3.3’ |
| services | This instruction marks the beginning of the containers to be managed. | services: |
| name (replace value) | This instruction is where you define the container and its configuration. “name” needs to be replaced with the actual name of the container you want to define, i.e. “webserver” or “database”. | webserver |
| build | This instruction defines the directory containing the Dockerfile for this container/service. (you will need to use this or an image). | ./webserver |
| ports | This instruction publishes ports to the exposed ports (this depends on the image/Dockerfile). | ‘80:80’ |
| volumes | This instruction lists the directories that should be mounted into the container from the host operating system. | ’./home/cmnatic/webserver/:/var/www/html’ |
| environment | This instruction is used to pass environment variables (not secure), i.e. passwords, usernames, timezone configurations, etc. | MYSQL_ROOT_PASSWORD=helloworld |
| image | This instruction defines what image the container should be built with (you will need to use this or build). | mysql:latest |
| networks | This instruction defines what networks the containers will be a part of. Containers can be part of multiple networks (i.e. a web server can only contact one database, but the database can contact multiple web servers). | ecommerce |
Note: These are just some of the possible instructions possible. Check out the compose file documentation for all possible instructions.
With that said, let’s look at our first docker-compose.yml file. This docker-compose.yml file assumes the following:
- We will run one web server (named web) from the previously mentioned scenario.
- We will run a database server (named database) from the previously mentioned scenario.
- The web server is going to be built using its Dockerfile, but we are going to use an already-built image for the database server (MySQL)
- The containers will be networked to communicate with each other (the network is called ecommerce).
- Our directory listing looks like the following:
- docker-compose.yml
- web/Dockerfile
Here is what our docker-compose.yml file would look like (as a reminder, it is essential to pay attention to the indentation):
version: '3.3'
services:
web:
build: ./web
networks:
- ecommerce
ports:
- '80:80'
database:
image: mysql:latest
networks:
- ecommerce
environment:
- MYSQL_DATABASE=ecommerce
- MYSQL_USERNAME=root
- MYSQL_ROOT_PASSWORD=helloword
networks:
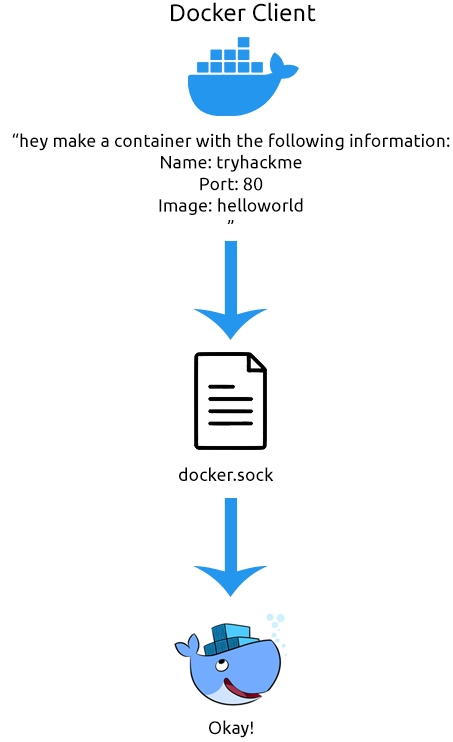
ecommerce:Intro to the Docker Socket
This task will explain how Docker interacts between the operating system and the container. When you install Docker, there are two programs that get installed:
- The Docker Client
- The Docker Server
Docker works in a client/server model. Specifically, these two programs communicate with each other to form the Docker that we know and love. Docker achieves this communication using something called a socket. Sockets are an essential feature of the operating system that allows data to be communicated.
For example, when using a chat program, there could be two sockets:
- A socket for storing a message that you are sending
- A socket for storing a message that someone is sending you.
The program will interact with these two sockets to store or retrieve the data within them! A socket can either be a network connection or what is represented as a file. What’s important to know about sockets is that they allow for Interprocess Communication (IPC). This simply means that processes on an operating system can communicate with each other!
In the context of Docker, the Docker Server is effectively just an API. The Docker Server uses this API to listen for requests, whereas the Docker Client uses the API to send requests.
For example, let’s take this command: docker run helloworld. The Docker Client will request the Docker server to run a container using the image “helloworld”. Now, whilst this explanation is fairly basic, it is the essential premise of how Docker works.
Let’s look at the following diagram to show this process in action:
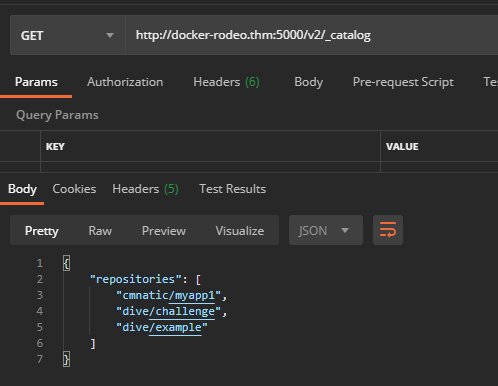
What’s interesting is that because of this, we can interact with the Docker Server using commands like curl or an API developer tool such as Postman. Now, using this is out of the scope for this room, but I’ll demonstrate communicating with the Docker Server using Postman to list all images that are stored on the operating system:
Finally, it’s important to note that because of this, the host machine running Docker can be configured to process commands sent from another device. This is an extremely dangerous vulnerability if it is not correctly configured because it means someone can remotely stop, start, and access Docker containers. Despite this, there are use cases where this feature of Docker is extremely helpful! We will cover this in further detail in a later room!