Cambiar los iconos de archivos y carpetas en el Mac
Puedes elegir un icono personalizado para cualquier archivo o carpeta utilizando tus propias imágenes, iconos descargados de internet o iconos de otro archivo o carpeta.
Utilizar tu propia imagen o una imagen de internet
-
En el Mac, selecciona la imagen que quieres usar, abre el archivo y copia su contenido al portapapeles.
Una manera de hacerlo es hacer doble clic en el archivo de imagen, que se abrirá en la app Vista Previa
 y, a continuación, seleccionar Edición > Copiar en la barra de menús.
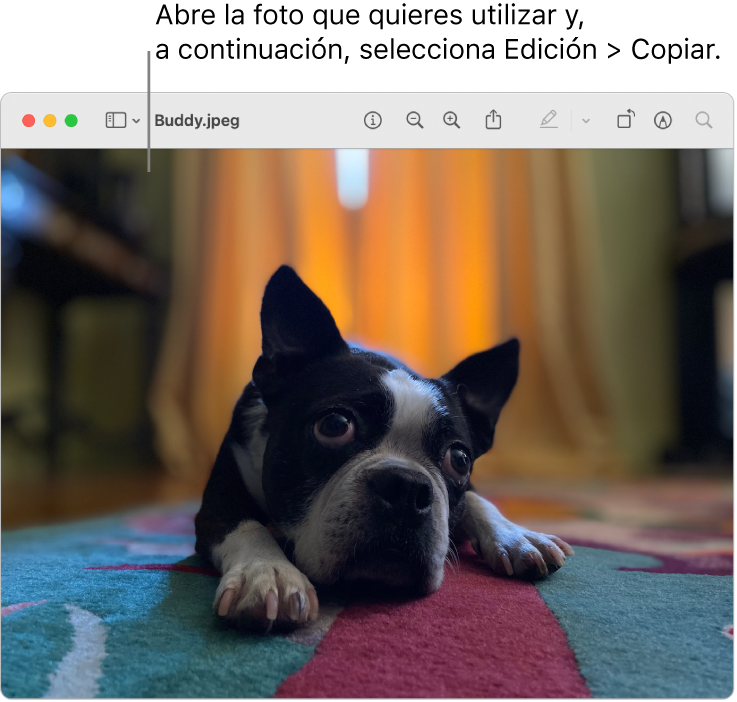
-
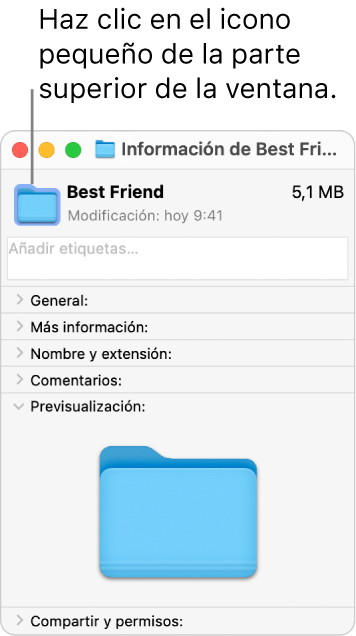
Selecciona el archivo o la carpeta cuyo icono quieres sustituir.
-
En la barra de menús, selecciona Archivo > Obtener información.
-
En la parte superior de la ventana de información, haz clic en el icono pequeño.
-
Selecciona Edición > Pegar en la barra de menús.
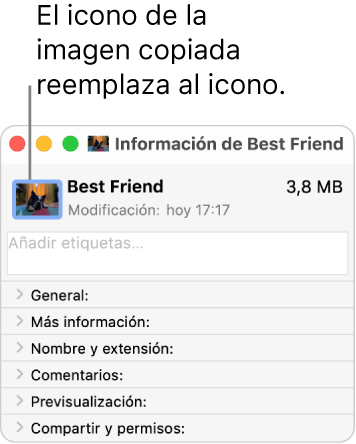
Si no está disponible la opción Edición > Pegar, asegúrate de hacer clic en el icono pequeño de la parte superior de la ventana de información (no en el icono grande de debajo de Previsualización).
Si tras pegarla ves una imagen JPEG o PNG genérica en lugar de la tuya, asegúrate de abrir el archivo que contiene la imagen y selecciona Edición > Copiar en la barra de menús antes de pegar. Copia el contenido del archivo de imagen, no el archivo en sí.
Kali Linux Screen Resolution Configuration on UTM - Mac M1
https://www.youtube.com/watch?v=Nd3F3DjUO14
Encriptar y proteger un dispositivo de almacenamiento con una contraseña con Utilidad de Discos en el Mac
Al formatear un dispositivo de almacenamiento interno o externo, puedes encriptarlo y protegerlo con una contraseña. Si encriptas un dispositivo interno, debes introducir una contraseña para acceder al disco y a su información. Si encriptas un dispositivo externo, debes introducir la contraseña al conectar el dispositivo al ordenador.
Si encriptas un dispositivo de almacenamiento externo, no puedes conectarlo a una estación base AirPort para guardar copias de seguridad de Time Machine.
Advertencia: Para encriptar y proteger el dispositivo con una contraseña mediante Utilidad de Discos, primero debes borrar el volumen.
-
Si el dispositivo contiene archivos que quieras conservar, cópialos en otro dispositivo de almacenamiento o volumen.
-
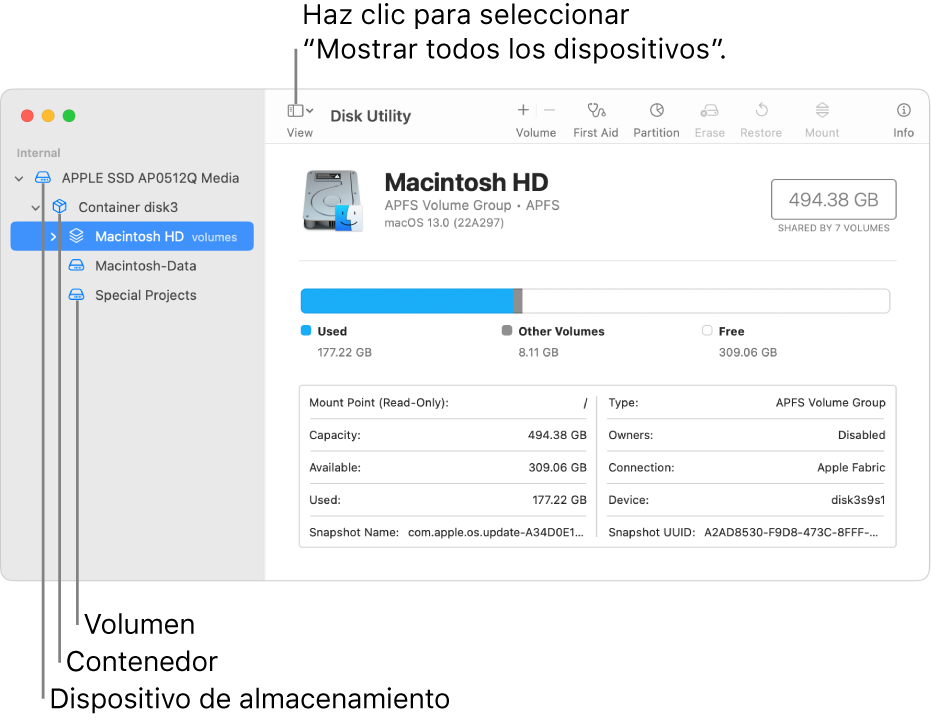
En la app Utilidad de Discos
 del Mac, selecciona Visualización > “Mostrar todos los dispositivos”.
Si Utilidad de Discos no está abierto, haz clic en el icono del Launchpad
 en el Dock, escribe “Utilidad de Discos” en el campo de búsqueda y haz clic en su icono .
 -
En la barra lateral, selecciona el dispositivo de almacenamiento que quieres encriptar.
-
Haz clic en el botón Borrar
 de la barra de herramientas.
 -
Escribe un nombre para el volumen.
-
Haz clic en el menú desplegable Esquema y selecciona “Mapa de particiones GUID”.
-
Haz clic en el menú desplegable Formato y selecciona un formato del sistema de archivos encriptado.
-
Introduce y verifica una contraseña y, a continuación, haz clic en Seleccionar.
Para cambiar la contraseña más tarde, selecciona el volumen en la barra lateral y, a continuación, selecciona Archivo > Cambiar contraseña.
-
(Opcional) Haz clic en “Opciones de seguridad” si está disponible, usa el regulador para seleccionar cuántas veces sobrescribir los datos borrados y, a continuación, haz clic en Aceptar.
Las opciones de borrado seguro solo están disponibles para algunos tipos de dispositivos de almacenamiento. Si el botón “Opciones de seguridad” no está disponible, no podrás usar Utilidad de Discos para realizar un borrado seguro en el dispositivo de almacenamiento.
-
Haz clic en Borrar, y a continuación, en Aceptar.
¿Cómo configurar el portapapeles compartido en Iphone/Mac/Ipad?
https://blog.hardpeach.com/como-copiar-pegar-entre-dispositivos-apple-portapapeles-universal/ Básicamente:
- Habilitar Handoff en todos los dispositivos
- Estar conectado con los dispositivos deseados a la misma red WiFi
- Tener en todos los dispositivos la misma cuenta de Apple Id
How to move your iPhone or iPad backups to an external hard drive
STEP 1: LOCATE YOUR BACKUPS
This part is easy. Your backups are stored in a MobileSync folder. You can find them by typing ~/Library/Application Support/MobileSync/Backup into Spotlight. You can also find the backups for specific devices from Finder.
- Click Finder on your Mac’s Dock.
- Click on your device on the left side of the Finder window.
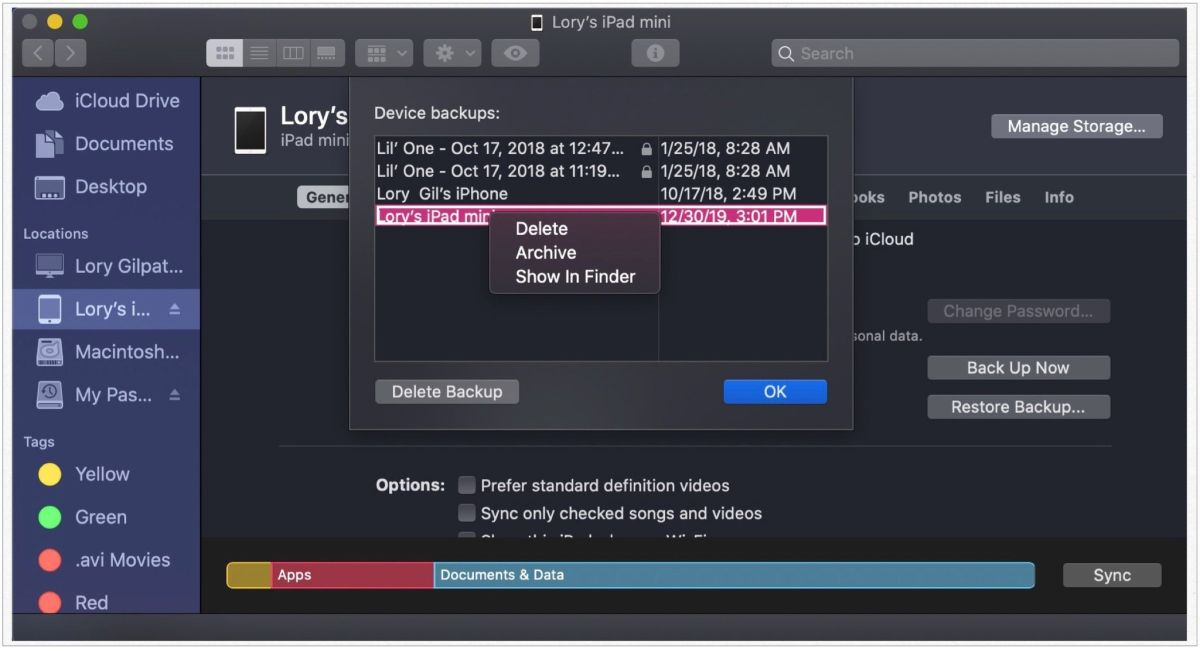
- Click on Manage Backups on the General tab.
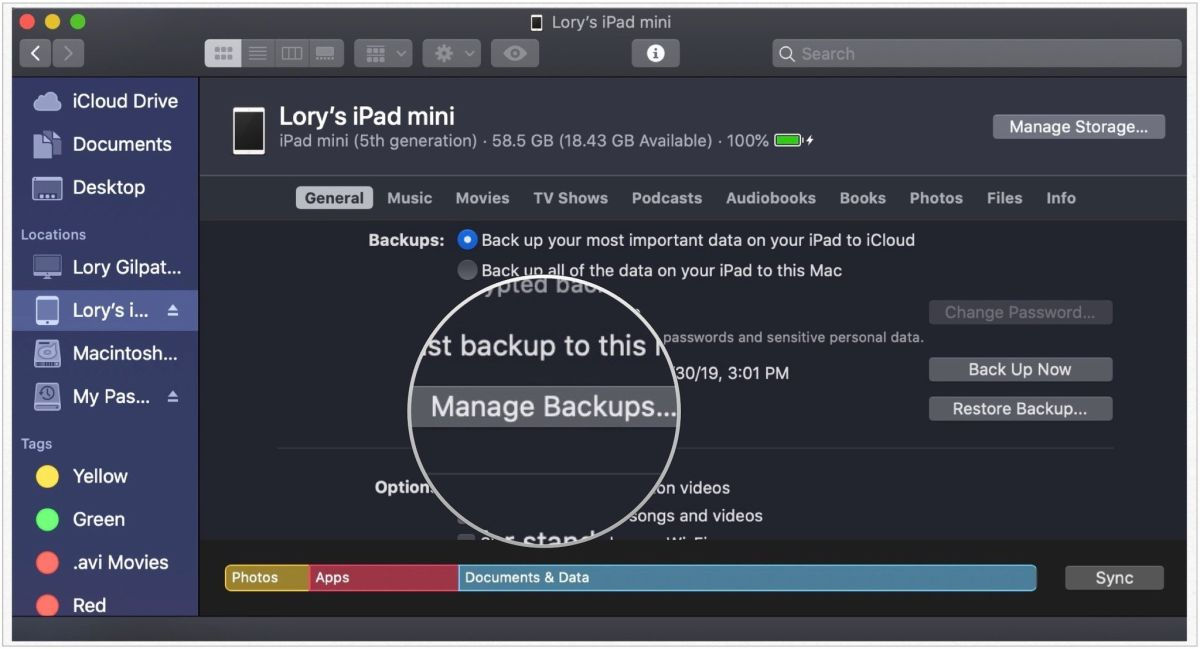
(Image credit: iMore)
- Select a specific device.
- Hold down the Control key and click on the device.
- Select Show in Finder from the list of available options.
STEP 2: MOVE YOUR BACKUPS TO AN EXTERNAL HARD DRIVE
This part is easy, too. But, you really have to pay close attention to the name of your hard drive and the new folder names you create, including punctuation and spacing. This information will be used when creating a Terminal pathway. If you use different terms than the ones suggested, replace them with the exact name you have in the Terminal command in Step 3.
- Connect your external hard drive to your Mac if it isn’t already connected.
- Open the external hard drive.
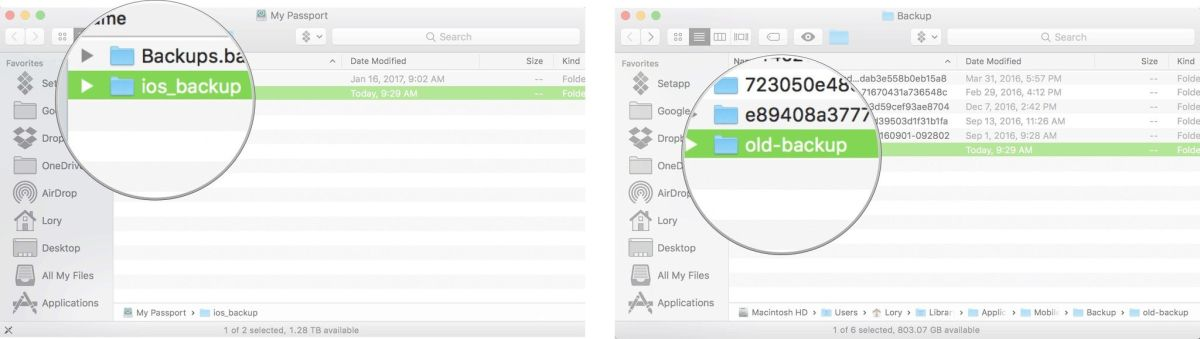
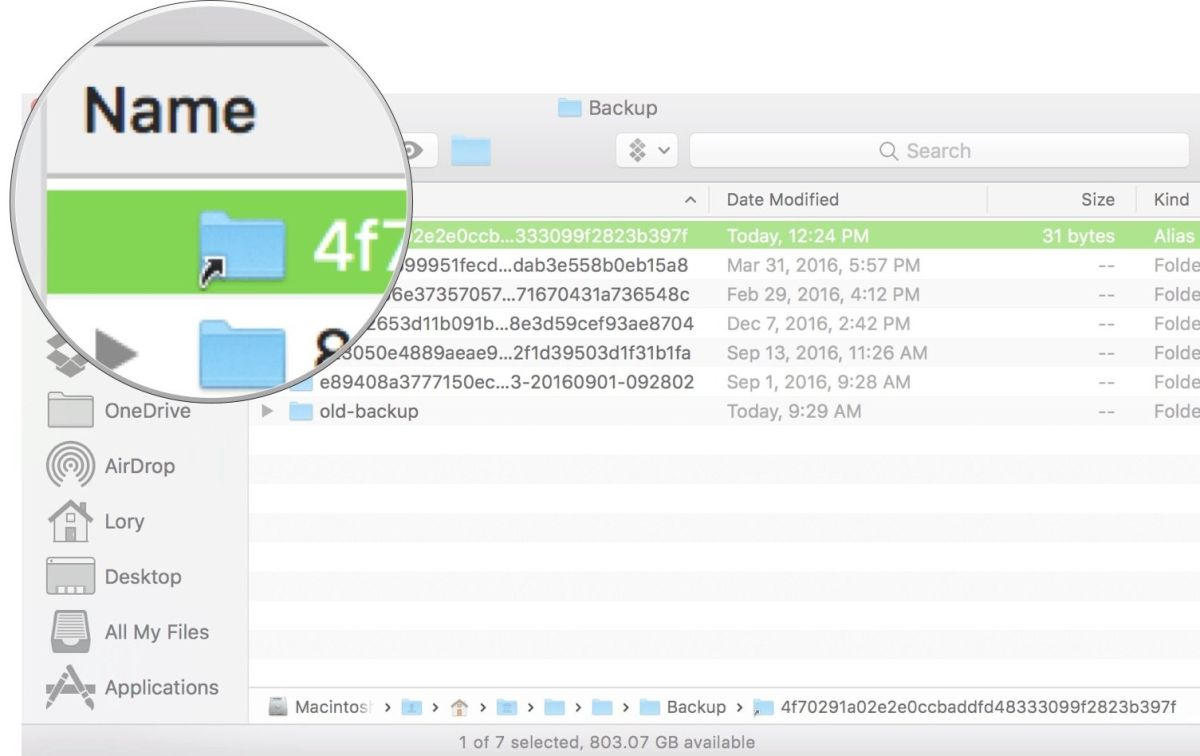
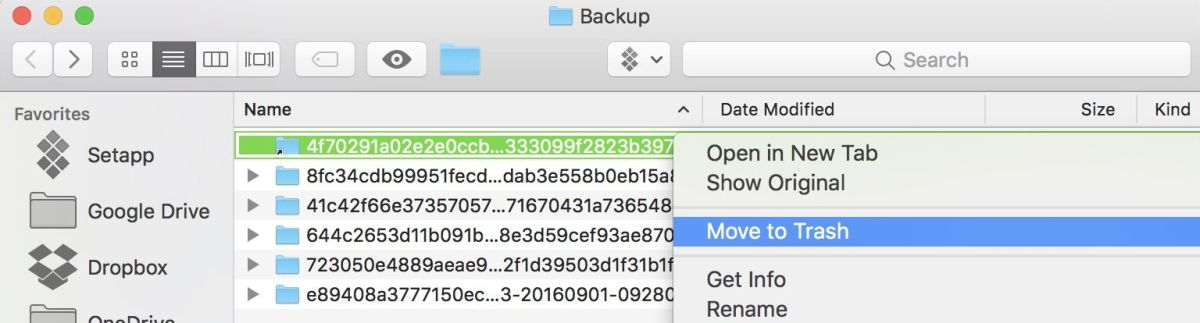
- Go back to the Finder window with your iOS backups in it and select the device backup folder (It will either be called “Backup” or have a bunch of numbers and letters).
- Drag it to your external hard drive.
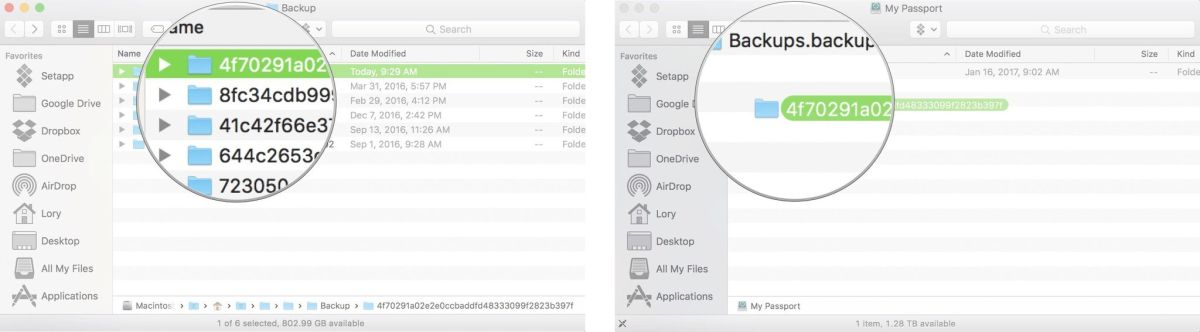
- Enter your administrator password to authenticate your action.
- Rename the iOS backup folder on your external hard drive to ios_backup. You may have to enter your administrator password once again to make this change.
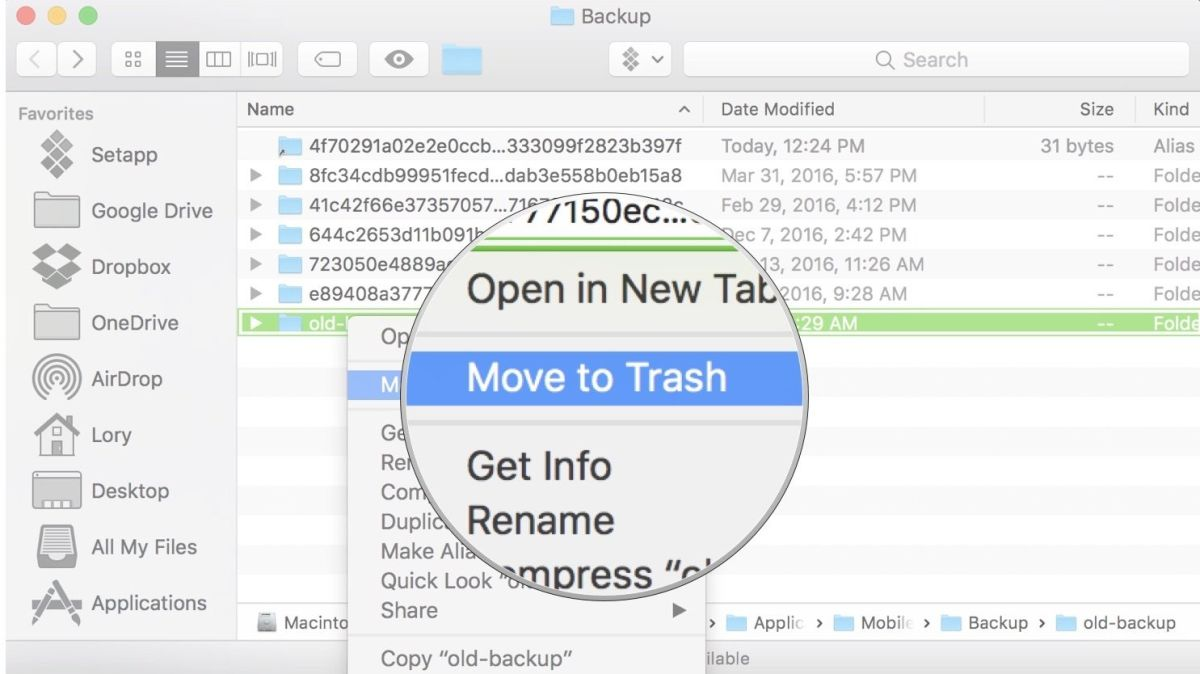
- Rename the old backup folder in Finder to old_backup.
Do not delete the old_backup folder yet.
STEP 3: CREATE A SYMLINK TO TELL YOUR COMPUTER THE NEW LOCATION OF YOUR BACKUPS
This is the most complex and essential step to moving your iOS backups to an external hard drive. If you don’t perform this step, your computer won’t back up your iPhone or iPad anymore. You’ll have to move the folders back to your Mac instead of manually.
In this step, you’ll create a symlink — or symbolic link. When you create a symlink, you create a new path for Finder to take to get to the backups folder.
Former iMore writer and Mac genius Peter Cohen explains symlinks perfectly:
“Some applications don’t follow aliases properly. An older way of creating those connections is more reliable for actions like what we want iTunes to do: Symbolic links, aka symlinks. They work at a low enough level that applications and operating system functions don’t have as hard a time with them as they do aliases. We’re going to use Mac’s Terminal app to create a symbolic link to trick iTunes into backing up onto your external drive rather than the boot drive,” Cohen said.
If you’re using macOS Mojave or later, you will first need to change the permissions for Terminal on your Mac. Otherwise, you won’t have permission to follow the remaining steps of this process. To do so:
- Open System Preference.
- Select Security & Privacy.
- Choose the Privacy tab.
- Select Click the lock to make changes at the bottom left of the screen if this screen is locked. Otherwise, skip to Step 6.
- Enter your system password and click Unlock on the popup screen.
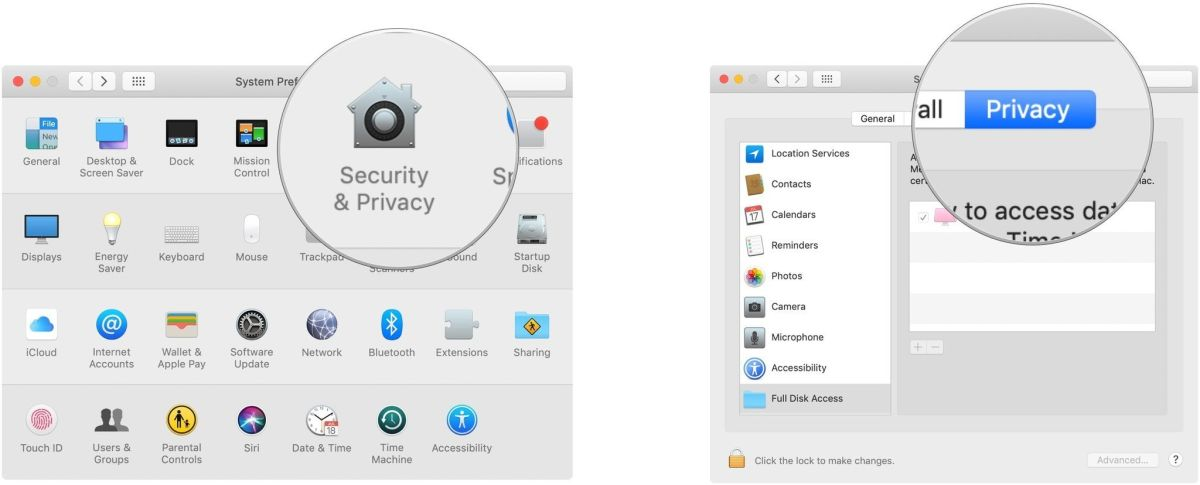
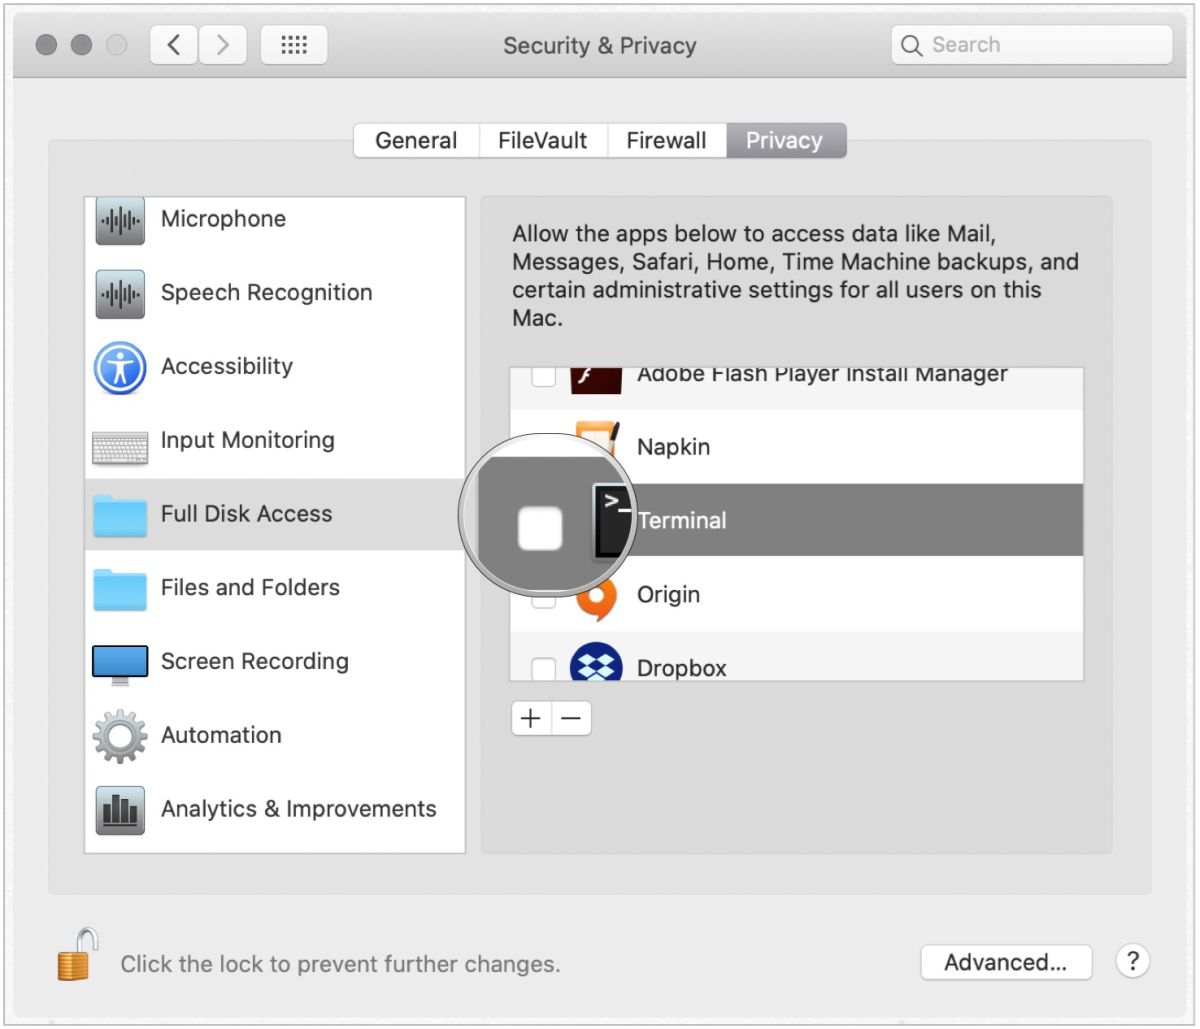
- Click Full Disk Access on the left-hand side of the screen.
- Choose + to add Terminal to the list of apps with full control on your computer.
- In the Finder screen that’s displayed, type Terminal in the search box.
- In the search results, highlight Terminal.
- Tap Open.
Next, a lesson in using Terminal. The proper pathway is critical for this to work. Every person’s hard drive and backup folder names will be different. The following is the anatomy of the Terminal code we are using:
ln -s /Volumes/External/ios_backup ~/Library/Application\ Support/MobileSync/Backup/4f1234a05e6e7ccbaddfd12345678f1234b123f
- ln -s: This command tells the operating system to go to the new location. (This starts with a lowercase L, not a capital I.)
- Volumes: A hard drive.
- External: The name of a hard drive. Yours will likely be named something else. In the Terminal command, you must change “External” to whatever your external hard drive is named.
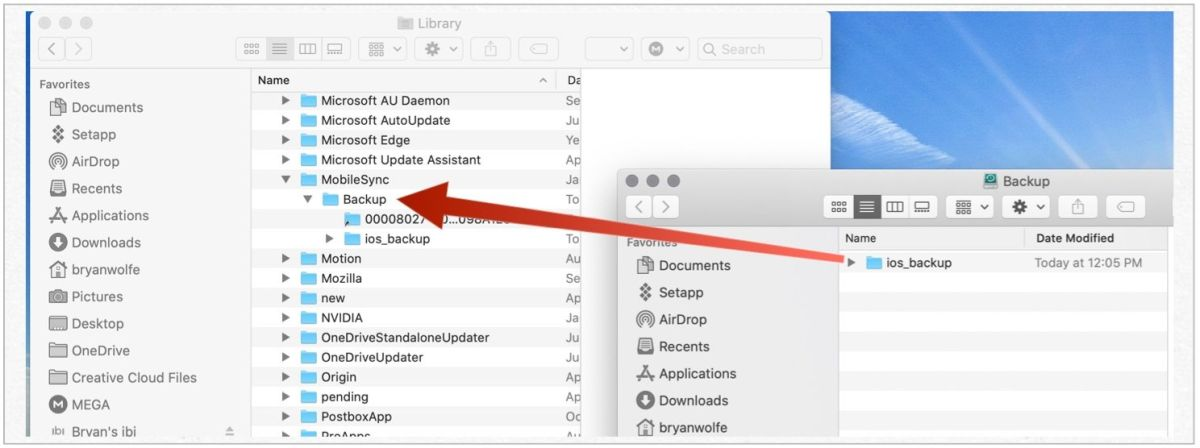
- ios_backup: The renamed backup folder you dragged into your external hard drive. This is the new place that your iOS backups will be stored.
- ~/Library/Application\ Support/MobileSync/Backup: This command tells the operating system where the backup is.
- 4f1234a05e6e7ccbaddfd12345678f1234b123f: The name of the device backup folder. If you are transferring all of your backups, this will just be named “Backup.” If you are transferring one device, use the name of the backup folder for your device. The one above isn’t even a real file name. You must change the above backup folder name to whatever is the name of the folder you are transferring.
If your external hard drive’s name has space, be sure to use the proper coding. For example, if your hard drive is named “My Passport,” be sure to use a backslash after My, then Space, then Passport. Like this: My\ Passport. Don’t forget to capitalize when necessary.
- Find Terminal using Spotlight.
- Type the code below.Don’t forget to change the hard drive name and the backup folder name to reflect the name of your hard drive and backup folder.
ln -s /Volumes/**External**/ios_backup ~/Library/Application\ Support/MobileSync/Backup/**4f1234a05e6e7ccbaddfd12345678f1234b123f**

- Hit Return.
- Quit Terminal.
You will see a new folder in your MobileSync folder called “Backup,” or the series of numbers and letters that represent your device. You can tell this is a symlink because it will have an arrow in the bottom left corner.
Next, you’ll need to confirm that it worked before deleting your old_backup file on your Mac.
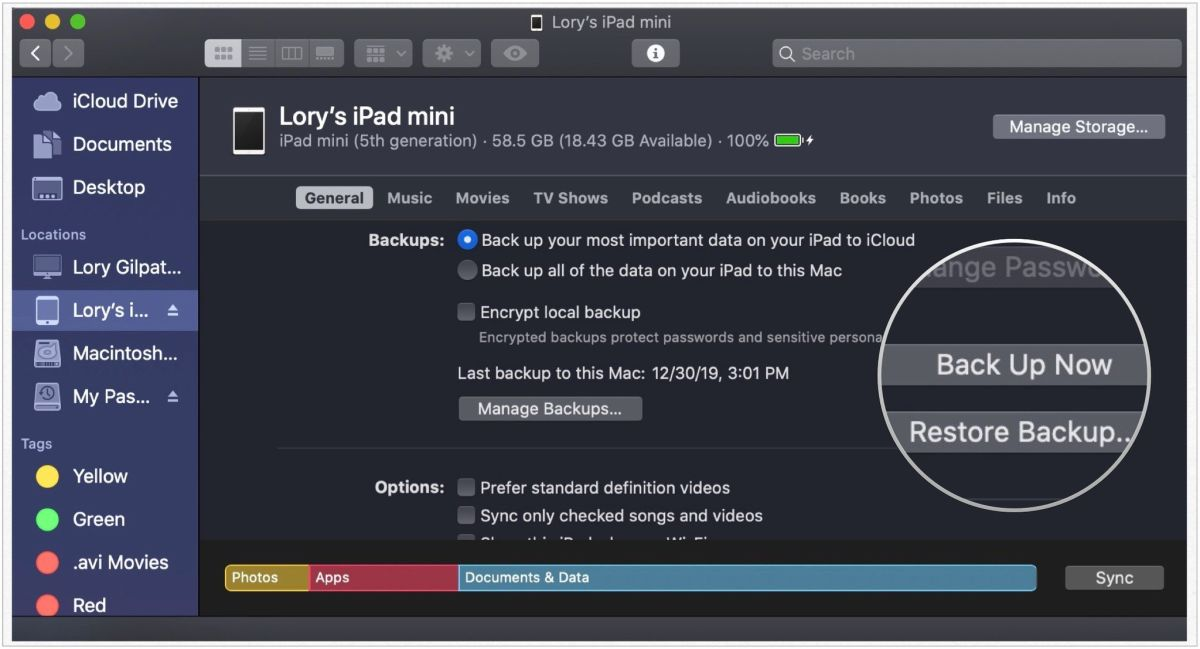
- Click Finder on your Mac’s Dock.
- Click on your device on the left side of the Finder window.
- Click on Back Up Now on the General tab.
- Open the ios_backup folder on your external hard drive.
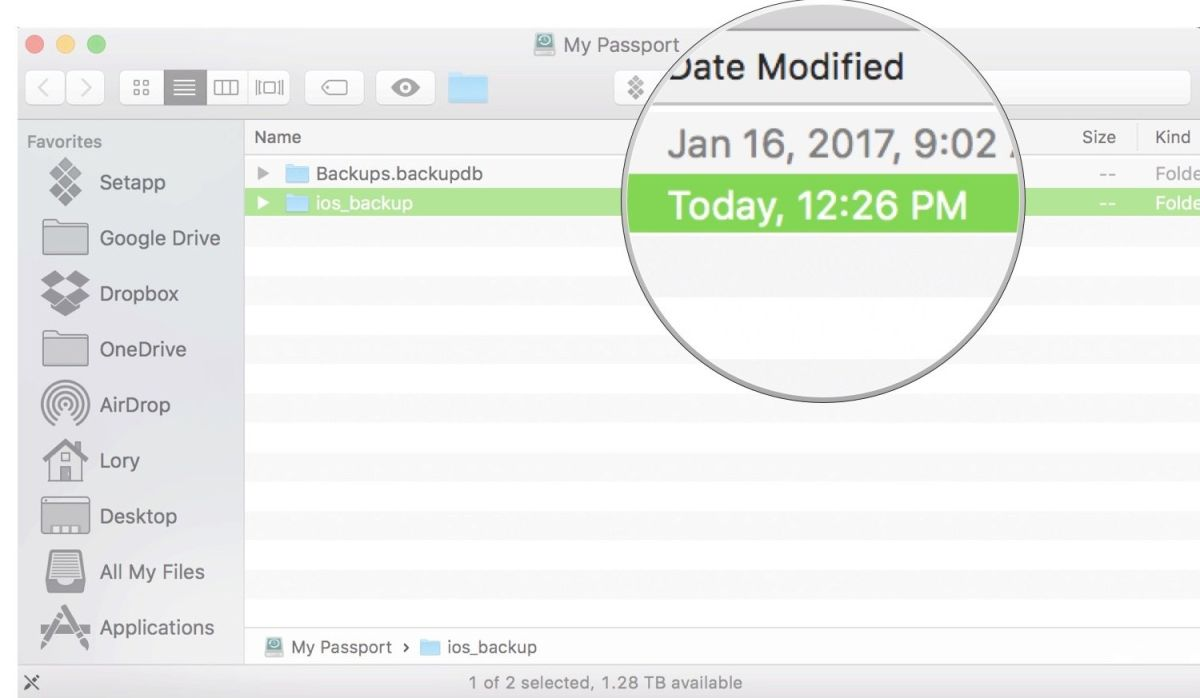
- Check to see that the date and time on the latest backup is for the one you just completed.
If the pathway relocation worked, and you can confirm that backups are now happening on your external hard drive, you can delete the old_backup folder on your Mac.
Note: If you go back to the MobileSync folder and open the symlink folder, you will see the names of the files that relate to your backup. These are aliases, not actual files. It’s like a thumbnail of a picture.
STEP 4: DISABLE AUTOMATIC BACKUPS WHEN CONNECTED TO YOUR COMPUTER
If you don’t always have an external hard drive connected to your Mac, you will need to disable automatic backups of your iPhone or iPad. Otherwise, you’ll get an error message whenever you connect your iOS device to your Mac.
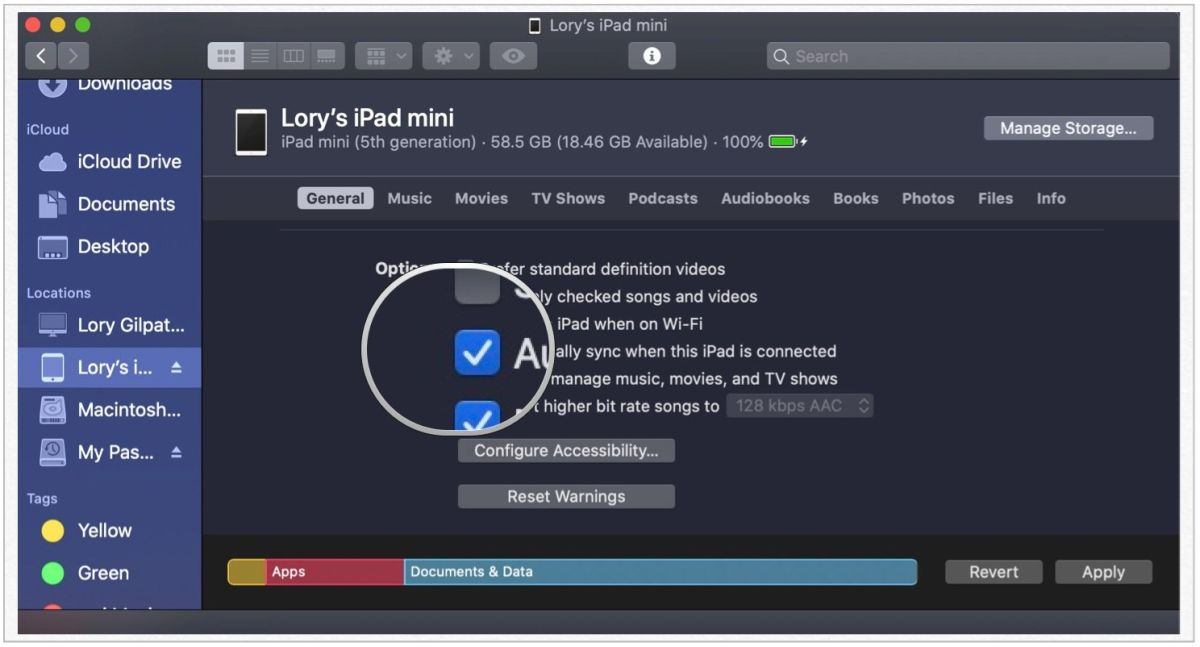
- Click Finder on your Mac’s Dock.
- Click on your device on the left side of the Finder window.
- Tick the box at the bottom next to Automatically sync when this iPhone is connected.
Don’t forget to manually back up your iPhone whenever you connect it to your computer and have your external hard drive plugged in too.
HOW TO RESTORE THE BACKUP TO YOUR IPHONE
To restore an iPhone or iPad backup from an external drive requires moving the files back to the Mac.
- Connect your external hard drive to your Mac if it isn’t already connected.
- Open the external hard drive.
- Go back to the Finder window and go to the device backup folder on your Mac, where the symlink file you created above is located. Our example above is located at ~/Library/Application\ Support/MobileSync/Backup/.
- Drag the backup file on your external hard drive to the device backup folder.
- Enter your administrator password to authenticate your action, if necessary.
Depending on the size of your backup, this could take a long time. Make sure you have enough space on your Mac. Next, you’ll need to begin the restore process in Finder:
- Click Finder on your Mac’s Dock.
- Click on your device on the left side of the Finder window.
- Click on Manage Backups on the General tab to confirm the backup you wish to use is present.
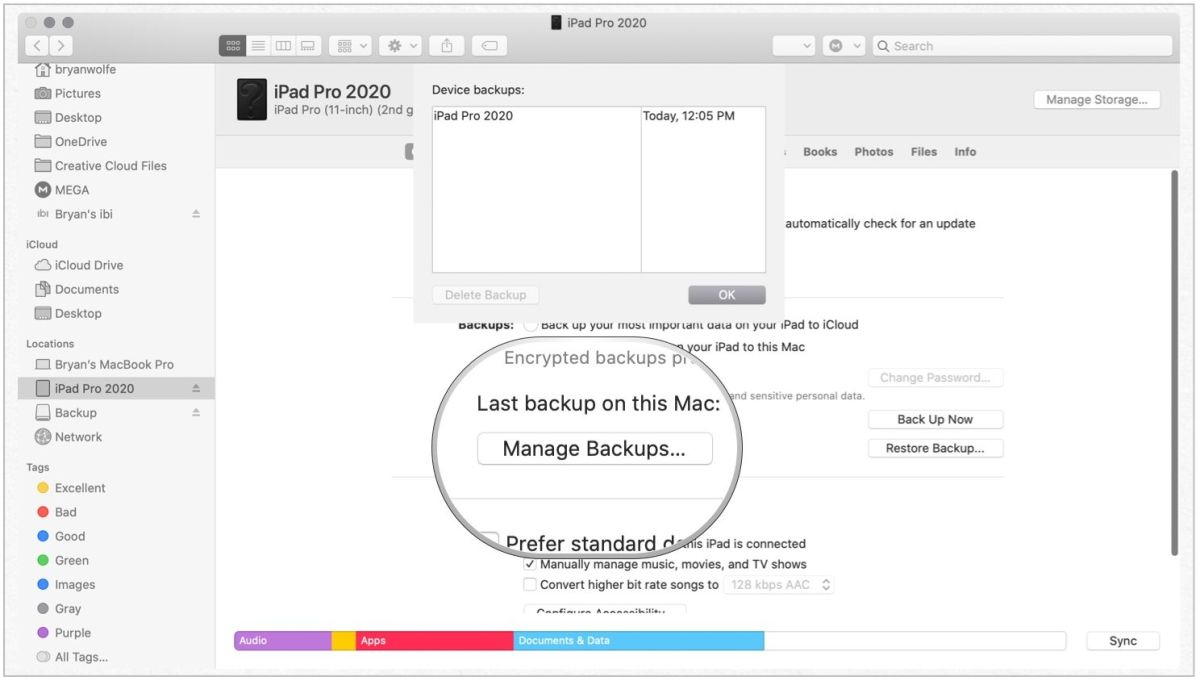
- Click OK to close the box.
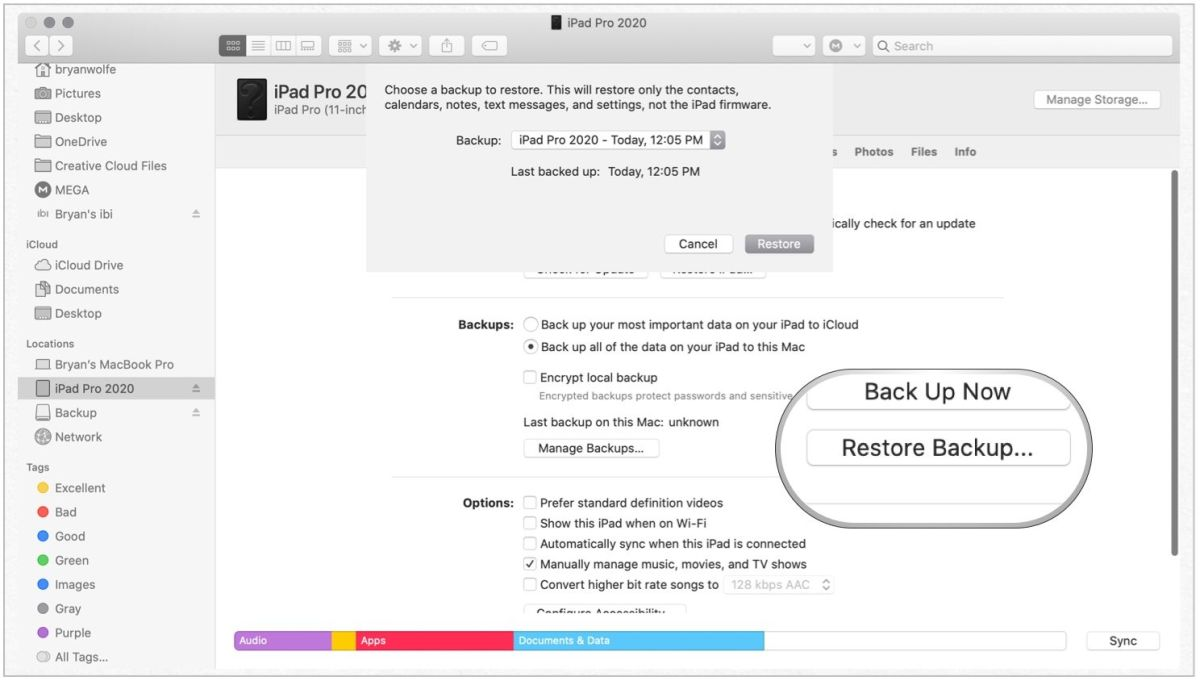
- Select Restore Backup.
- Toggle the backup you wish to use in the pop-up box.
- Click Restore.
Your mobile device is now being restored. Once it’s done, you may wish to delete the backup folder you dragged to the Mac to save space. Otherwise, you’ll now have two backups, the one you saved on the Mac and the other on the external drive that continues being used for backup purposes.
HOW TO REMOVE THE SYMLINK AND GO BACK TO STORING YOUR BACKUPS ON YOUR MAC
If you made a mistake and the symlink didn’t work, or you want to go back to storing your backups on your Mac, all you have to do is delete the symlink folder you created. No need to enter any “rm” or “unlink” command in Terminal.
- Type ~/Library/Application Support/MobileSync/Backup into Spotlight.
- Select the symlink folder. Remember, it’s the one with an arrow in the bottom left. It will either be called “Backup” or have a series of numbers and letters representing your device.
- Delete the symlink folder.
- Back up your device via the computer.
- Delete the ios_backup folder on your external hard drive (optional).
Lots of steps — perhaps a better solution
As previously stated, we strongly recommend not backing up your mobile devices via Mac. Instead, consider using iCloud to keep copies of your iPhone or iPad files. iCloud works seamlessly with all of your Apple devices and can keep everything tidy and organized. There are even other cloud storage apps and sites if you don’t prefer iCloud, but want something like OneDrive instead. However, if you’re still committed to going old-school, the above steps will help.
Bloquear las conexiones al Mac con un cortafuegos
El firewall puede proteger el Mac del contacto no deseado que inicien otros ordenadores cuando estás conectado a internet o a una red. No obstante, el Mac continuará permitiendo el acceso a través del firewall a algunos servicios y apps. Por ejemplo:
-
Si activas uno de los servicios de compartición, como el de compartir archivos, macOS abrirá un puerto específico para permitir la comunicación de dicho servicio.
-
Una app o un servicio de otro sistema pueden solicitar y obtener acceso a través del firewall, o puede tener un certificado de confianza gracias al cual se le garantiza el acceso.
Para obtener un mayor control, puedes seleccionar apps y servicios, y especificar si quieres garantizarles acceso a través del firewall.
Activar la protección del firewall
-
En el Mac, selecciona el menú Apple
 > Ajustes del Sistema, haz clic en Red
  en la barra lateral y selecciona Firewall. (Es posible que tengas que desplazarte hacia abajo).
 -
Activa Firewall.
-
Para especificar ajustes de seguridad adicionales, haz clic en Opciones y realiza cualquiera de las aciones siguientes:
-
Permitir solo la conexión de las apps y los servicios especificados: Haz clic en el botón Añadir
 y selecciona la app o el servicio en el cuadro de diálogo que aparece.
 -
Permitir solo la conexión de las apps y los servicios esenciales: Activa “Bloquear todas las conexiones entrantes”.
-
Permitir automáticamente que el software integrado reciba conexiones entrantes: Activa la opción “Permitir automáticamente que el software integrado reciba conexiones entrantes”.
-
Permitir automáticamente que el software firmado descargado reciba conexiones entrantes: Activa la opción “Permitir automáticamente que el software firmado descargado reciba conexiones entrantes”.
-
Hacer que resulte más difícil a los piratas informáticos y al software malicioso encontrar tu Mac: Selecciona “Activar modo encubierto”.
-
Configurar el acceso a través del firewall de servicios y apps
-
En el Mac, selecciona el menú Apple
> Ajustes del Sistema, haz clic en Red en la barra lateral y selecciona Firewall. (Es posible que tengas que desplazarte hacia abajo). -
Haz clic en Opciones.
Si está desactivado el botón Opciones, activa primero la opción Firewall.
-
Haz clic en el botón Añadir
situado debajo de la lista de servicios y, a continuación, selecciona los servicios o apps que quieras agregar. Después de añadir una app, haz clic en las flechas arriba y abajo  y selecciona si quieres permitir o bloquear las conexiones a través del firewall.
El bloqueo del acceso de una app a través del firewall puede interferir en el funcionamiento de la app o de otro software que dependa de esta.
Importante: Algunos servicios y apps que no figuran en la lista podrían tener acceso a través del firewall. Estas pueden incluir apps del sistema, servicios y procesos, así como apps firmadas digitalmente que se abran automáticamente mediante otras apps. Para bloquear estos programas, añádelos a la lista.
Si el Mac detecta un intento de conexión a una app que no has añadido a la lista y a la que no has concedido acceso, aparecerá un mensaje de aviso preguntándole si quieres permitir o denegar la conexión a través de la red o de internet. Mientras no lleves a cabo ninguna acción, el mensaje seguirá mostrándose y se denegará cualquier intento de conexión a la app.